You must sign in before you can work with content in the Workarea or on your Ektron Web site. You can perform the following basic functions on Ektron content:
Finding and Viewing Content
You can view all content in your Ektron Web site. Viewing content lets you see the content, metadata, summaries, and other information. You can find content in the Workarea in the following ways:
- Use the Action > Search option, which appears on every folder. See Also: Searching the Workarea
- Navigate the Workarea folder tree. See Also: Using the Workarea and Smart Desktop
- Navigate your Web site to the content you want to edit.
Viewing Content from a Web Page
- Sign in and browse to the content you want to view.
- Hover over the access point (
 ) and choose Properties.
Viewing Content from the Workarea
- Navigate to the folder that contains the content.
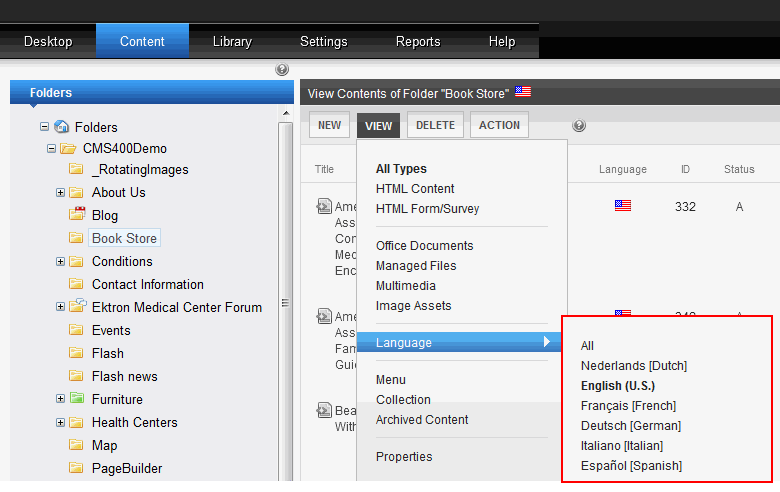
- To change the type of content being displayed, click View then select a type.
- If your system supports more than one language, you can view only content in any language via the View > Language menu option.

- Hover the cursor over the content, click the triangle (
 ), and select View from the drop-down menu. The View Content screen appears.
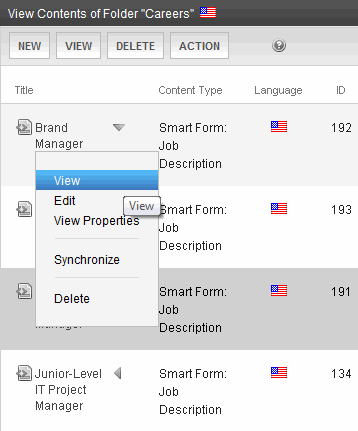
Content Properties
- Content Title—The title assigned to the content
- Content ID—The ID number assigned to the content. The ID number is used to retrieve content from a database.
- Content Language—The content’s language
- Status—The current status of the content. See Also: Content Statuses
- Last User to Edit—The last user to edit this content
- Last Edit Date—When the content was last edited
- Start Date—When the content will go live on the Web site
- End Date—When the content will be removed from the Web site
- Action on End Date—What happens to the content when its end date and time are reached. See Also: Scheduling Content
- Date Created—When the content was created
- Approval Method—Whether all approvers must sign off on content before it is published. See Also: Using the Approval Method
- Approvals—Users in the approval chain for this content. See Also: Approving or Declining Content
- Smart Form Configuration—The Smart Form applied to the content. This is typically managed by your system administrator. See Also: Working with Smart Forms
- Template—The template currently assigned to the content. This is typically managed by your system administrator. See Also: Working with Templates
- Path—The folder path to the content’s folder. A slash (\) represents the Content folder.
- Ranking—Ektron's Content Ranking feature lets site visitors rate content on a scale of 1 to 10. If this feature is enabled for the content, the average numerical rating appears. See Also: User-Ranking of Content
- Content Searchable—True appears if the content can be found when someone searches your Web site. See Also: Ensuring Your Content is Searchable However, even if content is not searchable, the Workarea Advanced search still finds it. See Also: Using Advanced Search in the Workarea
Other Content Information
- Properties tab—View the content’s properties
- Content tab—Displays content
- Summary tab—Edit content’s summary; Writing a Summary for Content
- Metadata tab—Edit content’s metadata; Working with Metadata
- Alias tab—View and edit the content item’s primary alias, or View all secondary aliases; Manual Aliasing
- Comment tab—View comments on changes made when editing content. This comment also appears on the View Content and Content History screens. Use it to help distinguish one version from another.
- Tasks tab—Add or edit tasks for this content; Assigning and Managing Tasks
- Web Alerts tab—Add or edit Web Alerts for this content; Administering Web Alerts
- Templates tab—The template currently assigned to the content; Working with Templates
- Category tab—Any taxonomy categories currently assigned to the content. Only appears if at least one Taxonomy is applied to the folder in which the content resides; Taxonomy ; Numbers on the View Categories Screen
- Edit—Open content for editing; Editing HTML Content
-
 —View older versions of content; restore older version; Managing Versions of Content
 -
 —Displays content as it is currently published
 -
 —Compares current and earlier versions of content; Managing Versions of Content
 -
 —Delete content; Deleting Content
 -
 —View and edit permissions for content; Setting Permissions for Content
 -
 —View and possibly edit the content's approval chain; Editing an Approval Chain For Content
 -
 —Find all content with Quicklinks to this content; Link Checking Before Deleting
 -
 —Attach a task to content; Creating a Task via the View Content Screen
 -
 —View Analytics for this content; Viewing Page-Level Analytics from the Workarea
 -
 —Displays the content item's rating and reviews, messages, and flags; MessageBoard Server Control; Defining Flags for Content
 -
 —View and edit content's Content Searchable check box and flagging definitions; Ensuring Your Content is Searchable; Defining Flags for Content
 -
 —Go back to previous menu
 -
 —Determines if content will be included when an .xlf file is created; Mark Translation Statuses
 -
 — Copy content to XLIFF files that can be submitted to a translation agency; Using the Language Export Feature
 - View (language)—If you can view content in more than one language, select a language from the drop-down list.
- Add-select language-—Lets you copy current content into a new item and translate it to selected language; Translating Content into Another Language
Content Statuses
|
Letter |
Meaning |
Content state |
|
A |
Through the approval chain and published on the Web site. You can:
|
|
|
O |
Currently being edited. Has not been checked in. You can:
|
|
|
I |
Checked in for other users to edit. You can:
|
|
|
S |
Saved and submitted into the approval chain. You can:
|
|
|
M |
Requested for deletion. You can:
|
|
|
P |
Approved but the Go Live date hasn’t occurred yet. You can:
|
|
|
T |
Task(s) assigned to content are not complete |
|
|
D |
Content was created with a future start date then checked in and deleted. This status only remains until the start date is reached. At that point, the content is deleted. |
Moving or Copying Content
You can move content from a folder to another folder. Or, you can copy content between folders. Moved content retains the original ID number, while copied content gets the next available ID number.
Your can only move or copy content that has an Approved status. If you select content that you are not approved to move or copy, a message appears. If a destination folder has an approval chain, the content status changes to Submitted (or Approved if you are the last person in the approval chain).
NOTE: The folder's Approval Method can affect the status of the moved/coped content. See Also: Using the Approval Method
You should move or copy content only between regular folders or eCommerce catalog folders. Do not move or copy from or to other folder types. If you copy an eCommerce catalog entry whose product type is not assigned to the destination catalog folder, the new product type gets assigned to the folder. See Also: Defining Roles; Guidelines for Using the Folder-User Admin Role ; Managing Folder Permissions
To move or copy content between folders:
- Select content items in a folder and choose Action > Cut or Copy (or right click and choose Cut or Copy).
- In the left panel of the Workarea, navigate to the folder to which you want to paste the selected content, right click and choose Paste Content.
NOTE: If you are copying content, you are informed that some items exist in several languages and asked if you want to paste them in all languages or only the selected languages. You can copy the content in only the languages you selected, or in all languages that the content exists in the source folder. If you are moving content, all language versions are moved.
Permissions for Moving/Copying Content
Permissions for moving or copying content are defined as follows:
- members of the Administrators user group
- a user with Add, Edit, and Delete permissions for the source and destination folders
- a user is a member of a group with those permissions
- a user assigned in the Roles > Folder Specific > Folder User Admins screen
- a user assigned in the Roles > Folder Specific > Move or Copy screen
Effects of Moving/Copying Content
When content is moved or copied, the following changes are made.
- The content inherits permissions, the approval chain, and the default template from the new folder.
- The content’s Quicklink is moved or copied in the library to the destination folder. However, the Quicklink remains the same (that is, the default template doesn’t change). You can update this by editing the Quicklink.
NOTE: If the Link Management setting in the web.config file is set to
true, you do not need to update the quicklink. Link Management automatically finds the correct template based on the current folder. - If the new folder already contains content with the same title, Ektron appends a number to the title to make it unique. For example:
ASP.NET Unleashed(2). - Library image paths inside the content remain the same.
- If a destination folder has required metadata that the pasted content lacks, the paste action is not affected. But, the next time a user edits that content, the user must complete the required metadata before the user can save the edits.
- If the content’s template is a Smart Form, it remains assigned even if the Smart Form is not assigned to the new folder.
Creating HTML Content
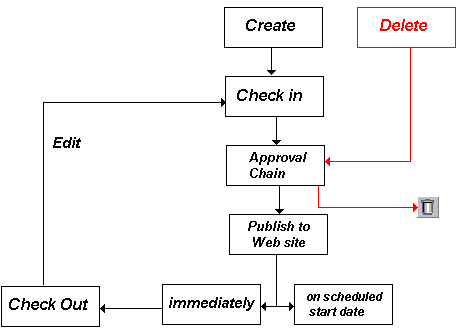
You can add content to a folder only if you have permission to do so. The following flowchart shows a typical sequence of events when creating content.
To add HTML content:
- Browse to the folder where you want to create the new content.
- Choose New > HTML Content and select a language from the list. The Edit Content screen appears.—Field descriptions—
- Title—Enter a title for the content. It cannot include these characters: \ / * > < |
- Content Searchable—(Available to Administrators) Check this box if this content should be found when someone searches your Web site. However, even if content is not searchable:
- the Workarea Advanced search still finds it. See Also: Advanced Search
- it can appear among Suggested Results. See Also: Suggested Results
—Button descriptions—- Publish or Submit—Publish the content to the Web site. This action updates the content in the database and exits the editor.See Also: Approving or Declining Content
NOTE: Only the last approver in the approval chain sees the Publish button. Other users see Submit. If no approval chain is assigned to the content’s folder, every authorized user sees this button.
 Check In—Save and check-in the content. This action updates the content in the database and exits the editor. It does not submit the content into the approval chain. Rather, it allows you and other users to continue changing it.
 Undo Checkout—Close editor without saving changes. Return content to its state prior to checkout.
 Save—Save the content without leaving the editor. It is a good idea to save your work frequently. But, if you later click Cancel and exit the editor, you lose changes saved by clicking this button.
 Cancel—Close editor without saving changes. Leave content in checked out state.
—Tab descriptions—- Content—Insert content. For more information about using Ektron’s editors, see Using the Ektron Editor
- Summary—Enter or edit the content summary. See Also: Writing a Summary for Content
- Metadata—Enter or edit the content metadata.Working with Metadata
All required metadata must be added before content can be checked in or submitted into the approval chain.
- Alias—Enter or edit the content's manual alias, and view its automatic alias. See Also: Creating User-Friendly URLs with Aliasing
A folder's Aliasing tab has a Manual Alias Required check box. If checked, the user creating or updating content must enter a manual alias before the user can save or submit the content.
- Comment—Briefly describe the content, or comment on changes made when editing content. The history comment appears on the View Content and Content History screens. On the Using Advanced Search in the Workarea, you can search for content by comments.
- Schedule—Use this tab to set a future publication date/time. To be published, this content must be approved and reach its publication date/time. See Also: Scheduling Content If appropriate, enter a date when the content will no longer be viewable on the Web site. See Also: Setting an End Date
- Web Alerts—See Administering Web Alerts
- Templates—This content’s folder must have a default template. It can also have additional templates assigned. When content is created, the default template is assigned to it. If you want to change the template assigned to this content, click this tab and choose a template from the drop-down list. See Also: Working with Templates
- Category—Assign taxonomy categories to this content. See Also: Taxonomy
After you create content, you or your system administrator typically make it available on the site. For example, you can add a hyperlink to it from another page, or place it in a collection or menu. Your administrator can add it to a list summary or content list.
The following list shows information about creating or uploading content types that are not HTML content.
- HTML Form/Survey—Creating a Form
- XML Smart Form—Working with Smart Forms
- Assets (including multimedia)—Managing Assets
- Microsoft Office document—Managing Microsoft Office Assets
- PageBuilder page—Creating Web Pages with PageBuilder
- Web Calendar event—Adding System Calendar Events
- Blog post—Working with Blog Posts
- Discussion forum posts—Working with Posts
For information about the content editor, see Using the Ektron Editor.
Deleting Content
The Delete command lets you permanently delete content from your Web site. You cannot delete checked-out content.
NOTE: If you do not see a Delete button on the View Contents of Folder screen, you do not have permission to do so.
Like publishing, deleted content must proceed through the approval chain before it is removed. If you are the last approver in the approval chain, the content is deleted immediately. See Also: Approving or Declining Content
Link Checking Before Deleting
NOTE: It is good practice to check for broken quicklinks before deleting content.
Use the link checker button to locate all content with a link to the current content. The identified content that will include a “dead” link after you delete the current content. So, remove or change the obsolete links before deleting.
- Access the View Content screen for the content where you want to check links
- Click Link Search (). A screen displays each content item with a link to the current content.
- Click the content title to access the View Content screen for the selected content.
- Remove or change the Quicklink.
Deleting Several Content Items in a Folder
On the View Contents of Folder screen, you can delete several content items at once.
NOTE: If you are working with an eCommerce catalog entry, you can only delete it if it is not on an order nor checked out.
- Navigate to the folder that contains the Approved content you want to delete.
- Choose Delete > Content. The Delete Contents screen appears.
- Check the boxes of the content items you want to delete.
- Click Delete Content. A confirmation message appears.
- Click OK.
Editing HTML Content
You can only edit content for which you have permission and in one of the following statuses:
- published
- checked in
- checked out by you
- submitted for your approval
Ektron provides 3 types of drop-down menus that let you edit content.
Editing with the Web Site Server Control Menu
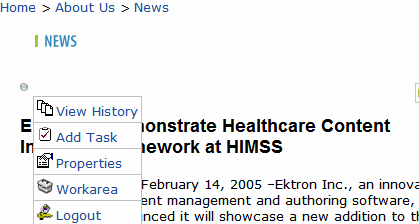
Web Site Server Control Menu—available after signing into an Ektron Web site. Lets you edit content from most server controls on a Web page. The options depend on the control and user’s folder permissions. To display this menu, click the triangle to right of content.
Editing with the Web Site Content Menu
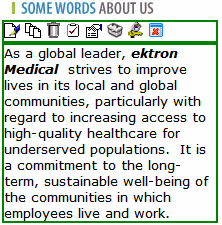
Web SiteContent Menu—available after signing into an Ektron Web site. After you sign in to your Web site, just above controls that contain content you have permission to edit is a silver access point (![]() ). When you hover the cursor over it, a menu appears.
). When you hover the cursor over it, a menu appears.
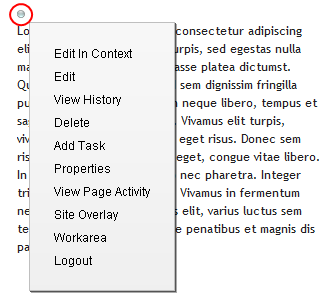
You can perform Ektron tasks from the menu. Menu options vary depending on the content’s status, your permissions, and so on. The advantage of this feature is that you can see how a Web page appears to site visitors.
System administrators can remove toolbar buttons by editing the C:\Program Files\Ektron\CMS400v8x\workarea\ContentDesigner\configurations file. Also, the content block server control’s
\InterfaceEditInContext.aspxSuppresswrappertags property must be set to false.
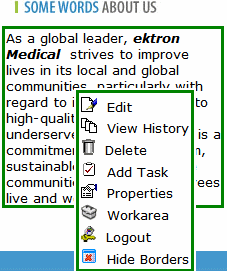
Web Site Content Menu Options
-
 Add—Appears if you selected a language and the content is not available in that language. Use this button to copy existing content into new content and translate it to the new language. Working with Multi-Language Content
 -
Add HTML Content—Create new HTML content in the folder to which the control is assigned. Creating HTML Content
-
Add Smart Form Content—Create new Smart Form content in the folder to which the control is assigned. Working with Smart Forms
-
 Approve—Approve or decline a request to publish or delete content. Approving or Declining Content
 -
 Add Task—Add a task to a user. Assigning and Managing Tasks
 -
 Delete—Open View Content page. From it, you can delete the content. Finding and Viewing Content
 -
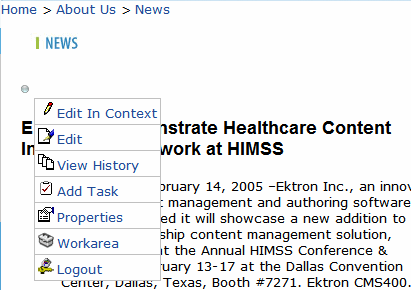
 Edit—Check out content for editing; open in separate window. Editing HTML Content
 -
 Edit in Context—Check out content for editing; content remains within Web page. Edit vs. Edit in Context
 -
 Logout—Log out of Web site. Logging Out
 -
 New Poll—Create new poll or survey. Creating Surveys and Polls
 -
 Preview—Preview content before it is published. Previewing Content in a Mobile Device Template
 -
Properties—Open content’s View Content page. Finding and Viewing Content
-
Site Overlay—View a visual map of popular links on a Web page, based on the frequency of clicks. Setting Up Site Overlay
-
View Content Difference—Display differences between previous and currently-published version of content. Comparing Versions of Content
-
View History—Open View History screen, where you can view previous versions of content. Managing Versions of Content
-
View Page Activity—View the current page's SEO information. Using the Search Engine Optimization (SEO) Server Control
-
 Workarea—Open Workarea. From here, you can perform all Ektron tasks. Using the Workarea and Smart Desktop
Edit vs. Edit in Context
You have the following options for editing content from a Web page.
|
Option |
Edit in Context |
Edit |
|
How the editor appears |
Within the page you are viewing |
In new window |
|
Editing functions |
Only a few |
Complete set |
|
What you can update |
Content only |
Content plus all editor tabs (Summary, Metadata, and so on) |
|
Types of content available |
HTML only |
|
|
What you can do after editing |
Submit/Publish |
|
|
Available from |
Web Site Content Menu |
Web Site Content Menu and Web Site Server Control Menu |
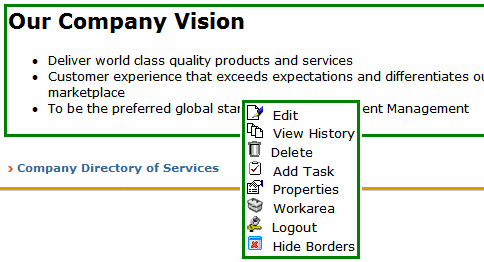
Hiding and Showing Content Borders
By default, Ektron provides the silver access point (![]() ) to indicate the edit menu. An alternate view of the edit menu uses borders around content areas. This is optional and can be set in the
) to indicate the edit menu. An alternate view of the edit menu uses borders around content areas. This is optional and can be set in the web.config file. To learn how to set this option, see Changing the Appearance of the Web Site Content Menu.
IMPORTANT: If you change the border to hidden, the Add and Edit buttons for menus are also hidden. This displays the page as it appears when you are not logged in. For information on menus, see Working with Menus.
You can hide the border that surrounds content when you are logged into Ektron. This lets you view the page as it appears when not logged in. If the border is hidden and you hover over a content area, there is no indication that it is Ektron content. However, you can right click to access the menu.
NOTE: Information about whether a border is hidden is stored in a cookie on a user’s system.
To show the border, log into Ektron, right click a content block, and choose Show Borders.
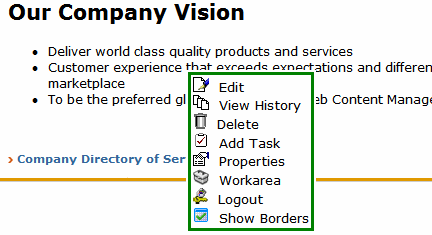
To hide the content border, right click on a content block and choose Hide Borders.
Changing the Appearance of the Web Site Content Menu
You have 3 choices for determining the appearance of the Web Site Content menu. To make your choice, edit the ek_UserMenuType element of the siteroot/web.config file. By default, ek_UserMenuType is set to 2.
|
Value set in ek_UserMenuType |
Description |
Illustration |
|
2 (default) |
drop-down Interface—No borders; drop-down menu appears when user clicks the Silver Access Point in top left corner of server control. |
|
|
1 |
Classic Interface—Colored borders and menus always appear; menu options appear as icons in the top row. NOTE: If you use this interface, the page layout is not depicted accurately because of the fixed toolbars. |
|
|
0 |
Hover Interface—Colored border appears when user hovers mouse over area; menu appears when user right clicks mouse inside border. This interface has 2 display options: vertical (shown on right) and horizontal. To change:
|
|
Editing with the Workarea Content Menu
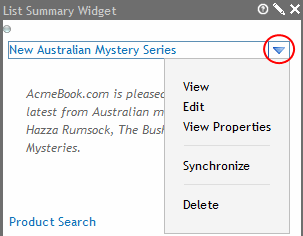
Workarea Content Menu—available within the Ektron Workarea; lets you edit content from the View Contents of Folder screen. Hover the cursor over the triangle () and click Edit. The editor opens with the content block inserted. An editor appears in which you can perform the following editing functions.
- edit content. See Using the Ektron Editor
- create or edit a summary
- specify metadata for the content
- enter or update a comment
- enter or update start and end dates
- review and update Web Alert information
- if aliasing is enabled and you are an alias administrator, an Alias tab appears
- assign or change available Working with Templates
- assign a taxonomy categories
- save changes
- check in content
- submit content for approval
- publish content to the Web site
- access the library
Writing a Summary for Content
A content summary is a short description that supplements the title when several content items appear on a Web page, such as Web page of top news stories. Content authors compose a summary when creating or editing content. Web developers can create pages that display the content title and summary to attract readers to the full story. Summaries can include images and various font styles and sizes.
|
TOP STORIES
Ektron Launches International Distribution Program(08-08-2009)
|
Creating or Editing a Summary
- Navigate to the folder in which you want to create or edit the content.
- In the View Content screen, choose New > {type of content} or open the View menu next to existing content and choose Edit. The Edit content screen appears.
- Insert a Title and content, if needed.
- Click the Summary tab.
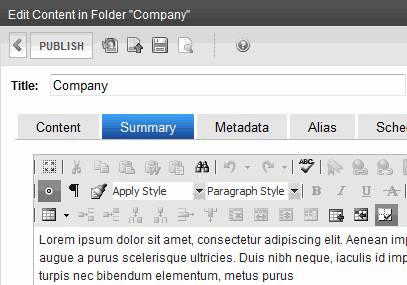
- Enter a summary for the content. The summary can include images, files, and hyperlinks.
- When done, click the appropriate button.
You can only edit the summary of content that is published, checked in, or checked out by you. When you enter or edit existing content’s summary, its status changes to checked out. After you create or edit the summary, click Check-In to check the content in. From that point, you need to submit or publish it.
Automatically Creating a Summary
Ektron automatically generates a summary for new content if none exists when it is first published. If the summary is blank, Ektron copies the first 40 words of content to the summary. After the content is published, you can update or delete the summary. If you delete a summary, it remains blank and is not automatically generated again.
How Membership Users Autogenerate a Summary
If a membership user edits content and wants to update the summary, the user checks the Auto Generate New Summary field on the membership editing screen, and the first 40 words of the content are automatically copied into the summary.
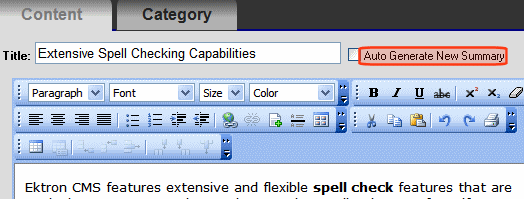
There is no limit on the number of times a membership user can automatically generate a new summary.
Making Content Private
Private content is available to Ektron administrators and users or membership users with at least Read-Only permissions for its folder. Those users must log in to work with private content. Unauthorized site visitors cannot see it. When you make a folder private, the content and any subfolders are also private (if they inherit permissions). You also can designate specific content items as private.
- Site visitor
- Logged in user with read-only permission
- Logged-in user with edit permissions
NOTE: You can determine the appearance of the menu shown above. See Changing the Appearance of the Web Site Content Menu.
Making a Folder Private
NOTE: You can only set content to private when inheritance is broken. See Also:
- In the Workarea, navigate to the folder that you want to make private.
- Choose View > Properties.
- Click View Permissions ().
- If necessary, uncheck the box that says Allow this object to inherit permissions. (You must disable inheritance before you can make the content private.)
- Check the box that says The content in this folder is private and can only be viewed by authorized users and members. A confirmation message appears.
- Click OK. All content in the folder is now private. As new content is added, it is automatically set to private.
Making Content Private
- In the Workarea, navigate to the folder that contains the content you want to make private.
- Click the content item you want to make private.
- Click View Permissions ().
- If necessary, uncheck the box that says Allow this object to inherit permissions. (Inheritance must be disabled before you can make the content private.)
- Check the box that says This content is private and is NOT viewable on the public Web site. A confirmation message appears.
- Click OK. The content is now private.
Making Assets Private
If assets are set to private, they are handled like other private content with one important exception: unless you follow the procedure described below, anyone can access an asset by typing the URL of the asset into the browser’s address field.
If a user attempts to access the asset in any other way (such as, linking to it from a Web page), the regular methods of making content private work. See Making a Folder Private and Making Content Private.
To make assets private even if someone types their URL into the browser’s address field:
NOTE: If site users receive a 404 Page Not Found error when trying to view private assets, make sure you have completed all steps below.
- Open your Web site’s
web.configfile, located in the site root folder. - Make sure the following line is uncommented.
<remove verb="GET,HEAD,POST" path="*"/>
- Comment out the 8 lines indicated below.
<httpHandlers>
<remove verb="GET,HEAD,POST" path="*"/>
<add verb="HEAD,OPTIONS,PROPFIND,PUT,LOCK,UNLOCK,MOVE,
  COPY,GETLIB,PROPPATCH,MKCOL,DELETE,(GETSOURCE),
  (HEADSOURCE),(POSTSOURCE)"
  path="*"
  type="Ektron.ASM.EkHttpDavHandler.EkDavHttpHandlerFactory"/>
<!--<add verb="GET,POST" path="*.doc"
  type="Ektron.ASM.EkHttpDavHandler.EkDavHttpHandlerFactory"/>
<add verb="GET,POST" path="*.docx"
  type="Ektron.ASM.EkHttpDavHandler.EkDavHttpHandlerFactory"/>
<add verb="GET,POST" path="*.xls"
  type="Ektron.ASM.EkHttpDavHandler.EkDavHttpHandlerFactory"/>
<add verb="GET,POST" path="*.xlsx"
  type="Ektron.ASM.EkHttpDavHandler.EkDavHttpHandlerFactory"/>
<add verb="GET,POST" path="*.ppt"
  type="Ektron.ASM.EkHttpDavHandler.EkDavHttpHandlerFactory"/>
<add verb="GET,POST" path="*.pptx"
  type="Ektron.ASM.EkHttpDavHandler.EkDavHttpHandlerFactory"/>
<add verb="GET,POST" path="*.vsd"
  type="Ektron.ASM.EkHttpDavHandler.EkDavHttpHandlerFactory"/>
<add verb="GET,POST" path="*.vsdx"
  type="Ektron.ASM.EkHttpDavHandler.EkDavHttpHandlerFactory"/>-->
Eight
add verbstatements in the middle are commented out. - Make sure the following line is uncommented.
<add verb="GET,HEAD,POST" path="*" type="Ektron.ASM.EkHttpDavHandler.EkDavHttpHandlerFactory"/>
- Save
web.config.
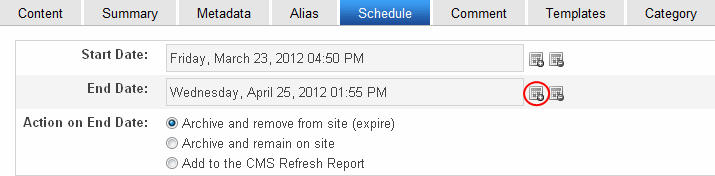
Scheduling Content
Scheduling lets you control when a version of content becomes visible on the Web site or when it expires (and is removed).
When you create or modify content, you can select a “go-live” date and time. If you do, and the content makes it through the approval chain, Ektron publishes the content to the live site at that time. For example, your company is having a sale of the century in a month, and everything is ready except the announcement. With this feature, you create the Web content now and set it to go live a week before the sale.
The Ektron Windows Service manages these changes to your site. See Also: Ektron Windows Service
Setting a Start Date
- Edit a content item and click the Schedule tab.
- Click Add (
 ) next to the Start Date field.
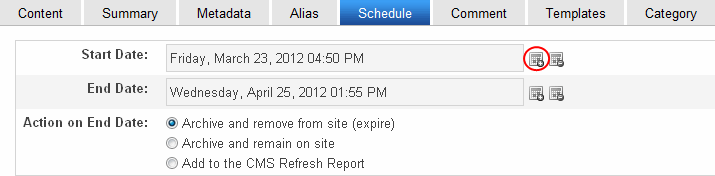
- A calendar pops up. Select the date and time when this version of the content will become visible on the Web site.
- Click Done. The date and time appear in the Start Date field.
NOTE: When you select a time for content to go live, that time depends on the server’s system clock. If the clock is incorrect, the content will not go live at the intended time.
After you save the content, it appears on the Content Pending Start Date report, which keeps track of content with a future start date. See Also: Content Pending Start Date Report
After you set a go-live date and the content completes the approval chain, the following scenarios may occur:
- Setting the Go-Live Date on New Content
When you set a go-live date on new content, it becomes viewable on the specified date and time as long as it completes the approval chain. If a site visitor accesses the page that contains the content before then, only the template appears.
If a logged-in Ektron user browses your Web site, the user sees a gray border around the content until the date specified. If the user clicks within the gray border, the user can use the Preview option to see the new content.
- Setting the Go-live Date on Existing Content
When you set a go-live date for changes to existing content, and it completes the approval chain, a logged-in Ektron user sees a gray border around the content until the date specified.
When you view content on the Web site, you see the previously published version. When the go-live date occurs, the new content replaces the previous version, and its status changes to Active.
- Setting the Go-Live Date on New Content
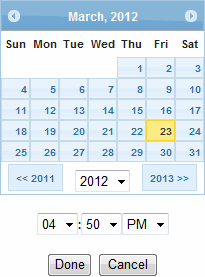
Setting an End Date
- Edit a content item and click the Schedule tab.
- Click Add () next to the End Date field.
- A calendar pops up. Select the date and time when this version of the content will become visible on the Web site.
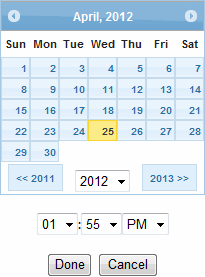
- Click Done. The date and time appear in the End Date field.
When content reaches its end date, it appears on the Expired Content report. See Also: Content to Expire
If your choice means the content will not appear on the Web site, you should have another content item ready to replace it. If not, the template appears without the content.
Setting Archive Options
Use content’s archive options to determine what happens upon reaching its end date/time. To be eligible for any option, the content must reach its end date/time, progress through its approval chain, and be published. Until those events occur, the content remains visible within its Workarea content folder and on the site.
|
Option |
Can site visitors |
Can users view and edit content within Ektron upon expiration? |
|
Archive and remove from site (expire) |
No |
Yes, within its folder by choosing the View > Archive Content option. Also, can be found via Basic Search and Advanced search (if the Archived check box is checked). |
|
Archive and remain on Site |
|
Yes, within its folder by choosing the View > Archive Content option. Also, can be found via Basic Search and Advanced search (if the Archived check box is checked). |
|
Add to CMS Refresh Report |
Yes |
Yes, in the active area of its folder and on the Refresh Report. See Also: Refresh Reminder |
Restoring Content from Archived to Active State
- Navigate to its folder.
- Choose View > Archived Content.
- Hover the cursor over the content, click the triangle (), then Edit from the drop-down menu. The Edit Content in Folder screen appears.
- Click the Schedule tab.
- Remove the End Date or change it to a future date.
- Submit the content for publishing. When the content is published, it will no longer be archived.
Managing Versions of Content
You can view and restore past versions of published content (unless your system administrator purged them). After viewing previous versions of content, and comparing any 2 versions, authorized users can replace the current version with any previous one. See Also: Managing Folder Permissions
Ektron assigns a unique number to each saved version of a content block. The number is increased by one tenth if the content is checked in but not published. If the content is published, the next whole number is assigned. For example, if the current version is 1.0 and you check in that content, the new version is 1.1. If the next editor publishes it, the new version is 2.0.
If content versions are purged, the numbering scheme restarts with the remaining content.
NOTE: The Purge History feature deletes historical versions of content according to user-defined criteria. Therefore, some previous versions may be unavailable. See Also: Purge History
Viewing Content History
- To access content history from the Workarea, click on a piece on content. The View Content Screen appears. Then click View History ().
- To access content history from a Web page, click the access point () and choose View History.
The following image shows a sample View Content History screen.
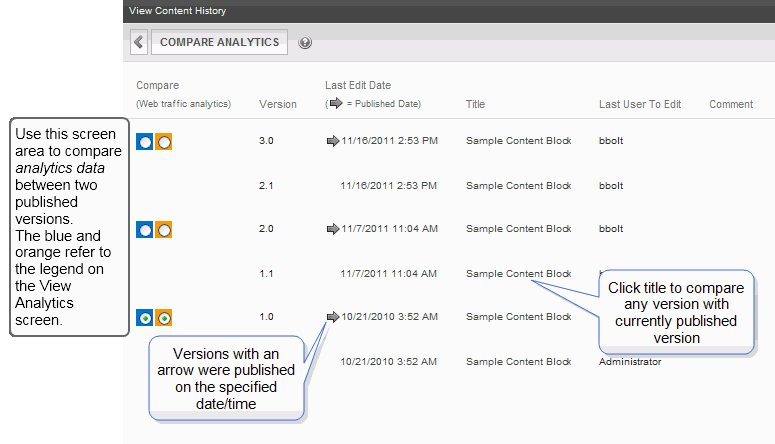
The window displays the following information for each version.
- a Compare column lets you compare Web traffic analytics data between any 2 published versions.
- Ektron assigns a unique number to each saved version of a content block.
- an arrow indicates a version that was published. Versions without an arrow indicate content that was checked-in but not published.
- date and time version was checked in or published
- title of content
- last user who edited content
- comments entered by user to describe the changes
To view any version, click its title to display the Content History window for that content.
There are 3 view modes.
Comparing Versions of Content
If content can be compared with another version, the View Difference button () appears in the content history area or the Web page view.
NOTE: The first time you use the View Content Difference screen on a client machine, you are prompted to install the differences tool. When the installation program completes, close and reopen the View Content Difference feature.
There are varying versions of this procedure. Consult your system administrator to determine the correct procedure for you.
Comparing Content (32-Bit Server/32-Bit Client)
- Click View Properties on content that you want to compare.
- Click History (). The View Content History screen appears.
- Click a version that you want to compare with the most recently published version.
- Click Compare Analytics. The View Content Difference screen highlights changes to selected content as shown in the following example.
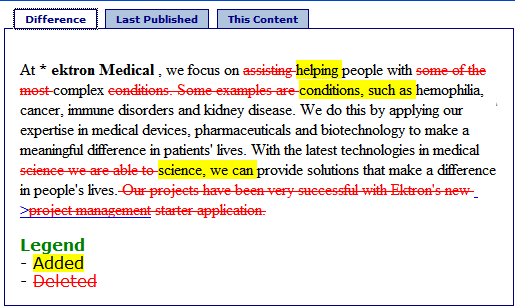
- Difference—Both versions:
- content that only appears in the version on the This Content tab is highlighted in yellow
- content that only appears in the currently published version is red
- unchanged content is black
- Last Published —Currently-published.
- This Content—The version you are comparing the currently-published content against.
- Difference—Both versions:
Comparing Content (64-Bit Server/32-Bit Client)
- Click View Properties on content that you want to compare.
- Click History (). The View Content History screen appears.
- Click a version that you want to compare with the most recently published version.
- Click Compare Analytics. The CMS Compare screen highlights changes to selected content as shown in the following example.
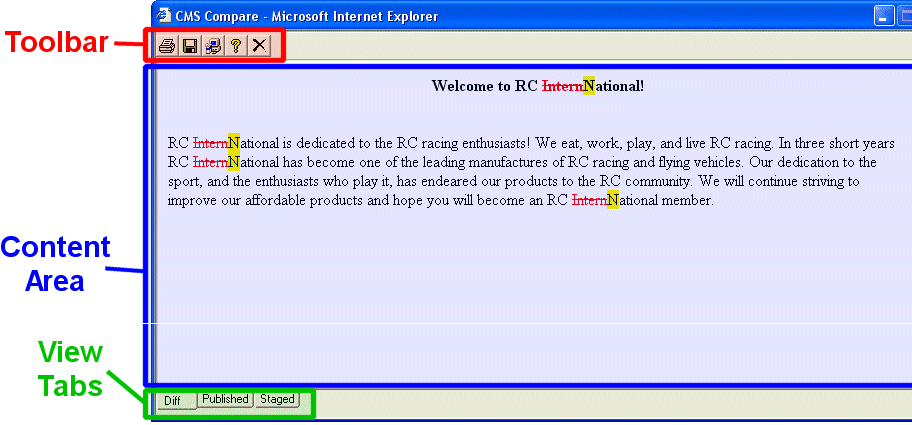
 Print—Sends content to local or network printer. This option prints the currently displayed content, whether it is the compared, published, or staged content.
- Save—Saves the version of the content (in HTML) to your local machine or network. When saved as a physical file, you can edit the HTML. However, the changes are not saved to the Web Server.
 Setup—Opens setup dialog box to configure the settings. Typically, only an administrator would use this.—Set up options—
- Compare visual aspect—Compares content as it would appear on a Web page
- Compare source code—Displays compared content as source HTML
- Ignore All—Blank (whitespace) characters are ignored
- Smart Detect—One or more consecutive whitespace characters are treated as a single separation sequence. That is, multiple whitespace characters are ignored.
- Detect All—Blank (whitespace) characters are treated as any other character.
- Ignore case—Determines whether comparison is case sensitive. For example, if you check this box, the strings “Bob” and “BOB” are not highlighted because their only difference is the case of the characters.
- Ignore format attributes—Determines whether comparison ignores changes in text-formatting attributes (HTML Visual Analysis only).
 Help—Displays additional information about the compare feature.
 Exit—Closes the window.
Restoring a Previous Version
NOTE: The ability to restore content is a permission granted by the system administrator. If you do not see Restore on the View Content History screen, you do not have permission to do so.
- Open the content folder that contains the content.
- Click the content item.
- Click History ().
- Select an historical version that you want to restore.
- Click Restore. The content history window closes, and you return to the View Content page or the Web page, with the content in a checked in status.
If desired, check out the content to make additional changes. Select the workflow to perform on the content. When the historical version is approved, it is published to the Web site.
![]()