Folder Operations
You can add, copy, move and delete folders and also purge folder history.
Adding Folders
To further organize content on your Web site, create folders to store related content.
- Navigate to and click the folder within which you want to create the new folder (that is, the parent folder).
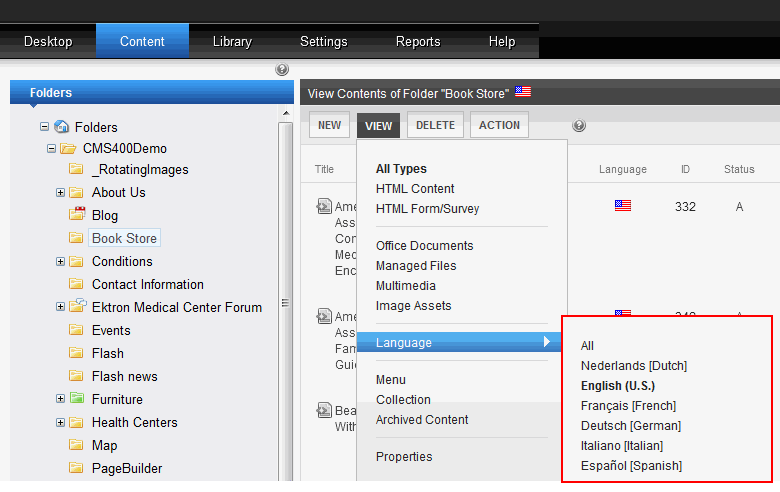
- Each folder has a default language. By default, it is inherited from the parent folder. To change a folder’s default language, use the parent folder’s View > Language selection (shown below).

- Choose New > Folder. Alternatively, you can hover the cursor over the folder, right click the mouse, and choose Add Folder. The Add a folder screen appears.

- Complete the fields. See Folder Properties Tabs and Fields.
- Click Add Folder.
You can modify the folder’s properties, permissions, approval chain, and so on. For a list of options, see Folder Properties Toolbar.
- If this is a Community Folder, see Community Folders.
- If this is a Site Folder, see Supporting Multi-Site Configurations.
- If this is a Catalog Folder, see Creating a Catalog Folder.
Copying and Moving Folders
You can copy a folder and paste it into another folder. Or you can cut and paste one folder into another. Cut and paste is synonymous with move.
- In the left panel of the Workarea, hover the cursor over the folder you want to copy/move.
- Right click the mouse.
- Click Copy or Cutfolder name.

- Hover the cursor over the folder to which you want to paste the copied/cut folder.
- Right click the mouse and select Paste Folder.

- A warning message appears. Click OK.

Who Can Copy and Move Folders
Any of the following users can copy or move folders.
- users who have Add, Edit and Delete permissions for the folder being moved/copied and the destination folder See Also: Managing Folder Permissions
- members of the Administrators user group
- users assigned in the Roles > Folder Specific > Folder User Admins screen
- users assigned in the Roles > Folder Specific > Move or Copy screen
See Also: Defining Roles; Guidelines for Using the Folder-User Admin Role
Rules for Copying and Moving Folders
- When you copy or move a folder, you also copy/move all of its subfolders.
- All properties assigned to a folder (permissions, metadata, templates, and so on) remain assigned after the copy or move. However, you can edit the folder in its new location and adjust its properties as needed.
- Any Inherit checkboxes (see example below) that were checked are now unchecked. After the copy/move, you can check them again as needed.

- The Root folder cannot be copied or moved
- You cannot copy or move a folder into its own subfolder
- You cannot move a folder to same level in the folder structure
- You can copy a folder to same level in the folder structure. If you do, a number is appended to the copied folder's name, such as
calendar(1). - If you move a folder, its content retains its status. That is, if content's status was checked out (O) before the move, it is checked out after the move.
- If you copy a folder, only content in Approved status is copied to the new folder. Content in any other status is not copied.
- All folder content that follows the above rules is moved/copied. This includes all language versions of those items.

Deleting Folders
You can delete obsolete folders from the Ektron Web site.
NOTE: The top-level folder, Root, cannot be deleted nor renamed.
WARNING! Deleting a folder permanently deletes the content and Quicklinks that belong to the folder and all of its subfolders. You cannot retrieve deleted content.
- In the Workarea, navigate to the content folder you want to delete.
- From the options across the top of the screen, choose Delete > This Folder.

- Alternatively, you can hover the cursor over the folder in the folder display panel , right click the mouse, and choose Delete folder name. A confirmation message appears.

- Click OK.
Purge History
WARNING! Purging historical versions of content in a folder permanently deletes the specified content. You cannot retrieve purged content.
The Purge History option lets you delete historical versions of content in a folder. For more information on content versioning, see Managing Versions of Content.
Purging is generally performed due to storage space concerns or to clear away obsolete versions before going live or migrating a site. Before purging, make sure you are aware of any organizational or legal data retention policies.
When purging, you can:
- specify a date to limit which historical versions are purged. Only historical versions with an edit/publish date before this are purged.
- indicate whether a folder’s subfolders are purged
- purge published as well as checked-in versions of content
Prerequisite: Only administrators and users identified on the Manage Members for Role: Folder User Admin screen can purge history.
To purge the history for a content folder:
- Access the View Folder Properties screen for the content folder you want to purge the history for, as described in Accessing the Folder Properties Screen.
- Click Purge History (
 ). The Purge History screen appears.
 - Use the following list to customize the Purge History options.
- Only purge historical versions before (required)—Specify a date to limit the number of historical versions to purge. When specified, only historical versions with a date before this date are purged.
- Recursive Purge (optional)—Purges historical content versions in this folder’s subfolders.
- Purge versions marked as Published (optional)—Purges published versions of content as well as checked-in versions.
- Click Purge History. A confirmation message appears.
- Click OK to execute the purge and display a confirmation when complete.
Folder Folder Folder Folder Folder Folder Folder Folder Folder Folder Folder Folder Folder Folder Folder Folder Folder Folder Folder Folder Folder Folder Folder Folder Folder Folder Folder Folder Folder Folder Folder Folder Folder Folder Folder Folder Folder Folder Folder Folder Folder Folder Folder Folder Folder Folder Folder Folder Folder Folder Folder Folder Folder Folder Folder Folder Folder Folder Folder Folder Folder Folder Folder Folder Folder Folder Folder Folder Folder Folder Folder Folder Folder Folder Folder Folder Folder Folder Folder Folder Folder Folder Folder Folder Folder Folder Folder Folder Folder Folder Folder Folder Folder Folder Folder Folder Folder Folder Folder FolderFolder Folder Folder Folder Folder Folder Folder Folder Folder Folder Folder Folder Folder Folder Folder Folder Folder Folder Folder Folder Folder Folder Folder Folder Folder Folder Folder Folder Folder Folder Folder Folder Folder Folder Folder Folder Folder Folder Folder Folder Folder Folder Folder Folder Folder Folder
![]()