As mentioned in Setting Up a Basic eCommerce Web Site, after specifying configuration settings, you build eCommerce products in the following order:
Creating Product Types
Create a separate product type definition for each category of catalog entries that you sell. For example, you might have a product type for movies, another for books, a third for electronics, and so on.
When thinking about creating new product types, the most significant differences are the Class field and the content page, which defines the XML Smart Form for products you will create for a Product Type.
Product Classes
A catalog entry’s product class affects customers’ purchasing options. Classes are explained below.
- Kit—Lets a customer (site visitor) select from any number of free-text options. Options can increase or decrease the overall price. See Also: Creating a Kit
Example: A computer whose price changes as a customer selects RAM, hard drive, monitor, and so on.
- Bundle—A catalog entry consisting of several other catalog entries bundled together. Its pricing, shipping, images, and so on, are independent of the individual items. See Also: Creating a Bundle
Example: A living room set: couch, end tables and lamps. Instead of buying each item separately, the customer buys all for a “package” price.
- Product—Simple or complex catalog entries. A complex product is a “wrapper” that provides links to related simple products. Each simple product has its own SKU, price, inventory data, and so on. See Also: Creating a Complex Product
Example: A movie in 3 formats and prices:
- VHS ($12.95)
- DVD ($14.95)
- Blu-ray ($17.95)
- Subscription—A catalog entry which can provide access to designated site pages, and may billed on a recurring basis. See Also: Creating a Subscription
Example: Web site content that is only available to subscribed members
How Product Types Affect the Creation of Catalog Entries
Catalog folders generally contain the same kind of catalog entries, such as DVDs or digital cameras. Some information applied to a catalog folder is inherited by all entries in the folder.
After you create product types, apply appropriate types to existing catalog folders using the Catalog Properties screen’s Product Types tab. Then, when creating a new catalog entry, you first navigate to a catalog folder. Next, click New and choose a product type assigned to the folder. See Also: Assigning a Catalog Folder’s Product Type
A product type determines the following aspects of the associated catalog entries:
- Product class—Product Classes
- Attributes—Step 1: Defining Properties, Attributes, and Media Defaults Attributes define additional information about catalog entries based on this product type. For example, if the Product Type is for movies, attributes might be Actors, Running Time, Rating, Year Released, and so on. In another example, you want an attribute that describes a chair’s dimensions. You create a text-based attribute for the Product Type you will use to add chairs to a catalog. Then, whenever you add a new chair to the catalog, you enter its dimensions into the Attributes tab’s Dimensions field. By default, Attributes appear on the Product server control.
- Media defaults (that is, size of thumbnail images added to a catalog entry)—Step 1: Defining Properties, Attributes, and Media Defaults
- Content page—Step 2: Creating the Content Page
Step 1: Defining Properties, Attributes, and Media Defaults
To create a product type:
- Go to Workarea > Settings > Commerce > Catalog > Product Types > New > Product Type.
- Click the Properties tab.
- Enter a unique product type title in the Title field. The title identifies this entry on the View Product Types screen. Also, when creating a new catalog entry, users must pick a product type from the catalog’s New menu.
- Enter a description for the product type in the Description field.
- Select a product class from the Class drop-down menu. For information about how class types affect how products are displayed, see Creating a Kit, Creating a Bundle, Creating a Complex Product and Creating a Subscription. In some cases, you will need to perform additional steps on other screens.
- Click the Attributes tab.
- Click Add Attribute. The Add Attribute dialog box appears.
- Enter an attribute name in the Name field, such as color.
- Choose a data type from the Type drop-down menu.
- Text
- Date
- Number
- Yes or No (boolean)
- Click OK. When a customer views the chair’s product page, the customer sees the attribute text below the thumbnails.
- Click the Media Defaults tab.
- Click Add thumbnail. The Add thumbnail dialog box appears.
- Enter a name for the thumbnail in the Name field.
- Specify the size if the thumbnail in pixels using the Width and Height fields.
- Click OK.
- Click Save. The XML Smart Form editor appears, as described in Step 2: Creating the Content Page.
Creating a Kit
A kit is a type of catalog entry that allows a customer to select from free-text options, which can affect the item’s price. The options can also be placed into logical groups.
For example, if a catalog entry is a laptop computer, one group may let you enter options for RAM, another for operating system version, and a third could present hard drive options.
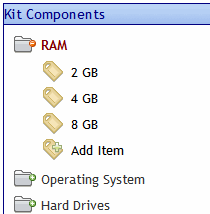
There is no limit to the number of groups you can add, nor the number of options in a group. All groups and options are simple text, created on a kit’s Items tab as needed, and can accommodate a price modifier. The example below shows how to set up chair color combinations.
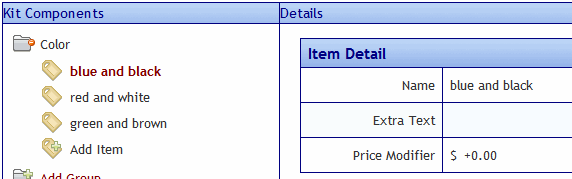
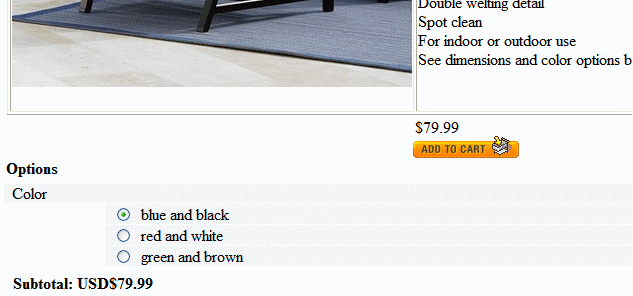
In this example, the options do not affect the price. Here is how the options appear on a product page.
Consider another example in which the price does change. In this case, use the Item screen’s Price Modifier field to adjust price based on the chair frame. As shown below, if the chair frame is teak, the sale price increases by $25.00.
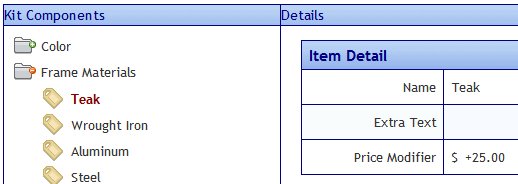
Other chair materials might adjust the price.
- Wrought Iron—$0.00
- Aluminum— +$15.00
- Steel— -$10.00
Note how the Price Modifier can either increase or decrease the sale price. Here are these options on the product page.
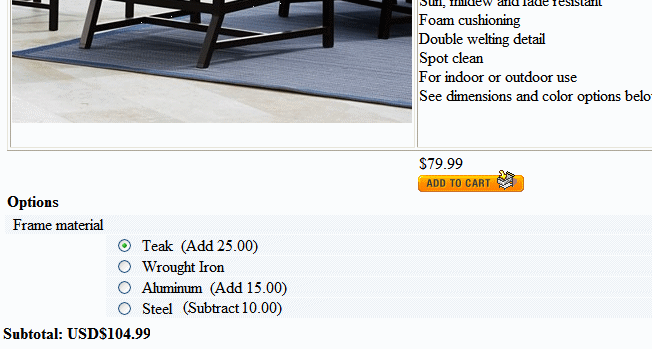
The chair’s base price is $79.99, and the teak frame increases it to $104.99.
Creating a Bundle
A bundle consists of several simple products. You would use it to combine several existing products into one “umbrella” catalog entry. That entry captures pricing, SKU number, shipping, and inventory information for the bundle. The information for the individual entries that make up the bundle are not affected when one is ordered.
As an example of a bundle using furniture, assume your eCommerce site sells a chair, a table, and an ottoman separately. You also sell them together as a set.
Use a bundle to define the set, add pictures, pricing, and so on. On the bundle’s Items tab, you select the individual catalog entries that make up the bundle.
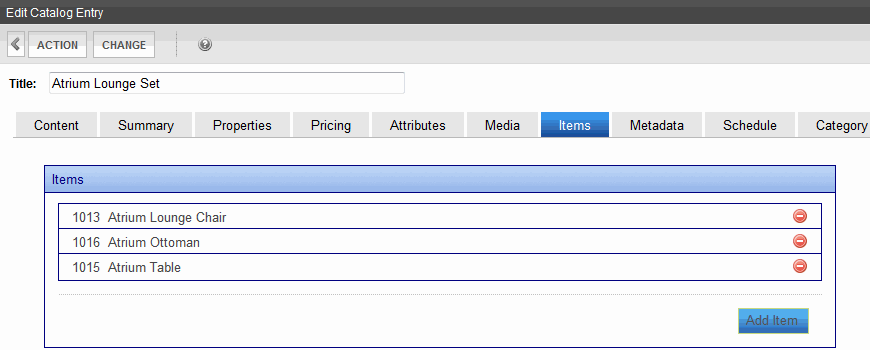
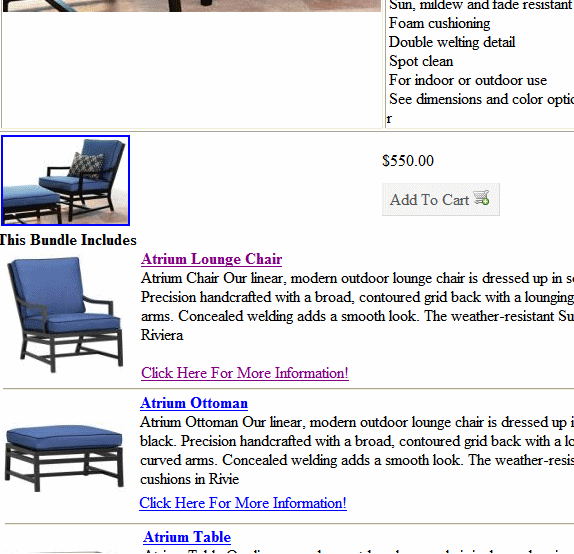
Here is how this bundle looks on a product page.
Creating a Complex Product
A Complex Product is similar to a bundle in that one catalog entry serves as an “umbrella” for other entries. However, unlike a bundle, a customer must select one of the catalog entries. So, the price is that of the selected entry, not the umbrella item.
The advantage of a Complex Product is its ability to consolidate several related items under one title, yet lets customers choose the item they want. Because each item under the umbrella is its own catalog entry, it is priced and tracked separately.
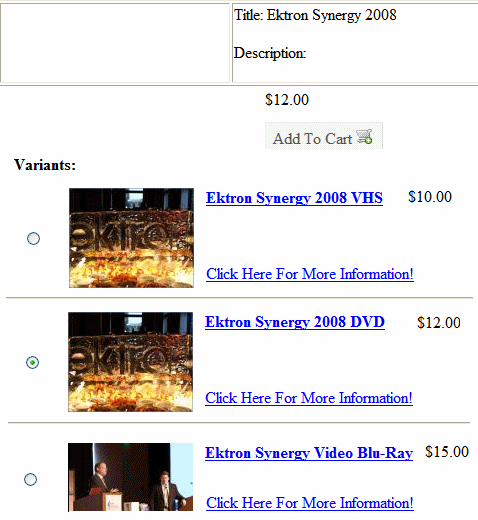
For example, a site sells movies in 3 formats: VHS, DVD, and Blu-ray. Each is priced differently. To accommodate this, create catalog entries for the movie in each format, assigning images, SKU number, pricing, dimensions, and so on. Then, create a Complex Product, make its title the title of the movie, and use the Items tab to select the catalog entries of the individual formats.
The Product List or Product Search control displays the Complex Product, which is the movie title. When a customer selects that, the customer sees the product page, which lists the format and price of each assigned catalog entry. The customer can only choose one.
Unlike the Kit or Bundle, a complex product does not have its own product class. Instead, you create a catalog entry whose product class is Product, then assign other catalog entries to it via the Items tab. As soon as you assign one catalog entry via the Items tab, the original catalog entry is converted to a Complex Product.

Note that the price of the “umbrella” product appears on the Product List and Product Search server controls. This can be misleading, since the price of individual items within the complex product can vary.
You cannot apply tier pricing to a complex product. See Also: Tier Pricing
Creating a Subscription
A subscription is a good or service which
- can be billed on a one-time or a recurring basis
- places users who purchase it into a designated membership group, letting you grant them access to private content
Examples include
- content only available to members who purchase a subscription
- a gym membership
- a book club, in which a customer makes the same payment and receives a different book each month
- anti-virus software that expires after 12 months
- a 3-year maintenance contract on a digital television, payable yearly
If you use the recurring billing feature (a series of scheduled payments), the bill can be generated for any number of months or years, but no other time increments. Each payment must be the same for the subscription’s term. The term begins when a customer submits the order.
Customers cannot apply a cart-level coupon to a subscription-based catalog entry. See Also: Creating a Coupon
Creating a Subscription-Based Catalog Entry
Creating a subscription is the similar to creating a regular catalog entry:
- Create a subscription-based Product Type. On the Product Type screen’s Class drop-down, select Subscription.
- Assign the Product Type to a catalog folder. See Also: Creating a Catalog Folder
- In that folder, create a catalog entry for each subscription.
- On the Pricing tab, enter the cost.
If using recurring billing, enter the term of the subscription. To learn about Recurring Billing fields, see Entering Recurring Billing Information
If this product does not use recurring billing, click No at the Use Recurring Billing drop-down. To learn about the Unit Pricing fields, see Entering a Catalog Entry’s Price Information.
- On the Items tab, assign membership and Ektron user groups. See Also: Assigning Groups to a Subscription-Based Catalog Entry
- If a subscription provides access to Ektron content, use its folder Permission Table to grant permission to the membership and Ektron user groups you defined in Step 5.Subscriptions Involving Ektron Content
Subscription-based products do not support tier pricing. See Also: Tier Pricing
Entering Recurring Billing Information
IMPORTANT: Due to differences in the way payment gateways work, you should test recurring payments with your gateway before processing live transactions.
The Pricing tab’s Recurring Billing area of a subscription-based catalog entry lets you determine if a subscription is billed on a one-time or a recurring basis. If recurring, it helps you define the terms.
To set up recurring billing:
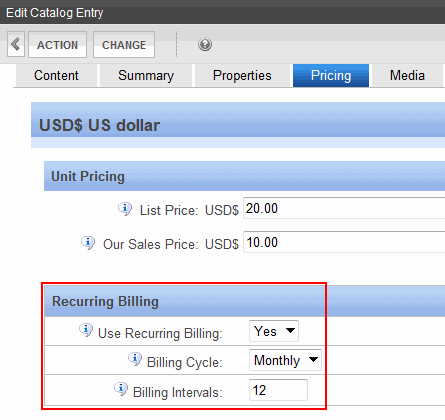
- Select Yes from the Use Recurring Billing drop-down. The recurring billing term begins when a customer submits an order, and is based on a number of months or years.
- Select a time interval from the Billing Cycle drop-down.
- Enter a number of Billing Intervals for which a customer is charged. For example, if a customer should be charged once a month for 12 months, complete the screen as shown above. If a customer purchases the item on June 1, 2008, his credit card will be billed on the first of each month from June 1, 2008 to May 1, 2009.
As another example, if a customer should be charged once a year for 3 years, complete the screen as shown below.
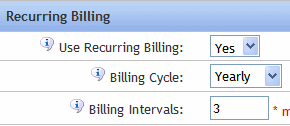
If a customer purchases the item on June 1, 2008, his credit card will be charged on the following dates.
- June 1, 2008 (purchase date)
- June 1, 2009
- June 1, 2010
Assigning Groups to a Subscription-Based Catalog Entry
You must assign a membership user group to a subscription-based catalog entry. Optionally, you can assign an Ektron user group. You assign groups via the subscription’s Items tab.
See Also: Membership Groups
So, as part of setting up a subscription, you must either create new membership and (possibly user) groups, or use existing groups.
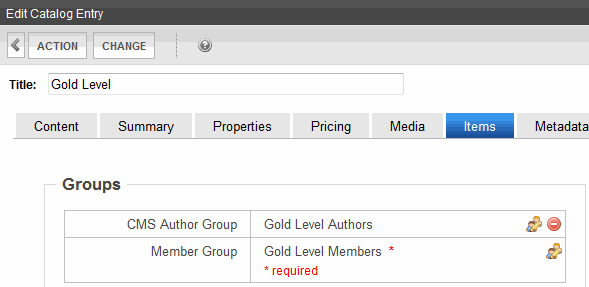
All users (identified by their email address) who purchase the product are automatically added to one of the groups. Ektron checks a user’s email address to determine if the user is an Ektron or a membership user.
- Ektron users are added to the group defined in the CMS Author Group field
- Non-Ektron users are added to the membership group defined at the Member Group field
Subscriptions not Involving Ektron Content
If a subscription does not involve access to Ektron content, the membership group provides a list of customers who purchased the subscription. You can use the list to manage the accounts, notify them when the subscription is about to expire, and so on.
Subscriptions Involving Ektron Content
If a subscription involves access to Ektron content:
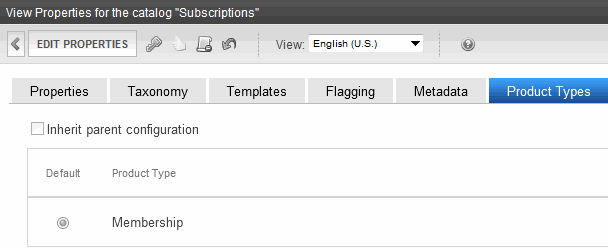
Create a folder and enable one or more subscription-based product types on its Product Type screen.
Place the subscription products in that folder. Customers shop for and purchase this content on your Web site as they do all products, via eCommerce server controls.
Then, create a regular content folder in which to create the confidential content. Next, use the content folder’s permission table to grant the subscription user groups access to that folder.
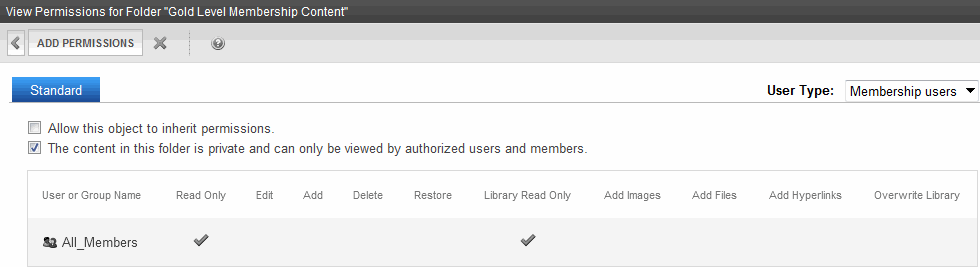
See Also: Managing Folder Permissions and Assigning Membership Permissions
Step 2: Creating the Content Page
After you complete and save the Add Product Type screen, a new screen lets you enter XML Smart Form information. On this screen, you set up fields to collect information for the content page of catalog entries based on this product type. See example below.
The content page appears on the Product server control, describing this catalog entry to customers. The process of creating a product type content page is the same as creating an XML Smart Form, described in Adding a Smart Form.
Editing a Product Type
- In the Ektron Workarea, go to Settings > Commerce > Catalog > Product Types.
- Click the product type that you want to edit.
- See Step 1: Defining Properties, Attributes, and Media Defaults.
NOTE: You cannot edit a Product Type’s Class.
Viewing an Attribute's Published Status
Each attribute has a publication status. To view attribute status, go to Settings > Commerce > Catalog > Product Types, select a product type and click the Attributes tab.
- Active—Attribute can be assigned to catalog entries
- Inactive—Attribute already assigned to one or more catalog entries, but can no longer be assigned. To make an attribute inactive, click the corresponding Mark for Delete (
 ).
). - Not Published—Attribute has been created but Product Type not saved yet
- Active (marked for delete with strike through)—Attribute will be deleted when Product Type is saved.
You can delete an attribute only if it is not applied to a catalog entry. If you try to delete an attribute applied to a catalog entry, it is marked “Inactive.” Inactive attributes can no longer be assigned.
Deleting a Product Type
Prerequisite: The product type is not assigned to any catalog entries.
- In the Ektron Workarea, go to Settings > Commerce > Catalog > Product Types.
- Click a product type you want to delete.
- Click Delete (
 ). A confirmation message appears.
 - Click OK.
Although you cannot delete a product type that is being used, you can prevent users from creating new catalog entries based on it. To do this, go to each applicable folder’s Catalog Properties > Product Types screen and remove that product type.
Creating a Catalog Folder
Prerequisite: One or more product types.
A catalog folder is a special kind of Ektron folder designed to hold eCommerce entries. Its unique icon ( ) distinguishes it from other folder types. If you are familiar with content folders, much of that information applies to catalog folders. See Also: Managing Folders
A Catalog folder's properties screen has several tabs/screens. The following screens are the same as regular content folders.
- Properties—See Folder Properties
- Taxonomy—See Taxonomy
- Templates—See Working with Templates
- Flagging—See Defining Flags for Content
- Metadata—See Assigning Metadata to a Folder
- Breadcrumb—See Breadcrumbs
- Aliasing—See Creating User-Friendly URLs with Aliasing
The unique screen is Product Types. See Also: Assigning a Catalog Folder’s Product Type
Like content folders, the following catalog folder information can be inherited from its parent or uniquely set for each catalog. You can only make changes after creating the catalog.
- Permissions—See Managing Folder Permissions
- Approvals—See Approval Chains
- Purge History—See Purge History
- Restore Web Alert Inheritance—See Assigning Web Alert Information to Folders and Content
Assigning a Catalog Folder’s Product Type
A catalog folder’s Product Types screen lets you identify product types upon which catalog entries can be based. For example, you created a lawn mower Product Type, and want only lawn mowers to be entered in a catalog folder. In this case, open a catalog folder’s Product Types tab, break inheritance if necessary, and select Lawn Mower as the catalog’s only product type.
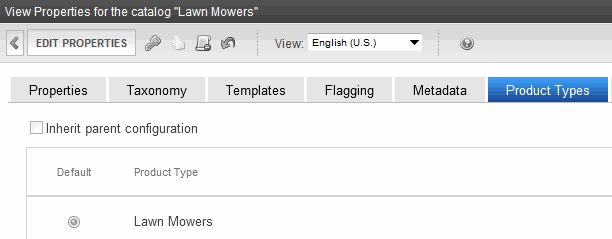
Then, when an Ektron user creates an entry in this catalog, the user must use the Lawn Mower product type.
Searching a Catalog Folder
Searching a Catalog folder is the same as searching any other type of Workarea folder. This procedure is described in Searching the Workarea.
Creating a Catalog Entry
Prerequisite: One or more catalog folders.
A Catalog entry is the eCommerce term that describes a product sold on your Web site. It is similar to content in the rest of Ektron, so those concepts also apply to catalog entries.
Catalog entries are built from Ektron XML Smart Forms, so use the same content and folder structure as other Smart Forms. See Also: Working with Smart Forms
Catalog entries share the following features with regular content:
- content status
- approvals and permissions
- metadata
- schedule
- can be private
- history and the ability to restore previous versions
- search
- taxonomies to categorize products
Catalog entries also have unique information:
- Tax Class—Determines which taxes apply to item
- Physical dimensions—Used to calculate shipping costs
- Inventory tracking
- Pricing—Can be fixed or variable for any currency
- tier pricing—Pricing adjusts when quantity reaches new plateau. For example, 1-9 items cost $500 each. But if 10 are sold, the price drops to $450 each.
- Images (full sized and thumbnail) to display the product on your Web Site
Because there is so much information to provide about managing catalog entries, this section takes 2 approaches:
- Creating a Catalog Entry describes how to work with catalog entries: create them, delete them, and so on.
- Creating/Updating Catalog Entries
- Deleting a Catalog Entry
- Adding Cross Sell and Upsell Recommendations to a Catalog Entry
- View and restore a previous version of a catalog entry—Navigate to catalog folder > select catalog entry > View Menu > Content History option. See Also: Managing Versions of Content
- Edit permissions for a catalog entry—To enable this, break permission inheritance. Then, assign permissions to selected users. See Also: Setting Permissions for Content
- Edit inherited approval chain—First break permission inheritance, and assign permission to users who need to be in the approval chain. Then, update the catalog entry’s approval chain. See Also: Editing an Approval Chain For Content
- Make a catalog entry private, so that the Web site search does not find it—See Making Content Private
- Archive a catalog entry—See Setting Archive Options
- Displaying Catalog Entries on your Web Site
- The following topics describe all accessible options (tables, menus, and so on) from the catalog entry screen
Creating/Updating Catalog Entries
Follow these steps to create a new catalog entry or update an existing one.
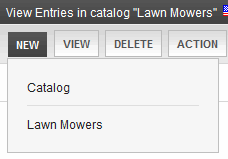
- Navigate to a catalog folder in which you want to create or update a catalog entry.
- Choose New then select a product type on which to base the entry.
- Complete the screens as needed. (For information on the catalog entry screens, see Tabs on the Catalog Entry Screen) The required fields are:
- content Title
- Properties tab > SKU Number
- any fields on the content screen that your Ektron administrator has designated as required
- Check in or submit/publish the content.
After signing in to your Web site, you can also update a catalog entry’s information from there using the context menu.

If a new catalog entry is similar to an existing one, you might find it quicker to copy the existing entry then edit the fields that are different. Moving a catalog entry is the same as moving content. See Moving or Copying Content
Deleting a Catalog Entry
Prerequisites:
- Catalog entry is not on an order, or checked out.
- You have delete permission for this catalog folder. See Also: Managing Folder Permissions
|
Best Practice Avoid deleting catalog entries due to the affect on your Web site. For example, if you delete an entry from your staging site, then run eSync, that entry is removed from all active carts on your live site. Instead of deleting entries, you should archive them using the Properties tab’s Archived checkbox. |
If you want to prevent customers from purchasing an item, but you cannot delete it because it has been placed on existing orders, you have 2 options.
- Uncheck its Buyable checkbox, located on the Properties screen. If you do, the product still appears on your Web site, but the Add to Cart button does not appear next to it.

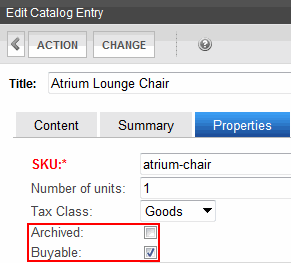
(This is the Drop-down text)
- Archive it, using the Archived check box on the Properties screen (circled above). In this case, the product does not appear on your Web site.
To delete a catalog entry:
- Navigate to the catalog folder that contains the entry.
- Click the entry.
- Choose Action > Delete. A warning message appears.
- Click OK. The catalog entry is deleted.
Tabs on the Catalog Entry Screen
- Content—The entry’s content page. See Also: Entering a Catalog Entry’s Content
- Summary—The content summary, by default the first 40 characters of the content text. See Also: Entering a Catalog Entry’s Summary
- Properties—eCommerce information about the catalog entry:
- SKU number
- Number of Units
- Tax Class
- Archived
- Buyable
- Dimensions
- Inventory
- Entering a Catalog Entry’s Properties
- Pricing—Lets you define list and sales price
- For each enabled currency, you can set a fixed price or have it float with exchange rate
- Allows tier pricing
- For subscription products, you enter recurring billing interval and term
- Entering a Catalog Entry’s Price Information
- Attributes—Additional information to help describe a catalog entry. See Also: Entering a Catalog Entry’s Attributes
- Media—Lets you add images that appear on several eCommerce server controls. See Also: Entering a Catalog Entry’s Media
- Items—Catalog entries that you are adding to this “umbrella” item. See Also: Entering a Catalog Entry’s Items
- If you add catalog entries to a simple product, it becomes a complex product. See Also: Creating a Complex Product
- For bundles, add catalog entries that make up a bundle.Creating a Bundle
- For kits, enter groups and their options.See Also: Creating a Kit
- For subscription products, define membership and Ektron user groups to which users are assigned when they purchase the subscription.Creating a Subscription
- Metadata—Enter meta tags, title tags, and so on. Working with Metadata When viewing the metadata screen in view mode only, you see the catalog entry’s Product Icon. The product icon is set on the Media tab. See Also: Images in eCommerce
- Alias—View and edit the catalog entry’s primary manual alias. View all automatic aliases assigned to this catalog entry. This tab only appears if Aliasing is enabled.See Also: Creating User-Friendly URLs with Aliasing
- Schedule—Lets you control when a version of a catalog entry becomes visible on the Web site. Similarly, you can remove a catalog entry on a predetermined date and time. The Archive and remain on the site option is not available with catalog entries.Scheduling Content
- Comment—View comments on changes made when editing a catalog entry. To view and edit catalog entry comments, open the editor and choose Change > Comment. The comment also appears on the View Content and Content History screens. Use it to help distinguish one version from another.
- Tasks—View tasks assigned to this catalog entry. To add a task from the View Entry screen, click Action > Add Task. See Also: Assigning and Managing Tasks
- Category—Add a taxonomy category to the catalog entry. A list of available taxonomies and whether one is required are defined on the Catalog properties screen. This tab only appears if at least one taxonomy is assigned to the catalog folder.Taxonomy
Menu Options on the Catalog Entry Screen
- Action Menu
- Save—Saves the catalog entry without leaving the editor. It is a good idea to save your work frequently.
- Check in—Save and check-in the document. This action returns the changed content to the database and exits the editor. It does not submit the content into the approval chain. Rather, it allows you and other users to continue changing it.
- Submit/Publish
- Submit the content into the approval chain. This action also returns the new or updated content to the database and exits the editor.
- Publish the content to the Web site. Only the last approver in the approval chain sees this button. If no approval chain is assigned to the content’s folder, every authorized user sees this button. See Also: Approval Chains. This action also returns the changed content to the database and exits the editor.
- Undo checkout—Exit screen and do not save changes made since you began editing this catalog entry.
- Change Menu
- Comment—Enter comments on changes made when editing a catalog entry. The comment also appears on the View Content and Content History screens. Use it to help distinguish one version from another.
- Template—A folder’s default template is automatically applied to all content in the folder. However, you can change a content item’s template to any of those assigned to the folder. See Also: Finding and Viewing Content
Entering a Catalog Entry’s Content
The Content tab displays the content page of this catalog entry’s product type. Because the format is customized for your system, this documentation cannot explain how to respond to the fields.
To learn about working with the editor, see Using Content Editors in Ektron.
Entering a Catalog Entry’s Summary
Creating summary information for a catalog entry is done the same as with any other type of content. See Writing a Summary for Content.
Entering a Catalog Entry’s Properties
The Properties screen collects eCommerce-specific information about your catalog entries:
- SKU—Enter a unique SKU code for this catalog entry. This is a required field that does not accept a value of zero (0) or a space character.
- Number of Units—If this item has a quantity other than one (1) for internal record-keeping purposes only, enter that number.
For example, a 12 pack of soda. Set Quantity is 12 to represent the number of units. But a customer still orders 1 of the item.
The quantity is not used when this item is ordered, nor does it affect inventory levels. It is used for clerical purposes only.
- Tax Class—Select the catalog entry’s Tax Class. See Also: The Tax Class Screens
- Archived—Check this box if you want to archive this catalog entry. When archived, customers can no longer see nor order it. Also, Ektron users cannot view an archived catalog entry in its catalog folder via the View Folders screen. To view it, open its catalog folder then select View > Archive.
To make the entry available again on your Web site, open its archive folder, edit the entry by unchecking the Archived check box, and publish it.
A catalog entry can also be set to Archived status if it reaches its expiration date and its Schedule tab > Action on End Date field is set to Archive and remove from site (expire).
- Buyable—To let customers add this catalog entry to a shopping cart, check this box. Otherwise, uncheck it.
If a product is not buyable, it can still be seen by customers, but its product page does not display an Add to Cart button.
- Dimensions—Used to calculate packaging containers and shipping costs. See Also: Packages
- Tangible Item—Check this box if the item is tangible, that is, it has dimensions, weight, and will be shipped to a customer. Examples of non-tangible items are services, warranties, and downloadable software. If a catalog entry is tangible, you must enter its height, width, length, and weight.
- Height—Enter the catalog entry’s height. The units of measure are specified in the
web.configfile’sek_measurementsystemproperty. - Width—Enter the catalog entry’s width.
- Length—Enter the catalog entry’s length.
- Weight—Enter the catalog entry’s weight.
- Inventory—eCommerce’s inventory system is a provider model, allowing you to connect with third-party inventory systems.
- Disable Inventory—Check this box if you do not want to track inventory activity for this catalog entry. As examples, it is a service contract or a subscription to confidential content on your site.
- In Stock—Enter the number of items on hand for this catalog entry. This number is automatically adjusted when an order containing this entry is submitted. For example, there are 100 items in stock. When an order for 10 is submitted, the In Stock value changes to 90. If the amount placed on an order exceeds the In Stock amount, the customer see this message “The item ... is not available for purchase. Please remove from cart before submitting order.”
- On Order—The number of items that have been ordered but not yet delivered appears.
- Reorder—Enter the In Stock quantity at which you need to reorder this item. When the In Stock quantity reaches this level, an event is triggered which can be used by an external inventory system to generate a new order.
Entering a Catalog Entry’s Price Information
Use the Pricing screen to enter price information for catalog entries.
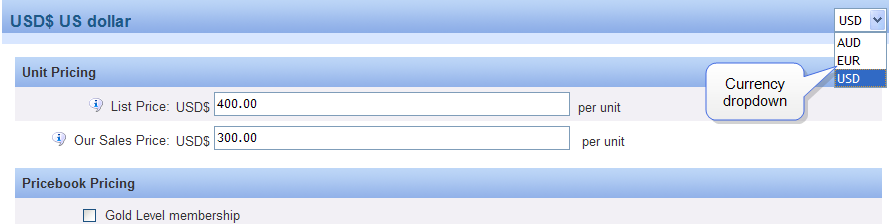
- Currency selector—Use this drop-down to select a currency for the prices. See Also: Alternate Currency Pricing. Only enabled currencies appear. See Also: Enabling Currencies .
- List Price—Enter the catalog entry’s list, or manufacturer’s suggested retail, price. The list price appears on most eCommerce controls but is not used in any calculations.
- Our Sales Price—Enter the catalog entry’s sale price. This price is used to calculate line item totals, coupon discounts, shipping costs, and so on. The sales price appears on most eCommerce controls. .
- Pricebook Pricing—See Also: eCommerce Pricebook Feature
- Add Pricing Tier—See Also: Tier Pricing
- Recurring Billing (appears only for subscription-based products)—See Also: Creating a Subscription
Alternate Currency Pricing
By default, the Pricing screen converts prices to every enabled currency using the exchange rate. Customers who select a non-default currency see these prices. See Also: Defining and Updating Exchange Rates
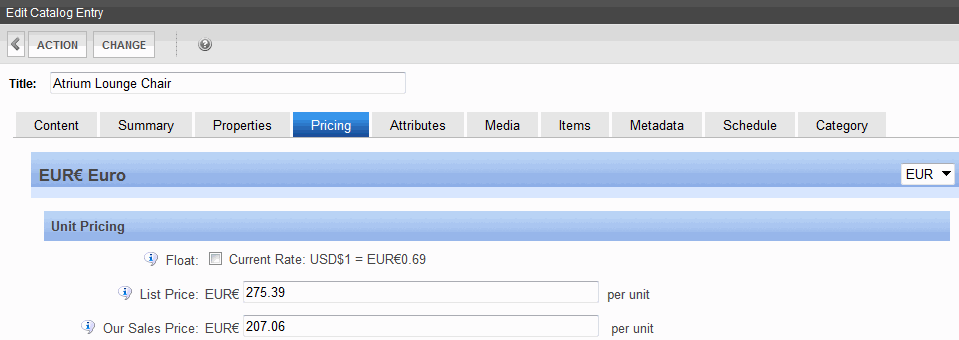
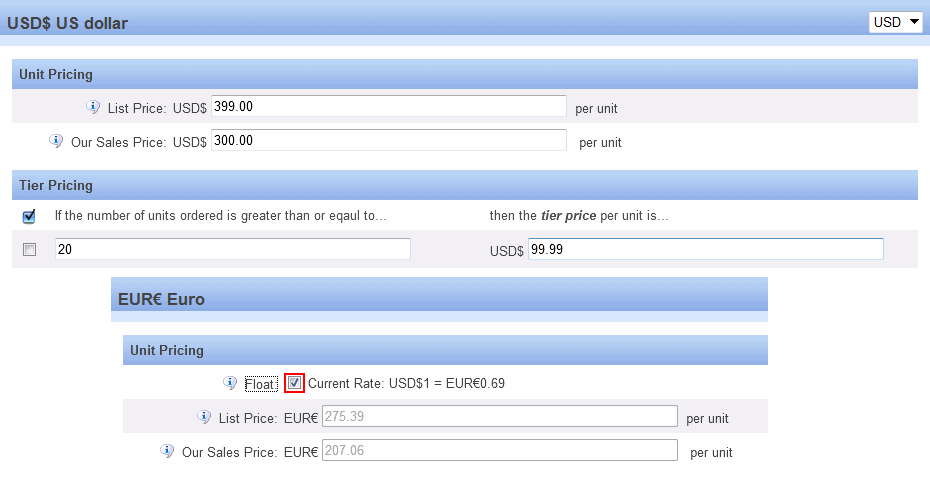
The Float checkbox (checked by default) indicates that prices change as the exchange rate changes.
If you do not want to float a catalog entry’s price, but instead fix it for a currency, select the currency, uncheck Float, edit the price, and publish. From then on, if a customer selects that currency and catalog entry, the price set on this screen is used. The exchange rate is ignored.
For example, a television costs 700 Euros, regardless of its cost in US dollars or the exchange rate. To incorporate this, do not check the Float checkbox.
When you first select EUR on the Pricing screen, the default currency’s prices are converted using the exchange rate. For example, the television’s sale price is $1000 US dollars, and today’s exchange rate is .7811. When you select Eur from the Pricing screen’s currency selector, the television’s cost is set at 781.10 Euros. You change the price to 700.00 Euros.
From that point on, the Euro price only changes if an authorized user accesses this screen and changes it manually.
Tier Pricing
eCommerce supports tier pricing, that is, a pricing schedule that adjusts according to order quantity. Typically, the price is reduced as more items are ordered. For example, if a visitor orders 1-5, items are $10.00 each; 6-10, $9.00 each; 11 or more, $8.50 each.
Tier pricing is not supported for subscription products, nor for complex products.
To set up tier pricing:
- In the Workarea, open the catalog folder containing the entry to which you want to apply tier pricing.
- Edit the catalog entry.
- Click the Pricing tab
- Click Add Pricing Tier. The Tier Pricing screen section appears.

- In the left column, enter the quantity of items above which the tier price is used.
- In the right column, enter the price to be used when an order quantity exceeds the number in the left column.
- Enter as many tiers as necessary.
NOTE: To remove a tier, check the box to its left, then click Remove Pricing Tier.
Tier Pricing and Non-Default Currencies: When Floated
If a non-default currency is floated, then that currency’s pricing tiers mirror the default currency’s pricing tier values. The amounts are adjusted by the exchange rate.
These values appear on pricing screen in view-only mode and cannot be changed.
If pricing tiers are set up for the default currency and the user unchecks the Float box, the user is notified that the pricing tiers can now be edited. Next, Tier Pricing fields are loaded with the existing values but the user can change values, remove existing tiers, and add new ones.
Tier Pricing and Non-Default Currencies: When Not Floated
If a non-default currency is not floated, its pricing tiers are independent of the default currency’s. That is, they do not exist initially regardless of whether they exist for the default currency. If the user clicks Add Pricing Tier, Tier Pricing fields appear and let the user enter number of units and corresponding tier price per unit.
If pricing tiers are set up for a non-default currency and the user checks the Float box, the pricing tiers are changed to mirror those of the default currency. If the default currency has no pricing tiers, then that currency has none. You cannot independently edit a non-default currency’s pricing tiers if Float is checked.
eCommerce Pricebook Feature
eCommerce's Pricebook feature lets you set up a separate pricing schedule for any number of products. You then create criteria that determine which users get the separate pricing. The criteria can use any user properties available through the API, such as membership group, device used to access your site, originating URL, location, and so on.
For example, you create a gold level of membership. Gold level members pay $30.00 for an item, while non-group members pay $35.00 for the same item.
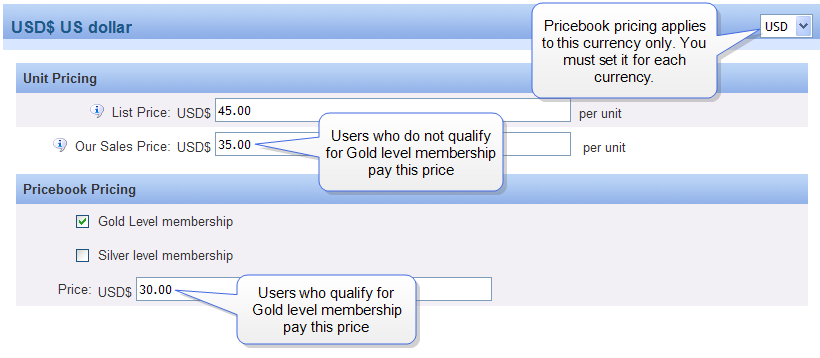
When applied, the Pricebook price replaces the sales price. All subsequent calculations (taxes, shipping, coupons, and so on) use the Pricebook price.
Your eCommerce system supports any number or Pricebooks.
Creating a Pricebook
- In the Workarea, go to Settings > Commerce> Configuration > Pricebooks.
- Click New > Pricebook.
- Enter a Name and Description.
- If you want to activate the Pricebook, check Enabled.
- Click Add (
 ). Now, you can apply this Pricebook to catalog entries.
Applying a Pricebook to a Catalog Entry
- In the Workarea, go to Content > an eCommerce folder that contains the catalog entry to which you want to apply Pricebook pricing.
- Edit the catalog entry.
- Click its Pricing tab.
- From the currency drop-down, select the currency for which you want to apply Pricebook pricing. You must select every currency for which you want to apply the Pricebook pricing.
- In the Pricebook pricing screen area:
- Check the Pricebook for which you want to apply pricing.
- Enter the Pricebook price.
- Click Action > Save, Checkin or Submit/Publish.
Setting up a Pricebook
- Create the Pricebook: a name and an ID
- Edit the Pricing screen of each catalog entry for which you want to apply Pricebook prices. For each currency, choose one or more Pricebooks and set the price.
- Create logic that assigns a user to a Pricebook upon login.
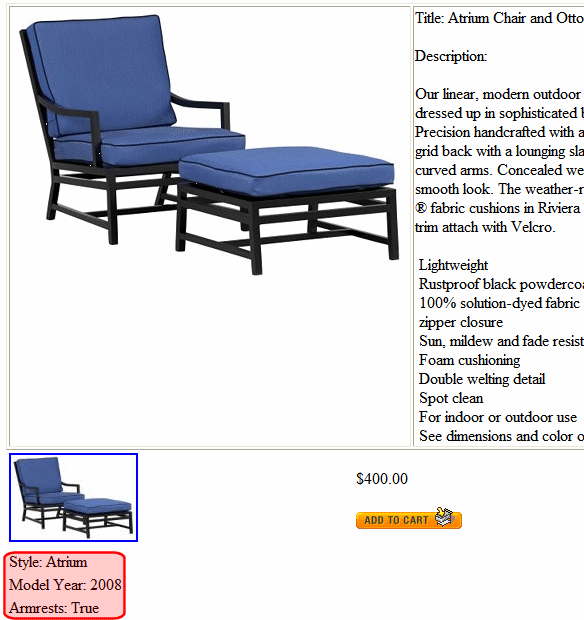
Entering a Catalog Entry’s Attributes
Attributes are additional pieces of information that help describe a catalog entry. Attribute fields, data types, and default values are created as part of a Product Type. When you create a catalog entry, you base it on a product type. The product type’s Attribute information is imported to the catalog entry. Like metadata that follows Ektron content, if a catalog entry is moved to another folder, its attributes stay with it.
To illustrate the concept, the following attributes are applied to furniture in Ektron’s sample site.
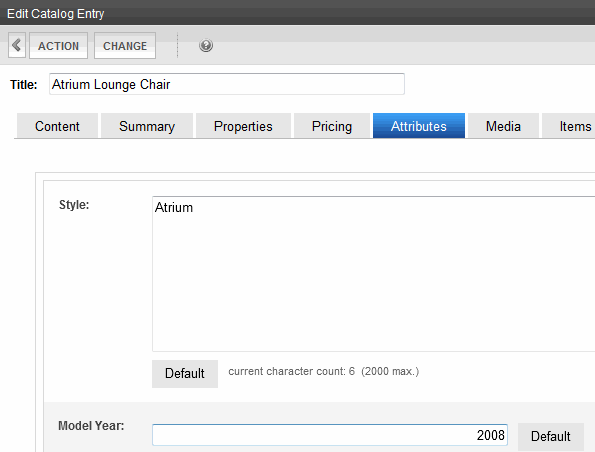
In the Workarea, you select a catalog entry then click the Attributes tab to enter or modify attribute values. If no attributes are assigned to the product type on which a catalog entry is based, you will not see an Attributes tab when working with that catalog entry. You could change model year to 2009, or style to Woodland. You cannot however change fields, field names, or data types.
On your Web site, a catalog entry’s Attribute field names and values appear by default on the Product server control.
Entering a Catalog Entry’s Media
Use the Media tab to add product images that appear on the following server controls.
- Product (the smallest thumbnail may appear)
- Product List
- Product Search
- Recommendation
See Also: Images in eCommerce
Adding a New Image
- Click the Media tab.
- Click Add New Image. The add New Image dialog box appears.
- Enter an image Title (required).
- Enter the image’s Alt text (required).
- Click Browse and navigate to the image you want to add.
- Click Upload. The image is uploaded to the
siteroot/uploadedimagesfolder and you are returned to the Media tab. The uploaded image appears on the screen, below any existing images. - Determine if you want the image’s smallest thumbnail to appear on the Product server control by selecting Yes or No next to Gallery Display. (See example below).
- If you want to designate the image as the product icon, click Set as Product Icon.
Image thumbnails and product icons are described in Images in eCommerce.
When an image is uploaded to the Media tab, the original image and any thumbnails associated with it are added to the Library. For example, if you add an image named “TestImage” (actual file name: “case.jpg”) with a 150px and 50px thumbnails, you see the following entries in your library (File Name - Path):TestImage - /~siteroot~/uploadedImages/case.jpgcase[filename]150 - /~siteroot~/uploadedImages/case[filename]150.jpgcase[filename]50 - /~siteroot~/uploadedImages/case[filename]50.jpg
If you assign several images to an eCommerce catalog entry, and want to allow searching for that catalog entry by image file name, the search only works with the first image assigned to the catalog entry.
Editing an Existing Image
NOTE: You cannot change an existing image. If you need to do this, delete the image you do not want, then add the correct one. You can only edit the Title and Alt Text.
- Click the Media tab.
- Move the cursor to the field that you want to edit.
- Click the pencil icon to the right of the field.>
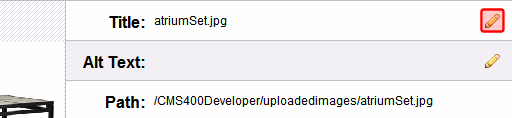
- Update the text as needed.
- Click OK (
 ).
).
Determining Thumbnail Size
When you create a catalog entry, you base it on a Product Type. The selected product type’s Media Defaults information determines the sizes of thumbnails created for each image assigned to the Media tab.
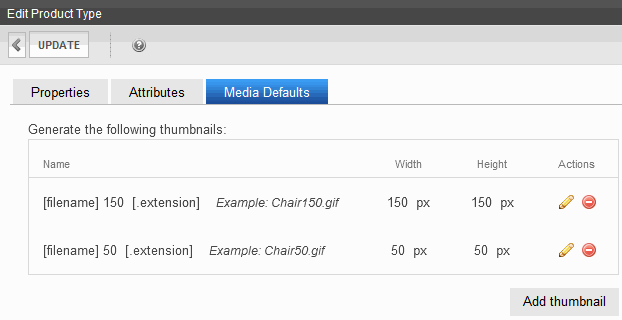
- If the image is less than both thumbnail dimensions (height and width), it appears full size.
- If the image is greater than the thumbnail’s dimensions, the image is reduced proportionately, scaling its dimensions to the thumbnail size.
The Default Image
If you do not assign an image to a catalog entry, but one is assigned to appear on a server control, the following default image is used.

If you want to change the default image, edit the following file:
siteroot/WorkArea/images/application/Commerce/productImageBackground.gif
Entering a Catalog Entry’s Items
Use the Items tab to add additional information to the current entry. You can only choose a catalog entry whose language matches the language of the original item. It is used in these situations:
- to select the catalog entries that make a product into a complex product.
- to select the catalog entries that make up a bundle.
- to select the groups and their options that make up kits.
- to select a subscription-based catalog entry’s user groups. See Also: Assigning Groups to a Subscription-Based Catalog Entry
Folder View Menu options
New Menu
- Catalog—Create a new catalog folder underneath the current one. See Also: Creating a Catalog Folder
- product types assigned to folder—Create a new catalog entry based on one of the displayed product types. Your product types may not match the ones shown below. Product types are assigned to a catalog’s via the Product Types screen. See Also: Creating Product Types
View Menu
- All types, Products, Kits, Bundles, Subscriptions—Lets you change the display of catalog entries. You can see all entries in folder, or only those of a selected product class.
- Language—Limits display of catalog entries to one language. Also determines the language of any new catalog entries you create in this folder.
- Archive—Displays archived catalog entries.
- Catalog Properties—Lets you view and edit catalog folder information.
Delete Menu
- This Catalog—Lets you delete a catalog folder.
- Entries—Lets you delete a catalog entry within a folder. You cannot delete a catalog entry that has been placed on any order. The order’s status is irrelevant.
Action Menu
- Move entry—Move catalog entry. You can only move catalog entries -- you cannot copy them. See Also: Managing Versions of Content
- Search—Search for a product. See Also: Searching the Workarea
Content View Menu Options
Action Menu
- Edit—Edit the catalog entry.
- Delete—Delete a catalog entry.
- Link Search—Locates all content that includes a Quicklink to the displayed catalog entry. This feature is useful before deleting a catalog entry, because it informs you of every entry that will include a “dead” link if you delete that entry. You should then edit those catalog entries and remove or change the obsolete Quicklinks.
- Add Task—Assigning and Managing Tasks
View Menu
- Content History—Lists every version of the content available in Ektron. After viewing the View Content History window, you can click any version to see its detail. See Also: Managing Versions of Content
- View Approvals—Access the catalog folder’s approval chain. See Also: Approval Chains
- View Permissions—Access the catalog folder’s permissions table. See Also: Managing Folder Permissions
- Cross Sell—Lets you assign cross sell items to this catalog entry. See Also: Adding Cross Sell and Upsell Recommendations to a Catalog Entry
- Up Sell—Lets you assign up sell items to this catalog entry. See Also: Adding Cross Sell and Upsell Recommendations to a Catalog Entry
- View Properties—Lets you:
- view the catalog entry’s product type
- view the Flagging Definitions assigned to the catalog entry’s folder
- view and edit the Content Searchable setting See Also: Ensuring Your Content is Searchable
Reports Menu
- Content Statistics—User-Ranking of Content
- Analytics—Provides a visual display of order information for a selected catalog entry. See Also: eCommerce Analytics
Editor View Menu Options
- Save—Save the content without leaving the editor. It is a good idea to save your work frequently.
- Check in—Save and check-in the document. This action returns the changed content to the database and exits the editor. It does not submit the content into the approval chain. Rather, it allows you and other users to continue changing it.
- Submit or Publish—Submit the content into the approval chain. Publish the content to the Web site. These actions also return the new or updated content to the database and exits the editor. Only the last approver in the approval chain sees this button. If no approval chain is assigned to the content’s folder, every authorized user sees this button. See Also: Approval Chains
- Undo Checkout—Close the editor without saving changes.
Change Menu
- Comment—Briefly describe the content, or comment on changes made when editing content. The history comment appears on the View Content and Content History screens.
- Template—Lets you specify one or more templates for catalog entries in this folder. These entries use the specified template when appearing on your Web site. See Also: Working with Templates
Product Server Control
The Product server control lets customers view the details of a product and add it to their cart. To display a product on a Web page, drag and drop a Product server control on a template and enter a product ID in the DefaultProductID property. You could also dynamically pass a product’s ID to the control by setting DynamicProductParameter property to the QueryString parameter used for product IDs.
This control handles each class of product Ektron provides. This means the Product server control displays Products, Kits, Bundles or Subscriptions without having to make any adjustments to the control.
Customers typically reach this server control when they click a product from either the ProductSearch or ProductList server control. When customers clicks a product, title or image in either of these controls, they are forwarded to the Product server control.
In addition, customers can reach this control from the Cart server control. In that control, customers click a product’s title and are taken to the Product server control.
When a customer has viewed the product and decided to purchase it, they click Add to Cart in the control.
Displaying a Product
A product is an item that has no kit, bundle or subscription information associated with it.
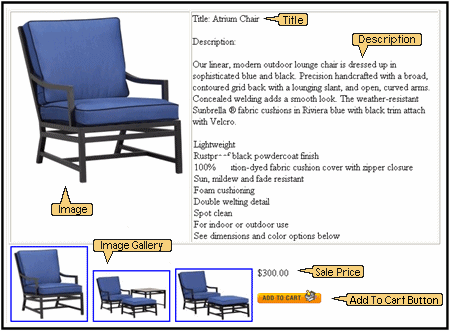
When displaying a simple product, the Product server control displays the following information:
- Title (optional)—The Title field in the product’s Smart Form. A content editor enters this information when creating a product in the Workarea. This area does not use the title of the product in Ektron’s Workarea.
- Description (optional)—The Description field in the product’s Smart form. A content editor enters this information when creating a product in the Workarea.
- Image Gallery—The Media tab when creating or editing a product. The Gallery Display property for each image on the Media tab must be set to Yes. In the Image Gallery, images are displayed at their smallest size. When a customer clicks an image, the full size version appears. See Also: Entering a Catalog Entry’s Media
- Price—The Pricing tab when creating or editing a product. This is the price defined in the Our Sales Price area. This is not the list price. See Also: Entering a Catalog Entry’s Price Information
- Add to Cart—This button appears in the server control when:
- a path to the Cart server control is defined in the
Templatecartproperty - the product is buyable. When a product is not buyable, information about the product appears, but customers cannot add it to their cart. This property is set in the Workarea when creating or editing a product.
- the
ShowAddToCartproperty is set to True
When customers click this button, the product is added to their cart and they are sent to a template containing the Cart server control.
You can hide this button by setting the
ShowAddToCartproperty to false. This lets you show details of a product, but not offer it for sale. For example, you have a product that is no longer for sale, but you want to allow people who purchased the product to view its details.Also, by using code-behind to dynamically set the property, you could create code that looks at your inventory system and hides the button depending on whether a product is in stock.
- a path to the Cart server control is defined in the
Using the Add to Cart Button with Aliasing
When a product has an alias path associated with it:
- Make sure the
TemplateCartproperty’s path is relative to the site root. For example:TemplateCart="Developer/Commerce/CartDemo.aspx"
- Add the following to the code-behind page. This example is in C#:
protected void Page_Init(object sender, EventArgs e)
{
  Utilities.RegisterBaseUrl(this.Page);
}
Displaying a Bundled Product
A bundled product is made up of multiple products that have been grouped together for sale as one product.
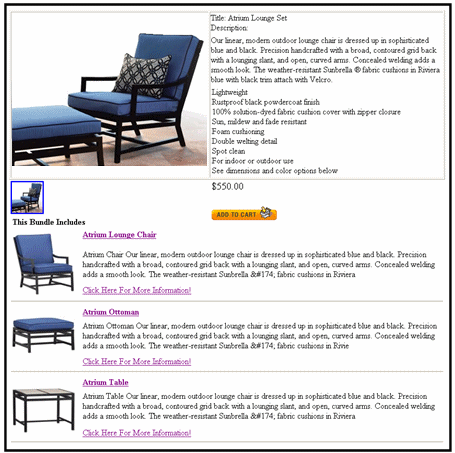
See Also: Creating a Bundle
When displaying a bundled product, the Product server control displays all information displayed in a Product as well as information about the individual components of the bundle.
The This Bundle Includes area includes products listed on the Items tab for a Product Bundle in the Workarea. A content editor adds existing products to this tab when creating the bundle.
Any products on the tab are displayed with the image, title and description for each product. A link to additional information about each product is also displayed.
Displaying a Complex Product
A Complex Product lets the customer choose between variations of a product. For example, if your site sells books, variant selections might be Paperback or Electronic.
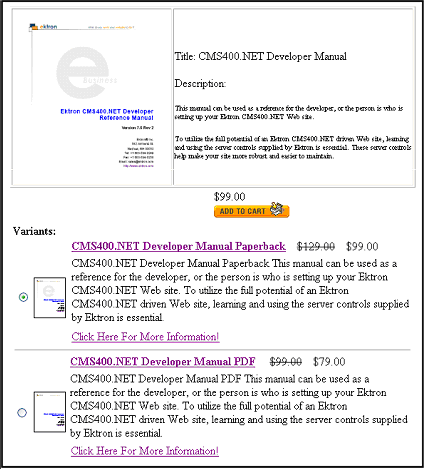
See Also: Creating a Complex Product
When displaying a Complex Product, the Product server control displays all of the information displayed in a Product in addition to information on product variants. The Variants area includes products listed on the Items tab. A content editor adds products to this tab when creating content.
Products on the Items tab are displayed with a radio button, image, title and description. A link to additional information about each product is also displayed. The radio buttons are used to select which product will be added to the cart.
Displaying a Kit
A kit lets the customer select product options, which can affect the product’s price. There is no limit to the types of options you can add, nor to the number of items in an option. For example, a customer purchasing a computer can add RAM, a hard drive, and a larger monitor.
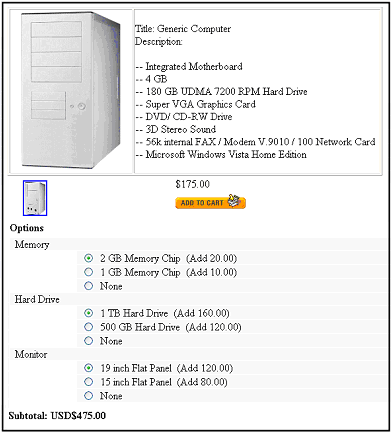
See Also: Creating a Kit
When displaying a kit, the Product server control displays all information displayed in a product in addition to options and subtotal information.
The Options area displays product options based on the Item tab for a kit in the Workarea. Options are divided into groups. A radio button, name and price appears for each item. The radio button lets you select one item from each group.
The Subtotal area shows the updated cost of the product with all options.
Product Server Control Properties
The following are Ektron-specific server control properties. You can find information about native .NET properties such as font, height, width and border style in Visual Studio® help.
- Authenticated (String)
Indicates if you are logged into the CMS Explorer and can use it to browse to content, collections, and so on. See Also: Browsing Your Ektron Site Using CMS Explorer.
- CacheInterval (Double)
The number of seconds that the server control’s data is cached. The default is 0 (zero). For example, if you want to cache the data for 5 minutes, set to 300. See Also: Caching with Server Controls.
- CustomXml (Code-behind Only) (String)
Lets you inject custom XML into the generated XML before being processed by the XSLT. Enter a string of XML that you want to make available to the XSLT as follows:
<root><customXml>custom-xml-inserted-here</customXml></root>
See Also: Displaying Custom XML in Ektron’s Server Controls.
- DefaultProductID (Integer)
Enter a default product’s ID. This is the default product that’s displayed when the template containing this control is viewed by a customer and a product ID is not dynamically passed. To make this server control dynamic, enter zero (0) for this property and set the
DynamicProductParameterto the QueryString parameter used to pass the product ID. - DisplayXslt (String)
If desired, enter a relative or absolute path to an Xslt that determines the display of the page. By default, the control uses
product.xsl. This file is located insiteroot\Workarea\Xslt\Commerce.See Also: The OverrideXslt and DisplayXslt Properties. - DoInitFill (Boolean)
By default, Fill occurs during the Page_Init event. Set to false if you want to postpone the fill-action until later. In this case, Fill is automatically called during the Page Render event. You might do this if you need to set or change a property on the control in code-behind and have it render with your changes shown.
- DynamicParameter (String)
The QueryString parameter name which is used to read the product ID. For example, if your QueryString parameter for products is ID, enter that in this property. Then, when customers views a product’s details, the product’s ID is passed to this control.
- Hide (Boolean)
Hides or displays the output of the control in design time and run time.
- True—Hide the control output.
- False—Display the control output.
- ImageGallery (ImageGalleryType)
Determine if the image gallery appears along with a product’s information. Images that appear in the gallery are set in the Workarea’s Media tab when creating or editing a product. The Gallery Display property for each image on the Media tab must be set to Yes. To set images on the Media tab, t
- List—display gallery images
- None—hide gallery images
In the Image Gallery, images are displayed at their smallest size. If a customer clicks an image, a full size version appears.
- Language (Integer)
Set a language for viewing content; shows results in design-time (in Visual Studio) and at run-time (in a browser).
- OverrideXslt (Integer)
Specifies an XSLT identified in the Edit Product Type Configuration screen.
- ShowAddToCart (Boolean)
Set to true if you want to the Add to Cart button to appear. The default is True. Setting this property to false lets you show details of a product, but not offer it for sale. For example, you have a product that is no longer for sale, but you want to allow people who purchased the product to view its details. Also, by using code-behind to dynamically set the property, you could create code that looks at your inventory system and hides the button depending on whether a product is in stock. You could also accomplish this for a specific product by removing the check from the Buyable property when creating or editing a product in the Workarea.
- SuppressWrapperTags (Boolean)
Suppresses the output of the span/div tags around the control.
- True—Suppress wrap tags.
- False (default)—Allow wrap tags.
- Stylesheet (String)
Specify the path to a style sheet for use with this server control. The location can be relative or absolute. Leave blank to use the default style sheet.
- TemplateCart (String)
Enter the URL path of the template that contains the Cart server control. The path can be relative or absolute. See Also: Cart Server Control and Using the Add to Cart Button with Aliasing
IMPORTANT: If you specify an external file, do not store this file in the Workarea folder. If you store this file in the Workarea folder, the file will be lost when you upgrade.
The OverrideXslt and DisplayXslt Properties
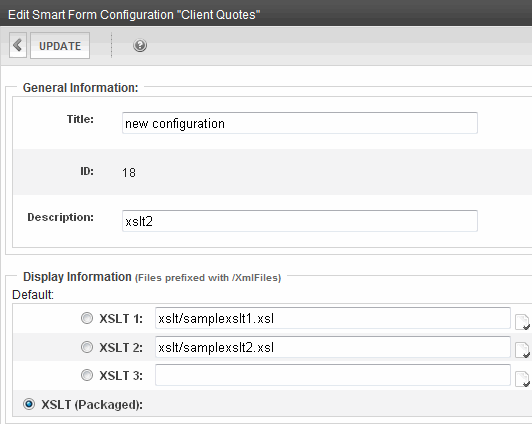
The DisplayXslt property is optional. If used, it specifies an external XSLT file. If the DisplayXslt property is not defined, the OverrideXslt property specifies an XSLT identified in the Edit Product Type screen. The following table provides more information about these properties.
|
To use this display XSLT |
Enter this value for DisplayXslt |
Enter this value for OverrideXslt |
|
The default XSLT specified in the Edit Smart Form Configuration screen. Note that, in this example, the XSLT Packaged option is the default XSLT, since it is selected. XSLT Packaged is the XSLT from the Edit Smart Form Configuration screen (that is, the XSLT created in the Data Designer).
|
|
0 |
|
XSLT 1 from the Edit Smart Form Configuration screen |
|
1 |
|
XSLT 2 from the Edit Smart Form Configuration screen |
|
2 |
|
XSLT 3 from the Edit Smart Form Configuration screen |
|
3 |
|
An absolute or relative path to an XSLT file. |
An external XSLT file not specified in the Edit Product Type Configuration screen. For example
|
No value required. If XSLT value exists, OverrideXSLT is ignored |
ProductList Server Control
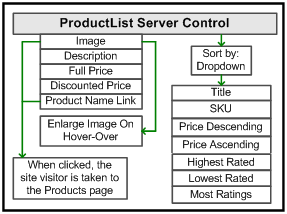
The ProductList server control displays a list of products on a Web page.
NOTE: Private catalog entries appear in display of the Product List server control only if the user is logged in and has at least Read-Only permissions for its catalog folder. See Also: Making Content Private
You decide which products appear by selecting a SourceType and populating either the SourceId or the IdList property, depending on the source type. You can choose from these source types.
|
If you want to display |
Set the SourceType property to |
In the |
In the |
|
All products for a selected catalog |
Catalog |
The ID of the catalog |
|
|
All products across multiple catalogs |
CatalogList |
|
A comma separated list of catalog IDs |
|
All products for a selected taxonomy |
Taxonomy |
The ID of the Taxonomy |
|
|
All products across multiple taxonomies |
TaxonomyList |
|
A comma separated list of taxonomy IDs |
| All products for a selected collection | Collection | The ID of the Collection | |
|
Display a list of products |
IdList |
|
A comma separated list of product IDs |
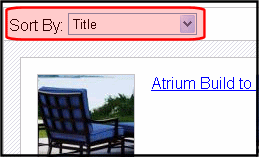
Sorting the Product List
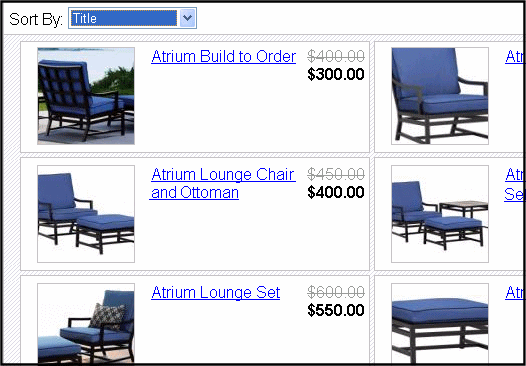
The ProductList server control lets a customer sort by:
- Title
- SKU
- Price High to Low
- Price Low to High
- Highest Rated
- Lowest Rated and Most Ratings
You can set the default sort order by setting the SortMode property.
For the Highest Rated, Lowest Rated and Most Ratings sorting options to work as intended, ContentReview server control should be associated with each product. (See Also: ContentReview Server Control) This lets customers rate your products.
For example, place a ContentReview control on the Master page of the template that display products, and set its DynamicParameter property to ID. Then, when customers view the product, they can rate and comment on it.
Flow of the ProductList Server Control
There are several ways customers might arrive at the ProductList server control, such as
- when a list of products appears on the side of a page
- through a link in a master page
- when they click Continue Shopping on the Cart or Checkout server control.
ProductList Server Control Properties
The following are Ektron-specific server control properties. You can find information about native .NET properties such as font, height, width and border style in Visual Studio® help.
- Authenticated (String)
Indicates if you are logged into the CMS Explorer and can use it to browse to content, collections, and so on. See Also: Browsing Your Ektron Site Using CMS Explorer.
- CacheInterval (Double)
The number of seconds that the server control’s data is cached. The default is 0 (zero). For example, if you want to cache the data for 5 minutes, set to 300. See Also: Caching with Server Controls.
- CustomXml (Code-behind Only) (String)
Lets you inject custom XML into the generated XML before being processed by the XSLT. Enter a string of XML that you want to make available to the XSLT as follows:
<root><customXml>custom-xml-inserted-here</customXml></root>
See Also: Displaying Custom XML in Ektron’s Server Controls.
- DisplayXslt (String)
If desired, enter a relative or absolute path to an Xslt that determines the display of the page. By default, the control uses
ProductList.xsl. This file is located insiteroot\Workarea\Xslt\CommerceIMPORTANT: If you specify an external file, do not store this file in the Workarea folder. If you store this file in the Workarea folder, the file will be lost when you upgrade.
- DoInitFill (Boolean)
By default, Fill occurs during the Page_Init event. Set to false if you want to postpone the fill-action until later. In this case, Fill is automatically called during the Page Render event. You might do this if you need to set or change a property on the control in code-behind and have it render with your changes shown.
- DynamicParameter (String)
Sets the QueryString parameter to read a source’s ID dynamically. For example, if your QueryString parameter for a source ID is SID, enter that.
- GetAnalyticsData (Boolean)
Set to
trueif you want the average ratings for this product to appear within the product display, as shown below. (Notice the stars below the price of the item.)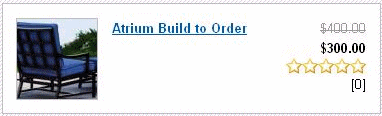
Below the rating (shown as one through five stars) is a number indicating how many customers have rated the product. For more information on letting customers rate your products, see ContentReview Server Control.
IMPORTANT: This property only provides reliable data when the Business Analytics Feature is on. Business Analytics.
- Hide (Boolean)
Hides or displays the output of the control in design time and run time.
- True—Hide the control output.
- False—Display the control output.
- IdList (String)
Enter a comma separated list of IDs when the
SourceTypeproperty is set to IdList, TaxonomyList or CatalogList. - Language (Integer)
Set a language for viewing content; shows results in design-time (in Visual Studio) and at run-time (in a browser).
- LoadingImage (String)
The image to display while the Product List is loading.
The default is
siteroot\Workarea\images\application\ajaxloader_circle_lg.gif. - OrderBy
(SortMode property must be set to None)
For further definition of the values shown here, see the entryPropertyenumeration in the API documentation. Documents are located at this URL: http://ektron.com/Resources/Product-Documentation/
- AverageRating
- CatalogId
- CollItemsDisplayOrder (only available if
SourceTypeproperty = Collection) - ContentStatus
- CurrencyId
- EndDate
- EntryType
- GoLIve
- Html
- Id
- IsArchived
- IsBuyable
- IsPublished
- LanguageId
- LastEditDate
- LastEditorFirstName
- LastEditorLastName
- ListPrice
- Media
- NumberRated
- ProductTypeId
- SalesPrice
- Sku
- Status
- Summary
- TaxClassId
- TaxItemsDisplayOrder (only available if
SourceTypeproperty = Taxonomy) - Title
- ViewCount
- PageSize (Integer)
Specify the number of items to show per page when a customer views the product list. If the number of items exceeds the quantity defined in this property, the list is paged and the customer can use the paging navigation system to move through the list.
- PageSpan (Integer)
The number of pages to show before and after the current page. Enter zero to show all pages.
For example, if you set this property to 2 and you are on page four of the product list, you see:

- SortMode (SortModes)
Select the default way the product list is sorted when a customer first views the page. When the page is loaded, a customer can change the sort via a drop-down list. Choices are:
- Title—sorts in alphabetical order.
- SKU—sorts by the product number. This number is typically a unique number supplied by the producer of the product.
- Price Descending—sorts by price from highest to lowest.
- Price Ascending—sorts by price from lowest to highest.
- Highest Rated—sorts by rating from highest to lowest.
- Lowest Rated—sorts by rating from lowest to highest.
- Most Rated—sorts by products that have most ratings from highest to lowest.
- None—Use this setting to use OrderBy property.
See Also: Sorting the Product List
- Title—sorts in alphabetical order.
- SourceId (Integer)
The ID of the catalog, collection or taxonomy that is being used as a product list. This property is used when the
SourceTypeproperty is set to Catalog, Collection or Taxonomy. - SourceType (SourceObjectType)
The type of source being used to create the list. Choices are:
- Catalog—use the
SourceIdproperty to specify the ID of a single catalog when this source type is selected. - CatalogList—use the
IdListproperty to specify a list of catalog IDs when this source type is selected. - Taxonomy—use the
SourceIdproperty to specify the ID of the single taxonomy when this source type is selected. - TaxonomyList—Use
IdListproperty to specify a list of taxonomy IDs when this type is selected. - IdList—Use the
IdListproperty to specify a list of product IDs when this source type is selected. - Collection—use the
SourceIdproperty to specify the ID of a collection when this source type is selected.
- Catalog—use the
- Stylesheet (String)
Specify the path to a style sheet for use with this server control. The location can be relative or absolute. Leave blank to use the default style sheet.
- SuppressWrapperTags (Boolean)
Suppresses the output of the span/div tags around the control.
- True—Suppress wrap tags.
- False (default)—Allow wrap tags.
- TaxonomyDepth (Integer)
Enter the number of taxonomy levels to retrieve below each taxonomy/category. Only the top level appears in the control. The rest of the levels are available through XML in Code-behind. For example, if the taxonomy is DVDs > Movies > Comedies, and you set Taxonomy Depth to 2, only DVDs and Movies are available in Code-behind.
To retrieve all categories for a taxonomy recursively, enter -1. A depth greater than 1 or using -1 is only useful if you create a custom output using the Taxonomy’s XML. The default value is 1.
For a live site, Ektron strongly recommends leaving this value at 1. Increasing this value can slow down your live Web server. However, for testing on a staging server, you can increase the depth.
- TemplateProduct (String)
Specify the URL that contains the Product server control. This allows a customer to see the details of the product when the product link is clicked.
![]()