eCommerce Configuration Screens
This section describes the configuration screens located in the Workarea at Settings > Commerce > Configuration and Settings > Commerce > Tax.
Countries
Use the Countries screen to modify existing country information or add new countries to eCommerce.
How Countries are Used
- to define country tax tables—For example, assume Canada has a national tax of 5% that applies to the sale of certain goods. National tax tables are defined in the Country Tax Tables screen.
- to determine shipping costs—In the checkout process, a purchaser selects a shipping address, which includes country. So, be sure to enable countries from which customers (site visitors) can enter orders. Countries are also part of the location on the Warehouse screen. An order’s shipping cost is determined by the distance between the warehouse and the destination.
Default Countries
By default, Ektron provides information for countries on the ISO list of English country names and code elements (http://www.iso.org/iso/country_codes/iso_3166_code_lists/english_country_names_and_code_elements.htm).
The following is provided for each country.
- name
- numeric ISO code
- long alphabetical ISO code
- short alphabetical ISO code
The countries screen lets you enter new countries, and edit information for provided countries.
Creating a Country
Prerequisite: The new country’s ISO codes
To add a new country:
- From the Workarea, choose Settings > Commerce > Configuration > Countries.
- Click New > Country.
- Enter information in the following fields:
- Name—Enter the country’s name.
- Numeric ISO—Enter the country’s ISO 3166-1 3-digit numeric ISO code. See Also: http://en.wikipedia.org/wiki/ISO_3166-1_numeric
- Enabled—Check this box if you want this country to be active. Only active countries can be selected on the Edit Billing Information screen, which appears during the Checkout procedure.
- Long ISO—Enter the country’s ISO 3166-1 alpha-3, 3-letter country code. See Also: http://en.wikipedia.org/wiki/ISO_3166-1_alpha-3
- Short ISO—Enter the country’s ISO 3166-1 alpha-2, 2-letter country code. See Also: http://en.wikipedia.org/wiki/ISO_3166-1_alpha-2
- Click Save.
Editing a Country
- Go to Workarea > Settings > Commerce > Configuration > Countries.
- Click the name of the country that you want to edit.
- Click Edit.
- Edit any of the fields, which are described in Creating a Country
Regions
The Regions screen lets you define geographic regions within countries that your eCommerce site services. For example, in the United States of America, each state is a region.
Regions are used in the same way that countries are used. See Also: How Countries are Used By default, the Regions screen includes 50 United States of America, the District of Columbia, and 9 Canadian Provinces.
Creating a Region
Prerequisite: The region’s country is defined in the Countries screen
- Go to Workarea > Settings > Commerce > Configuration > Regions.
- Choose New > Region.
- Use the following information to complete the screen.
- Name—Enter the region’s name.
- Enabled—Check this box if you want this region to be active. Only active regions can be selected on the Edit Billing Information screen, which appears when customers enter billing information during the Checkout procedure.
- Code—Enter an abbreviation for this region.
- Country—Select this region’s country from the pull down list. If the country is not there, exit this screen, and create the country using the Countries screen.
- Add another region to this country?—This field saves the effort of selecting a country when entering several regions for one country.
To add more regions for this country, check this box and press Save. When you do, the screen refreshes, and the most recently selected country appears as the default.
- Click Save.
Editing a Region
- Go to Workarea > Settings > Commerce > Configuration > Regions.
- Click the name of the region that you want to edit.
- Click Edit.
- Edit any of the fields, which are described in Creating a Region
Currencies
eCommerce supports all currencies. However, customers can choose only enabled currencies. The Currency screen lets you enable and edit information for installed currencies.
Installed Currencies
By default, Ektron provides currencies on the ISO 4217 currency names and code elements list (http://www.currency-iso.org/iso_index/iso_tables/iso_tables_a1.htm).
The following information is provided for each installed currency.
- name
- enabled (yes or no)
- numeric ISO code
- alpha ISO code
- exchange rate
Enabling Currencies
When users are setting prices in the Ektron Workarea or site visitors are shopping, they can only choose enabled currencies. When you install Ektron, the following currencies are enabled.
- U.S. dollar, the default currency. See Also: The Default Currency
- Euro
- Australian dollar
To see which currencies (other than the default) are enabled, click Action > Edit Exchange Rates from the Currencies screen. Only non-default, enabled currencies appear.
WARNING! The Euro and Australian dollar are shipped with a default exchange rate. If you will support these currencies, you should update the rate to its current value before going live. See Also: Defining and Updating Exchange Rates
To enable any installed currency:
- From the Workarea, choose Settings > Commerce> Configuration > Currencies.
- Click the currency you want to enable. (Use the Search box to quickly find a currency.) The Edit Currency screen appears.
- Check the Enabled check box.
- Click Update.
The Default Currency
The default currency is the reference currency when setting the exchange rate on the Edit Currency screen. For example, if the default is US dollars, USD appears on the left of the exchange rate equation, as shown below.
The default currency is also the default value in the Currency Selector server control, and on the Pricing tab of the View/Edit Catalog Entry screen. See Also: CurrencySelect Server Control
Viewing and Changing the Default Currency
When you install Ektron, the default currency is U.S. dollars, indicated by the Numeric ISO code 840. At that time, you can change this by editing the value for the web.config file’s ek_ecom_DefaultCurrencyId tag. You must enable the new default currency in the Ektron Workarea before changing it in the web.config file.
WARNING! After your eCommerce feature goes live, do not change the ek_ecom_DefaultCurrencyId value in web.config.
IMPORTANT: If you edit the siteroot/web.config file's ek_ecom_DefaultCurrencyId property, you must begin a manual crawl. See Also: eCommerce Configuration Screens You will only see the new default currency in search results when that crawl is complete.
How Currencies Are Used in the CurrencySelect Server Control
If your developer places a CurrencySelect server control on a page, a site visitor can use it to select any enabled currency.
After a currency is selected, the prices change to that currency. See Also: Defining and Updating Exchange Rates
From that point on, the cart and order use the selected currency. See Also: CurrencySelect Server Control
Defining and Updating Exchange Rates
The Edit Currency screen lets you define an exchange rate between the default and any other currency. A good Web site for finding exchange rates is http://www.xe.com/ucc/.
The exchange rate can dynamically adjust prices when the rate changes. See Also: Alternate Currency Pricing
You can update the exchange rates using:
- the Ektron API
- the Edit Exchange Rates screen
The following Ektron API supports calling an exchange rate service to update rates automatically: Ektron.Cms.Commerce.ExchangeRateApi. For more information, see the Ektron API documentation (http://reference.ektron.com/developer/).
The Edit Exchange Rates screen lets you update the exchange rate for enabled currencies:
- In the Workarea, go to Settings > Commerce > Configuration > Currencies.
- Choose Action > Edit Exchange Rates. The Edit Exchange Rates screen appears, showing enabled currencies and their exchange rates.

- Update rates as needed.
- Choose Action > Update.
Editing a Currency
- Go to the Workarea > Settings > Commerce > Configuration > Currencies.
- Click the currency you want to edit.
- You can only edit the Name, Enabled, and Exchange Rate fields. The Numeric ISO Code and Alpha ISO Code are not editable and are determined by the currency selected.
- Name—Enter the currency’s name.
- Enabled—Check this box to enable this currency.
- Exchange Rate—Enter the exchange rate between this currency and the default one.
- Click Update.
CurrencySelect Server Control
The CurrencySelect server control lets you select the monetary type you will use to make purchases. When a currency is selected, eCommerce server controls use it for that order. If you close the browser, the currency needs to be selected again the next time you visit the site.
For a currency to appear in the CurrencySelect server control, enable it in the Workarea > Settings > Commerce > Currencies screen. See Also: Enabling Currencies
CurrencySelect Server Control Properties
The following are Ektron-specific server control properties. You can find information about native .NET properties such as font, height, width and border style in Visual Studio® help.
- Authenticated (String)
Indicates if you are logged into the CMS Explorer and can use it to browse to content, collections, and so on. See Also: Browsing Your Ektron Site Using CMS Explorer.
- CacheInterval (Double)
The number of seconds that the server control’s data is cached. The default is 0 (zero). For example, if you want to cache the data for 5 minutes, set to 300. See Also: Caching with Server Controls.
- CustomXml (Code-behind Only) (String)
Lets you inject custom XML into the generated XML before being processed by the XSLT. Enter a string of XML that you want to make available to the XSLT as follows:
<root><customXml>custom-xml-inserted-here</customXml></root>
See Also: Displaying Custom XML in Ektron’s Server Controls.
- DisplayXslt (String)
If desired, enter a relative or absolute path to an Xslt that determines the display of the page.. By default, the control uses
CurrencySelect.xsl. This file is located insiteroot\Workarea\Xslt\CommerceIMPORTANT: If you specify an external file, do not store this file in the Workarea folder. If you store this file in the Workarea folder, the file will be lost when you upgrade.
- DoInitFill (Boolean)
By default, Fill occurs during the Page_Init event. Set to false if you want to postpone the fill-action until later. In this case, Fill is automatically called during the Page Render event. You might do this if you need to set or change a property on the control in code-behind and have it render with your changes shown.
- Hide (Boolean)
Hides or displays the output of the control in design time and run time.
- True—Hide the control output.
- False—Display the control output.
- Language (Integer)
Set a language for viewing content; shows results in design-time (in Visual Studio) and at run-time (in a browser).
- Stylesheet (String)
Specify the path to a style sheet for use with this server control. The location can be relative or absolute. Leave blank to use the default style sheet.
- SuppressWrapperTags (Boolean)
Suppresses the output of the span/div tags around the control.
- True—Suppress wrap tags.
- False (default)—Allow wrap tags.
Payment Options
The Payment Options screen lets you determine which options are available for your customers to pay for their purchases.
- PayPal—The PayPal checkbox is not available for selection until you have set up a PayPal account. See Also: Using PayPal with Ektron eCommerce
- a Payment Gateway, such as AuthorizeNet—See Also: Payment Gateways
Both options can be enabled, but only one gateway can be enabled at a time.
PayPal payments work like checks in that they need to be settled. After an order is placed, the payment must be marked as “settled” for the workflow to proceed.
Using PayPal with Ektron eCommerce
Customers can use PayPal to pay for purchases from either of 2 points in the checkout process
- the shopping cart screen
- the payment screen
IMPORTANT: PayPal requires you to place the Pay with PayPal option on both the shopping cart and payment screens.
If you access PayPal via the shopping cart screen, you follow these steps.
Here is the sequence illustrated above.
- From the Cart screen, a site visitor clicks PayPal.
- He logs into his PayPal account.
- Account information populates the shipping and billing addresses.
- The site visitor can change addresses if needed. If the PayPal account address is used for the order, it is saved as part of the site visitor’s eCommerce account information.
- Shipping costs are added.
- The order is confirmed.
- Site visitor checks out via PayPal.
Alternatively, the site visitor can use the standard eCommerce checkout process, select PayPal on the payment screen, and complete his order using the PayPal payment screen. That sequence is illustrated below.
PayPal Documentation
Use the following PayPal technical documentation resources when integrating PayPal into your eCommerce site: PayPal Express Checkout Integration Guide and Payflow ACH Payment Service Guide, located at https://www.x.com/developers/paypal/development-and-integration
Enabling PayPal Support
- Create a Sandbox Account. This step includes updating Ektron’s web.config file.
- Begin Using PayPal
- Enable PayPal in the Workarea
Create a Sandbox Account
- Sign on to http://www.sandbox.paypal.com.
- Sign up for an account.
- You receive an email confirmation that directs you to another page.
- Log in using the information you provided in Step 2.
- Under Test Accounts, click Create a preconfigured buyer or seller account.
- Create a buyer account. You will use this to test the customer experience.
- Change the password to one you can easily remember.
- Click Home > Test Accounts > Create a preconfigured buyer or seller account.
- Click Account Type Seller.
- Create a seller account. You will use this to test the merchant experience.
- Change the password to one you can easily remember.
- In the upper left corner of the screen, click API Credentials.
- Open your
siteroot/web.configfile. - Copy the following values from the API Credentials screen into the
web.config’sproviders/paypalelement. Saveweb.config.- API Username > PayPalUser
- API Password > PayPalPwd
- Signature > PayPalSignature
The following illustration shows the PayPal API Username copied into the web.config file’s PayPalUser property.
Encrypting PayPal Authentication Values
Follow these steps to encrypt the following values in the web.config file’s providers/paypal element.
- PayPalUser
- PayPalPwd
- PayPalSignature
- Open the
siteroot/web.configfile. - Set the
AuthValuesEncryptedelement totrue.
- Save and close
web.config. - Open
C:\Program Files\Ektron\CMS400v8x\Utilities. - Run EncryptEmailPassword.exe. The Encrypt Utility dialog appears.
- Enter the PayPal user name into the Text field.
- Click Encrypt. The screen displays encrypted text in the Encrypted field.
- Copy the encrypted text and paste it into the
web.configfile’sPayPalUserelement value. - Repeat Steps 6 through 8 for
PayPalPwdandPayPalSignature.
Test the Sandbox Account
- Sign into Workarea > eCommerce > Cart.
- Click the PayPal button.
- Enter the buyer account user name and password that you created in Create a Sandbox Account. You proceed to the Ektron Checkout screen.
After completing these steps, you have verified your PayPal buyer experience and are ready to begin using PayPal.
Begin Using PayPal
- Sign on to http://www.paypal.com.
- Create a new account.
- Follow the instructions to obtain API credentials.
- Copy the following values from the API Credentials screen into the
web.config’sproviders/paypalelement. Saveweb.config.- API Username > PayPalUser
- API Password > PayPalPwd
- Signature > PayPalSignature
- If you want to encrypt these values, see Encrypting PayPal Authentication Values.
- Enable PayPal in the Workarea.
- If desired, customize the PayPal page on your Web site.
Customizing the PayPal Page
If you are using Ektron’s sample site and PayPal is enabled, the login screen contains an Ektron logo for demonstration purposes.
You can replace the logo using the apiparamHDRIMG property of the <providers> add name=”PayPal” element in the web.config file.
To change the logo, change the referenced image.
To learn how to customize other aspects of the page, see PayPal’s “Express Checkout Integration Guide” section “PayPal Page Style.” The guide is located at https://www.x.com/developers/paypal/development-and-integration
When setting values in the web.config’s providers/add name=” PayPal” element, prefix any variable with apiparam. For example, to set the header background color, enter apiparamHDRBACKCOLOR=”FFF666”.
Payment Gateways
A payment gateway provider is a pluggable component that is integrated into the Ektron eCommerce module. A payment provider handles eCommerce customer payments by using third-party payment gateways. Ektron eCommerce module accepts payments such as credit cards or checks. Then, it passes that information to a third-party service. The third-party service processes the payment and returns a transaction ID that is stored with the customer's order.
Your company needs to set up an account with a third party payment service before using the payment provider. Ektron provides 4 standard payment gateways: authorize.net, Payflow, Sage Pay and PayFlowWebsite Payments Pro along with manual. The manual gateway accepts credit cards. In this case, the merchant emails the credit card information to the credit card company. You can customize these providers or create your own using the extendable Payment Gateway Provider architecture. See Customizing the Payment Gateway Provider.
In addition, some payment gateways might support recurring payments, while others might not. Recurring payments let you create a payment that recurs at a given interval for a specified period of time. For example, you could create a payment for $9.99 that occurs on the first of every month for the next 12 months. This is something to consider if your site relies on a subscription service.
Ektron lets you edit information on any provided gateway as well as create a new one.
Processing Credit Card Transactions via a Gateway
The following sequence explains typical processing of credit card transactions. (source: www.authorize.net)
- A customer purchases a product from your site and submits payment information.
- Ektron passes the information to your payment gateway.
- The payment gateway provider (PGP) receives secure transaction information and passes it via secure connection to the Merchant Bank’s Processor.
- The Merchant Bank’s Processor submits the transaction to the Credit Card Interchange (a network of financial entities that manage credit card transactions).
- The Credit Card Interchange sends the transaction to the customer’s Credit Card Issuer.
- The Credit Card Issuer approves or declines the transaction, based on the customer’s available funds. It then passes the transaction results and, if approved, the appropriate funds back through the Credit Card Interchange.
- The Credit Card Interchange relays the transaction results to the Merchant Bank’s Processor.
- The Merchant Bank’s Processor relays the transaction results to PGP.
- The PGP stores transaction results and sends them to the customer and/or the merchant. This communication process averages 3 seconds or less.
- The Credit Card Interchange passes the transaction’s funds from the Credit Card Issuer to the merchant’s bank account.
Processing Check Transactions via a Gateway
The following sequence explains how a payment gateway processes checks. (source: www.authorize.net)
- Customer authorizes merchant to charge his bank account for an amount.
- Order and payment information is securely transmitted via the Internet to the payment gateway.
- The transaction is accepted or rejected based on initial data validation and security criteria defined by the payment gateway.
- If accepted, the transaction is sent to the ACH Network for settlement.
- The ACH Network uses the transaction’s bank account information to determine the bank that holds the customer’s account (the RDFI).
- The ACH Network instructs the RDFI to charge or refund the customer’s account.
- The RDFI transfers funds from the customer’s account to the ACH Network. The RDFI also notifies the ACH Network of any returns (if funds could not be collected from the customer’s bank account) or charge backs (if a customer disputes a purchase).
- The ACH Network transfers funds for the transaction to the payment gateway’s bank.
- After a holding period, the payment gateway provider initiates a ACH transaction that deposits the funds into the merchant’s bank account.
Establishing a Relationship with a Payment Gateway Provider
You need to set up an account with a third-party payment service before using a payment provider. Each payment gateway provider accepts configuration parameters. For example, Authorize.NET requires a username and password, while PayFlow requires a Username, password, vendor, and partner.
In addition, some payment gateways do not support subscription payments. Consider this if your site relies on subscriptions. See Also: Creating a Subscription
The Default Gateway
The eCommerce checkout uses the default gateway only. Additional gateways are unused unless one is changed to the default.
You cannot delete the default gateway. If you want to delete it, you must first make another gateway the default.
To change the default gateway:
- Go to Settings > Commerce > Configuration > Payment Options.
- Click the Payment Gateways tab. The currently-defined default has a check in the Default column.
- Click the radio button next to the gateway you want to make the default.
- Choose Action > Mark as Default. A confirmation message appears.
- Click OK.
Adding a Payment Gateway
NOTE: To create a new payment gateway provider, see Customizing the Payment Gateway Provider.
- In Ektron, go to Settings > Commerce > Configuration > Payment Options.
- Choose New > Payment Gateway.
- Enter information or select options for the following fields:
- Name—Enter the name of the gateway.
- Default—Check this box if this is the default gateway. If you do, and another gateway is currently the default, it is replaced by this one.
- User ID—Enter your User ID. This ID will identify your account with this gateway provider.
- Password—Enter the password for your account with this gateway provider.
- Expand Custom Values—If this gateway provider needs additional fields of information, enter those values into the Custom 1 and Custom 2 fields.
- Credit Cards—Check if this payment gateway accepts credit cards.
- Checks—Check if this payment gateway accepts checks.
The following sections explain how to set up standard Payment gateways.
- Setting up a PayFlow Payment Gateway
- Setting up a PayFlowWebsite Payments Pro Payment Gateway
- Setting up an Authorize.Net Payment Gateway
- Setting up a SagePay Payment Gateway
NOTE: When setting up a payment gateway, you are asked to enter authentication codes, such as user name and password. To keep them safe, Ektron encrypts these values when saving them to the database.
Setting up a PayFlow Payment Gateway
NOTE: See PayFlow's Web site for additional instructions on setting up the PayFlow Gateway.
When setting up a PayFlow payment gateway:
- Set up an account with PayFlow. To do this, go to https://www.paypal.com/cgi-bin/webscr?cmd=_payflow-gateway-overview-outside. During this process, you should obtain a Login ID and password.
- Go to Settings > Commerce > Configuration > Payment Options.
- Choose New > Payment Gateway.
- Enter information or select options for the following fields:
- Name—Choose Payflow.
- Default—Check this box to make PayFlow the default gateway.
- User ID—Enter the user ID provided to you by the authorized PayPal Reseller who registered you for the Payflow SDK. If you purchased your account directly from PayPal, use PayPal.
Limitations: 64 alphanumeric, case-sensitive characters.
- Password—Enter the password you defined while registering for account.
Limitations: 6- to-32 alphanumeric, case-sensitive characters
- Expand Custom Values—Click this text to open the Custom 1 and Custom 2 fields.
- Custom 1—Enter the merchant login ID sent to you when you registered the account.
Limitations: 64 alphanumeric, case-sensitive characters.
- Custom 2—Enter the Partner ID sent to you by the authorized PayPal Reseller who registered you
for the Payflow SDK. If you purchased your account directly from PayPal, use PayPal.
Limitations: 12 alphanumeric, case-sensitive characters.
- Custom 1—Enter the merchant login ID sent to you when you registered the account.
- Credit Cards—Check if this payment gateway accepts credit cards. You should verify that this payment gateway supports credit card payments.
- Checks—Check if you will accept checks with this payment gateway. You should verify that this payment gateway supports check payments.
Setting up a PayFlowWebsite Payments Pro Payment Gateway
The PayFlowWebsite Payments Pro payment gateway is used in the United Kingdom and Australia.
- Set up an account with PayFlowWebsite Payments Pro. To do this, go to https://cms.paypal.com/us/cgi-bin/?&fli=true&cmd=_render-content&content_ID=developer/howto_gateway_payflow_wpp&bn_r=o.
- In the Ektron Workarea, go to Settings > Commerce > Configuration > Payment Options.
- Choose New > Payment Gateway.
- Enter information or select options for the following fields:
- Name—Choose PayFlowWebsite Payments Pro.
- Default—Check this box to make PayFlow the default gateway. See Also: The Default Gateway
- User ID—Enter the API username sent to you by the authorized PayPal Reseller who registered you for the Payflow SDK. For example, sellUK_1271963915_biz_api1.ektron.com. If you purchased your account directly from PayPal, use PayPal.
Limitations: 64 alphanumeric, case-sensitive characters.
- Password—Enter the API password you defined while registering for the account.For example,1234567891.
Limitations: 6- to-32 alphanumeric, case-sensitive characters
- Expand Custom Values—Click this text to open the Custom 1 and Custom 2 fields.
- Custom 1—Enter the API signature sent to you by the authorized PayPal Reseller who registered you for the Payflow SDK. For example, AAAAAAAAAAAAAAAAAAAAAAAAAAAAAAAAAAAAAAAA
Limitations: 64 alphanumeric, case-sensitive characters. - Custom 2—Not used
- Custom 1—Enter the API signature sent to you by the authorized PayPal Reseller who registered you for the Payflow SDK. For example, AAAAAAAAAAAAAAAAAAAAAAAAAAAAAAAAAAAAAAAA
- Credit Cards—Check if this payment gateway accepts credit cards. You should verify that this payment gateway supports credit card payments.
After defining the payment gateway, you typically want to test it. See Testing a Payment Gateway
Setting up an Authorize.Net Payment Gateway
- Set up an account with AuthorizeNet. To do this, go to http://www.authorize.net/solutions/merchantsolutions/. During this process, you should obtain a Login ID and password.
- In the Workarea, go to Settings > Commerce > Configuration > Payment Options.
- Choose New > Payment Gateway.
- Enter information or select options for the following fields:
- Name—Choose Authorize.Net.
- Default—Check this box to make Authorize.Net the default gateway.
- User ID—Enter the Login ID you obtained in Step 1.
- Password—Enter the password you obtained in Step 1.
- Custom 1 and Custom 2—Not used.
- Credit Cards—Check if you will accept credit cards with this payment gateway. You should verify that this payment gateway supports credit card payments.
This gateway accepts only credit cards. No checks.
After defining the payment gateway, you typically want to test it. SeeTesting a Payment Gateway
Setting up a SagePay Payment Gateway
NOTE: SagePay does not support recurring billing nor check payments.
- Set up an account with SagePay. To do this, go to http://www.sagepay.com/products_services/bolt_ons/merchant_services. During this process, you should obtain a Login ID and password.
- Set up a SagePay simulator account using https://support.sagepay.com/apply/RequestSimAccount.aspx.
- From the Simulator Main Menu, click Account > Valid Currencies for this Account. Enable currencies set up in your Workarea’s Currencies screen. See Also: Currencies
- In Ektron, go to Settings > Commerce > Configuration > Payment Options.
- Choose New > Payment Gateway.
- Enter information or select options for the following fields:
- Name—Choose SagePay.
- Default—Check this box to make SagePay the default gateway.
- User ID—Enter the User ID you obtained in Step 1.
- Password, Custom 1, Custom 2—Not used.
- Credit Cards—Check if this payment gateway accepts credit cards. You should verify that the gateway supports credit card payments.
- Checks—Not available with SagePay.
After defining the payment gateway, you typically want to test it. SeeTesting a Payment Gateway and Testing SagePay Payment Gateway
Testing a Payment Gateway
Typically, you test a default payment gateway before going live with it. eCommerce provides a test mode for this purpose. While eCommerce is in test mode, customers cannot purchase goods. So, disable test mode before going live with a new default payment gateway.
To test a payment gateway, open the siteroot/web.config file and set <ektronCommerce> ek_ecom_TestMode to true.
<ektronCommerce>
   <add key="ek_ecom_ComplianceMode" value="false" />
   <!-- This is used only when compliance mode is on, and cannot be less than 4. -->
   <add key="ek_ecom_PasswordHistory" value="4" />
   <add key="ek_ecom_OrderProcessingDisabled" value="false" />
   <add key="ek_ecom_TestMode" value="true" />
    ....
When testing is done, change the value of ek_ecom_TestMode to false.
Testing SagePay Payment Gateway
Do not use the following cards with the SagePay test card number when testing the SagePay payment gateway:
- Japan Credit Bureau (JCB)
- Mastercard
- Visa Electron UK Debit
- Visa Delta Debit
- American Express
Because these cards do not have a cardholder field, the following error is displayed: The CardHolder field should be between 1 and 50 characters long.
To test the SagePay Payment Gateway:
- Follow instructions in Testing a Payment Gateway.
- Open your
siteroot/web.configfile. - Set
<EktronPaymentGateway>/<providers> SagePay SimulatorModetotrue.<EktronPaymentGateway defaultProvider="Automatic"> <providers> . . <add name="SagePay" type="Ektron.Cms.Commerce.Providers.Payment.SagePayGateway" SagePayVersion="2.23" SimulatorMode="true" Description="Ektron CMS Order" /> </providers> </EktronPaymentGateway> - When testing is complete, change the value of
SimulatorModetofalse.
Editing a Payment Gateway
- Go to Workarea > Settings > Commerce > Configuration > Payment Options.
- Click the payment gateway that you want to edit.
- Click Edit.
- Edit any of the fields, which are described in Adding a Payment Gateway.
- Click Save.
Deleting a Payment Gateway
NOTE: You cannot delete the default gateway. If you want to delete it, you must first make another gateway the default.
- From Workarea, choose Settings > Commerce > Configuration > Payment Options.
- Click the payment gateway that you want to delete.
- Click Delete (
 ). A confirmation message appears.
 - Click OK.
Check Support
Payment gateways generally offer 2 payment mechanisms: credit cards and checks. You can enable or disable check support for a gateway via the Settings > Commerce > Configuration > Payment options > Edit Payment Gateway screen.

If checks are enabled for the default payment gateway, a site visitor can pay by Check on the payment screen. If check support is not enabled, the Payment Method field does not appear.
Check Support Integration Documentation
Use the following resources to familiarize yourself with integrating checks into your eCommerce site.
- Authorize.Net: http://www.authorize.net/files/echecknetuserguide.pdf
- PayFlow: https://cms.paypal.com/cms_content/US/en_US/files/developer/PP_PayflowLink_Guide.pdf ; see the chapter “Integrating TeleCheck Transactions.”
Effect of Check Payment on Order Processing
The following describes a typical sequence of events when processing a check for eCommerce payment.
However, Ektron is very flexible and does not enforce this sequence. For example, you can enter a tracking number and mark an order shipped even though its payment has not been captured yet.
- eCommerce user accesses the View Payment screen’s Capture option, which submits a payment request to the customer’s bank.
- A few days later, the funds are transferred to the merchant’s account.
- eCommerce user accesses the View Payment screen’s Mark as Settled option to confirm the receipt of funds.

- If goods are tangible, eCommerce user ships the merchandise, using the View Payment screen’s Enter Tracking Number option to insert the tracking number and confirm the shipment.

- If goods are not tangible, the workflow sends the customer an email with purchase details, such as how to download it.
Credit Card Types
Use this screen to enter types of credit cards that your eCommerce system may use. By default, Ektron’s sample sites provide the following card types.
- American Express
- Diners Club (not accepted by default)
- Discover
- MasterCard
- Visa
You can edit the information provided for these types or enter a new one.
Creating a Credit Card Type
To create a new credit card within Ektron:
- From the Workarea, choose Settings > Commerce > Configuration > Card.
- Choose New > Card Type to see the Add Card Type screen.
- Enter the credit card's name in the Name field.
- Enable the Accepted check box if site visitors can use this card to make purchases on your Web site.
- Add an image for the credit card. The image must reside on your computer.The image does not appear on the standard checkout screen, but it is a field in the XML, so you can enable it using XSLT.
- Click Change. The Library Upload screen appears.
- Click Add Library.
- Click Browse and navigate to the folder that contains the image.
- Choose the image file.
- Enter a title in the Title field.
- Click Add Library. The file name appears in the Image field with the image directly below.
- Enter a Regex expression. See Also: Using Regex Expressions for Validation
- Click Save.
Using Regex Expressions for Validation
A Regex expression is a simple way to validate a credit card account number. (See Also: http://regexlib.com/.) Validation occurs when a site visitor completes the Checkout procedure’s Submit Order screen
Regex prevents the submission of invalid account numbers to a payment gateway, which may charge a fee for such failures.
Ektron provides a Regex expression for the credit cards supplied with the medical sample site. You can modify them as needed. If you enter a new credit card, you can enter a Regex expression for it.
Editing a Credit Card Type
- From the Workarea, choose Settings > Commerce > Configuration > Card.
- Click the Credit Card Type that you want to edit.
- Click Edit.
- Edit any of the fields, which are described in Creating a Credit Card Type
- Click Save.
eCommerce Messages
Ektron’s eCommerce feature provides a messaging feature that can notify a purchaser or the Ektron administrator when the following events occur. Each message has a unique type that corresponds to an event and, in one case, a recipient.
|
Event |
Message Type |
Sends email to |
|---|---|---|
|
Order is submitted |
OrderReceived |
purchaser |
|
Order is submitted |
OrderReceivedToAdmin |
Ektron administrator See Also: Setting up a PayFlow Payment Gateway |
|
Order is cancelled |
OrderCancelled | purchaser |
|
Order is shipped |
OrderShipped | purchaser |
|
Order is completed |
OrderCompleted | purchaser |
You can create any number of messages for each event, assigning one as the default. Only the default message is sent when the corresponding event occurs. Here is a sample message as set up within Ektron.
Here is a portion of the same message as delivered to a recipient’s inbox.
How Messages are Created and Generated
Ektron provides sample text for each type of message. To view and edit a message, go to the Workarea > Settings > Commerce > Configuration > Messages.
The Message Type determines the event that causes a message to be sent. For example, the Orderreceived message is sent to a purchaser when the order is submitted.
If content notification emails are being generated, the site visitor provided an email address, and a message is defined for the event, emails are sent when eCommerce events occur. No additional set up is required.
NOTE: eCommerce messages are distributed in the same way as content notification emails. For information on setting this up, see Configuring email for Tasks and Content.
Creating orEditing an eCommerce Message
- From the Workarea, choose Settings > Commerce > Configuration > Messages.
- If a message of the type you want to create already exists, select it. Otherwise, click Add Email Message.
- Assign a Title, Subject (for the email subject line), Message Type, and message text.
- When the message is complete, click Save.
Message Variables
An eCommerce message can include the following variables, which pull order information into the message:
- @CustomerFirstName@—Customer’s first name
- @CustomerLastName@—Customer’s last name
- @OrderCouponTotal@—The order’s coupon discounts
- @OrderId@—The order’s ID number
- @OrderItemQuantity@—The quantity of any item on the order
- @OrderItemSalePrice@—The sale price of any item on the order
- @OrderItemStart@ and @OrderItemEnd@— Use the start and end markers to show information for ordered items.
The markers show no information by themselves. Instead, they repeat the variables between them for every item on the order.So, for example, assume an order has 10 items, and your message looks like this:
@OrderItemStart@@OrderItemTitle@@OrderItemQuantity@@OrderItemSalePrice@@OrderItemTotal@@OrderItemEnd@The message prints the title, quantity, sale price, and total for each item on the order.
- @OrderItemTitle@—The title of any item on the order
- @OrderItemTotal@—The total cost of one item. For example, if
orderItemSalePrice= $10 andorderItemQuantity= 2,orderItemTotal= $20. - @OrderShippingTotal@—The order’s shipping cost
- @OrderSubTotal@—The order’s subtotal, that is the amount of ordered items prior to shipping costs, taxes, and coupon discounts
- @OrderTaxTotal@—The order’s tax amount
- @OrderTotal@—The order’s final cost (which includes taxes, shipping, and coupon discounts)
- @TrackingUrl@—The link to a Web page that tracks your package. It is usually a combination of the shipper’s URL and the tracking number.
Setting up a Recipient for the OrderReceivedToAdmin Message
The OrderReceivedToAdmin message type requires additional setup. Specifically, you must update the following values in the web.config file.
- adminEmail—email address of eCommerce administrator to receive order confirmation message
- ek_ecom_SendOrderReceivedEmailToAdmin—Set to true to enable this functionality. Set to false to disable it.
eCommerce Shipping Screens
The eCommerce shipping screens let you specify information about where catalog entries are stocked, how they are packaged, and the available shipment methods.
Warehouse
Use the Warehouses screen to enter information about warehouses that stock your catalog entries. eCommerce uses this location as the “from” address when calculating shipping costs.
Only the default warehouse is used by the checkout process. Additional warehouses are unused until they are made the default. See Also: Changing the Default Warehouse
Prerequisite: Regions and Countries must be set up
Creating a Warehouse
- Go to Settings > Commerce > Shipping > Warehouses.
- Choose New > Warehouse.
- Enter information or select options as follows:
- Name—Enter the warehouse’s name.
- Street1, Street2—Enter the warehouse’s street address
- City—Enter the warehouse’s city.
- Postal Code—Enter the warehouse’s postal code.
- Country—Select the warehouse’s country from the pull-down list.
- State/Province—Select the warehouse’s state or province from the pull-down list.
- Default Warehouse—This check box indicates if this is the default warehouse.
- Click Save.
Changing the Default Warehouse
NOTE: You can also specify a warehouse as the default via the Edit Warehouse screen’s Mark Default Warehouse toolbar button ( ).
).
- Go to Workarea > Settings > Commerce > Shipping > Warehouses.
- Click the radio button next to the warehouse that you want to make the default.
- Choose Action > Mark Default Warehouse. A confirmation dialog appears.
- Click OK.
Editing a Warehouse
- Go to Workarea > Settings > Commerce > Shipping > Warehouses.
- Click the warehouse that you want to edit.
- Click Edit.
- Edit any of the fields as described in Creating a Warehouse.
- Click Save.
Deleting a Warehouse
You cannot delete the default warehouse. However, you can designate another warehouse as the default, then delete the one that was the default.
- Go to Workarea > Settings > Commerce > Shipping > Warehouse.
- Click the warehouse that you want to delete.
- Click Delete (
 ). A confirmation message appears.
 - Click OK. The warehouse is deleted.
Packages
The Packages screen lets you define standard sizes of packaging. Use it to define every package size that your shipping department uses to ship your products. If you use a provider such as UPS® or FedEx®, it is likely they provide boxes.
How Packaging Information Is Used
Each item in an order has size and weight dimensions. The shipping calculator uses them to fit the order into the smallest-sized and fewest packages. It then passes packaging information (number, sizes and weight) to the shipping provider, which returns the order’s shipping costs. If a catalog entry’s dimensions exceed all box sizes, eCommerce passes those dimensions to the shipping provider.
NOTE: Some shipping providers, FedEx and UPS for example, have size and weight limits on packages. If the size or weight exceeds the limit, shipping rates may not be returned when a site visitor is checking out. In this case, a site visitor cannot continue the checkout process and an application error is logged in the Event Viewer.
Size and Weight Units of Measure
By default, Ektron uses English units of measure (inches and pounds) for package size and weight. At the beginning of your eCommerce implementation, you can change to metric units of measure by updating the web.config file’s ek_measurementsystem tag value to metric.
WARNING! After your eCommerce feature goes live, do not change the web.config ek_measurementsystem value.
Creating a New Package
- Go to Settings > Commerce > Shipping > Packages.
- Click New > Package.
- Enter package information in the following fields:
- Name—Enter a text description of this package size.
- Length—Enter the package’s length in the units of measure that appear to the right (inches or centimeters). See Also: Size and Weight Units of Measure
- Height—Enter the package’s height in the units of measure that appear to the right (inches or centimeters).
- Width—Enter the package’s width in the units of measure that appear to the right (inches or centimeters).
- Max Weight—Enter the package’s weight in the units of measure that appear to the right (pounds or kilograms).
- Click Save.
Editing a Package
- Go to Workarea > Settings > Commerce > Shipping > Packages.
- Click the package that you want to edit.
- Click Edit.
- Edit any of the fields, which are described in Creating a New Package.
- Click Save.
Shipping Methods
Use the Shipping Methods to define choices your site visitors will have for delivering their purchases.
Prerequisites:
- Default warehouse with an address
- A default shipping provider is defined in the
siteroot\shipment.configfile
Defining Shipping Providers
When you instEktron, several providers exist in the siteroot\shipment.config file:
- FedExShipmentProvider
- FlatRateShipmentProvider
- UPSShipmentProvider
However, the FedEx and UPS information is for testing purposes only. To use FedEx, UPS, or another shipping provider, obtain the following information from them. (The information can vary slightly for each provider.)
- service URL
- key
- password
- account number
- meter number
- transactionId
Then, enter that information into shipment.config, following the format of providers already in the file.
The shipment.config file also contains name and type properties for each provider. The specific text you insert is not important, but the name and type strings must match.
name="FedExShipmentProvider"
type="Ektron.Cms.Commerce.Shipment.Services.FedExShipmentProvider,
Ektron.Cms.Commerce"
To define a custom shipping provider, see Customizing the Shipment Provider.
Defining the Default Shipping Provider
While you can define any number of shipping providers in the shipment.config file, only one can be active. The active provider appears on the Settings > Commerce > Shipping > Methods > New > Shipping Method screen when you click View Options.

Specify the default shipping provider via the defaultprovider property in siteroot\shipment.config.
<?xml version="1.0" encoding="utf-8" ?>
<shipmentProvider defaultProvider="FedExShipmentProvider">
	<providers>
		<add name="FedExShipmentProvider" .
	.
</shipmentProvider>
Adding a Shipping Method
Use the Add Shipping Method screens to select shipping methods you will support. When a site visitor submits an order, these shipping choices appear on the Shipping screen.
- Go to Workarea > Settings > Commerce > Shipping > Methods.
- Choose New > Shipping Method. The Add Shipping Method screen appears.
- Enter information or make selections in the following fields.
- Name—Enter the name of the shipping method. Site visitors select a shipping method for their order using this name
- Active—Check this box if you want site visitors to be able to select this shipping method.
- Provider Service—As explained in Defining the Default Shipping Provider, a default shipping provider is defined in your site’s shipment.config file. To view the methods offered by that provider, click View Options. Then, select from the drop-down list that appears.
- Click Save.
Editing a Shipping Method
- Go to Workarea > Settings > Commerce > Shipping > Methods.
- Click the Shipping Method that you want to edit. The View Shipping Method screen appears.
- Click Edit (
 ).
). - Edit the fields described in Adding a Shipping Method.
Changing the Order of the Shipping Method
Each shipping method you define has an Order field. This determines the sequence in which shipping methods appear on the Shipping Rates screen when a site visitor is submitting an order.
The shipping method with 1 in the Order field appears at the top of the list.
By default, every shipping method’s order is set to 1. To set a sequence for shipping methods, follow these steps
- Go to Workarea > Settings > Commerce > Shipping > Methods.
- Choose Action > Reorder Items.
- Use the selection bar and arrows to arrange methods in the desired sequence.
- Choose Action > Save.
eCommerce Tax Screens
eCommerce provides a set of tax screens in the Ektron Workarea that lets you:
- set up tax classes (for example, goods, services, tobacco)
- define tax rates for these geographic entities (from most to least specific)
- postal code
- region
- country
- apply tax classes
- for tax classes except shipping
- applying shipping taxes
Calculating an Order’s Tax Amount
During checkout, Ektron tries to find a tax rate for each catalog entry’s Tax Class and the shipping address’s geographic entity.
|
Ektron checks the shipping address for each item's tax class |
If it finds a tax rate for the geographic entity |
If it does not find a tax rate for the geographic entity |
|
1. Postal code |
It adds that amount and stops. For example
|
It checks the shipping address for a regional tax code. |
|
2. Region |
It adds that amount and stops. For example
|
It checks the shipping address for a country tax code. |
|
3. Country |
It adds that amount. For example
|
No tax is added to the order. |
If a postal zone has several taxes (for example, a local tax and a regional tax), build the combined percentage into the postal code tax. So, assume New York City has a 4% tax, and New York state has a 3% tax. Enter a combined total of 7% into postal zones within New York City. See Also: The Tax Class Screens
For example, the atrium chair is assigned to the Goods Tax Class. A person who lives in New York state purchases the chair. Although no postal tax class is defined for the shipping address, a regional tax of 8.5% is set up for New York state, and so is applied to the order.

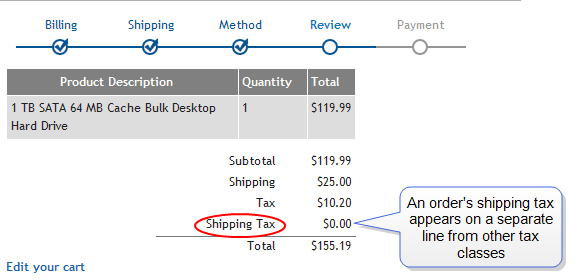
Calculating an Order’s Shipping Tax Amount
The shipping tax is separate from the other taxes, and appears on a separate line of the order.
A shipping tax is applied to an order if
- shipping tax is enabled in
web.configand
- a tax rate is applied to one of the geographic regions in which the shipping address falls.
Unlike the other tax classes, you do not apply shipping tax to catalog entries. Instead, you apply them to geographic regions only. However, each tax class compares an order's shipping address against regional tax tables to calculate the tax.
Enabling the Shipping Tax for a Geographic Region
You apply a shipping tax to every applicable geographic region. As explained in Calculating an Order’s Tax Amount, the eCommerce module first looks for a tax applied to the order's postal code. If one is found, that shipping tax is applied. If none is found, eCommerce looks for a shipping tax applied to the order's region. If no regional shipping tax is found, eCommerce looks for a shipping tax applied to the order's country.
Applying a Shipping Tax to a Geographic Region
You apply a shipping tax rate to geographic regions as you do with the tax classes. See Also: Postal Tax Tables, Regional Tax Tables, Country Tax Tables
The Tax Class Screens
Use the Tax Class screen to define classes of catalog entries that can be taxed. When you install eCommerce, the following tax classes are installed.
- alcohol
- goods
- service
- tobacco
- shipping
You can modify or delete all classes except shipping, which you can modify but not delete. You also can add new classes.
Deleting a Tax Class
If a tax class has been assigned to a catalog entry that appears on any order, the Delete button does not appear.
- Go to Settings > Commerce > Tax > Classes.
- Click the Tax Class that you want to delete.
- Click Delete (). A confirmation message appears.
- Click OK. The Tax Class is deleted.
Postal Tax Tables
Use postal code tax tables to identify local areas (cities, counties, and so on) that apply taxes to eCommerce catalog entries. The areas are identified by their postal code. For example, London, England taxes alcohol delivered to addresses within it.
You only need to create a postal tax table if the area that applies the tax is smaller than a country’s geographical regions (states, provinces, and so on). If an entire region applies a tax, use a regional tax table.
Creating a New Postal Code Tax Table
Prerequisite: The postal code’s country and region are defined in the Regions and Countries screens
- Go to Settings > Commerce > Tax > Postal Tax Tables.
- Choose New > Postal Code.
- Enter information into the following fields:
- Postal Code—Enter the postal code for which you want to enter a tax rate. If this is for a US state, the code must consist of 5 or 9 digits.
- Region—Enter the geographic region (for example, state or province) in which the postal code resides.
- Country—Enter the country in which the postal code resides.
- Select the Tax Rates tab and specify values for the tax rates, for example, Alcohol, Goods, Services, Shipping, Tobacco. For any tax class, enter a tax rate as a whole number. For example, if the tax is 7%, enter 7.
- Click Save.
Editing a Postal Code Tax Table
- Go to Settings > Commerce > Tax > Postal Tax Tables.
- Click the ID of the tax table that you want to edit.
- Click Edit.
- Edit the fields described in Creating a New Postal Code Tax Table.
- Click Save.
Regional Tax Tables
Use regional tax tables to identify regions (states, provinces, and so on) that apply taxes to eCommerce catalog entries. For example, within the United States of America, the state of New Jersey applies a 5% tax on goods purchased on the internet and shipped to it.
You only need to define a regional tax table if the area that applies the tax is smaller than a country. If an entire country applies a tax, use a country tax table.
Editing a Regional Tax Table
A regional tax table is automatically created for every existing region. By default, tax rates are zero (0). To change any tax rate:
- Go to Settings > Commerce > Tax > Regional Tax Tables.
- Click on the name of the region for which you want to set tax rates. The View Region Tax Rate screen appears.
- Click Click here to edit the tax rates.
- Click Edit.
- Enter information into the following fields.
- Name—Select the region for which you want to enter a tax rate.
- Enabled—Enable or disable the regional tax entry as required.
- Select the Tax Rates tab and specify regional tax rates by class. For example, Alcohol, Goods, Services, Tobacco, and Shipping. For any tax class, enter a tax rate.
- Click Save.
Country Tax Tables
Use country tax tables to identify nations that apply taxes to eCommerce catalog entries. For example, Ethiopia applies a 5% tax on goods purchased on the internet and shipped to it.
Editing a Country Tax Table
A country tax table is automatically created for every existing country. By default, tax rates are zero (0). To change any country tax rate:Country Tax Tables
- Go to Workarea > Settings > Commerce > Tax > Country Tax Tables.
- Select the country for which you want to edit a tax table. The View Country Tax Rate screen appears.
- Click Click here to edit the tax rates.
- Click Edit.
- Select the Tax Rates tab and edit the tax rates, for example, Alcohol, Goods, Services, Tobacco, and Shipping. For any tax class, enter a tax rate.
- Click Save.
![]()