Working with Ektron Server Controls
Ektron provides server controls that you can drag and drop onto an ASPX page to coexist with other components. This includes control for everything from content, to user management, breadcrumbs, and social network controls—all to provide out-of-the-box markup and functionality. Ektron’s server controls provide a great deal of flexibility. In addition to having a set of properties that you can use to change the controls' output and behavior, you can access the Server Control API.
Overview
Ektron’s server controls let you insert many standard methods and properties within the Visual Studio environment. This means that you can see the effect of your changes in real time—you don’t have to modify a page then compile a sample project to see the results.
You can insert server controls using drag and drop or programmatically. You can also use databinding to retrieve and display data from Ektron.
Additional information and examples for Ektron Server Controls are available online after you install the sample site. Here is the path: http://localhost/samplesite/Default.aspx
Replace localhost with the webroot where you installed the sample site.
IMPORTANT: For improved security,you should rename or remove the Web services file when you move it to your production server. After installation, this file is named ServerControlWS.asmx in the /siteroot/Workarea/ folder in your Web root.
ServerControlWS.asmx is the Web service that lets server controls communicate with Ektron. The path is coded in the web.config file, as follows. Edit this line if you change the location or name of the ServerControlWS.asmx file.
<!-- Web Service URL for Server Controls design time  -->
<add key="WSPath" value="http://localhost/siteroot/Workarea/ServerControlWS.asmx" />
Ektron Server Controls
Use these server controls to customize Ektron.
- Analytics Tracker—Track statistics about visits to your Web site. Analytics Tracker Server Control
- AssetControl—When viewed on a Web form, displays a drag and drop box for users to upload assets to Ektron or update an existing asset. AssetControl Server Control
- Blog—Ektron provides 9 server controls that relate to displaying a Blog on a Web site. They are:
- Blog
- BlogCalendar
- BlogCategories
- BlogEntries
- BlogPost
- BlogRecentPost
- BlogRoll
- Blog RSS
- BlogArchive
- BreadCrumb—Creates a breadcrumb trail of where site visitors have been and allows them to navigate back to previous pages. BreadCrumb Server Control
For information on other Breadcrumb types, see FolderBreadcrumb Server Control and SiteMap Server Control
- BusinessRules—Adds a Business Rule created in the Ektron Workarea to a Web form. BusinessRules Server Control
- Calendar—Displays an event calendar. Using the WebCalendar Server Control
- Community Platform—Enable you to build a community site.
- CommunityDocuments Server Control
- CommunityGroupBrowser Server Control
- CommunityGroupList Server Control
- CommunityGroupMembers Server Control
- CommunityGroupProfile Server Control
- Favorites Server Control
- Friends (Colleagues) Server Control
- Invite Server Control
- MessageBoard Server Control
- Messaging Server Control
- PhotoGallery Server Control
- SocialBar Server Control
- UserProfile Server Control
- TagCloud Server Control
- ActivityStream Server Control
- Micro-messaging Server Control
- ContentFlagging Server Control
- Collection—Displays links generated by a collection. Using the Collection Server Control
- ContentBlock—Displays and manages a content block. Using the ContentBlock Server Control
- ContentList—Displays a list of content blocks created from a comma delimited list. Using the ContentList Server Control
- ContentReview—Places a star-based rating scale on any page of your Web site. This control can also retrieve and display visitor reviews and comments. ContentReview Server Control
- DesignTimeDiagnostic—The DesignTimeDiagnostic server control is used to verify the connection to Ektron’s server controls Web service. Using the DesignTimeDiagnostic Server Control
- DhtmlMenu—Displays a drop-down menu with submenus. Working with Menus
- Directory—Lets you customize the behavior of the Taxonomy feature. You place this control on any Web form to display a taxonomy. Directory Server Control
- eCommerce—let you set up an online marketplace where site visitors can purchase merchandise, services or content.
- FlexMenu—Displays a menu on a Web form. A FlexMenu creates XML, so, you can modify its behavior using an XSLT file, and change its appearance using a cascading style sheet (.css) file. Flexible Menu Server Control
- FolderBreadcrumb—Shows the path through the sitemap to the current page. FolderBreadcrumb Server Control. For information on other Breadcrumb types, see BreadCrumb Server Control and SiteMap Server Control.
- FormBlock—Displays a content block that is associated with a form. Displaying a Form with the FormBlock Server Control
- Forum—Provides a Discussion Board where topics can be discussed on your Web site. Three server controls are associated with Discussion Boards:
- Forum
- ActiveTopics
- PostHistory
- ImageControl—Display an Ektron image on a Web page. In addition, you have permission to edit the image, you can right click the image and a drag and drop box appears. This box lets you overwrite the existing file. ImageControl Server Control
- LanguageAPI—Allows developers to force a language for a Web site. LanguageAPI Server Control
- LanguageSelect—Lets user select language of site. LanguageSelect Server Control
- ListSummary—Displays a list of content block summaries. ListSummary Server Control
- Login—Displays the login or logout button, which lets the user log in and use Ektron. Login Server Control
- Map—Displays a map that flags locations of interest to your site visitors. Each location is an Ektron content item to which map information was added. Using the Map Server Control
- Membership—Creates a form for site visitors to add themselves to your Membership users list. Membership Server Control
- Menu—Calls a defined menu to be used with an XSLT to display the menu. Menu Server Control
- MetaData—Adds metadata contained in content blocks to a Web page. Adding Content to a Web Page with the Metadata Server Control
- MetaDataList—Creates a list of content blocks based on the metadata contained in the content blocks. Adding Content to a Web Page with the MetadataList Server Control
- Personalization—Personalization server controls let you create a Web page that site users can personalize. See Personalization Server Controls. The following server controls allow for personalization:
- EktronCatalogPart
- EktronCommunityCatalogPart
- EktronWebPartZone
- PersonalizationManager
- Poll—Displays a poll or survey created from an Ektron form on a Web page. Displaying a Poll with the Poll Server Control
- RssAggregator—Aggregates an RSS feed from an RSS Web site. Using the RssAggregator Server Control
- Search—Lets site visitors search for Web site content
- Content Search
- User Search
- eCommerce Product Search
- XML Index Search
- Sitemap—Utilizes the folder breadcrumb information in the Workarea to display a sitemap of your site. SiteMap Server Control
For information on other Breadcrumb types, see BreadCrumb Server Control and FolderBreadcrumb Server Control
Opening a Sample Project
- Browse to and double click Ektron‘s solution file,
localhost/siteroot/projectname.sln. For example, for the OnTrek sample site, the file isOnTrek.sln. The sample site project opens. - To work on a template page, click it from the Solution Explorer.

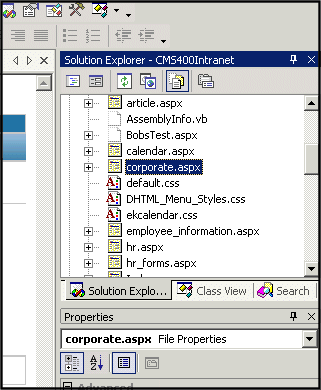
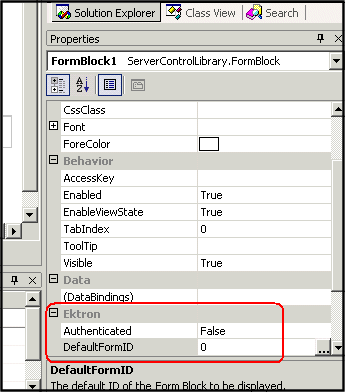
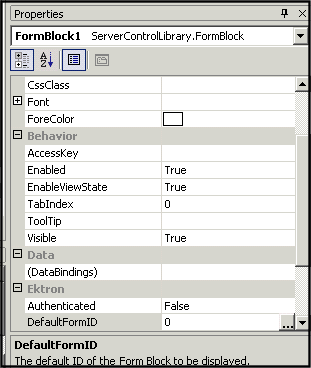
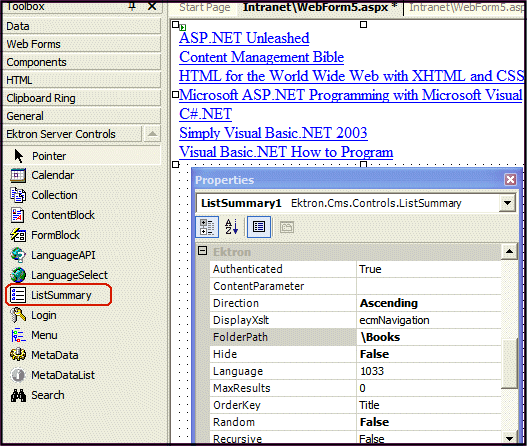
When you select a page, its properties appear in the Properties area (below Solution Explorer), and the page appears in the center of the screen. A control’s properties include several standard .NET properties along with Ektron-specific ones. The Ektron properties are labeled as illustrated below.
Installing Server Controls
This section describes how to install server controls (other than Search Server controls; to install those, see Adding Search Server Controls to Visual Studio).
NOTE: You must copy the dlls to a local drive before installing them. You cannot copy them from a network drive.
- Display the Visual Studio toolbox (View > Toolbox).
- Right click the mouse within the Toolbox.
- Click Add Tab.
- Type Ektron Server Controls then press <Enter>.
- Click the Ektron Server Controls Tab.
- Right click the mouse in the empty area.
- Click Add/Remove Items. If using Visual Studio, click Choose Items. The Customize Toolbox dialog appears.
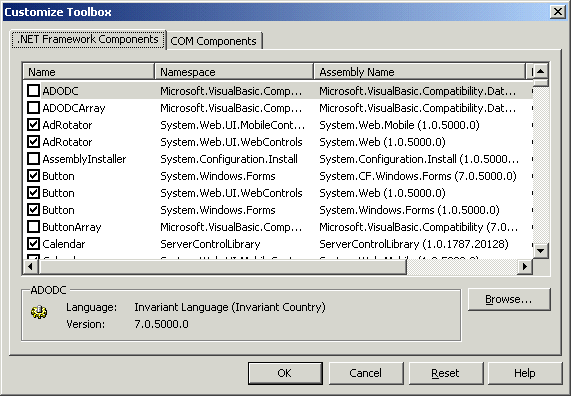
- Select the .NET Framework Components tab.
- Browse to the directory that stores
Ektron‘s dll files,localhost/samplesite/bin, and add theEktron.Cms.Controls.dllfile. This file provides access to Ektron’s server controls.Alternatively, you could use the following location,
C:\Program Files\Ektron\CMS400v8x\bin. The file is identical in both places.NOTE: Using the bin folder in your site provides better speed when loading Web pages. However, if you use the bin folder located in Program Files, you do not have to worry about deleting the .dll file if you change or delete your site.
- Click OK.
For easier viewing once the server controls are installed, you can right click on them and select Sort Items Alphabetically. You can only see the server controls when an aspx template is selected.
Removing Server Controls
- Display the Visual Studio toolbox (View > Toolbox).
- Right click the mouse within the Toolbox.
- Click Add/Remove Items. If using Visual Studio, click Choose Items.
- Click Namespace or Assembly Name to sort the Server Controls by manufacturer.
- Uncheck all boxes that are Ektron.Cms.Controls.
- Click OK.
- Right click the Ektron Server Control tab.
- Click Delete Tab to remove it.
Browsing Your Ektron Site Using CMS Explorer
Ektron provides a window (called the CMS Explorer) that lets you browse through your Web site to identify Ektron objects such as folders, calendars, blogs, and content blocks. For example, if you insert a List Summary Server Control, its FolderID property identifies the folder whose contents are displayed. If you are not sure of the folder path, click the ... button. A login screen appears.
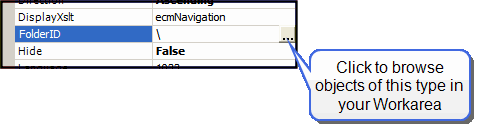
NOTE: You cannot be logged into the CMS Explorer and the Ektron Workarea at the same time. If you log into the CMS Explorer while logged into the Workarea, an error message appears. If you log into the Workarea while logged into the CMS Explorer, you will need to re-login to the CMS Explorer when you return to using it.
Enter your Ektron username and password. The CMS Explorer window appears so you can browse your Ektron Web site.
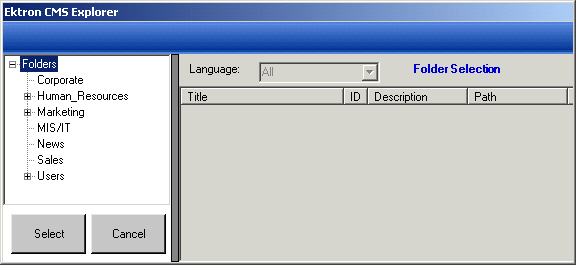
Navigate through the folders, select an object, then click Select. The selected object is pasted to the server control property.
NOTE: Although you see the object in the selected language in Visual Studio, the language is not stored. For example, if you select a German content block whose ID=2, Ektron only stores content block ID=2. When a visitor to your site browses to that page, the content block does not appear in the selected language. Instead, it is determined by a cookie or the user’s language selection.
Building the Project
After you open the solution file in Visual Studio and add the required files, build the project. After the project is built, a browser opens and it appears as a Web page. You can also view a Web page while working on it by right clicking on the Web form and clicking View in Browser.
Inserting a Server Control Using Drag and Drop
Because Visual Studio is a visual environment, you can watch the page layout change as you add or move a control and adjust its properties. And, whenever you need to identify an Ektron object (such as content block or collection), use the CMS Explorer to select it.
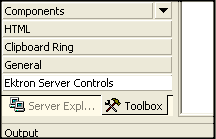
- Display the Visual Studio toolbox (View > Toolbox).
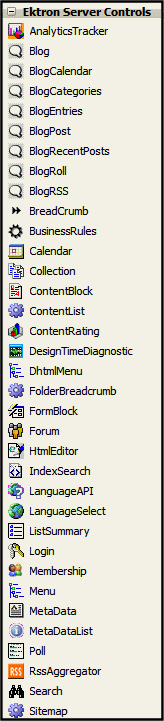
- Click the Ektron Server Control tab. Ektron’s server controls appear.
- Drag a server control and drop it into the desired location on the page.
- As desired, modify the control’s properties using the Properties area of Visual Studio.**
Inserting a Server Control Programmatically
Besides using the drag-and-drop method to insert a server control (explained in Inserting a Server Control Using Drag and Drop), you can insert one programmatically. You might prefer to insert server controls programmatically for several reasons:
- You want the control to be loaded into memory only under certain conditions. In this case, insert the logic that only displays the control if the condition exists.
- You want to display only certain properties of an object, such as the title of last edited date of a content block.
To insert an Ektron server control programmatically:
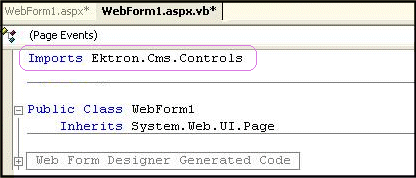
- Declare the Namespace at the top of the code-behind Visual Basic file.
NOTE: You do not need to declare a namespace. However if you do not, you must fully qualify objects that you create. For any customization of Ektron, classes or controls that inherit from Ektron classes, you should create your own namespace within 'Ektron.Cms.Custom'. For example, if your company is 'AcmeExampleTech, Inc.' you should create all of your custom classes within the namespace 'Ektron.Cms.Custom.AcmeExampleTech'.
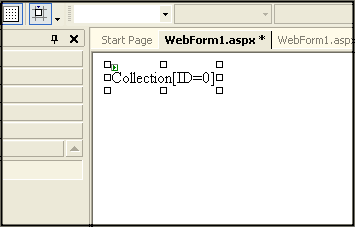
- Create an instance of the new control by declaring a control as an object in the code-behind; in this example, a collection named
MyColl.Ektron.Cms.Controls.Collection MyColl = new Ektron.Cms.Controls.Collection();
You can declare any server control as an object by using the server control name. See Ektron Server Controls. Another example would be:
Dim MyMdl as New MetaDataList. - Set the properties that you want to display on the page. For example:
Dim MyColl as New Collection
MyColl.DefaultCollectionID = 4
MyColl.Page = Page
For descriptions of the properties and how to use them, see Accessing Server Control Properties in code-behind Programmatically.
With C#, use this syntax.
>
Ektron.Cms.Controls.Collection MyColl = new Ektron.Cms.Controls.Collection();
MyColl.DefaultCollectionID = 4;
MyColl.ID = “Collection1”;
MyColl.Page = Page;
These lines tell the page to display CollectionID 1 unless otherwise specified.
WARNING! When using code-behind to add a server control to your Web form, you must set the Page object for the server control to Page. For example,
Mycoll.Page = Page
This line needs to appear between Dim new server control line and the Fill() line. This line is not added when dragging and dropping a server control on a Web form. See Also: Referencing the Page Property.If you do not know an object’s ID number, you can switch to Design mode, drag and drop the object, then use the CMS Explorer to find the ID number. (See Browsing Your Ektron Site Using CMS Explorer.) If you do this, remember to delete the dropped object when you are done. You can also obtain the ID number via the Workarea. This line sets the
Randomproperty to true. See Also: Random (Boolean)Set to True if you want to randomly display one content block in the specified folder. The content changes each time a user views the page.True—randomly display one content block.False—display the list summary normally. If you use a custom XSLT or EkML file, the type of content displayed can be manipulated. For example, if you use an EkML file that has the [$Html] variable in it, the actual content appears instead of a link. See Also: Controlling Output with Ektron Markup Language and [$Html].Dim MyColl as New Collection
MyColl.ID = “Collection1”
MyColl.DefaultCollectionID = 4
MyColl.Page = Page
MyColl.Random = True - Call the Fill method to fill an object’s properties on the page because there is no render event when using objects as components not as controls.
>
Dim MyColl as New Collection
MyColl.ID = “Collection1"
MyColl.DefaultCollectionID = 4
MyColl.Page = Page
MyColl.Random = True
MyColl.Fill()
- Use the property to determine what appears on the Web page. For example, to display the first item in a collection, use this syntax.
NOTE: Before adding this line you need to drag and drop a label on your Web form.
>
Dim MyColl as New Collection
MyColl.ID = “Collection1”
MyColl.DefaultCollectionID = 4
MyColl.Page = Page
MyColl.Random = True
MyColl.Fill()
Label1.Text = myColl.EkItems(0).Title
To display all items in a collection, use this syntax.
Dim myColl As New Ektron.Cms.Controls.Collection
Dim ekitem As New Ektron.Cms.Common.ContentBase
MyColl.DefaultCollectionID = 2
MyColl.ID = “Collection1”
MyColl.Page = Page
MyColl.Fill()
Label1.Text = "<ul>"
For Each ekitem In myColl.EkItems
Label1.Text &= "<li><a href=""" & ekitem.QuickLink & """>" & ekitem.Title & "</a>"
Next
Label1.Text &= "</ul>"
This example displays the quick link for every content block in the collection, formatted as a bulleted list. You can use similar code to display a List Summary or search results. The following explains the new (red) code above.
label1.Text = "<ul>"displays the opening tag for the bulleted listFor Each ekitem In myColl.EkItemscreates a loop for all content blocks in the collectionlabel1.Text &= "<li><a href=" & ekitem.QuickLink & ">" & ekitem.Title & "</a></li>"for each content block in the collection, displays its quicklink and titleNextloops through all content blocks in the collectionlabel1.Text &= "</ul>"closes the bulleted list
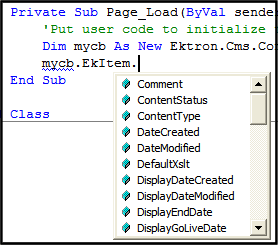
Accessing Server Control Properties in code-behind Programmatically
Every server control has properties associated with it that you can only access programmatically. This section explains what they are, how to access them, and how to use them.
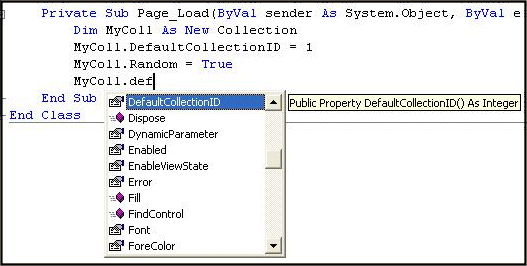
You can use Visual Studio’s intellisense feature to display a control’s properties. The intellisense box appears as soon as you insert the period (.) after the object, as illustrated below.
The intellisense box displays all properties that can be applied. For a description of Ektron’s standard server control properties, see Ektron Server Controls. To learn about native VS properties, see its documentation.
The property’s tooltip text indicates its type. In the above example, note that the DefaultCollectionID’s type is integer.
For more information about accessing Ektron object properties, see Customizing the Server Control in the code-behind.
Mutual Server Control Properties in code-behind
Every server control has the following read-only properties in the code-behind. These properties let you personalize any page with user names and IDs, and show if they are logged in.
NOTE: The properties do not display values within Visual Studio during design time. Instead, they only display values at run time, which are dependent on the user’s login status.
|
Property |
Value |
|
IsLoggedIn |
Tells if a user is logged in to Ektron.
|
|
LoggedInUserName |
Gets the Ektron user name to display. |
|
LoggedInUserID |
Gets the Ektron ID of the user to display. |
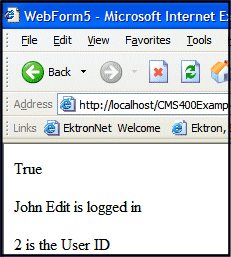
The following examples shows these properties in code-behind.
NOTE: You must be logged in to Ektron for this example to show your name and ID.
- Drag an Ektron server control onto a Web form.
- Drag 3 Literals onto the Web form.
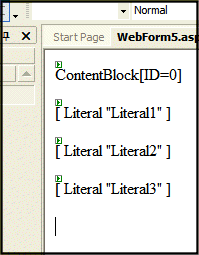
- Open the code-behind for the Web form.
- Add the following code to the Page_Load event.
Literal1.Text = ContentBlock1.IsLoggedIn
If ContentBlock1.IsLoggedIn Then
	Literal2.Text = ContentBlock1.loggedInUserName & " is logged in "
	Literal3.Text = ContentBlock1.loggedInUserID & " is the User ID "
End If
- Build and run the solution.
- Browse to the login page and log in.
- Browse to the new Web form you added. The login information appears.
Accessing Additional Properties
Ektron provides access to additional properties for the following objects.
- ListSummary
- collection
- Search
- ContentBlock
- FormBlock
You can use intellisense to select from a list of additional object properties.
To access additional properties, use the standard property's syntax but add .ekitem or .ekitems after the object.
- EkItems is an array of
Ektron.Cms.Common.ContentBase - EkItem is a single
Ektron.Cms.Common.ContentBase
dim MyCB as New ContentBlock
MyCB.DefaultContentID = 30
MyCB.ID = “ContentBlock1”
MyCB.Page = Page
MyCB.Fill()
label1.text = MyCB.EkItem.dateCreated
or
dim MyCB as new Ektron.Cms.Controls.ContentBlock
MyCB.DefaultContentID = 30
MyCB.ID = “ContentBlock1”
MyCB.Page = Page
MyCB.Fill()
label1.text = MyCB.EkItem.dateCreated
WARNING! To access additional properties for the Collection, ListSummary, and Search objects, use ekitems, not ekitem. For example: MyColl.ekitems(0).dateCreated. where (0) is the index of the array.See Also: Accessing Items in an Array.
NOTE: The following properties are read-only. For example, you can get a content block’s ID and pass it to another part of the code. However, you cannot set a content block ID to be shown. mycb.Ekitem.id = 8 does not set a content block’s ID. To set a content block's ID, use DefaultContentID = 8.
- Comment—The content block’s comment.
- ContentStatus—The status of the content block. See Content Statuses.
- approved
- checked out
- checked in
- expired
- pending deletion
- pending expiration
- pending start date
- submitted
- ContentType—One of the following: See Scheduling Content.
- all types
- archived content
- archived forms
- content
- forms
- DateCreated—The date when the content block was created, formatted as a .NET date type.
- DateModified—The date when the content block was modified, formatted as a .NET date type.
- DefaultXslt—The default XSLT used to display the content.
- DisplayDateCreated—The date when the content block was created. It is formatted as a string that represents Ektron’s display of the date.
- DisplayDateModified—The date when the content block was edited. It is formatted as a string that represents Ektron’s display of the date.
- DisplayEndDate—The content block’s end date. It is formatted as a string that represents Ektron’s display of the date. See Scheduling Content.
- DisplayGoLiveDate—The content block’s start date. It is formatted as a string that represents Ektron’s display of the date. See Scheduling Content.
- DisplayStartDate—The content block’s start date. It is formatted as a string that represents Ektron’s display of the date. See Scheduling Content.
- EndDate—The content block’s end date, formatted as a .NET date type. See Scheduling Content.
- EndDateAction—One of the following: See Scheduling Content.
- archive display
- archive expire
- refresh report
- FolderID—The ID of the folder that contains each content block.
- GoLiveDate—The content block’s start date formatted as a .NET date type. See Scheduling Content.
- Html—The content that makes up the content block. If content block is in XML it will return it as raw XML content.
- Hyperlink—Content block title wrapped by
<a href>tags. - Id—The content block ‘s ID number.
- InheritedFrom—If folder permissions are inherited, the folder from which they are inherited. See Inheriting Permissions.
- IsInherited—Whether a content block’s permissions are inherited. See Inheriting Permissions.
- IsPrivate—Whether or not a content block is private. See Making Content Private.
- Language—The content block’s language. See Working with Multi-Language Content.
- LastEditorFname—The first name of the last person to edit the content block.
- LastEditorLname—The last name of the last person to edit the content block.
- PackageDisplayXSLT—If the content block is XML, the name of its XSLT.
- QuickLink—The content block’s quicklink. See Adding a Quicklink or Form to Content.
- StartDate—The content block’s start date formatted as a .NET date type. See Scheduling Content.
- Status—The status of the content block. See Content Statuses
- approved
- checked out
- checked in
- expired
- pending deletion
- pending expiration
- pending start date
- submitted
- Teaser—The content block summary. See Writing a Summary for Content
- TemplateLink—Currently empty and not being used with the ContentBlock server control.
- Title—The content block title.
- UserID—Last user who edited the content.
- Xslt1—The content block’s first Xslt, as defined in Ektron.
- Xslt2—The content block’s second Xslt, as defined in Ektron.
- Xslt3—The content block’s third Xslt, as defined in Ektron.
- Xslt4—The developer can use this property programmatically. Ektron only uses Xslt1, 2 and 3 in the workarea.
- Xslt5—The developer can use this property programmatically. Ektron only uses Xslt1, 2 and 3 in the workarea.
Accessing Items in an Array
To access and manipulate content blocks returned by an object, use the common class Ektron.Cms.Common.ContentBase. For example, Search, Collection and ListSummary have EkItems (an array of ContentBase), while ContentBlock has a single EkItem. This example creates a bulleted list of every item in the collection.
dim MyC as new Ektron.Cms.Controls.Collection
MyC.DefaultCollectionID = 1
MyC.ID = “Collection1”
MyC.Page = Page
MyC.Fill()
dim item as Ektron.Cms.Common.ContentBase
MyC.Text = "<ul>"
for each item in MyC.EkItems
MyC.Text &= "<li>" & item.Title & "</li>"
next
MyC.Text &= "</ul>"
Response.Write(MyC.Text())
NOTE: For information on using ekitems with eCommerce server controls, see Using the EkItems Property with eCommerce server controls.
Referencing the Page Property
Server controls require a reference to their parent page (for example, using the DynamicParameter property on a content block to check for a query string). You must provide access to the page object if you declared your control in the code-behind. To do this, set the control's Page property to the Web page you're working on, as shown in the following example.
Ektron.Cms.Controls.Search MySearch = new Ektron.Cms.Controls.Search();
MySearch.Page = Page;
MySearch.Fill();
This relationship only is required when inserting a control in the code-behind. When dragging and dropping, even if you make changes in code-behind, the relationship is automatically generated.
|
Best Practice You should include the |
Customizing Server Controls
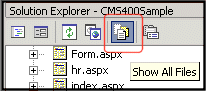
One of Visual Studio’s strengths is its separation of coding and logic from presentation. Web page formatting is handled by a page’s HTML, while the logic is handled by the code-behind, which is stored in the corresponding .vb file. For example, if the ASP.NET page is mypage.aspx, the code-behind file is mypage.aspx.vb.
NOTE: If you do not see the code-behind files, click Show All Files on the VS Solution Explorer toolbar (circled in the following figure).
Within the vb file, you can use Visual Basic to insert code to manipulate the events that occur on the page.
Recognizing the Server Control Within the HTML
Within a Web page’s HTML, a <cms> tag wraps the Visual Studio object. The following is an example of the Search and Contentblock server controls.
<cms:Search id="Search1" runat="server" ButtonText="Search" Display="Vertical">
</cms:Search>
<cms:ContentBlock
  id="ctrlMainContentBlock"
  runat="server"
  DefaultContentID="1"
  DynamicParameter="id”
  OverrideXslt="Default">
</cms:ContentBlock>
Recognizing the Server Control Within the code-behind
Within a Visual Studio code-behind file, the Ektron server controls appear (along with the VS controls) in the Web Form Designer Generated Code section. When you click + to display this section, you see something like the following. The content block listed in HTML above is circled below to help you see their relationship.
![]()

The next section of the code-behind page loads the page into the browser.
Private Sub Page_Load(ByVal sender As System.Object, ByVal e As System.EventArgs) Handles MyBase.Load
You want your events to occur while the page is loading, so add the custom code following this line.
Customizing the Server Control in the code-behind
To customize an Ektron server control in the code-behind, insert code similar to the following after the Page_load command.
Dim MyObj As New Ektron.Cms.Controls.ContentBlock
This code declares a variable named MyObj and assigns to it the value of a content block. The content block is part of the Ektron.CMS.Controls content base, so it has access to the Ektron database.
After defining MyObj as a content block, you can access its properties. For example, to assign a defaultID of 24, insert the following.
Dim MyObj As New Ektron.Cms.Controls.ContentBlock
MyObj.DefaultContentID = 24
Now the content block can be specified dynamically in the URL of the hyperlink that calls it. If not, content block 24 displays.
This is an example of programmatically applying property values to content blocks.
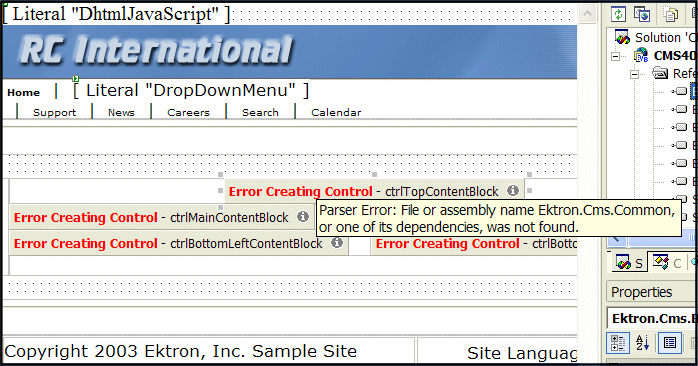
Troubleshooting Error Creating Control Message
If you get an Error Creating Control message while trying to use a server control, you can view the message by hovering the mouse over the control.
Using Ajax-Enabled Server Controls and Custom Code
|
Best Practice When using Ajax server controls and custom code, wrap the custom code in a check for “is not a callback,” so it is not executed when a callback from an Ajax server control occurs. |
If you use an Ajax-enabled server control and write custom code, it may generate an exception, indicating the server control does not work. This issue happens during callback for the Ajax server control when custom code accesses a property that is filled during page load, but not filled during callback.
For example, a Poll server control is on a Web form, and you want the title of a content block to appear in a literal on that form. The EkItem.Title property for the content block is filled upon page load. When a site user answers a poll question, an exception occurs during the callback because the EkItem.Title property is not refilled. However, the site user does not see the exception because it looks like the Poll server control is not working.
The following example shows custom code that makes the content block’s title appear in the literal:
Literal1.Text = ContentBlock1.EkItem.Title
To solve this issue, wrap the custom code in a check for “is not a callback”. This prevents the code execution when callback occurs. For example:
[C#]
If( !IsCallback )
  {
    Literal1.Text = ContentBlock1.EkItem.Title
  }

[VB]
If
  ( Not IsCallback )
  Literal1.Text = ContentBlock1.EkItem.Title
End If
Manipulating Server Controls with Drag and Drop and Programmatic
You can manipulate server controls further after dragging and dropping them on a Web form by using the code-behind. The following example shows using a drag and drop ListSummary Server Control then modifying it programmatically.
- Drag and drop a List Summary on your Web form and set your properties.
- Add the following code to the code-behind.
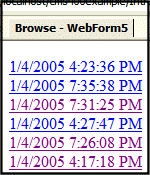
Dim myString As String
Dim i
For i = LBound(ListSummary1.EkItems)To UBound(ListSummary1.EkItems)
  myString &= "<a href=""" & ListSummary1.EkItems(i).QuickLink & """>"
    & ListSummary1.EkItems(i).DateCreated & "</a><br>"
ListSummary1.Text = myString
Next
ListSummary1 is the ID of the object. It is used to get access to its properties.
- Create a string that contains the output (myString).
Dim myString As String
- Set the object’s
Text property to that string.myString &= "<a href=""" & ListSummary1.EkItems(i).QuickLink & """>" & ListSummary1.EkItems(i).DateCreated & "</a><br>"
- Wrap in a loop so it loops through each of the items.
Dim i
For i = LBound(ListSummary1.EkItems) To UBound(ListSummary1.EkItems)
Next
This example outputs the date created for each content block in a List Summary.
Data Binding with Server Controls
With data binding, you can bind Ektron server controls to a GridView Control, DataList Control, or Repeater Control. This gives more flexibility when you use data from the Ektron server controls. Benefits of data binding include ease of data manipulation and the ability to format data.
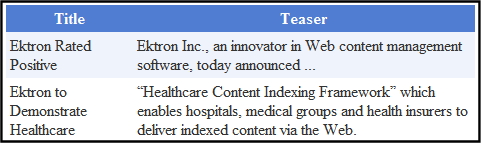
WARNING! When HTML is bound to a column, you need to add HtmlEncode = False to it. Otherwise, the HTML appears as code. For example, <p>Ektron Inc., an innovator in Web content management software, today announced...</p>.
The following are data bindable Ektron server controls.
- Collection
- ContentList
- IndexSearch
- ListSummary
- MetaDataList
- RssAggregator
The following example shows code-behind that uses a GridView to display a Collection:
NOTE: For the example code to work properly, you need to drag and drop a GridView server control on a Web form.
Dim myCol As New Ektron.Cms.Controls.Collection
  MyCol.ID = “Collection1”‘‘‘Create an ID for the Collection
  myCol.DefaultCollectionID = 4
  myCol.Page = Page
  myCol.Fill()
GridView1.DataSource = myCol
GridView1.DataBind()
Steps to Data Binding Using Drag and Drop Server Controls
- Create a new Web form.
- Drag and drop a data bindable Server Control on the Web form. For example, a Collection server control.
- In properties, choose a
DefaultCollectionIDfor the Server Control and make sure DisplayXslt is set to None- DataBind Only.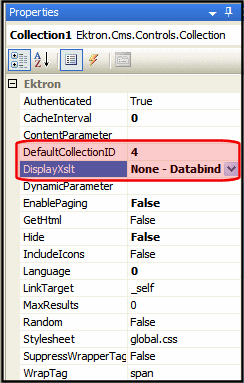
- Drag and drop a GridView on the Web form.
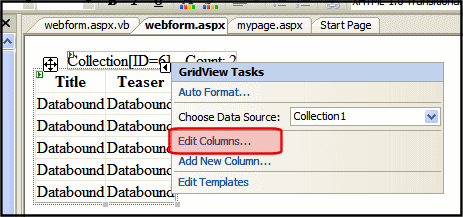
- In the GridView Tasks, choose the DataSourceID.
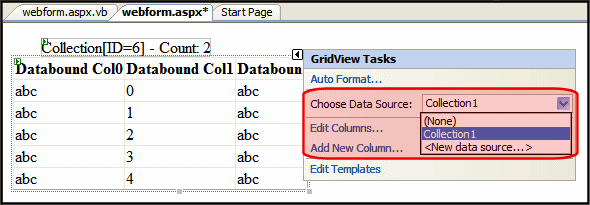
- In code-behind, add the following line of code to the Page add field.gifnit event:\
Collection1.Fill()
- Select the columns to be databound by clicking Add New Column in GridView Tasks.
- Complete the Add Field window.
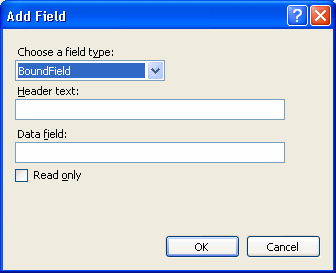
- Choose a field type—BoundField
- Header text—The title name for each column.
- Data field—The data to bind to each column. Choose one of the following:
- ID—the content block ID
- Title—the content block title
- Teaser—the content summary
- Html—the html content
- StartDate—the content’s start date
- DateModified—the content’s last modified date
- EndDate—the content’s end date
- LastEditorFname—the last editor’s first name
- LastEditorLname—the last editor’s last name
- QuickLink—the content’s quicklink
- HyperLink—the content’s hyperlink
- DisplayStartDate—the string representation of the start date
- FolderID—the folder ID where the content is located
- ContentStatus—the content’s status
- Language—the content’s default language
- DisplayDateModified—string representation of the content’s last modified date
- DisplayEndDate—string representation of the content’s end date
- EndDateAction—an action tied to end date. For example, Refresh_Report
- Comment—the content’s comments
- Click OK.
- Repeat steps 6, 7 and 8 for each column you want to add.

- If you want to add all of the columns automatically, in the GridView Task menu click Edit Columns. Otherwise, skip to step thirteen.
- Click the Auto-generate fields checkbox.

- Click OK.
- From the Build menu, click Build Page.
- In design view, right click the form and select View in Browser.
For more information on GridView, DataList, Repeater and DetailsView, see the help inside Visual Studio.
Caching with Server Controls
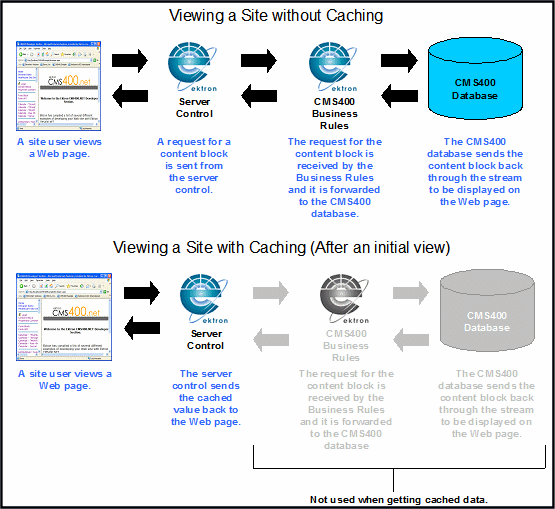
A key factor in building high-performance, scalable Web applications is the storage of items in memory after the first time they are requested. The items include data objects, pages, and parts of a page. Caching saves and later reuses page output or application data across HTTP requests. You can store items on the Web server or other software in the request stream, such as the proxy server or browser. Caching saves time and resources because the server does not have to recreate information, particularly things that demand significant processor time or other resources. The following image contrasts data flow in non-cached and cached environments.
Caching While Logged In
When a user is logged in, changes appear on the site only after time defined in the cache interval. This reduces the number of database hits, which improves your server’s performance. For example, if you add a new item to a Collection, the change only appears on the site when the cache interval expires. In the meanwhile, use Preview mode to see the updated Collection immediately.
- Collections
- ContentList
- DhtmlMenu
- ListSummary
- MetadataList
- Menu
IMPORTANT: Caching while logged in does not work with Private content. See Also: Making Content Private
To set up caching of content for a Web page:
- Set the siteroot/Web.config file’s
ek_CacheControlsproperty’svalueto“1”. - Add to a Web form a server control that supports caching of individual content.
- Set the control's
CacheIntervalproperty to the number of seconds for which data should be cached. For example, to cache for 5 minutes, setCacheIntervalto 300.The default value is 0 seconds. So, you must change the default to enable caching.
Page-Level Caching
- ActiveTopics
- All blog controls
- Collections
- CommunityDocuments
- CommunityGroupBrowser
- CommunityGroupList
- CommunityGroupMembers
- CommunitySearch
- ContentBlock
- ContentList
- DhtmlMenu
- Directory
- Favorites
- FlexMenu
- FormBlock
- Forum
- Friends
- ListSummary
- MetadataList
- Menu
- Poll
- PostHistory
- SiteMap
- SmartMenu
- TagCloud
- UserProfile
The following example shows a page-level cache for non-logged-in users. You use a server control to define whether a user is logged in, then define if the page is cached, based on the user’s status.
- Create a new Web form in your Ektron project.
- Add the following text to the Web form:
Refresh the page. The page will cache for 20 seconds when not logged in:
Time is = - Next to Time is =, add a literal.
- Below that, add a ContentBlock Server Control.
- Set the DefaultContentID. For this example,
DefaultContentID = 20. - Add the following to the Page_Load event in the code-behind.
If Not ContentBlock1.IsLoggedIn Then
  Response.Cache.SetExpires(DateTime.Now.AddSeconds(20))
  Response.Cache.SetCacheability(HttpCacheability.Public)
  Response.Cache.SetValidUntilExpires(True)
  Response.Cache.VaryByParams("id") = True
NOTE: On a PageBuilder page, you would use
Response.Cache.VaryByParams("pageid") = True.Response.Cache.SetVaryByCustom("cmsCache")
End If Literal1.Text = Now() - Build your Web form.
- Browse to your Web form using a browser.
- Press your browser’s refresh button. If you are not logged in to Ektron, the time remains for twenty seconds. After twenty seconds, when you refresh, the new time appears.
NOTE: You can use the same code in a user control to cache output in a particular region of the page.
Displaying Custom XML in Ektron’s Server Controls
Several Ektron server controls provide a CustomXml property, which lets you add custom XML to a control’s generated XML before it is processed by its XSLT. Use the CustomXml property in code-behind with these server controls:
- Cart
- Checkout
- CurrencySelect
- MyAccount
- OrderList
- Product
- ProductList
- ProductSearch
- Recommendation
The following examples shows a C# usage of the CustomXml property in code-behind.
protected void Page_Load(object sender, EventArgs e)
	{
	product1.CustomXml = "<banner>Save $$$ While Christmas Shopping!</banner>
	<specials><special><link>ProductDemo.aspx?id=1013</link>
	<text>A great gift for Dad!</text></special><special>
	<link>ProductDemo.aspx?id=1015</link><text>
	A great gift for Mom!</text></special></specials>";
	}
The following example shows the XML sent to the XSLT file.
<root>
  <customXml>
    <banner>Save $$$ While Christmas Shopping!</banner>
	<specials>
	   <special>
		<link>ProductDemo.aspx?id=1013</link>
		<text>A great gift for Dad!</text>
	   </special>
	   <special>
		<link>ProductDemo.aspx?id=1015</link>
		<text>A great gift for Mom!</text>
	   </special>
	</specials>
   </customXml>
</root>
Using the RssAggregator Server Control
An RSS aggregator consumes an RSS feed and displays its information in a readable format. The RssAggregator server control lets you do the same by processing and displaying an RSS feed from any Web site. This lets you create an information Web page for news, stories, images, lists of music, and so on.
You can create a multi-level information Web page by placing several RssAggregator server controls on a page. For example, create a world news Web page by adding RSS feeds from the NY Times, BBC, and AFP (Agence France-Presse). The process of adding an RSS Aggregator to your Web site is simple.
- Drag and drop the RssAggregator server control a Web form.
- Set the
URLproperty to point at the RSS feed. For example,http://msdn.example.com/rss.xml
When a site visitor views the Web form, the RSS feed displays properly. If the visitor refreshes the page, any information updated by the RSS feed provider appears.
To change an RSS feed's appearance, create a custom XSLT.
The following are Ektron-specific server control properties. You can find information about native .NET properties such as font, height, width and border style in Visual Studio® help.
- Authenticated (String)
Indicates if you are logged into the CMS Explorer and can use it to browse to content, collections, and so on. See Also: Browsing Your Ektron Site Using CMS Explorer.
- DisplayXslt (String)
Determines how the information on the page appears.
- None—databind only
- ecmNavigation—lists the title of every RSS feed item
- ecmTeaser—lists a title and a description of every RSS feed item
- Path to Custom Xslt—If desired, enter a relative or absolute path to an Xslt that determines the display of the page.
WARNING! If you specify an external file, do not store this file in the Workarea folder. If you store this file in the Workarea folder, the file will be lost when you upgrade.
- DoInitFill (Boolean)
By default, Fill occurs during the Page_Init event. Set to false if you want to postpone the fill-action until later. In this case, Fill is automatically called during the Page Render event. You might do this if you need to set or change a property on the control in code-behind and have it render with your changes shown.
- Hide (Boolean)
Hides or displays the output of the control in design time and run time.
- True—Hide the control output.
- False—Display the control output.
- Language (Integer)
Set a language for viewing the RssAggregator. This property shows results in design-time (in Visual Studio) and at run-time (in a browser).
- LinkTarget (ItemLinkTarget)
Determines the type of window that appears when you click a link in the server control.
- _Self (default)—opens in same window.
- _Top—opens in parent window.
- _Blank—opens in new window.
- _Parent—opens in the parent frame.
- MaxResults (Integer)
The Maximum number of items from an RSS feed that are returned. 0 (zero) = unlimited.
- SuppressWrapperTags (Boolean)
Suppresses the output of the span/div tags around the control.
- True—Suppress wrap tags.
- False (default)—Allow wrap tags.
- URL (String)
The RSS feed path for the server control. For example:
http://msdn.example.com/rss.xml - WrapTag (String)
Lets a developer specify a server control’s tag.
- Span (default)—designate an inline portion of an HTML document as a span element.
- Div—apply attributes to a block of code.
- Custom—Lets you use a custom tag.
Retrieving the XML Structure of an RssAggregator Server Control
Retrieving the XML structure of XML content allows for greater control over developing XSLs. To retrieve the XML structure:
- Open a new Web form.
- Drag and drop a RssAggregator server control onto it.
- Set the
URLproperty. - Drag and drop a textbox on the Web form.
- Set the
TextModeproperty to MultiLine.NOTE: You should set the text box width to at least 400px.
- Add the following line on the code-behind page.
Textbox1.Text—RssAggregator1.XmlDoc.InnerXml
- Build the project.
- View the Web form in a browser. The XML structure of the RssAggregator Menu appears in the textbox.
Using the Search Engine Optimization (SEO) Server Control
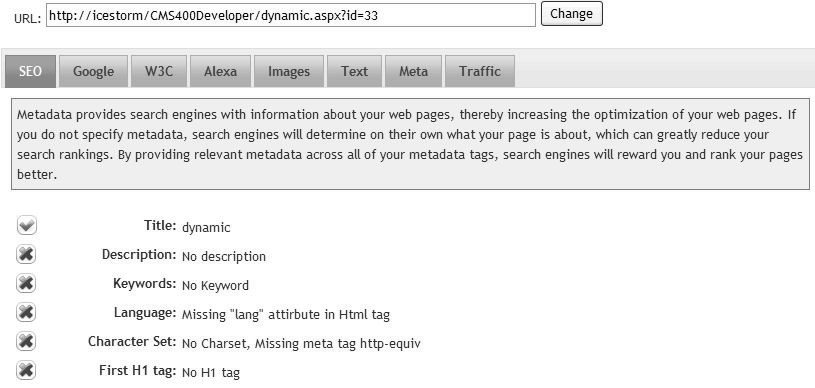
The SEO server control analyzes your Web site for W3C compliance, what information Google has about the page, Alexa rankings, image alt text, keyword density and metadata. SEO lets you know how (and if) you’ve set these values.
The Search Engine Optimization (SEO) Control appears as an image on any template or master page on which you drop it.
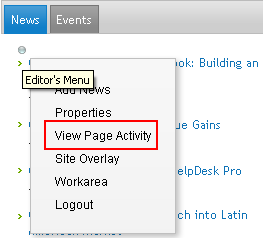
You also can access the SEO report by clicking the Web Site Content menu then choosing View Page Activity.
When you are logged in and click the image, you see a detailed report of how search engines evaluate the page. For example, the report runs the page through a W3C validation site, or displays how search engines evaluate the page's text.
Inserting the SEO Server Control in a Web Site
- Within Visual Studio, open your Web site.
- Open a master page or template on which to place the SEO control.
- Open Solution Explorer, and your Web site within it.
- Open the Workarea then the SEO folder.
- Drag the SEO control (
seo_w3c.ascx) onto an area of the page.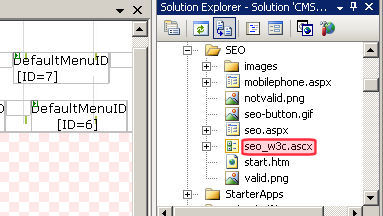
- Save the page.
Viewing a Web Page's SEO Report
Only logged-in Ektron or Membership users can see the SEO control.The following list summarizes the information on the SEO Report.
- SEO—Compares viewed page against a basic SEO checklist, such as if keywords are included, language and charset values, and so on.
- Google—Information that search engines have about your page, including pages that link to it, indexed pages on the site and what the page looks like on a mobile device.
- W3C—Validates Web page for markup and CSS compliance, and also checks for broken links and the ability of the page to be displayed on mobile devices. By having correct markup that conforms to HTML or XHTML standards, search engines will detect words and phrases correctly, a key element in SEO. Correct markup also ensures that search engine spiders can easily understand the content and navigation on the page. Proper code will make it easier for spiders to parse as expected and digest the content for organic search engines.
- Alexa—Alexa is a leader in providing insight on the overall ranking of your Web site on the Internet. Alexa overview, traffic, related and linked-to sites.
- Images—To ensure SEO and compliance, all images on your pages should contain alt tags. This enables searching of the images (since engines cannot read the contents of an image). In addition, alt tags must be used for 508 compliance. This tab identifies all images and their alt tags.
- Text—A keyword density analysis report displays text graphically in much the same way that organic search engines see your page. Web pages that are content rich typically yield higher search engine rankings than pages that are mainly images or multimedia based. This report displays words, two-word phrases and 3-word phrases in a cloud format, revealing words and phrases that show up most often on the page. This information helps you to optimize your content and reach your target audience.

- Meta—The page's metadata
- Misc—Additional search information
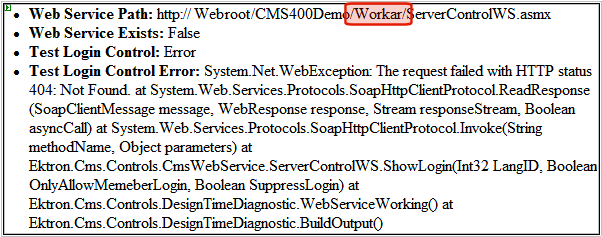
Using the DesignTimeDiagnostic Server Control
IMPORTANT: This control is for use in design-time only. Nothing is rendered at run-time.
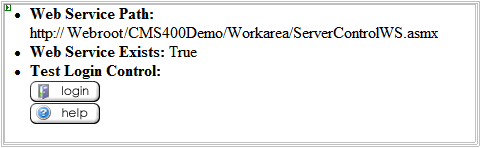
The DesignTimeDiagnostic server control is used to verify the connection to Ektron’s server controls Web service. When added to a Web form, this control provides the following information:
- Web Service Path—displays the server control Web service path in your web.config file.
- Web Service Exists—calls a method in the Web service that returns True when the Web service exists. When it does not, it returns False.
- Test Login Control—displays the Login server control to show that the Web service is connected and working properly. When not connecting properly, an error message appears.
The DesignTimeDiagnostic server control has no definable Ektron properties.
The following example shows the control on a page connected to the Web service.
The following example shows the control on a page not connecting to the Web service. Note that the path is not the correct path. It should be: http://192.168.0.82/siteroot/Workarea/ServerControlWS.asmx
Learning About Visual Studio
This section provides background information about Microsoft’s Visual Studio. For more information, use the help feature installed with Visual Studio and Microsoft’s developer Center (http://msdn.microsoft.com/vstudio/).
NOTE: The following definitions are from Visual Studio Help.
- Grid Layout—Absolute positioning attributes are inserted into elements that are added, and updated in elements that are moved. Elements can be dragged across the Design view surface. The positioning grid and Snap to Grid are available.
- Flow Layout—Elements are added without absolute positioning attributes. Web browsers arrange elements in the order that they occur on the page, from top to bottom. You cannot drag elements across the Design view surface or use the positioning grid.
Grid layout is the default, which means that all controls drawn to the Web form in the designer window have absolute positioning. Here is an example.
<body MS_POSITIONING="GridLayout">
<form id="Form1" method="post" runat="server">
  <asp:Button id="Button1" style="Z-INDEX: 101;
    LEFT: 160px; POSITION: absolute;
    TOP: 80px" runat="server" Text="Button">
  </asp:Button>
  <asp:Button id="Button2" style="Z-INDEX: 102;
    LEFT: 480px; POSITION: absolute;
    TOP: 88px" runat="server" Text="Button">
  </asp:Button>
  <asp:GridView id="GridView1" style="Z-INDEX: 103;
    LEFT: 208px; POSITION: absolute;
    TOP: 152px" runat="server">
  </asp:GridView>
</form>
</body>
In Grid layout, you can position your controls like a WYSIWYG editor with no knowledge of HTML. However, because absolute positioning is not rendered consistently by all browsers, the page layout can be flexible based on the size of other controls on the page, and the Web browser window.
When other controls are dynamically populated, such as a GridView, controls that appear beneath it in the Web form would be obscured if they were positioned absolutely at design time. In addition, when utilizing globalization of pages with different languages, the size of text areas can vary and cause obstructions.
Using Ektron’s Developer SDK
The Developer SDK for Ektron contains the following components to help you extend and customize your site.
- Developer API, which includes:
- Server Control API: An interface for calling the methods and properties of the Ektron server controls. For additional information on the server controls, see Introduction to Server Controls and the Developer API Documentation.
- Web Services API: Exposes a method’s functionality for use with SOAP over HTTP. For additional information on the Web Services, see Web Services and the Developer API Documentation.
- .NET Assembly API: Similar to the Business API provided in previous version, the .NET Assembly API provides an interface for calling the methods and properties that are exposed in Ektron. See Also: the Developer API Documentation.
- DeveloperAPI Documentation
The API Documentation contains a detailed description of the functions included in each of the APIs. To access the Developer’s API documentation in Visual Studio, choose Help > Contents. Next, choose Ektron API Documentation from the list of contents. You can also filter the documentation so you see only Ektron’s API documentation. Click Ektron API Documentation in the filter drop-down box.
You can also access the API documentation online by clicking http://reference.ektron.com/developer/.
- Extensions
Extensions are developer-defined software modules that modify the behavior of Ektron.
In versions previous to Ektron version 8.0, developers used the Plug-in Extension Wizard to extend the system. As of version 8.0, Extensions are preferred over the Plug-in system.See Also: Customizing Behavior with Extensions
- Ektron Server Controls Toolbox
Ektron controls are installed with the Developer SDK. Server controls let you insert, via drag and drop or programmatically, many standard methods and properties within the Visual Studio environment. This means that you can see the effect of your changes in real time -- you don’t have to modify a page then compile a sample project to see the results.
An opportunity to install the Developer SDK appears during the installation or upgrade of Ektron (see third checkbox from top in the following dialog box).
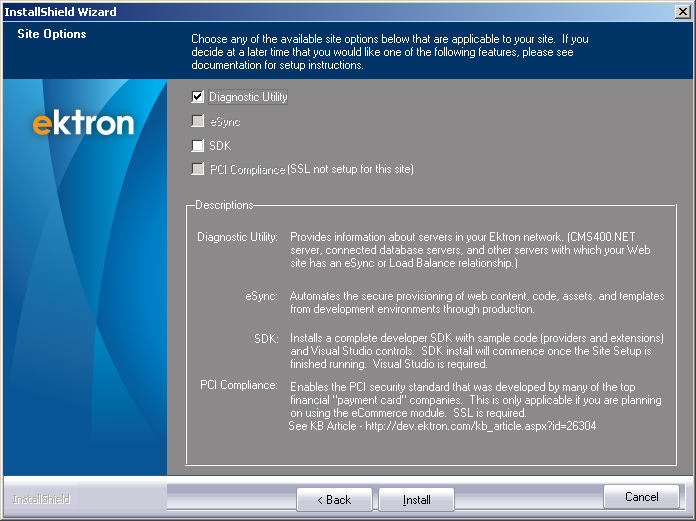
If Developer SDK is not checked during installation, you can install it by going to Windows Start button > All Programs > Ektron > CMS400v8x > Utilities > CMS400SDK Install.
![]()