A breadcrumb is display of the trail a site visitor took to arrive at the page. Breadcrumbs are commonly found on Web sites to help navigate the site. For example, a simple text breadcrumb such as Products > Monitors > Flat Panel shows that you arrived at this page by clicking Products, then Monitors, then Flat Panel.
Sitemap Breadcrumbs versus History Breadcrumbs
Ektron provides 2 kinds of breadcrumbs.
| Type | Description | To set up in Workarea | To place on Web page |
|---|---|---|---|
| Sitemap | Displays the path through the sitemap to the current page, like the path shown in a Yahoo! directory listing. Sitemap breadcrumbs always show the same path to a page, regardless of how it is reached. | Creating SiteMap Breadcrumbs | FolderBreadcrumb Server Control |
| History | More accurately fulfilling the breadcrumb metaphor, they display a history of recently-visited pages. Site visitors can click a history breadcrumb to jump to a previously-visited page. | Not necessary | BreadCrumb Server Control |
You can also use the folder breadcrumb information to deploy a site map. See Also: SiteMap Server Control
Creating SiteMap Breadcrumbs
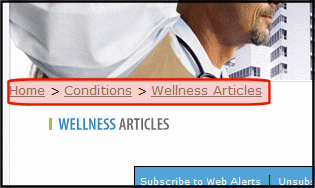
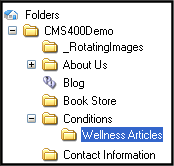
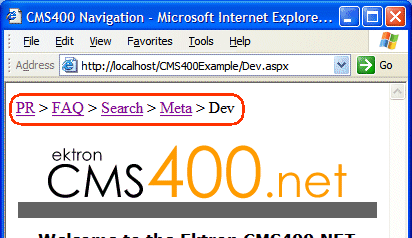
Below is an example of a sitemap breadcrumb on a Web page.
The following topics explain how to create and manage Sitemap Breadcrumbs in the Workarea. FolderBreadcrumb Server Control explains how to place them on a Web page.
Adding a Breadcrumb Trail
Before you add a breadcrumb, determine which topics should appear when a Sitemap Breadcrumb control appears on pages that display content in the selected folder. The most common trail would include the sequence of topics that introduce the folder's content, but you can create any sequence that makes sense.
For example, on a university Web site, content that describes the women's swimming team might have this sitemap trail: Home > Athletics > Women's Athletics > Swimming.
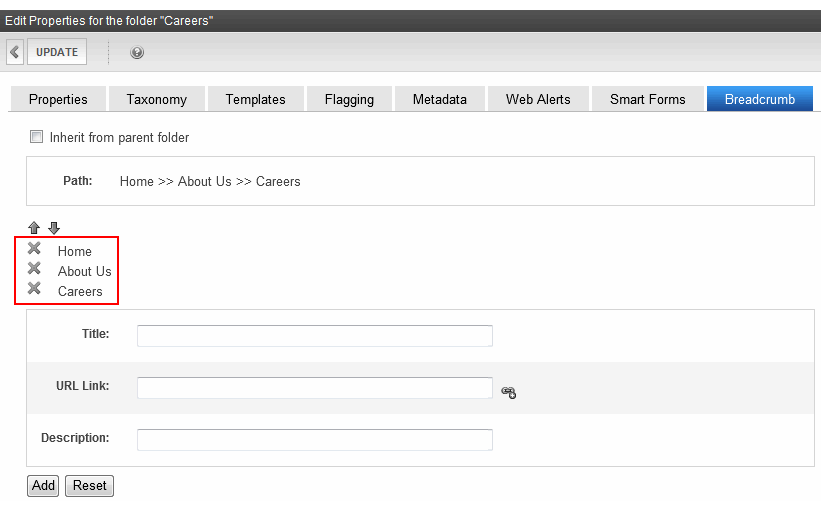
The example below adds 3 breadcrumbs to a sitemap trail.
- Navigate to the folder for which you want to add the breadcrumbs.
- On the View Contents of Folder screen, click View > Properties.
- Click Edit Properties.
- Click the Breadcrumb tab. The Edit Breadcrumbs screen appears.


- Uncheck the Inherit from parent folder box.
- Add the following information.
- Title—the breadcrumb name as you want it to appear in the breadcrumb trail
- URL Link—the URL path to the breadcrumb’s destination, typically an Ektron content item. For example, default.aspx.
If you are not sure of the file path, click Select quicklink ( ), and the library for quicklinks appears. Select the breadcrumb's content item.
Alternatively, you can enter a URL, for example,www.example.com.
You would typically enter the first item in the breadcrumb path first. But even if you do not, you can easily change the sequence of items at any time on this screen. See Also: Reordering Breadcrumb Items - Description—add a description for the breadcrumb
- Click Add. The first item in the breadcrumb path appears.
- Repeat steps 6 and 7 for each item in the breadcrumb path. The breadcrumb trail now looks like this.
- Click Update.
Reordering Breadcrumb Items
- Navigate to the folder for which you want to reorder breadcrumbs.
- On the View Contents of Folder screen, click View > Properties.
- Click Edit Properties.
- Click the Breadcrumb tab. The Edit Breadcrumbs screen appears.
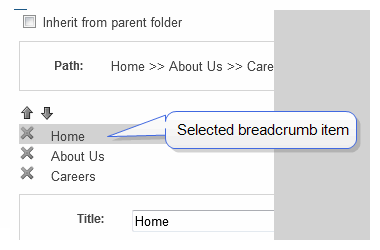
- Click a breadcrumb item.
WARNING! Clicking the Remove button deletes the breadcrumb item. See Also: Removing a BreadcrumbItem
- Click the Up and Down arrows to move the item within the list.
- Click Update.
Editing a Breadcrumb Item
- Navigate to the folder for which you want to edit breadcrumbs.
- On the View Contents of Folder screen, click View > Properties.
- Click Edit Properties.
- Click the Breadcrumb tab. The Edit Breadcrumbs screen appears.
- Click a breadcrumb item.
WARNING! Clicking the Remove button deletes the breadcrumb item. See Also: Removing a BreadcrumbItem.
- Edit the Title, URL Link, and Description information. See Also: Breadcrumbs
- Click Update.
Removing a BreadcrumbItem
- Navigate to the folder for which you want to remove a breadcrumb.
- On the View Contents of Folder screen, click View > Properties.
- Click Edit Properties.
- Click the Breadcrumb tab. The Edit Breadcrumbs screen appears.
- Click Remove (
 ) next to the breadcrumb item you want to remove.
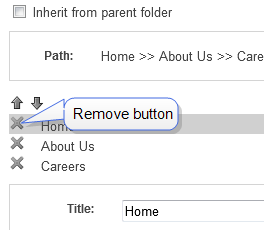
- The breadcrumb item is deleted.
- Click Update.
FolderBreadcrumb Server Control
Use a FolderBreadcrumb server control to display Sitemap breadcrumbs. This trail typically consists of the current content’s folder path. For example, the FolderBreadcrumb below matches the content’s folder structure.

The FolderBreadcrumb server control does not read your folder structure and display its path. Instead, administrators define a folder’s breadcrumb trail on the Folder properties > Breadcrumb tab.
FolderBreadCrumb Server Control Properties
The following are Ektron-specific server control properties. You can find information about native .NET properties such as font, height, width and border style in Visual Studio® help.
- AddContentTitleToBreadcrumb (Boolean)
When set to true, the content title is added to the end of the breadcrumb path, as shown below.
Home > Content > Content_Title
By default, the value is set to false. In that case, the breadcrumb path looks like this.
Home > Content
- Authenticated (String)
Indicates if you are logged into the CMS Explorer and can use it to browse to content, collections, and so on. See Also: Browsing Your Ektron Site Using CMS Explorer.
- DefaultContentID (Long)
Display the breadcrumb trail for the folder in which the given content ID resides. To use this property, breadcrumb information for a folder must be defined in the Workarea > [Specified Folder] > Folder properties > Breadcrumb tab.
- DefaultFolderID (Long)
The folder ID for which you want the breadcrumb trail to display. If a DefaultContentID is given, it overrides this property. To use this property, breadcrumb information for a folder must be defined in the Workarea > [Specified Folder] > Folder properties > Breadcrumb tab.
- DisplayStyle (DisplayStyles)
Indicate how to display the breadcrumb trail: horizontally or vertically. The default is Horizontal.
- DoInitFill (Boolean)
By default, Fill occurs during the Page_Init event. Set to false if you want to postpone the fill-action until later. In this case, Fill is automatically called during the Page Render event. You might do this if you need to set or change a property on the control in code-behind and have it render with your changes shown.
- DynamicParameter (String)
Gets or sets the QueryString parameter to read a content ID dynamically.
- Hide (Boolean)
Hides or displays the output of the control in design time and run time.
- True—Hide the control output.
- False—Display the control output.
- Language (Integer)
Set a language for viewing content; shows results in design-time (in Visual Studio) and at run-time (in a browser).
- LinkTarget (ItemLinkTargets)
Determines the type of window that appears when you click a link in the server control.
- _Self (default)—opens in same window.
- _Top—opens in parent window.
- _Blank—opens in new window.
- _Parent—opens in the parent frame.
- Mode (Modes)
Lets you make the breadcrumb trail appear as non-hyperlinked plain text.
- Normal (normal)—breadcrumb trail is hyperlinked
- DisplayOnly—breadcrumb trail is plain text
- Separator (String)
Enter one or more characters to separate the items in a breadcrumb trail on this Web form. The default character is the greater than sign (>).
- SuppressWrapperTags (Boolean)
Suppresses the output of the span/div tags around the control.
- True—Suppress wrap tags.
- False (default)—Allow wrap tags.
- WrapTag (String)
Lets a developer specify a server control’s tag.
- Span (default)—designate an inline portion of an HTML document as a span element.
- Div—apply attributes to a block of code.
- Custom—Lets you use a custom tag.
Using the FolderBreadCrumb Server Control
Add the FolderBreadcrumb server control to each Web form for which you want to create a breadcrumb sitemap. Follow these steps to use the FolderBreadcrumb server control.
- In the Workarea, define breadcrumb information for a folder. See Adding a Breadcrumb Trail.
- Open a Web form for which you want to create a folder breadcrumb map.
- Drag and drop the FolderBreadcrumb server control onto the Web form.
- Set the
DefaultContentIDorDefaultFolderIDproperty. If you useDefaultContentID, make sure the content is in a folder where breadcrumb information has been defined. If you useDefaultFolderID, make sure breadcrumb information has been defined for that folder. - Save the Web form.
- Open a browser.
- View a Web page with the FolderBreadCrumb server control in it. The FolderBreadcrumb appears on your site as a sitemap breadcrumb.
BreadCrumb Server Control
The Trail Created by the Breadcrumb Server Control
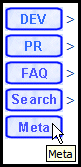
A breadcrumb trail can appear vertically or horizontally on a Web page. In addition, you can define how many breadcrumbs are left for site visitors to navigate back. You can also use an image and Alt text instead of, or in addition to, text to display the breadcrumb trail. These variations are illustrated below.
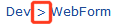
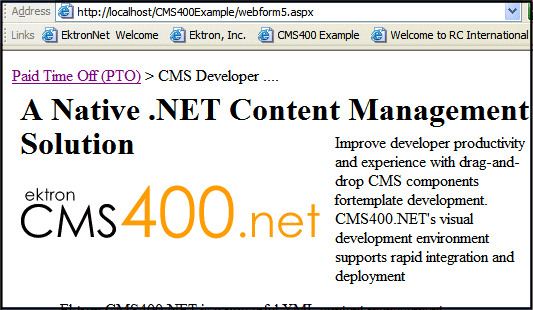
NOTE: If a site visitor revisits a page that is in the breadcrumb trail already, the breadcrumb trail reverts back to that point in the trail. For example, if you visit the following pages Dev > FAQ > WebForm > PR, and then return to FAQ, the breadcrumb trail looks like this: Dev > FAQ.
- Horizontal; text only

- Horizontal with images

- Horizontal with images and Alt text

- Vertical; text only

- Vertical with images

- Vertical with images and Alt text
You should add a BreadCrumb server control to every Web form in your site. Doing this ensures that a breadcrumb trail may appear on each Web page.
BreadCrumb Properties Apply to Web Forms, Not Web Pages
Keep in mind that your Web site is made up of Web forms. Each page depends on a form to determine much of its appearance. Forms and pages have a parent > child relationship. That is, a form can be associated with any number of pages.
When defining breadcrumb properties, you define them for a form. All pages that use that form inherit its breadcrumb properties.
Assume, for example, that a Web form is used for the Human Resources section of your Web site. You might use the title Human Resources to identify the form in the BreadCrumb server control. Whenever a page is visited that uses that form, Human Resources appears on the breadcrumb trail -- that is, the form title appears, not the individual page.
Types of BreadCrumb Server Control Properties
BreadCrumb server control properties are divided into 2 categories:
Properties that Determine a Breadcrumb Trail’s Appearance
For each Web form, you can customize the breadcrumb trail. For example, you might want the breadcrumb trail to appear horizontally on one Web form and vertically on another. The following property list determines the aspect of breadcrumb trail appearance on a form.
- CurrentPageIndicator—Symbols or characters to identify the current page.
- DisplayStyle—Whether it appears horizontally or vertically.
- LinkLastItem—Whether the last item is a hyperlink.
- LinkTarget—The type of window that appears when a user clicks an item.
- MaxItems—The maximum number of items.
- Mode—whether the breadcrumb trail appears as hyperlinked text or plain text.
- Separator—Symbols or characters used to separate items.
Properties that Determine How Form Pages Appear on Breadcrumb Trail
Use these properties define how any page that uses this form appears within a breadcrumb trail. It does not matter where the trail appears.
Note that you can use text, an image, or both to describe the form within the breadcrumb trail. If you use both, the image appears first, followed by the text. the following property list determine the aspect of the Web form when it appears on a breadcrumb trail.
- DisplayTitle—Text to describe it.
- IconAlt—“Alt” text associated with image specified in IconPath property.
- IconPath—Image to define it.
BreadCrumb Server Control Properties
The following are Ektron-specific server control properties. You can find information about native .NET properties such as font, height, width and border style in Visual Studio® help.
- Authenticated (String)
Indicates if you are logged into the CMS Explorer and can use it to browse to content, collections, and so on. See Also: Browsing Your Ektron Site Using CMS Explorer.
- CurrentPageIndicator (String)
If desired, enter one or more symbols or characters that identify the current page in the breadcrumb trail. See example below.

These characters appear after the image or title that identifies the current page in the breadcrumb trail.
- DefaultContentID (Long)
Gets or Sets the ContentID for the BreadCrumb display title.
- DisplayStyle (String)
Indicate how to display the breadcrumb trail: horizontally or vertically. The default is Horizontal. See Also: Horizontal; text only
- DisplayTitle (String)
Enter text to describe this Web form when it appears in the breadcrumb trail. For example, if the Web form’s properties you are defining is used for all Human Resources pages on your site, enter Human Resources. See Also: BreadCrumb Properties Apply to Web Forms, Not Web Pages
If you define an image in the
IconPathproperty below, the image appears in the trail, followed by this text.WARNING! This property is for code-behind only. It cannot be set in design time.
- DoInitFill (Boolean)
By default, Fill occurs during the Page_Init event. Set to false if you want to postpone the fill-action until later. In this case, Fill is automatically called during the Page Render event. You might do this if you need to set or change a property on the control in code-behind and have it render with your changes shown.
- DynamicParameter (String)
Gets or sets the QueryString parameter to read a content ID dynamically.
- Hide (Boolean)
Used to hide the breadcrumb trail in design time and run time.
- True—Hide breadcrumb trail
- False—Show breadcrumb trail
- IconAlt (String)
If you define an image in the
IconPathproperty, enter any “Alt” text that should appear when a site visitor hovers the cursor over that image. Here is an example. - IconPath (String)
If you want the breadcrumb trail to display an image to identify this Web form, enter the path to the image.
WARNING! The image location must be relative to the Web root.
For example:
\CMS400Developer\Workarea\Images\bc_meta_icon.gifOn the breadcrumb trail, the image precedes any text defined in the
DisplayTitleproperty. - Language (Integer)
Set a language for viewing content; shows results in design-time (in Visual Studio) and at run-time (in a browser).
- LinkLastItem (Boolean)
Use this property to determine whether the last breadcrumb item appears as a hyperlink on this Web form. If this property is set to True, and a user clicks the item, the current page reappears.
- True—last item is a hyperlink
- False—last item is an image and/or text only; the user cannot click on it
- LinkTarget (String)
Determines the type of window that appears when you click a link in the server control.
- _Self (default)—opens in same window.
- _Top—opens in parent window.
- _Blank—opens in new window.
- _Parent—opens in the parent frame.
- MaxItems (Integer)
Enter the maximum number of items in the breadcrumb trail on this Web form. The default is 5. If you set a value of 1 or greater and the user navigates beyond that number of pages, only the most recent pages appear. The older pages disappear from the trail. 0 (zero) = unlimited.
- MetadataName (String)
Specify the name of a Metadata Type that you want to associate with the page. For more information, see BreadCrumb Metadata Type
- Mode (String)
Lets you make the breadcrumb trail appear as non-hyperlinked plain text. The default is Normal.
- Normal = breadcrumb trail is hyperlinked

- DisplayOnly = breadcrumb trail is plain text

- Normal = breadcrumb trail is hyperlinked
- Separator (String)
Enter one or more characters to separate the items in a breadcrumb trail on this Web form. The default character is the greater than sign (>).
- SuppressWrapperTags (Boolean)
Suppresses the output of the span/div tags around the control.
- True—Suppress wrap tags.
- False (default)—Allow wrap tags.
- WrapTag (String)
Lets a developer specify a server control’s tag.
- Span (default)—designate an inline portion of an HTML document as a span element.
- Div—apply attributes to a block of code.
- Custom—Lets you use a custom tag.
BreadCrumb Metadata Type
To associate a Metadata Type with the BreadCrumb server control:
- In the properties window for the BreadCrumb server control, click on the MetadataName property.
- Click Ellipses (
 ).
). - If you are not logged in, log in using the CMS Explorer window.
- The Browsing Metadata screen appears.
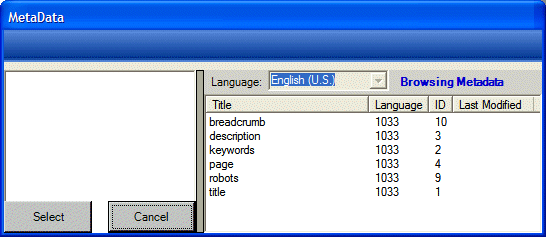
- Select a Metadata Type to apply to the BreadCrumb server control.
- Set the DynamicParameter to ID. This allows the metadata to reflect the content block on the page.
Using the BreadCrumb Server Control
Add the BreadCrumb server control to each Web form for which you want to create a breadcrumb trail. Follow these steps to use the BreadCrumb server control.
WARNING! Do not add a BreadCrumb server control to a Web form that contains a Calendar server control. When both controls appear on a page and a site visitor clicks on different months, the BreadCrumb trail could look like this: Calendar > Calendar > Calendar > Calendar > Calendar. This happens because each time a site visitor clicks on a month, you are in effect opening a new Web form.
- Open a Web form for which you want to create a breadcrumb trail.
- Drag and drop the BreadCrumb server control onto an appropriate location of the Web form.
- Set the
DisplayTitleproperty. See DisplayTitle (String)Enter text to describe this Web form when it appears in the breadcrumb trail. For example, if the Web form’s properties you are defining is used for all Human Resources pages on your site, enter Human Resources. See Also: BreadCrumb Properties Apply to Web Forms, Not Web PagesIf you define an image in the IconPath property below, the image appears in the trail, followed by this text.WARNING! This property is for code-behind only. It cannot be set in design time..NOTE: To customize the look of your breadcrumb trail, configure the other properties. For more information, see BreadCrumb Server Control Properties.
- Save the Web form.
- Repeat steps 1 through 4 for all Web forms to be included in the breadcrumb trail.
- Open a browser.
- View a Web page with a BreadCrumb server control in it.
- Navigate to the rest of the Web pages that contain BreadCrumb server controls.
- As you move around, the pages are added to the breadcrumb trail.
Making a Content Block’s Title Appear in the Breadcrumb Trail
By adding a line or 2 of code, the breadcrumb trail can display the title of a content block. You can add a line of code to each Web form or if your content is dynamic, add the code once and each time a new piece of content is called dynamically a new breadcrumb is created.
Only one content block per Web form can be used with the breadcrumb. If you have multiple content blocks on a page, select the one that describes the overall page best.
Steps to Use a Content Block’s Title as a Breadcrumb
- Drag and drop a ContentBlock server control on a Web form.
- Choose a DefaultContentID for the content block.
- Drag and drop a BreadCrumb server control on the same form.
- Remove the word Title from the
DisplayTitleproperty. - Add the following line of code to the pageload event code-behind:
BreadCrumb1.DisplayTitle = ContentBlock1.EkItem.Title
- Build the project.
- View the Web form in a Web browser.
The following example content block shows titles used as breadcrumbs.
The word Title appears in the breadcrumb trail when the DisplayTitle property is left empty. Even with the added code, if the breadcrumb loads before the content block, the breadcrumb has no information in the DisplayTitle property and therefore displays the word title by default.
If the word Title appears in the breadcrumb trail, check to make sure the word Title does not appear in the DisplayTitle property. Next, if Title still appears, add the following line of code to the page load event of the code-behind:
ContentBlock1.Fill()
The code in the page load event should now look like this:
ContentBlock1.Fill()
BreadCrumb1.DisplayTitle = ContentBlock1.EkItem.Title
This ensures that the content block information is loaded first.
SiteMap Server Control
The Sitemap server control utilizes the folder breadcrumb information in the Workarea to display a sitemap of your site. By choosing the starting point of the sitemap, the max levels to display and applying a style class, you can customize the sitemap. The sitemap appears as indented list when viewed on a Web page.

The contents of the sitemap are defined on the Breadcrumb tab, located in the Workarea folder properties. See Also: Breadcrumbs
Sitemap Server Control Properties
The following are Ektron-specific server control properties. You can find information about native .NET properties such as font, height, width and border style in Visual Studio® help.
- Authenticated (String)
Indicates if you are logged into the CMS Explorer and can use it to browse to content, collections, and so on. See Also: Browsing Your Ektron Site Using CMS Explorer.
- CacheInterval (Double)
The number of seconds that the server control’s data is cached. The default is 0 (zero). For example, if you want to cache the data for 5 minutes, set to 300. See Also: Caching with Server Controls.
- ClassName (String)
The style sheet class name used to format the HTML. Leave blank to use the default. To use a new class, add it to the following file:
webroot\siteroot\Workarea\csslib\sitemap.css
Then, add the class name to the property.
- DisplayXslt (String) (Code-behind only)
If desired, enter a relative or absolute path to an Xslt that determines the display of the page.
WARNING! If you specify an external file, do not store this file in the Workarea folder. If you store this file in the Workarea folder, the file will be lost when you upgrade.
- DoInitFill (Boolean)
By default, Fill occurs during the Page_Init event. Set to false if you want to postpone the fill-action until later. In this case, Fill is automatically called during the Page Render event. You might do this if you need to set or change a property on the control in code-behind and have it render with your changes shown.
- FlatTopLevel (Boolean)
When set to True, include site nodes from the parent folder but not their items. Set to False to include all nodes and items.
- FolderID (Long)
The folder ID for the starting point of the site map. To choose the root folder, enter 0 (zero).
- Hide (Boolean)
Hides or displays the output of the control in design time and run time.
- True—Hide the control output.
- False—Display the control output.
- Language (Integer)
Set a language for viewing content; shows results in design-time (in Visual Studio) and at run-time (in a browser).
- MaxLevel (Integer)
Set the maximum amount of levels to show. 0 (zero) = unlimited.
- StartingLevel (Integer)
Set to the starting level of the site map. If set to 0 (zero), starts from the root.
- SuppressWrapperTags (Boolean)
Suppresses the output of the span/div tags around the control.
- True—Suppress wrap tags.
- False (default)—Allow wrap tags.
- WrapTag (String)
Lets a developer specify a server control’s tag.
- Span (default)—designate an inline portion of an HTML document as a span element.
- Div—apply attributes to a block of code.
- Custom—Lets you use a custom tag.
Using the Sitemap Server Control
NOTE: Make sure you have added the sitemap information to your folders’ Breadcrumb tab in the Ektron Workarea.
To use the Sitemap server control:
- Open a Web form for which you want to create a sitemap.
- Drag and drop the Sitemap server control onto an appropriate location of the Web form.
- Add the starting folder’s ID to the
FolderIDproperty. - Set any of the other properties. See Also: Sitemap Server Control Properties.
- Save the Web form.
- Open a browser.
- View a Web page with the Sitemap server control in it. The sitemap now appears on your site.
Retrieving the XML Structure of a Site Map
Retrieving the XML structure of XML content allows for greater control over developing XSLs. The following is an example of how to retrieve the XML structure:
- Open a new Web form.
- Drag and drop a SiteMap server control onto it.
- Set the
FolderIDproperty. - Drag and drop a textbox on the Web form.
- Set the
TextModeproperty to MultiLine.NOTE: It is also recommended that you set the width of the text box to at least 400px.
- On the code-behind page, add the following line.
Textbox1.Text = SiteMap1.XmlDoc.InnerXml- Build the project.
- View the Web form in a browser. The XML structure of the Site Map appears in the textbox.
For an additional example, see the XML Site Map page in the CMS400Developer samples page. It is located at:
In a browser:
http://siteroot/CMS400Developer/Developer/Sitemap/SiteMapXML.aspx
In the source code:
siteroott/CMS400Developer/Developer/Sitemap/SiteMapXML.aspx and SiteMapXML.aspx.vb
![]()