Metadata is information about a content item, such as its title and language. Ektron provides extensive and flexible support for metadata, which it uses in both standard and innovative ways.
You define metadata in the Workarea at Settings > Configuration > Metadata Definitions, but you assign metadata in the Content area.
Prerequisite: Only members of the Administrator user group and those defined in the Manage Members for Role: Metadata-Admin screen can view, add, or edit metadata definitions. See Also: Using the Roles Screens
Metadata Types
- Searchable—Metadata that can be found by Ektron’s search. This kind of metadata can also be found using the Workarea Search screen. Creating and Deploying a Search Tag Definition
- Meta tag—Resides in a content item’s source code, helping search engines find it. Creating and Deploying a Meta Tag Definition
- HTML tag—Information about the content used by a Web browser. For example,
<title>identifies the content in the screen title, favorites list, and browser history. Creating and Deploying a Title Tag Definition - Related content—A related content item, collection, List Summary, or library item that accompanies a content item on a Web page. Creating and Deploying a Related Content Definition
- Content tags—Keywords that can be assigned to content and library items. Content tags allow for tag-based searching. Applying Content Tags
- Image—Not part of a metadata definition; automatically appears for every content item and lets you assign an image to that content. Assigning an Image to Metadata
- Simple Dublin Core—A set of fifteen standard fields that cover the most useful information about content. Applying Simple Dublin Core Metadata
|
Best Practices
|
Adding a Metadata Definition
Use the Add Metadata Definition screen to define metadata (such as keywords and title). You can define as many instances of metadata as you wish. If your site supports multiple languages, you create metadata definitions for each supported language.

To add a metadata definition:
IMPORTANT: After creating a definition, you must assign it to folders whose content should use the definition through the folder’s properties.
- From the Workarea, choose Settings > Configuration > Metadata Definition. The View Metadata Definitions screen appears.
- Click Add Metadata Definition. The Add Metadata Definition screen appears.
- Name—Enter a name to identify this metadata. Do not include spaces. Ektron reserves a list of names that you cannot use. If you enter one of them, an error message appears.
- Type—Select the type of metadata from the drop-down list. The type you select changes the fields on the lower part of the metadata screen.
- Editable—Check this box if you want to allow users to edit the contents of the metadata when creating or editing the metadata. Do not check this box if you want uniform metadata text for each content item that uses this metadata.
- Complete the field and click Update.
If you create a metadata definition, assign it to a folder, then users insert metadata information into their content, the collected information takes on the characteristics of the metadata definition. For example, if the metadata is title and its type is HTML tag, this is how it appears in the Web page’s source code.
<title>CMS Developer</title>
If you later change its type to Meta, the following effects occur:
- metadata to which the definition has already been assigned maintains the previous style definition. For example,
<title>CMS Developer</title>. - when you create a new content item that uses the metadata definition, its metadata takes on the new style. For example,
<meta name="title" content="CMS developer">.
NOTE: For background information about metadata, see http://www.w3.org/TR/REC-html40/struct/global.html#edef-META.
Creating and Deploying a Meta Tag Definition
Copied from www.w3.org/MarkUp/html-spec/html-spec_5.html:
The META element is an extensible container for use in identifying specialized document meta-information. Meta-information has 2 main functions:
- to provide a means to discover that a data set exists and how it might be obtained or accessed
- to document the content, quality, and features of a data set, indicating its fitness for use

- In the Workarea, choose Settings > Configuration > Metadata Definition.
- Click Add Metadata Definition. The Add Metadata Definition screen appears.
- Name—Enter the metadata name. (Do not include spaces.)
- Type—Choose Meta Tag from the drop-down list. The Meta Tag section appears.
- Editable—Check the box.
- Fill in the Meta Tag description fields. —Fields—
- Style—Select from the drop-down list to indicate whether you want the style to be name or http-equiv. For more information, see http://www.w3c.org/TR/REC-html40/struct/global.html#h-7.4.4.2
- Remove Duplicates—Check this box to remove duplicate words or phrases from the metadata.
- Case Sensitive—Check this box to remove duplicates only if the letters and case of each letter match.
- Separator—Enter a character to separate the metadata values. The default is a semicolon (;).
- Selectable Metadata—Check this box to force users to select from the options specified in the Allow Selectable Text and Default Text fields. If you do not check this box, users can create their own metadata.
- Allow Multiple Selections—Check this box to let users select multiple metadata values instead of one. If multiple values are allowed, use the separator character to delimit them. If this box is not checked, all values appears in a drop-down list, and the user selects the correct one. This field is only active if the Selectable Metadata box is checked.
- Allowed Selectable Text—Enter standard metadata that can be selected by users. Separate each option by the separator specified for the metadata definition. This field is only active if the Selectable Metadata box is checked.
- Default Text—Enter default content for the metadata tag.
- Click Save.
- Add the definition to all applicable folders by editing the properties of the folder and checking the metadata boxes on the Metadata tab and clicking Update.
- Edit the metadata on content items in the folder and click Save or Publish.
- Add a metadata server control to every Web form (.aspx page) on which the content will appear. See Adding Content to a Web Page with the Metadata Server Control.
Creating and Deploying a Title Tag Definition
Copied from www.w3.org/MarkUp/html-spec/html-spec_5.html.
The title should identify the contents of the document in a global context. A browser may display the title of a document in a history list or as a label for the window displaying the document.

- In the Workarea, choose Settings > Configuration > Metadata Definition.
- Click Add Metadata Definition. The Add Metadata Definition screen appears.
- Name—Enter
Titleas the metadata name. (Do not include spaces.) - Type—Choose HTML Tag from the drop-down list. The HTML Tag section appears.
- Editable—Check the box.
- Name—Enter
- Enter default content for the HTML tag. For example:
content="document management web content management content management cms" - Click Save.
- Add the definition to all applicable folders by editing the properties of the folder and checking the metadata boxes on the Metadata tab and clicking Update.
- Edit the metadata on content items in the folder and click Save or Publish.
- Add a metadata server control to every Web form (.aspx page) on which the content will appear. See Adding Content to a Web Page with the Metadata Server Control.
Creating and Deploying a Search Tag Definition
Searchable metadata allows content to be found by a search phrase that you add to the content’s metadata. The content is typically found by either a Web site search or a Workarea search. For example, each document stored in the Document Management functionality has a unique part number.
NOTE: When metadata is set up, the system administrator determines whether it is “publicly viewable.” If it is, the search field appears on the search screen that site visitors use along with the search screen in the Ektron Workarea. If the data is not publicly viewable, it can be found only through a Workarea search.
- In the Workarea, choose Settings > Configuration > Metadata Definition.
- Click Add Metadata Definition. The Add Metadata Definition screen appears.
- Name—Enter a description of the kind of data to be searched. (Do not include spaces.) It should describe the Metadata tabs on the Folder Properties and View Content screens and the Workarea search screen.
- Type—Choose Searchable Property from the drop-down list. The Searchable Property section appears.
- Editable—Check the box.
- Fill in the Searchable Property description fields. —Fields—
- Publicly Viewable—If you check the box, site visitors can find the metadata value when searching your Web site. Otherwise, site visitors cannot find the metadata value.
NOTE: Regardless of whether this is checked, this metadata value can be found using the Workarea’s Search Content Folder screen. Only logged-in users can access the Workarea.
- Style—Select the style of the response field from these choices (available in a drop-down list). You are specifying the kind of information that a user adding searchable properties to content will enter to describe the data. Later, anyone using the search can search on that information.
- Text—The user enters free text to describe the content.
- Number—The user enters a number to describe the content.
- Byte—1 byte. 0 through 255 (unsigned)
- Double—8 bytes. -1.79769313486231570E+308 through -4.94065645841246544E-324 † for negative values; 4.94065645841246544E-324 through 1.79769313486231570E+308 † for positive values
- Float—(single-precision floating-point) 4 bytes. -3.4028235E+38 through -1.401298E-45 † for negative values; 1.401298E-45 through 3.4028235E+38 † for positive values
- Integer—4 bytes. -2,147,483,648 through 2,147,483,647 (signed)
- Long—8 bytes. -9,223,372,036,854,775,808 through 9,223,372,036,854,775,807 (9.2...E+18 †) (signed)
- Short—2 bytes. -32,768 through 32,767 (signed)
- Date—The user enters a date to describe the content.
- Yes or No—The user answers yes or no to describe the content. For example, if the content describes automobile parts, the user could answer Yes to include new and used parts or No to search for new parts only.
- Select from a list—The user picks a from a list to describe the content.
- Multiple selections—The user selects an item from a drop-down list.
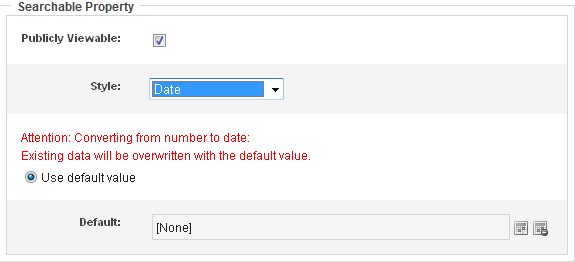
- Default—If desired, enter the most common response to this definition. The default value is automatically applied to all existing content within folders to which this definition is assigned. While editing content that uses this definition, a user can accept the default value or change it.
- Publicly Viewable—If you check the box, site visitors can find the metadata value when searching your Web site. Otherwise, site visitors cannot find the metadata value.
- Click Save.
- Add the definition to all applicable folders by editing the properties of the folder and checking the metadata boxes on the Metadata tab and clicking Update.
- Edit the metadata on content items in the folder and click Save or Publish. The next time you visit the Workarea search screen, you will see the new field.
- If you want site visitors to use this field when searching your Web site, ask your developer to set the
ShowExtendedSearchproperty of the Search Server Control to true. This value enables the Web site search to find searchable metadata.
Creating and Deploying a Related Content Definition
You can set up a Web page so that whenever the source content item appears, the related information appears next to it by associating the following types of content with a content item.
- another content item
- a collection
- a list summary
- a menu
- a user
- library items of type image, hyperlink, or file
For example, your Web site sells motorcycle helmets. On a page that shows a particular helmet, the left column lists a collection of motorcycle drivers who wear that helmet. Another example might show the profile of a user when a certain content item appears.
Related content lets you connect a content item with several types of related content (see list above), and is associated with a content item, not a Web form. For example, you can display a library image of the company logo on a page whenever content in a certain folder appears. For content in a different folder, a different logo could appear.
NOTE: This capability is similar to the MetadataList Server control except that MetadataList shows a link to every content item with a selected term in the keywords or title. Also, a MetadataList is associated with a Web form (.aspx page), not a content item.
- In the Workarea, choose Settings > Configuration > Metadata Definition.
- Click Add Metadata Definition. The Add Metadata Definition screen appears.
- Name—Enter a title for the kind of data you want to be related to content. (Do not include spaces.) It should describe the Metadata tabs on the Folder Properties and View Content screens.
- Type—Choose one of the types from the drop-down list that ends in Selector.


- Editable—Check the box.
- Click Save.
- Add the definition to all applicable folders by editing the properties of the folder and checking the metadata boxes on the Metadata tab and clicking Update.
- Edit the metadata on content items in the folder (associating related content) and click Save or Publish. The next time you visit the Workarea search screen, you will see the new field.
- Have your Web developer add code to each page on which the related item appears.
For more information, go to
http://localhost/cms400developer/developer/default.aspxand read the Metadata > Meta Associations description.
IMPORTANT: If you are using Collection Selector type, only users with permission to work with collections can select a collection. Also, if you are using Image, Hyperlink or File Selector type, only users with permission at least read-only Library permissions can select a library item. See Also: Managing Folder Permissions.
Changing the Style of a Metadata Definition
You can change the style of a searchable property type of metadata. For example, you create a definition to collect Part Number. Originally, the style is text, but you later decide its style should be number.
When you change the style of searchable property type metadata, Ektron attempts to maintain any data stored in content blocks that use the definition. For example, if the data style was number and you change it to text, the number stored for that metadata definition is converted to text and maintained in all content that uses it. However, sometimes Ektron cannot maintain the data when you change the style. For example, if you change a metadata definition style from number to date, Ektron cannot convert those styles, in which case any data stored in metadata definitions is lost.
The following table shows the conversion scenarios and how Ektron handles each one. It indicates whether data is maintained after you convert from a data style in the left column to a style to its right.
- OK—Data is maintained
- NO—Data is lost during conversion
|
|
Text |
Number |
Date |
Boolean |
Single Select |
Multiple Select |
|
Text |
- |
OK |
OK |
NO |
NO |
NO |
|
Number |
OK |
- |
NO |
NO |
NO |
NO |
|
Date |
OK |
NO |
- |
NO |
NO |
NO |
|
Boolean |
OK |
NO |
NO |
- |
NO |
NO |
|
Single Select |
OK |
NO |
NO |
NO |
- |
OK |
|
Multiple Select |
OK |
NO |
NO |
NO |
NO |
- |
When you change the style of a metadata definition, the screen lets you either use existing data if possible or use the default value. Following these choices is a field that lets you define a default value. If you want to simply replace any existing data, select Use default value and enter the new value in the Default field. If the data is convertible and you want to maintain existing data if possible, select Use existing data if possible, else default. Then, enter a default value below. If the existing data cannot be maintained, the default value replaces it.
Assigning Metadata to a Folder
After you create a metadata definition, assign it to folders whose content will use it. On each folder’s properties screen, you determine which metadata definitions can be used. The section of the folder properties screen used to assign metadata appears below. Only metadata definitions whose Assigned box is checked can be completed by users working with content in the folder.

Requiring Users to Enter Metadata
You can determine that a metadata value must be inserted before content can be saved (see the Required checkboxes in the illustration above). This occurs both when new content is added and existing content is edited. If you set a kind of metadata to be required, its label is red and includes an asterisk (*) on the Metadata tab of the Edit Content screen.

NOTE: If a default value is defined for a required metadata field, the default value is used when the user saves the content. In this case, the user is not prompted to enter a value because the default value is sufficient.
Inheriting Metadata by Folder
Each folder can inherit metadata fields from its parent folder or have a unique set of them. The information includes the kinds of metadata that are assigned and which of those are required. For example, you could assign the top folder (Content) all metadata definitions, while you assign the Contacts folder (directly below it) none. On every folder property’s Metadata tab, use the Inherit Parent Configuration check box to determine if metadata definitions are the same as the parent folder or unique. By default, Inherit Parent Configuration is checked, meaning that the folders inherits its metadata definition from the parent folder. When you uncheck Inherit Parent Configuration, you can change the settings as desired. All inherited values appear by default (that is, Assigned and Required boxes are either checked or unchecked).

Adding Metadata to Content
When a user creates or updates content, the user can define its metadata within the assignments specified for its folder. Default metadata values are applied without user intervention. To enter or edit content’s metadata:
NOTE: You may only edit metadata of content that is published, checked in, or checked out by you.
- Access the Edit Content screen for the content whose metadata you want to enter or edit.
- Click the Metadata tab. The Edit Metadata screen opens with the current metadata displayed. To add metadata to content, an administrator must have created definitions for it in the language of the content.
- Edit the metadata.
- Required field labels are red and marked with an asterisk (*). You must place at least one response in such fields before you can save the metadata.
- Your system administrator may prevent you from editing a field. In this case, the field has a gray background, and you cannot place the cursor there.
- Fields may appear in 2 columns. In this case, the system administrator provides a list of terms that you can apply to the content. You can select terms from the list or enter free text. One column is labeled Not Included and the other Included. Move terms between lists by clicking Add and Remove.
- You may see a list of terms in one box, and a field labeled Text above it. You can:
- add a new term by typing it into the Text field and clicking Add.
- remove any term by selecting it and clicking Remove.
- modify any term by selecting it. It appears within the Text field, where you can change it. Then, click the Edit button.
- restore the terms to their default settings by pressing the Default button.
- change the sequence of terms by selecting one then pressing the up and down arrows.
- If related content metadata is available for the content, its name appears followed by None Selected (ID) Change Clear. Click Change to display a window of choices. For example, if the related content type is a collection, all collections appear in the popup. Select the appropriate data for this content. Selected items appear in the bottom of the screen. You can reorder them by selecting an item then clicking the up and down arrows. To remove items from the bottom of the screen, select them and click Delete (
 ). If the related content type is either content item or library image, hyperlink, or file, a window appears when you click Change where you can identify the related content.
- Select a folder from the left frame.
- Double click the related-content item from the top right frame. The item appears in the lower right frame
- When all items are in the lower right frame, click Save.
- If default metadata is defined for a specific data type, you can click Default at the bottom of each field to restore it.
- Below each field is a Characters Left field, which counts the number of metadata characters. You cannot exceed the maximum (500 characters).
- Click Save. The View Content screen reappears. The content is now in a checked out state to you. For the changes to take effect on the Web site, check in the content and submit it to the approval chain. See Also: Approval Chains
Applying Content Tags
Content tags apply terms by which you want users to find content when the terms are not actually contained in the content. The search can find content using the tags.
Default content tags appear on the Metadata tab of every content item. Check any tag that you want to apply to a content item. You can also create a new tag and apply it to a content item. You cannot reapply that tag to other content. The following example shows Farm, Silo, and Combine added to the content tags.

Assigning an Image to Metadata
You can assign an image to any content item’s metadata from a standard field that is available to every content item; it is not a definition in the Metadata fields. Use the Image field to identify an image that can be retrieved by Ektron Markup Language’s (EkML) [$Image] and [$ImageThumbnail] variables. See Also: Controlling Output with Ektron Markup Language.
An example of using Image data is a list summary that includes a photo of every item on the list. For example, your site promotes a soccer team and the list summary shows every player on the team. To the left of each player’s name is a thumbnail of his image.
Adding Content to a Web Page with the Metadata Server Control
The Metadata server control lets you add the metadata from content blocks to a Web page. This lets developers add metadata quickly without having to type it in. You can add metadata from a single content block, multiple content blocks, or dynamically pass a content ID from a URL.
With the MetaData server control, you add metadata from content blocks to your Web page. By comparison, the MetaDataList server control lets you create a list of content blocks to display on your site, based on the Metadata in each content block.See Also: Adding Content to a Web Page with the MetadataList Server Control.
The following are Ektron-specific server control properties. You can find information about native .NET properties such as font, height, width and border style in Visual Studio® help.
- Authenticated (String)
Indicates if you are logged into the CMS Explorer and can use it to browse to content, collections, and so on. See Also: Browsing Your Ektron Site Using CMS Explorer.
- CacheInterval (Double)
The number of seconds that the server control’s data is cached. The default is 0 (zero). For example, if you want to cache the data for 5 minutes, set to 300. See Also: Caching with Server Controls.
- DefaultContentID (Long)
Enter the ID of the content block whose metadata is added to the page. If you don’t know the ID number of the content block, use the CMS Explorer to browse to it. See Also: Browsing Your Ektron Site Using CMS Explorer. If you want to add metadata from several content blocks, set this property to 0 (zero) and use the
DefaultItemListproperty to identify them. - DefaultItemList (String)
A bracket-separated list of content block IDs whose metadata added to the page. This list is used only if the
DefaultContentIDproperty is set to 0 (zero). For example:
In the ID list, you can specify metadata definitions to exclude for each content block. To exclude a metadata definition, insert a semicolon after the ID and enter the metadata definition. For example,

In the above example, the control will:
- add all metadata definitions for content block 30
- exclude the
Titlemetadata definition for content block 10 - exclude the
TitleandDescriptionmetadata definitions for content block 23
Note the following criteria for metadata definitions that may be excluded:
- the definition is case-sensitive, so must exactly match how the Name field of the Metadata Definitions screen.

- The metadata definition type must be Meta Tag
- DoInitFill (Boolean)
By default, Fill occurs during the Page_Init event. Set to false if you want to postpone the fill-action until later. In this case, Fill is automatically called during the Page Render event. You might do this if you need to set or change a property on the control in code-behind and have it render with your changes shown.
- DynamicParameter (String)
Gets or sets the QueryString parameter to read a content ID dynamically.
- GenerateDublinCore (Boolean)
When enabled, this property automatically creates 7 of the Simple Dublin Core metadata fields from standard Ektron system properties. The default is false.
- True—Generate Simple Dublin Core metadata fields
- False—Do not generate Simple Dublin Core metadata fields
The 7 fields and how they are associated with the Ektron properties is explained in Applying Simple Dublin Core Metadata
- True—Generate Simple Dublin Core metadata fields
- Hide (Boolean)
Hides or displays the output of the control in design time and run time.
- True—Hide the control output.
- False—Display the control output.
- Language (Integer)
Set a language for viewing content; shows results in design-time (in Visual Studio) and at run-time (in a browser).
- SuppressWrapperTags (Boolean)
Suppresses the output of the span/div tags around the control.
- True—Suppress wrap tags.
- False (default)—Allow wrap tags.
- WrapTag (String)
Lets a developer specify a server control’s tag.
- Span (default)—designate an inline portion of an HTML document as a span element.
- Div—apply attributes to a block of code.
- Custom—Lets you use a custom tag.
- Drag a MetaData server control onto a template.
- Set the properties of the Metadata server control. This will create the following HTML in the HTML body.
<cms:MetaData id="MetaData1" runat="server" DefaultContentID="12"></cms:MetaData>Or, if you are using multiple content block IDs in the
DefaultItemList, the following HTML is created.<cms:metadata id="MetaData1" runat="server" DefaultItemList="[12,7,4]"></cms:metadata>
- Click the HTML tab and copy that line from the
<body>tag to the<head>tag. 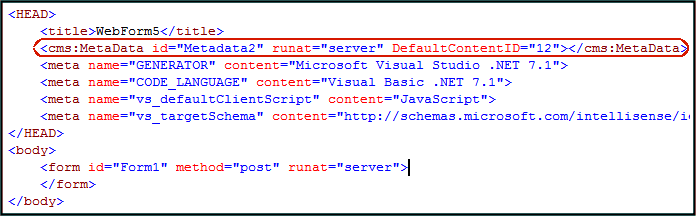
- Save the Web form and rebuild the solution.
- Open the Web page in the browser.
- Right click the Web page and click View Source.
- In the
<head>tag, you see meta tags from the content block added to the page, as shown in the following image. 
Adding Content to a Web Page with the MetadataList Server Control
Use the MetadataList server control to create lists based on Keyword Names and Keyword Values contained within the metadata of content. The list can display the information as a list of hyperlinks. You can choose, based on properties you set, to display the summary and how to order the display. For general information Metadata, see Working with Metadata.
NOTE: On a PageBuilder page, you can insert a metadata list using the MetaDataList widget. See Also: Widget Reference
The following are Ektron-specific server control properties. You can find information about native .NET properties such as font, height, width and border style in Visual Studio® help.
- Authenticated (String)
Indicates if you are logged into the CMS Explorer and can use it to browse to content, collections, and so on. See Also: Browsing Your Ektron Site Using CMS Explorer.
- CacheInterval (Double)
The number of seconds that the server control’s data is cached. The default is 0 (zero). For example, if you want to cache the data for 5 minutes, set to 300. See Also: Caching with Server Controls.
WARNING! If the
EnablePagingproperty is set to True, theCacheIntervalproperty is disabled. - ContentType (Ektron.Cms.Controls.CmsWebService.CMSContentType)
Select a type of content for this control. Choices are:
- All Types
- Content
- Forms
- Archive_Content
- Archive_Forms
- Assets
- Archive_Assets
- LibraryItem
- Multimedia
- Archive_Media
- NonLibraryContent
- DiscussionTopic
- DisplayXslt (String)
Determines how the information on the page appears
- None—databind only
- ecmNavigation—lists the title of every content block in the folder. See Also: ecmNavigation Display Example
- ecmTeaser—lists the title of every content block in the folder plus the content summary. See Also: ecmTeaser Display Example
- Path to Custom Xslt—If desired, enter a relative or absolute path to an Xslt that determines the display of the page.
WARNING! If you specify an external file, do not store this file in the Workarea folder. If you store this file in the Workarea folder, the file will be lost when you upgrade.
If you enter a valid EkML file at the MarkupLanguage property, the Displayxslt property value is ignored.
- DoInitFill (Boolean)
By default, Fill occurs during the Page_Init event. Set to false if you want to postpone the fill-action until later. In this case, Fill is automatically called during the Page Render event. You might do this if you need to set or change a property on the control in code-behind and have it render with your changes shown.
- EnablePaging (Boolean)
This property, in conjunction with the MaxNumber property, lets site visitors view an unlimited number of items while controlling the amount of screen space. The MaxNumber property limits the number of items displayed. If you set this property to True, and the number of items exceeds MaxNumber, navigation aids appear below the last item, allowing the visitor to go to the next screen. See example below.
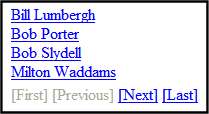
So, for example, if specified metadata is found in 9 items and the
MaxResultsproperty is set to 3, the screen displays only the first 3 items. When the site visitor clicks [Next], the visitor sees items 4, 5 and 6, and so on.WARNING! If the
EnablePagingproperty is set to True, theCacheIntervalproperty is disabled. - ExactPhrase (Boolean)
Determines whether the KeyWordValue needs to match the metadata value exactly. For example, if “site” is the KeyWordValue, the title of a content block is “Welcome to the site” and ExactPhrase is set to True, you would not see the content block in the metadata list. This is because “site” does not equal “Welcome to the site”.
- True—Match the exact phrase
- False—Doesn’t need to match exact phrase
- True—Match the exact phrase
- FolderID
The folder ID from which content is retrieved. At the
Recursiveproperty, you determine if content in this folder’s subfolders is also retrieved. - GetAnalyticsData (Boolean)
Set this property to True if you want the following information for each content in the list. Returns Content View Count, Content Rating, Content Rating Average. Create your own XSLT styles to display this data. This property only provides reliable data when the Business Analytics Feature is on. Business Analytics.
- GetHtml (Boolean)
Set to True if you want to display the content (html body) for all content to appear on this metadata list. For example, you want to display content inside a Web server control such as a GridView.
- Hide (Boolean)
Hides or displays the output of the control in design time and run time.
- True—Hide the control output.
- False—Display the control output.
- IncludeIcons (Boolean)
Choose whether to display icons next to the metadata list’s links.
NOTE: This property only works when ecmSummary or ecmTeaser are used in the
DisplayXsltproperty. When the[$ImageIcon]variable is used in an EkML file and that file is assigned to theMarkupLanguageproperty, this property acts as True.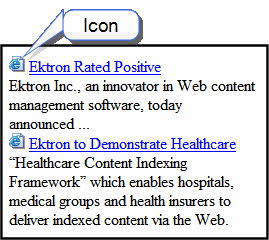
- KeyWordName (String)
KeyWordName represents a metadata definition, that is, the container for the KeyWordValues. Examples of a KeyWordName are Keywords and Title. If you are authenticated, you can click the ellipsis button and select from a list of existing metadata definitions. For information on creating metadata definitions, see Adding a Metadata Definition.
- KeyWordValue (String)
Enter the values associated with the KeyWordName. Only content whose metadata (defined at the
KeyWordNameproperty) matches this value appears on the metadata list. Examples of a KeyWordValue are “home; page; company.” To view an illustration of the relationship between KeyWordName and KeyWordValues, see Adding Content to a Web Page with the MetadataList Server Control.NOTE: The character that separates multiple items is defined at the
KeyWordValueSeparatorproperty. At theKeyWordValueMatchAllproperty, you determine if all metadata definition values must match or any one of them. - KeyWordValue MatchAll (Boolean)
This property is only used if you enter more than one keyword value. If you do, and only want content to appear on the metadata list if all values entered at the KeyWordValue field match its metadata values, enter True. If metadata can appear on the list as long as any value defined at the KeyWordValue field matches the selected metadata value for a content item, enter False.
Example:
KeyWordValue for Title (assigned for this server control): home; page; company. Metadata values for a content item’s Title metadata definition field: software; ektron; company.
- If
KeyWordValueMatchAll =true, content does not appear on metadata list because some items do not match. - If
KeyWordValueMatchAll = false, content item appears on metadata list because one item (company) matches.
- If
- KeyWordValueSeparator (String)
Enter the character used to separate the list of keyword values. An example is a semicolon(;).
- Language (Integer)
Set a language for viewing content; shows results in design-time (in Visual Studio) and at run-time (in a browser).
- LinkTarget (ItemLinkTargets)
Determines the type of window that appears when you click a link in the server control.
- _Self (default)—opens in same window.
- _Top—opens in parent window.
- _Blank—opens in new window.
- _Parent—opens in the parent frame.
- MarkupLanguage (String)
Identify the template markup file that controls the display of the server control. For example,
mymarkup.ekml. If the EkML file is located in the same folder as the Web form containing the server control, just enter its name. Otherwise, the path to the file can be relative or absolute. See also: Controlling Output with Ektron Markup LanguageSee Also: metadatalist.ekml
NOTE: If you enter a valid EkML file at the MarkupLanguage property, the Displayxslt property value is ignored. If the EkML file contains the
[$ImageIcon]variable, theIncludeIconsproperty acts as True. - MaxNumber (Integer)
Enter the maximum number of items to appear in the initial display of this server control. To set no maximum, enter zero (0). To let site visitors view more than the maximum but limit the amount of space being occupied, enter the maximum number of results per page here. Then, set the
EnablePagingproperty to true.If you do and more than the number of
MaxResultsare available, navigation aids appear below the last item to help the site visitor view additional items. See example below. - OrderBy (Ektron.Cms.Controls.CmsWebService.ContentOrderBy)
The order of the list to be returned.
- Title—The title of the content block
- ID—The content block ID number
- Date Created—The date the content block was created
- Date Modified—The date the content block was last modified
- LastEditorLname—The last editor’s last name
- LastEditorFname—The last editor’s first name
- ContentRatingAverage—Business Analytics Content Rating
- ContentViewCount—Business Analytics Content Views
- Recursive (Boolean)
Whether to search sub-folders of the identified root folder. The starting folder is identified in the
FolderIDproperty. - SortOrder (String)
Choose the order direction of the list, Ascending or Descending.
- SuppressWrapperTags (Boolean)
This property is set to
falsebecause Ajax uses<div>tags to rewrite the region around the tag. You cannot change the value totrue. - WrapTag (String)
Lets a developer specify a server control’s tag.
- Span (default)—designate an inline portion of an HTML document as a span element.
- Div—apply attributes to a block of code.
- Custom—Lets you use a custom tag.
Retrieving the XML Structure of a MetadataList
Retrieving the XML structure of XML content allows for greater control over developing XSLs. The following is an example of how to retrieve the XML structure:
- Open a new Web form.
- Drag and drop a MetadataList server control onto it.
- Set the
KeyWordNameandKeyWordValueproperties. - Drag and drop a textbox on the Web form.
- Set the
TextModeproperty to MultiLine.NOTE: You should set the width of the text box to at least 400px.
- On the code-behind page, add the following line.
Textbox1.Text = Metadata1.XmlDoc.InnerXml
- Build the project.
- View the Web form in a browser.
- The XML structure of the MetadataList appears in the textbox.
For an additional example, see the MetadatList XML page on the Developer samples page. It is located at:
In a browser:
http://siteroot/CMS400Developer/Developer/MetaDataList/MetadataListXML.aspx
In the source code:
siteroot/CMS400Developer/Developer/MetaDataList/MetadataListXML.aspx and MetadataListXML.aspx.vb
Assigning Metadata to a Folder
After you create a metadata definition, assign it to folders whose content will use it. On each folder’s properties screen, you determine which metadata definitions can be used. The section of the folder properties screen used to assign metadata appears below. Only metadata definitions whose Assigned box is checked can be completed by users working with content in the folder.
Requiring Users to Enter Metadata
You can determine that a metadata value must be inserted before content can be saved (see the Required checkboxes in the illustration above). This occurs both when new content is added and existing content is edited. If you set a kind of metadata to be required, its label is red and includes an asterisk (*) on the Metadata tab of the Edit Content screen.
NOTE: If a default value is defined for a required metadata field, the default value is used when the user saves the content. In this case, the user is not prompted to enter a value because the default value is sufficient.
Inheriting Metadata by Folder
Each folder can inherit metadata fields from its parent folder or have a unique set of them. The information includes the kinds of metadata that are assigned and which of those are required. For example, you could assign the top folder (Content) all metadata definitions, while you assign the Contacts folder (directly below it) none. On every folder property’s Metadata tab, use the Inherit Parent Configuration check box to determine if metadata definitions are the same as the parent folder or unique. By default, Inherit Parent Configuration is checked, meaning that the folders inherits its metadata definition from the parent folder. When you uncheck Inherit Parent Configuration, you can change the settings as desired. All inherited values appear by default (that is, Assigned and Required boxes are either checked or unchecked).
Applying Simple Dublin Core Metadata
Simple Dublin Core is a set of fifteen standard names for metadata fields designed to cover the most useful items of information on a document. From the Dublin Core site FAQ: “Dublin Core metadata provides card catalog-like definitions for defining the properties of objects for Web-based resource discovery systems.” For more information, refer to the Usage Guide: http://www.dublincore.org/documents/usageguide/.
To generate Dublin Core metadata, set the GenerateDublinCore property to True. This creates 7 of the fifteen Dublin Core metadata fields. These fields are automatically filled with the information from the equivalent Ektron property. The following list shows the 7 fields and their Ektron equivalent. For more information on the Metadata Server Control, see Adding Content to a Web Page with the Metadata Server Control.
- DC.title—Content block title
- DC.description—Plain text version of a content summary
- DC.contributor—Content block last editor name
- DC.date—Content block last edit date
- DC.format—"text/html"
- DC.identifier—URL of current page (from ASP.NET Server.Request object)
- DC.language—CMS language cookie / current site language, expressed as a .NET System.Globalization Culture Name
To fully comply with the Simple Dublin Core metadata element set, the administrator must create the remaining 8 Dublin Core fields as standard Ektron Metadata definitions and apply them to all Ektron folders. Next, Ektron users complete the appropriate values for each content block.
IMPORTANT: When creating the Dublin Core metadata fields in the Metadata section of the Workarea, you do not need to create the first 7 fields in the table above. In addition, the names of the fields you create must match the names in the following list. For example, in the name field, enter “DC.subject”. The DC identifies the metadata as Dublin Core metadata.
These descriptions are from the Dublin Core Metadata Initiative site. For a more detailed description, visit http://www.dublincore.org.
- DC.subject—The topic of the content of the resource. Typically, a Subject is expressed as keywords, key phrases, or classification codes that describe the topic of the resource.
- DC.type—The nature or genre of the content of the resource. Type includes terms describing general categories, functions, genres, or aggregation levels for content.
- DC.source—A reference to a resource from which the present resource is derived. For example, DC.source=”Image from page 54 of the 1922 edition of Romeo and Juliet”
- DC.relation—A reference to a related resource.
- DC.coverage—The extent or scope of the content of the resource. Coverage typically includes spatial location (a place name or geographic co-ordinates), temporal period (a period label, date, or date range) or jurisdiction (such as a named administrative entity). Examples: DC.coverage=”1995-1996”, DC.coverage=”Boston, MA”, DC.coverage=”17th century” or DC.coverage=”Upstate New York”.
- DC.creator—An entity primarily responsible for making the content of the resource.
- DC.publisher—The entity responsible for making the resource available.
- DC.rights—Information about rights held in and over the resource. Typically, a Rights element contains a rights management statement for the resource, or reference a service providing such information.
![]()