Working with Discussion Boards
The discussion board feature provides topic discussions on your Web site. A site or membership user with Add Topic permission creates a topic and posts a starter question. Site visitors can then reply. Ektron supports an unlimited number of discussion boards. A discussion board consists of a hierarchy. The following example shows the hierarchy with sample data, to explain how each element is used.

The following example shows a discussion board where the first screen has general topics, the second screen’s topics are more specific, and a third screen displays posts to the forum.

In the Workarea, discussion boards appear as top-level folders ( ) in the folder structure. Forums appears under them. If you click a discussion board, you see its subjects and forums on the right side of the Workarea.

On the Web site, if you click a discussion forum, you see its topics. If you click a topic, you see its posts.

To implement a discussion board into your Web site, place a forum server control on a Web page. Then, select a discussion board. All subjects and forums within that board appear on the Web page. You cannot selectively suppress subjects or forums. Keep this in mind when determining the contents of a discussion board.
To view a discussion board, select it from the Folders display. When viewing the board, you see all of its forums. You can click any forum to see details about it.
An administrator determines the following discussion board features.
- The subjects being discussed
- A starter post that initiates a discussion
- If users must sign in before posting to the forum
- If a post appears as soon as someone submits it, or must be approved first
- If a post requires approval, you can edit or delete it before it appears
- Whether posts must be approved, anyone with permission to the board can edit, delete, or reply to a post from the Workarea
Creating a Discussion Board
- From the Workarea’s Content tab, navigate to the folder in which you want to place the discussion board.
- Click New > Discussion Board. (You also can hover the cursor over the folder, right click the mouse, and select Add Discussion Board.) The Add a Discussion Board to folder screen appears.

Editing a Discussion Board
When editing a discussion board, you can change information entered when it was created plus additional fields only available when editing.
- Click the Workarea’s Content tab.
- From the folder structure in the left frame, click the Discussion Board.
- Click View > Properties.
- Click Edit Properties.
- Update the screen as needed.
- Click Save Board Properties.
NOTE: Some items in this table only appear when editing an existing discussion board’s properties.
|
Field |
Description |
|
Name |
Enter the name of the discussion board. This text describes the board within the Workarea and on your Web site. |
|
Title |
Enter the title of the board. |
|
A comma-delimited list of HTML tags allowed in the editor. When left blank, all tags are available.Site visitors posting to the forum can apply these HTML tags to content when their forum editor is eWebEdit400, as set in the user profile. The default list is: NOTE: You must add the embed tag if you want users to be able to insert WMV files into their posts. |
|
|
A comma delimited list of file extensions that can be uploaded. You can enter the extension with or without the period (.). Use a comma to separate each extension. The list appears at the bottom of the editor screen to notify the person entering a post which file types can be attached. The default list is:
|
|
|
The maximum size of a file, in bytes, that a user can upload. The default is 200000 bytes (.19 megabytes). |
|
|
Topics: Require Authentication |
Effect of this Field on the Web Site Check this box if a site visitor must sign in to post to the discussion board. If the user cannot access a login screen, the user cannot post. If this box is unchecked, site visitors can post without signing in. Effect of this Field within the Workarea If this field is checked, only users with Add Topic or Edit Topic permissions for the discussion board can create or reply to posts. See Also: Modifying Permissions for a Discussion Board |
|
Check this box if you want to prevent all posting to this discussion board. You can do this temporarily or permanently. If a Board is locked, only Administrator user group members can post to it, or edit or delete posts. Those users can post from the Web site or the Workarea. You can alternatively lock any forum underneath this Board via the forum properties screen. |
|
|
CSS Theme |
Choose a style sheet to determine the appearance of the discussion board on your Web site. Select any theme available in the CSS Theme drop-down. The default is NOTE: If you edit a CSS file, you should save it under a new name. This prevents your changes from being overwritten during an upgrade. |
|
Page Template |
Lets you specify a template for the forum. If you do not specify a template, the search results do not link properly to the forum. See Also: Working with Templates. To preview what the forum looks like within the selected template, click preview ( |
|
If you want all topics in this discussion board to be assigned a taxonomy category, check Required category selection. If you do, a signed-in user is prompted to select a taxonomy category when creating a topic. This checkbox has no effect when creating new topics within the Ektron Workarea. See Also: Taxonomy |
|
|
Select a taxonomy whose categories will be assigned to forum topics. The Taxonomies are created in the Taxonomy Tab. The discussion board’s taxonomy display represents another way to organize the forum’s posts. See Also: Taxonomy . Effect of Assigning Taxonomy Categories to a Topic When a discussion board server control is placed on a Web page, its display includes a small taxonomy icon (circled below).
When a site visitor clicks this icon, taxonomy categories are displayed. When the user selects a category, the user sees its subcategories followed by all forum posts assigned to that category. Below is an example of how a discussion board’s posts might be organized by taxonomy category.
|
|
|
Subjects Tab |
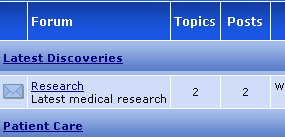
Enter as many subjects as you wish. Each subject contains one or more discussion forums. You must create at least one subject for each discussion board. NOTE: You can also add a subject by selecting a discussion board then selecting New > Subjects. Subjects are the highest level of the hierarchy that appears on your Web site. In the sample forum below, Latest Discoveries and Patient Care are Subjects.
Subjects appear in alphabetical order unless you use the Sort Order field. The Sort Order field accepts a number and uses it to arrange the subjects of a discussion board on the Web site. The lowest numbers appear near the top of the page. To access the Sort Order field:
|
|
Terms & Conditions Tab |
Add the Terms & Conditions for using the discussion board. By entering text in this text box and saving, you activate the Terms and Conditions feature. See Also: Defining Terms and Conditions |

 ) to the right.

Deleting a Discussion Board
When you delete a discussion board, its subjects, forums, and posts are also deleted. When deleted, they cannot be retrieved.
- Click the Workarea’s Content tab.
- From the folder structure in the left frame, click the discussion board.
- Click Delete > This folder. A message appears asking you to confirm.
- Click OK.
Modifying Permissions for a Discussion Board
Like content folders, discussion boards have a permission table that lets you determine the functions a user can perform. (See Managing Folder Permissions.) Because discussion boards have different functions than folders, the permission table is slightly different.
In addition, each Forum has its own permission settings. By default, a forum inherits permissions from its parent discussion board but you can break inheritance and customize permissions for a forum.
To access a discussion board’s permission table, navigate to and click the board so it appears in the Workarea. Then, click View > Permissions (![]() ).
).
NOTE: Only Administrators group members can access the discussion board Permission Table.
The following example shows a discussion board permission table for regular users. Membership users have fewer permissions.

When you create a discussion board, the permission table has the following default values from the parent folder (Parent Folder Permission—Discussion Board Permission):
- Read only—Read only
- Edit—Edit Topic
- Add—Add Topic
- Delete—Delete Topic
- Add Folders—Add Forum
- Edit Folders—Edit Forum
- Delete Folders—Delete Forum
NOTE: Because there are no corresponding permissions for the discussion board’s Moderate and Post/reply permissions, their initial value is blank.
So for example, if the user JSmith has permission to perform all functions for a folder, and a discussion board is created in that folder, JSmith initially receives all permissions listed above for the discussion board. However, you can edit the permissions as needed.
As soon as you create a discussion board, it is disconnected from the parent folder’s permission table. Subsequent changes to the parent folder’s permissions have no effect on discussion board permissions.
The following table lists all permissions that you can grant to regular users. Only some permissions can be granted to membership users (that is, site visitors who register to participate in the forum).
|
Permission |
Give the user ability to |
Can be assigned to membership users |
|
Read only |
View forums and posts; cannot submit a post |
Yes |
|
Edit Topic |
Edit a topic’s title (Editing a Topic Title) |
No |
|
Add Topic |
Add new topics (Adding a Topic to a Forum) |
Yes |
|
Delete Topic |
Delete a topic (Deleting a Topic) |
No |
|
Post/Reply |
Post a new topic or reply to an existing one, either from the Workarea or the site. (Adding a Topic to a Forum and Replying to a Post) |
Yes |
|
Approve and delete posts and topics. Also, receive notifications when a post is reported using the report post feature; only applicable if the forum’s properties field Moderate Comments is checked. (Moderating from the Control Panel ) WARNING! Everyone who has Moderate permission will receive notifications when a post is reported. See Also: Reporting a Post |
Yes |
|
|
Add Forum |
Create a new forum (Creating a Forum) |
No |
|
Edit Forum |
Edit a forum (Editing a Forum) |
No |
|
Delete Forum |
Delete a forum (Deleting a Forum) |
No |
Modifying Discussion Forum Permissions for Membership Users
By default, membership users are assigned the following permissions:
- Read only
- Add Topic
- Post Reply
They cannot be granted Edit or Delete topic nor advanced permissions (Add, Edit or Delete forum). However, if a membership user creates a new topic, the user can delete it.
- Navigate to and click the discussion board so it appears in the Workarea.
- Click View > Permissions.
- Click the User Type drop-down field and choose Membership Users.
- The View Permissions for Board screen appears.
- Add new member users and groups, remove them, or change their permissions.
Granting Discussion Board Permissions
- Navigate to and click the discussion board so it appears in the Workarea.
- Click View > Permissions.
- Click Add. All users and groups who are not currently assigned permissions appear.
- Click any user or group. The Add Permission for Folder screen appears with the selected user or group.
- Assign appropriate standard and advanced permissions then click Save.
Removing Discussion Board Permissions
- Navigate to and click the discussion board so it appears in the Workarea.
- Click View > Permissions.
- Click Delete (
 ).
). - Select a user or group that you want to remove from the Permission table. A confirmation message.
- Click OK. The user is removed.
After you remove a user, discussion boards do not appear in his Workarea.
Changing Page Size for Discussion Boards
You can change the number of topics or posts shown on a page by changing the ek_PageSize value in the web.config file.

Defining Terms and Conditions
A discussion board's Terms & Conditions convey your expectations to its users. If you add Terms & Conditions, anyone posting to that board sees the following screen the first time a post or reply is attempted to a forum. Users can only post to a forum after agreeing to its Terms & Conditions.

To add terms and conditions to a discussion board:
- Click the Workarea’s Content tab.
- From the folder structure in the left frame, click the discussion board to which you want to add terms and conditions.
- Click View > Properties.
- Click Edit Properties.
- Click the Terms & Conditions tab.
- Add the terms and conditions text to editor.
- Click Save Board Poperties.
Working with Subjects
This sections show you how to create and edit subjects in a Discussion board.

Editing Subject Name and Sort Order
- Click the Workarea’s Content tab.
- From the folder structure in the left frame, click the discussion board that contains the subjects.
- Click View > Properties.
- Click the Subjects tab.
- Click the subject that you want to edit. The current subject name and sort order appear on a new screen. Edit as needed.


- Click Save Board Subject.
Working with Forums
A forum is a particular thread within a discussion board. For each forum, you define the following:
- name and Description
- whether its posts must be approved before appearing on your Web site
- if it’s accepting new postings
- its sort order, which determines its sequence on the Web page within its subject
- its subject
Creating a Forum
Prerequisite: You can only create a forum after a discussion board and at least one subject have been created.
- In the Workarea, click the Content tab.
- Select a discussion board.
- Click New > Discussion Forum. The Add a Discussion Forum to Board screen appears.

- Name—Enter the name of the discussion forum. The name identifies the forum in the left side of the Workarea. The forum’s name appears next to a forum icon (). This icon distinguishes it from content and blog folders. It also appears on the Web site.

- Description—Enter a more detailed description of the forum. The description appears on the Web site, as illustrated above.
- Moderate Comments—Checking this box causes comments to require approval before appearing on the Web site and a post to be reported to all moderators of the forum. See Also: Reporting a Post and Setting Up Post Reporting. Only users who are granted Moderate permission can approve comments, thereby allowing them to be published on the site.
The Smart Desktop has a Forum Topics and Posts category. This tells you how many posts currently require your approval before they appear on the site.
- Lock Forum—Check this box to prevent all posting to this forum. You can do this temporarily or permanently. If a forum is locked, only members of the Administrators user group can post to it, or edit or delete posts. Those users can post from the Web site or the Workarea.
A discussion board can also be locked. If a board is locked, a message on this screen indicates that. In that case, no posting is allowed to this forum regardless of this setting.
- Sort Order—Enter a number if you want to arrange the sequence of forums within the subject. If you do not, forums appear in alphabetical order within a subject.
- Subject—Enter the subject within which this forum will appear on the Web site.
- Name—Enter the name of the discussion forum. The name identifies the forum in the left side of the Workarea. The forum’s name appears next to a forum icon (
- Click Add Discussion Forum.
Deleting a Forum
You can delete any forum. When you do, its topics and posts are also deleted. When deleted, they cannot be retrieved.
- In the Workarea, click the Content tab.
- Select the discussion board that contains the forum.
- Click the forum.
- Click Delete Forum (
 ). A message appears asking you to confirm.
 - Click OK.
Modifying Permissions to Forums
You can use all of the permission features available to discussion boards with any forum.
- Open CMS Workarea > Content.
- Click the forum.
- Click View Permissions (
 ) on the Contents of forum screen. A permission table appears.
When you first view a forum’s permission table, you see these settings plus a check box that lets you maintain the inheritance or break it. A forum initially inherits (that is, copies all permissions from) its parent discussion board’s permission settings.
- If you break inheritance by unchecking the Allow this object to inherit permissions box, the forum permission screens change from view-only to edit. At this point, you can modify the forum’s permissions as needed.
To later restore inheritance, check the box. When you do, the parent discussion board’s permissions overwrite any forum-specific changes. The forum then reverts to a read-only state. Any permission changes must be made at the discussion board level while inheritance is enabled.
Blocking an IP Address from a Forum
If you are not using authentication for the forums and want to block a site visitor from posting to the forum, you can use the Restricted IP feature to block site visitors from posting to the forum.

NOTE: In addition to using Restricted IPs for a specific forum, you can access the Restricted IP feature from the Workarea > Settings > Configuration > Discussion Board > Restricted IPs. If you have more than one forum, this lets you select which Discussion Boards the Restricted IPs are applied.
Adding an IP Address to the Restricted List
- In the Workarea, click the Content tab.
- Select a forum from the folder structure.
- Click New > Restricted IP.
- Enter the IP Address to be blocked in the Block IP field.
- Click Save. A list of restricted IP addresses appear.
Editing a Restricted IP Address
- In the Workarea, click the Content tab.
- Select a forum from the folder structure.
- Click View > Restricted IPs. A list of restricted IP addresses appears.
- Click the IP address to be edited.
- Click Edit.
- Edit the IP address in the Block IP text box.
- Click Save.
Deleting a Restricted IP Address
- In the Workarea, click the Content tab.
- Select a forum from the folder structure.
- Click View > Restricted IPs. A list of Restricted IP addresses appears.
- Click the IP address to be deleted.
- Click Delete (
 ). A dialog asks if you are sure you want to delete the restricted IP address.
 - Click OK to continue. A list of the remaining restricted IP addresses appear.
Ranking Forum Users
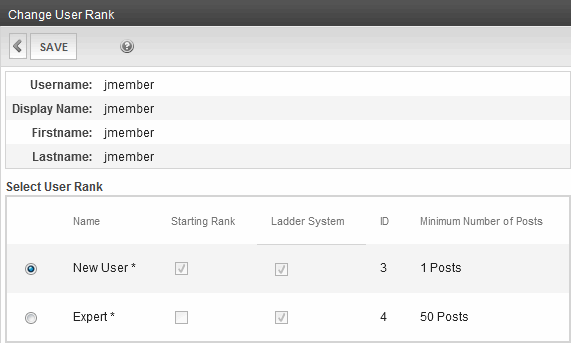
The User Ranking feature lets you recognize active forum contributors. You can create a ranking system that moves a contributor to the next level after submitting a specified number of posts. This is known as a ladder system, which lets forum contributors build credibility. For example:
- New User—0 - 9
- Intermediate User—10 - 19
- Expert User—20 and up
You can assign an image to each rank that appears below the user’s name on any post. The rank also appears on a user’s forum profile.
![]()
You can also create ranks that are independent of the ladder system. Such ranks have no relationship to a contributor's number of posts. For example, after a forum user acquires Ektron Developer Certification, the user is assigned the Ektron Developer rank.
You can move contributors from a non-ladder rank to the ladder system and vice versa. Whether or not a contributor is in a ladder system, Ektron keeps a tally of posts. So, if the user is moved into a ladder system at any time, the user is placed into the correct rank.
Adding a User Rank
To add a user rank:
NOTE: You can also access the User Ranks screen from Workarea > Settings > Configuration > Discussion Board > User Ranks. If you have more than one forum, this screen lets you pick the discussion board to which a rank is assigned.
- In the Workarea, click the Content tab.
- Select a discussion board.
- Click New > User Rank. The User Ranks screen appears.

- Name—The name of the rank. For example, New User, Expert User, Developer, or Associate.
- Rank Image—Click Upload to browse and select an image to upload. When uploaded the path where the image is stored appears in the text box. Images are optional. If you assign an image, it appears below the user’s name on any post.
- Number of Posts—Enter the number of posts it takes to reach this rank. If the Starting Rank check box is checked, the number is 1 and cannot be changed.
- Ladder System—Check this box if this rank is part of a ladder system. That is, a rank based on the number of posts a user has submitted to this discussion forum. If you uncheck Ladder System, both Starting Rank and Number of Posts become inactive, since those fields set up and manage the ladder system.
- Starting Rank—If you are using a ladder system, use this check box to designate this rank the Starting Rank. A user is assigned to this rank when the user submits the first post. A discussion forum can only have one Starting Rank. Also,if this is the Starting Rank, you cannot enter a number of posts.
- Applies To—If you accessed this screen from Workarea > Settings > Configuration > Discussion Board > User Ranks, use this field to select the discussion forum to which this rank applies.
- Click Save.
Changing a User’s Rank
A user’s rank appears below the user name on any post the user has made. You can only move a user into and out of a ladder system. You cannot change his rank within a ladder system—that is determined by the number of posts.
To change a user’s current rank, you must know what it is. To change a user’s rank:
- In the Ektron Workarea, go to Content and navigate to the forum to which the user has posted.
- Click View > User Ranks.
- Select the rank that you want to move the user out of. The User Ranks screen appears. The lower half shows all users assigned that rank.

- Click the user that you want to move out of the rank. The screen displays all ranks. The current one is selected.
- Click next to the desired rank.
- Click Save.
Sending Notifications of Forum Activity
The discussion board’s Email Notification feature enables Ektron to generate email for a list of registered users whenever certain forum activities take place. For example, anyone may register to be notified whenever a new forum topic or post is created. As soon as a new forum topic or post is created, registered users receive an email with a link to the new topic or post. The recipient clicks the link to access the page. So, users can be instantly notified when users' posts to the discussion board relate to their interests. When the messages are set up, you don’t need to do anything—everything happens in the background.

Creating the Email Message
You can create an email message to be sent when these discussion board events occur.
- a new post is added
- a new topic is added
- someone reports a post See Also: Setting Up Post Reporting
A simple editor lets you apply some XHTML formatting the message. To create a message:
- In the Workarea, go to Settings > Configuration > Discussion Boards > Messages.
- Click Add.
- Enter a title that describes the message.
- At the Type field, select either NewForumTopic, ReportForumPost, or ForumPost.
- Select whether to make the email message a Default message.
- Enter the message subject.
- In the editor, enter the message text. Use the variables listed in the table above to retrieve information about the about the new post or topic and display it in the message.
- Click Save.
Including Variables in the Default Message
The messages can include variables that retrieve information about the new post or topic and display it in the message text. The variables are surrounded by at signs (@). For example:
@appPosterDisplayName@ has created a thread you have subscribed to.
In the email, this text might read:
Alan Administrator has created a thread you have subscribed to.
You can use the following variables in the body of discussion board email notifications.
- @appTopicTitle@—The title of the topic.
- @appTopicId@—The integer ID of the topic.
- @appRecipientDisplayName@—The display name of the person receiving the email.
- @appRecipientId@—The recipient’s integer ID.
- @appRecipientFirstName@—The first name of the person receiving the email.
- @appRecipientLastName@—The last name of the person receiving the email.
- @appRecipientEmail@—The email address of the person receiving the email.
- @appHostUrl@—The host site’s URL.
- @appForumUrl@—The forum’s URL.
- @appPostMessage@—The text of the message that was posted to the discussion board.
- @appPosterId@—The integer ID of the person who created the post.
- @appPosterDisplayName@—The display name of the person who created the post.
- @appPosterProfileUrl@—The profile URL for the person who created the post.
- @appPostUrl@—The URL of the post on the Web site.
Working with Topics
A topic is a specific issue to be discussed in a forum. For example, in a medical research forum, a topic might be New Cancer Treatments. Before creating a topic, you must create a forum into which to place it. To view a topic from the Workarea:
- In the Workarea, click the Content tab.
- Select a discussion board, then select a forum from the folder structure.
- The forum’s topics appear in the right frame. Click the one that you want to view.
If an option is underlined, you have authority to perform it; if not, you cannot. For example, if a post’s status is approved, the approve option is not underlined because it is already approved.
Adding a Topic to a Forum
When you create a new topic in the Workarea, the first post is created from the topic message. If you add a topic but you are not a forum moderator, you do not see the topic in the Workarea until it is approved.
NOTE: You also can create new topics from the OnTrek user interface (Support > Support Forums).
To create a topic:
- In the Workarea, click the Content tab.
- Select a discussion board, then a forum from the folder structure.
- Click New Topic. The Post New Topic screen appears.

- Subject—Enter a short description of the topic. The topic subject appears on the forum page.
- Priority—Set the priority level for the topic. This determines where the topic appears in the topic list on the site. The default setting is Normal.
- Lock—Check this box if you want to prevent posting of replies to this topic. You can do this temporarily or permanently. If a topic is locked, only Administrator user group members can post to it, or edit or delete posts. Those users can post from the Web site or the Workarea.
- Message—Enter the topic text. This text appears on a new Web page after a Web site visitor clicks a topic’s subject line.
- Click Save. The new topic appears in the list.

Editing a Topic Title
The only part of topic you can edit is its title.
- In the Workarea, click the Content tab.
- Select a discussion board, then select a forum from the folder structure. The forum’s topics appear in the right frame.
- Click the one that you want to edit.
- Click View Properties (
 ). The Edit Topic screen appears.
 - Modify the title as needed.
- Click Save.
Approving a Topic
If a post is surrounded by a yellow border in the Workarea, the post must be approved before it can appear on the Web site. A topic needs approval when a user without moderate permissions for the forum adds a topic. Only users with Moderate permission can approve a post. To approve a topic:
- In the Workarea, click the Content tab.
- Select a discussion board, then select a forum from the folder structure.
- The forum’s topics appear in the right frame. Click the one that you want to approve. The View Topic screen appears.

- Click approve.The topic is approved.
Setting a Topic Priority
In a forum, topics are sorted by priority. You can set a topic’s priority when you create it. A forum moderator can change a topic’s priority. To set a topic property:
- In the Workarea, click the Content tab.
- Select a discussion board, then a forum from the folder structure.
- Click on a topic.
- Click View Properties ().
- Click Click here to Edit the Properties of this Topic. The Edit topic screen appears.
- Choose one of the Priority options.
- Announcement—topic always appears at the top of the list. If a list has more than one announcement, they are sorted by date with most recent on the top. The Announcement icon (
 ) indicates its priority to the left of the title.
 - Sticky—topic appears near the top of the list, just below the announcements. If a list has more than one sticky topic, they are sorted by date with most recent on the top. The Sticky icon (
 ) indicates its priority to the left of the title.
 - Normal—Topics with this priority follow Announcements and Sticky topics. The Normal icon (
 ) next to the topic indicates its priority.
- Announcement—topic always appears at the top of the list. If a list has more than one announcement, they are sorted by date with most recent on the top. The Announcement icon (
- Click Save.
Locking a Topic
Locking a topic prevents users from posting a reply to it. For example, you might create an announcement, but don’t want people replying to it. Or, you might decide that a topic has had enough discussion and want to stop further replies. If a topic is locked, only Administrator user group members can post to it, or edit or delete posts from the Web site or the Workarea. To lock a topic:
- In the Workarea, click the Content tab.
- Select a discussion board, then a forum from the folder structure.
- Click a topic.
- Click View Properties ().
- Click Click here to Edit the Properties of this Topic. The Edit topic screen appears.
- Check the Lock check box. (To unlock a topic, remove the check mark.)
- Click Save.
Deleting a Topic
When you delete a topic, its posts are deleted, too. When deleted, they cannot be retrieved.
- In the Workarea, click the Content tab.
- Select a discussion board, then select a forum from the folder structure. The forum’s topics appear in the right frame.
- Click the one that you want to delete. The View Topic screen appears.
- Click Delete. A confirmation message appears.
- Click OK if you are sure you want to delete it.
Working with Posts
When a new topic is created, the first post is created from the topic's message. Posts to a topic are replies to the first post. You can search posts by clicking Search.
Replying to a Post
- From the Web Site:
- Go to the Web page that hosts the discussion board.
- Click the forum of interest.
- Click Add Reply.
- Enter the text of your post.
- Click Post. If a topic is moderated, a message appears stating that your reply is pending moderator approval.
- From the Workarea:
- In the Workarea, click the Content tab.
- Navigate to a discussion board, then a forum. The forum’s topics appear in the right frame.
- Click the topic with the post to which you want to reply. The next screen, View Topic, displays all posts to the selected topic.
- Find the post to which you want to reply by reading its text.
- Click Reply.
- In the Message field, enter the text of your post.
- Click Save.
Quoting a Post
Quoting a post means that your reply begins with the original post. You can then add comments and even edit the quoted post. For example, you can include only the portion on which you are commenting. To quote a post:
- Go to the Web page that hosts the discussion board.
- Click the forum of interest.
- Click a topic.
- Find the post you want to quote.
- Click Quote.
- The editor appears with the quoted text at the top. You may edit the quoted post to focus on the portion on which you are commenting.
-
Add your comments below the quote.

- Click Post. The reply is added.

Moderating from the Control Panel
Users with forum moderate permissions can do so from the Control Panel by clicking the Moderate link.
- Log in to the site and navigate to the forum.
- Click Control Panel.
- Click the Moderate link.The forum’s control panel appears with a list of items requiring approval appears.

- Click the item you want to approve. From this screen, you can edit, approve, or delete the post.
Approving a Post
When defining a forum, you can check the Moderate Comments field. If you do, posts to the forum must be approved before they appear on the Web site. Only users who are assigned the Moderate permission are allowed to approve a post. There are 2 ways to approve a post in the Workarea.
- From the Web Site:
- Log into the site and navigate to the forum.
- Click Control Panel. The Control Panel appears.
- Click the Moderate link.
- Click the topic. The topic appears.
- Click Approve. A message notifies you that the post was approved.
- From the Workarea's discussion board:
- In the Workarea, click the Content tab.
- Select a discussion board, then a forum from the folder structure.
- The forum’s topics appear in the right frame. Click the one that has the post that you want to reply to. (Unapproved posts have an Approval Needed icon in the left column (
 ).
). - The next screen, View Topic, displays all posts to the selected topic.
- Find the post you want to reply to. Unapproved posts have a yellow border (Illustrated below).
- Click approve under the post icon.
Editing a Post
You can edit the text of a post but you cannot edit its title.
- From the Web Site
- Go to the Web page that hosts the discussion board.
- Click the forum of interest.
- Find the topic you want to edit.
- Click Edit.
- From the workarea
- In the Workarea, click the Content tab.
- Select a discussion board, then a forum from the folder structure.
- The forum’s topics appear in the right frame. Click the one that has the post that you want to edit. The View Topic screen displays all posts to the selected topic.
- Find the post that you want to edit and click edit under the post icon. The Edit Reply screen appears.
- Update the text as needed.
- Click Save.
Deleting a Post
- From the Web Site
- Go to the Web page that hosts the discussion board.
- Click the forum of interest.
- Find the topic you want to delete.
- Click Delete.
- From the Workarea
- In the Workarea, click the Content tab.
- Select a discussion board, then a forum from the folder structure. The forum’s topics appear in the right frame.
- Click the one that has the post you want to delete. The View Topic screen displays all posts to the selected topic.
- Find the post that you want to delete and click delete under the post icon.
Attaching Images and Files to a Post
You can add an attachment to a post. In the Attached Files field, a list of files that will be attached appears. The list of valid file extensions also appears. The list of file extensions and maximum size of the file upload are defined for the discussion board.
- Create a new post or reply to an existing post.
- Click Attachments. The Attachments window appears.

- Click Browse... to navigate to the file that you want to attach.
- Click Open.
- Click Attach to attach the file to the post.The file appears in the list of Current File Attachments.
- When all attachments have been added, click Close.
- Click Attachments below the editor.
- Highlight the attached item.
- Click Remove.
- Click Close.
Adding Video to a Post
You can add video to a post by clicking Insert WMV ( ) in a forum post using eWebEdit400. The following are prerequisites for this action.
- the embed tag must be added to the Accepted HTML property in the Workarea forum’s properties.
- a user must be using eWebEdit400
- the video must be in the .wmv format
- the video must reside in a hosted location. For example,
http://www.example.com/myvideos/fridaylunch.wmv

Moving a Topic and Its Posts to Another Forum
To move a topic and its associated posts in one forum to another, the forum to which you want to move the topic and posts must exist.
- Access a page on your Web site that has a login button.
- Sign in as a member of the Administrators group or as a Moderator of the board.
- Navigate to a page with discussion board and select a forum.
- Navigate to a topic page.
- Click the Move to... drop-down list.
- Select the topic to which you want to move.
- Confirm that you want to move all posts.
Replacing Words in a Post
You can configure Ektron to replace unwanted words in a post such as obscene or indecent words that should not appear on your site. You also can fix commonly misspelled words. For example, the can replace teh.
The Replace Words feature works with exact matches but does not append words. For example, if you replace car with auto, the sentence I bought the car from the cartel becomes I bought the auto from the cartel. Note that cartel did not change to autotel even though the word car appears in cartel.
Using Regular Expressions
If you would like the Replace Words feature to modify words that contain a word you do not want used, you can use Regular Expressions. A Regular Expression, often referred to as regex, is a pattern of metacharacters placed around a word that describes a string. Used for string manipulation, regex lets you detail a succinct description of a group of words without having to detail each word in the group.
- .—Matches any character, similar to a wildcard. For example, .ar matches any 3-letter word ending in ar, such as car, bar, tar or far.
- |—Acts as an or operator. For example, steak|stake would find steak or stake.
- [ ]—Matches one character that is between the brackets. For example, [rst] matches r, s or t. [d-g] matches d, e, f, or g. Another example, [bc]ar matches bar and car. If you need to match a dash (-), use it a the beginning or end of the group. For example, [xyz-] or [-xyz].
- [^ ]—Matches one character that is not in the group. For example, [^rst] matches any character other than r, s or t. Another example, [^bc]ar does not match bar or car, but does match words, such as tar or far.
- ^—Matches the beginning of any line. For example, ^[bc]ar matches bar or car, but only at the beginning of a line.
- $—Matches the end of any line. For example, ^[bc]ar matches bar or car, but only when it appears at the end of a line.
- ( )—Marks a sub expression. For example, alt(a|e)r finds altar or alter.
- *—When an expression is followed by *, it matches zero or more versions of the expression. For example, [rst]* finds (blank), r, s, t, rs, sr, rt, tr, st, ts, rst, rts, srt, str, trs and tsr.
- +—When an expression is followed by +, it matches one or more versions of the expression. This differs from * because it does not match (blank). It must match at least one character. For example, r+ matches r, rr, rrr and so on.
- {x,y}—Must match at least x times and not more than y times. For example, s{2,4} matches ss, sss and sss. You can also use {x} to specify an exact match. For example, s{3} matches sss. You can use {x,} to specify that the match is at least x amount of times. For example, s{4} matches ssss, sssss, ssssss and so on.
- ?—Must match the preceding character zero or one times. For example, Boa?rder matches boarder and border.
Adding a Replacement Word
NOTE: In addition to using Replace Words for a specific forum, you can access the Replace Word feature from the Workarea > Settings > Configuration > Discussion Board > Replace Words. If you have more than one forum, this allows you select to which discussion boards the Replace Words feature is applied.
- In the Workarea, click the Content tab.
- Select a forum from the folder structure.
- Click New > Replace Word. The Replace Words screen appears.
- Click Add.
- Add the word to be replaced in the Old Word textbox.
- Add the replace word in the New Word textbox.
- Select the language for the Replace Word.
- Click Save.
Adding Emoticons to a Post
An emoticon is an icon used to express emotion in a forum post. In the post editor, click the emoticon (![]() ) symbol.
) symbol.

You can also enter a few characters that resemble the image. For example, to insert  , enter
 O:\). While working in a post, the user only sees the text. But when the post is saved, Ektron converts the text to the corresponding emoticon. In all subsequent work with the post, users see only the emoticon. You can add new emoticons at Settings > Configuration > Discussion Boards > Emoticons.

You also can place emoticon images in the following folder: webroot\Workarea\threadeddisc\emoticons. Administrators reference these files when editing or creating new emoticons.
Creating or Editing an Emoticon
- Within the Ektron Workarea, go to Settings > Configuration > Discussion Boards > Emoticons.
- Click the emoticon text or image that you want to edit.
- Click Add or Edit.
- Emoticon Text—Enter or update the characters a forum participant would enter to insert this emoticon.
- Emoticon Image—Enter the name of the image file that will appear after a user enters the above Emoticon text and saves the post. Administrators place emoticon images in the
siteroot\Workarea\threadeddisc\emoticonsfolder. - Regex—See Using Regular Expressions
- Language—Select the emoticon’s language from the drop-down list. If a forum is language-specific, only emoticons assigned to that language or all languages are available.
Deleting an Emoticon
- Within the Ektron Workarea, go to Settings > Configuration > Discussion Boards > Emoticons.
- Click the emoticon that you want to delete.
- Click Delete.
- Reply to the confirmation message.
Reporting a Post
You can allow site visitors to report inappropriate posts, such as spam or offensive posts. When a site visitor clicks the Report Post button, an email notification is sent to all forum moderators. Any moderator can review the post and decide to edit, delete, or leave it alone.
If you want to edit the message that is sent when someone reports post, go to the Workarea and choose Settings > Configuration > Discussion Boards > Messages and select ReportForumPost.
Setting Up Post Reporting
When you set up the forum post reporting feature, you add a Report button to the bottom of each post to let site visitors report posts to forum moderators. For example, users can report posts that are offensive or spam. When a site visitor clicks Report Post, an email notification is sent to moderators. A moderator can then view the post and decide whether to edit, delete or leave the post.

NOTE: Your Ektron Web server must be set up to send emails. See Configuring email for Tasks and Content.
- From the Ektron Workarea, choose Content.
- In the left panel, select a discussion board from the folder structure.
- Click View > Permissions. (Make sure forum moderators have Moderate permission.)
- Click Back (
 ).
). - Select a forum.
- Click Properties ().
- Click Edit and check the Moderate Comments box.
- Click Save.
Using Discussion Boards on Your Web Site
This section explains how to work with a discussion board on your site.
Using the Control Panel
The Control Panel lets logged in users view your profile, read, reply to, and delete private messages. It also lets users with moderate permissions moderate the forum. The Control Panel button is located at the forum level.

The Inbox view appears by default from which you can...
- read a message by clicking on it. A read message's icon changes from unread (
 ) to read (
 ).
). - view information about the message sender by clicking the name.
- delete the message by clicking the corresponding check box then the Delete button.
- switch to a different view.
- check your subscriptions.
- reply to a message by clicking Reply (
 ).
).
IMPORTANT: When replying to a private message, you add your response to the existing message. Only one message is created.
Approving a Topic
A Topic needs to be approved when a user who does not have moderate permission for the forum adds a topic. When you view topics on the site, any that need approval are highlighted with a different color background.

From this screen, you can click Approve next to the topic’s title. You could also click the topic’s title to view it and click Approve ( ) on that screen.
Sorting Topics
- Go to the Web page that hosts the discussion board.
- Click the forum of interest.
- Click any column title to sort by alpha or numerical order.
On the first click, items are sorted first by any numeric (1-10) values, then by alpha values (A to Z). Clicking a column title a second time sorts the items in reverse. When the page is first viewed, the list is sorted by Last Post date and time.

Deleting a Topic
- Go to the Web page that hosts the discussion board and click the forum of interest.
- Click the topic you wish to delete.
- Click Delete Topic. A dialog appears asking you to confirm the deletion.
- Click OK.
Topics can be deleted from a forum by the users who created them or by users with the Moderate permission. This includes Membership users.
WARNING! When you delete a topic, its replies and posts are also deleted.
Suppressing User Information from the Forum Profile Display
Anyone browsing to a discussion forum can view information about its contributors by clicking the user name. However, if the forum server control’s HideUserProfile property is true, non-administrator users cannot see the profile, even if the Private Profile setting is set to Public. Administrators can see the profile, regardless of how the HideUserProfile property is set. The profile contains the following user information.
- First Name
- Last Name
- Email—email address
- Joined—date the user joined
- Last Visit—date the user last visited the site
- Number of Posts—the number of posts a user has contributed
- Post History—a list of posts the user has contributed

Users can determine if their profile is viewable via the Private Profile drop-down box on the Membership Registration screen and the Edit Profile screen. The Membership Registration screen appears wherever your developer inserts the Membership Server Control. If Private Profile is set to Private, profile information is suppressed. If it is set to Colleagues, only a user’s colleagues can see his profile. When set to public, everyone can see a user’s profile information.

NOTE: If the forum server control’s HideUserProfile property is set to true, non-administrator forum visitors cannot see a user profile, even if the Private Profile field is set to Public.
If you want to suppress the display of user names as an administrator:
- If the user is a regular user, go to Settings > Users and select the user whose information you want to suppress.
If the user is a membership user, go to Settings > Community Management > Memberships > Users and select the user whose information you want to suppress.
- In the User Properties area of the screen, check the Private Profile checkbox.
NOTE: If the forum server control’s
HideUserProfileproperty is set totrue, non-administrator forum visitors cannot see the profile, even if the Private Profile check box is unchecked.
Outputting a Forum as an RSS Feed
You can output a forum as an RSS feed by clicking the RSS feed button ( ). Each level of the forum has an RSS feed button. This lets you output a specific topic as an RSS feed.
<?xml version="1.0" encoding="UTF-8" ?>
- <rss version="2.0">
<!-- Generated by Ektron -->
- <channel>
  <title>Ektron Medical Center Forum</title>
  <link>http://test/webform.aspx</link>
  <description>Ektron Medical</description>
  - <item>
<title>Research</title>
<link>http://test/webform.aspx?g=topics&f=108</link>
  - <description>
<![CDATA[ Latest medical research ]]>
</description>
<pubdate>Mon, 7 Feb 2012 09:56:00 GMT</pubdate>
  </item>

</channel>
</rss>
Subscribing to a Discussion Board
- After logging in, discussion board you can subscribe to a forum post and replies by clicking the Subscribe button (
 ). The button appears at each discussion board level, so that a user can subscribe to forums and topics of interest.
After clicking the button, the following screen appears.

- Selects a notification type, listed below.
- All Posts—notifies you when any post or reply is added
- Replies to Me—notifies you when someone replies to your post
- Click the AddSubscription button.
Reviewing Subscriptions
To review your forum subscriptions, go to the Control Panel and click Notifications in the lower left corner. A screen indicates each discussion board level to which you have subscribed.

Deleting a Subscription
To delete a subscription, check the corresponding box and click Delete.
Sending a Private Message to a Forum Member
Logged in users can send a private message to the person who created a post or reply. Only the sender and receiver can view private messages. This requires both users to be either an Ektron user or a Membership user.
- Navigate to a post and click the user’s name.
- When the User Profile appears, click Message. The Message screen appears.
- The To: field is filled automatically. You cannot add additional members.
- Enter a subject.
- Enter a Message.
- Click Post. You are notified that the message was sent.
Using Discussion Boards in Community Groups
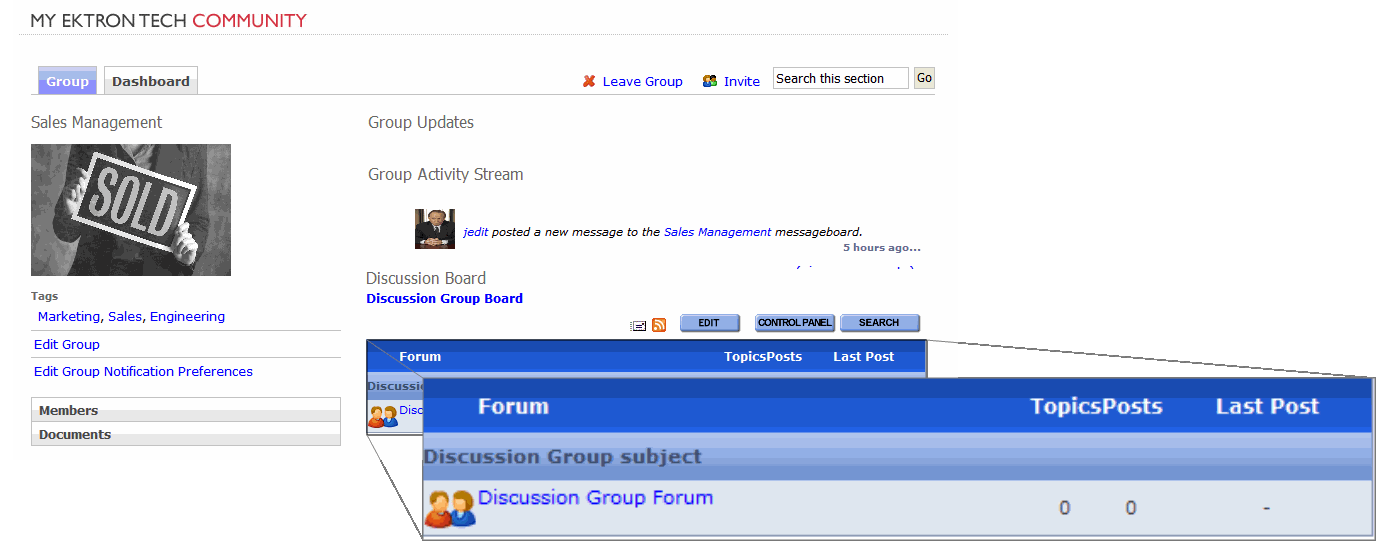
Community groups can have their own discussion board. This provides a forum for community-based discussions that are limited to the forum members. All discussion board features are available to a forum in a community group. However, only one step is needed to first create a discussion board in the database.The following example shows a discussion forum on a community group page.
To use a group discussion board, you must first add the group discussion forum into the database. Each group needs to do this one time when they decide to have a discussion forum for their group. To add a group discussion forum database:
- Log in to your Web site.
- Navigate to your group Web page.
- Click Edit Group. The Edit Group Link window appears.
- In this example, the Edit Group link is located on this group profile page of the eIntranet Starter Site.

- Check the Create Group Forum checkbox to create a group forum in the database. After the group forum database is created, you cannot uncheck this option.

- Click Save. A group forum exists in the database and can appear on the group page.
Discussion Board Server Controls
The discussion board feature provides a forum where topics can be discussed on your Web site. An Ektron or membership user with Add Topic permission creates a topic and posts a starter question. Any site visitor can then reply.
Ektron provides 3 server controls for use with discussion boards.
- Forum Server Control—use to place a discussion board on a Web page
- ActiveTopics Server Control—use to display the most active or most recent topics and posts
- PostHistory Server Control—use to display a list of posts for a user
After creating at least one hierarchy of discussion board elements, place a Forum server control on a Web page. If you want require site visitors to authenticate, the Web page that hosts the forum should also contain:
- a Membership server control (or a link to page that has one). This lets site visitors/membership users register for discussion boards.
- a Login server control that lets the site visitor/membership user log in
NOTE: You should add text below the Login server control to remind the site visitor to enter his email address at the User field. For example, “At the User field, enter your email address.”
Forum Server Control
After creating at least one hierarchy of discussion board elements, place a Forum server control on a Web page. The Forum server control displays a discussion board on a Web page. You should text below the Login server control to remind the site visitor to enter his email address at the User field. For example, “At the User field, enter your email address.”

If you want require site visitors to authenticate, the Web page that hosts the forum should also contain
- a Membership server control (or a link to page that has one). This lets site visitors/membership users register for discussion boards.
- a Login server control that lets the site visitor/membership user log in
WARNING! After placing a Forum server control on a page, follow the procedure described in Updating the Page Command. Otherwise, the user may get an error when posting a reply.
The following are Ektron-specific server control properties. You can find information about native .NET properties such as font, height, width and border style in Visual Studio® help.
- AllowAnonymousPost (Boolean)
Set to True to allow site visitors the option of posting anonymously to the forum. When true, a Post Anonymous checkbox appears above the text editor used to create a post.

If a site visitor adds a check mark to this box, the word Anonymous appears where the Display Name normally appears. The default is True.
- True—make the Post Anonymous checkbox available to site visitors when they create a post.
- False—disable Post Anonymous checkbox.
- True—make the Post Anonymous checkbox available to site visitors when they create a post.
- Authenticated (Boolean)
Indicates if you are logged into the CMS Explorer and can use it to browse to content, collections, and so on. See Also: Browsing Your Ektron Site Using CMS Explorer.
- BoardID (Long)
The ID of the discussion board to display on this page if one is not defined in a query string parameter. If you don’t know the ID, click Ellipses (
 ), then sign in and select a discussion board.
 - CacheInterval (Double)
The number of seconds that the server control’s data is cached. The default is 0 (zero). For example, if you want to cache the data for 5 minutes, set to 300. See Also: Caching with Server Controls.
- CustomOrderBy (String)
Provide a property’s Friendly Name to order search results by that property. For example, if you define DocAuthor, results will be sorted by the document’s author. Results can be ascending or descending based on
OrderDirection. If you enter an invalid property, no search results are returned. If you specify bothCustomOrderByandOrderBy, theOrderByproperty is ignored. - DefaultObjectID (Long)
The Static ID of a community group.
- DynamicForumParameter (String)
Gets or sets the QueryString parameter to read a forum ID dynamically. The default is “f”. Note that a Forum resides one level below a discussion board.
- DynamicGroupParameter (String)
Gets or sets the QueryString parameter to read a group’s ID dynamically. The default is “g”.
- DynamicObjectParameter (String)
Dynamic Parameter for the community group id. Default is “id”.
- DynamicParameter (String)
Gets or sets the QueryString parameter to read a discussion board’s ID dynamically. Set to None - Use Default—if you want to always display the default discussion board. Note that a discussion board is one level above a Forum.
- boardid—reads a Threaded discussion board’s ID dynamically.
- None - Use Default—use the default discussion board’s ID.
- ID—reads a discussion board’s ID dynamically.
- DynamicThreadParameter (String)
Gets or sets the QueryString parameter to read an individual thread’s ID dynamically. The default is “t”. Note that a Thread resides 2 levels below a discussion board and one level below a Forum.
- EditorCSS (String)
Set the style sheet for the Editor when a site visitor creates or edits a post. By default, this property is blank. When a style sheet is not supplied, the style sheet defined in the Theme property is used.
- EditorToolbar (String)
Enter a comma separated list of items that you want to appear on the Editor’s toolbar. The default is StyleMenu, FontMenu, ParagraphMenu, TextFormatMenu, LinkMenu, ClipBoardMenu, SymbolsMenu, EmoticonSelect, WMV, Table. See Also: Adding and Removing Toolbar Items From the Editor.
- EnableForumQuickSelect (Boolean)
If you set this property to
true, a drop-down list of all forums appears below the topic list. The site visitor can click a forum and jump immediately to it. - EnableThreadRating (Boolean)
If you set this property to
true, a ContentReview server control appears on any topic screen run by this server control. The site visitor can use the control to rate the topic thread. An average rating for the thread appears next to each topic on the forum screen.
- ExcludeList (String)
Enter a comma-separated list of custom user properties to exclude from the Forum’s profile page. For example, to suppress the Subscriptions field value, enter subscriptions.
- FilterXslt (String)
Enter the path to an XSLT file used to filter forum content, such as, HTML Attributes, Tags and unwanted words in a user’s forum post. The path can be relative or absolute. The user’s post is filter when the user clicks Submit. By default, this property points to
<webroot>/siteroot/Workarea/Xslt/ForumFilter.xslt. This file removes hrefs with javascript:, vbscript: and “on” events in the link. You can modify this file or create a new one.WARNING! If you want to edit this file, make a copy, change its name and move it outside of your Web site’s Workarea folder. If you make changes to this file and do not move it out of the Workarea folder, this file and the changes will be lost when you upgrade.
For additional sample code used to create a filter XSLT, see the following KB article: http://dev.ektron.com/kb_article.aspx?id=485
- Hide (Boolean)
Hides or displays the output of the control in design time and run time.
- True—Hide the control output.
- False—Display the control output.
- HideUserProfile (Boolean)
Set to True to suppress user profiles. The default is True.
- True—hides user profiles from non-administrator users.
- False—displays user profiles from non-administrator users. However, an administrator can view a profile regardless of how this property is set.
On the other hand, if the Private Profile is set to Private for any user, his profile information is not visible, regardless of this setting. If Private Profile is set to Colleagues, only colleagues can see profile information. When the profile is visible, only properties and their values not listed in the
ExcludeListproperty (above) appear. - True—hides user profiles from non-administrator users.
- JavascriptEditorHeight (Integer)
Set the height in pixels for the eWebEdit400 content designer. The default is 400. The minimum height is 300.
- JavascriptEditorWidth (Integer)
Set the width in pixels for the eWebEdit400 content designer. The default is 625. The minimum width is 500.
- Language (Integer)
Set a language for viewing content; shows results in design-time (in Visual Studio) and at run-time (in a browser).
Setting this property to -1 (negative one) causes the Forum server control to display topics from all available languages.
- ObjectType (String)
Describes the type of forum displayed by this server control.
- CommunityGroup—Used for forums inside a Community page.
- DiscussionBoard—Used for forums on templates that are not Community pages.
- OrderBy (String)
The order of search results. For example, you want to sort search results by last modified date.
- Title—The content title (alphabetical).
- ID—The content ID number.
- Date Created—The date the content was created.
- Date Modified—The date the content was most recently modified.
- Editor—The user who last edited the content (alphabetical).
- Rank—The rank assigned to the content.
NOTE: The OrderDirection field determines the direction of the search results. For example, if you sort by ID and OrderDirection is set to Descending, the results sort by ContentID number with the highest number at the top of the list.
WARNING! Specifying a
CustomOrderByproperty overrides this property. - OrderDirection (String)
The direction in which search results are sorted. The default is Ascending.
- Ascending—Alphabetical results from A to Z; numeric values low to high; dates from oldest to most recent
- Descending—Alphabetical results from Z to A; numeric values high to low; dates from most recent to oldest
- ProfileLink (ItemLinkTargets)
Enter a link to the user’s social networking profile page, a part of Ektron’s community platform. This allows a user to click another user’s name link or avatar and be taken to the user’s profile page. The link has 2 variables that represent the user’s ID and display name.
- {0}—user ID
- {1}—user display name
You need to have both variables in the link. The Web form can be relative or absolute. For example:
userprofilepage.aspx?uid={0}&dn={1}The default for this property is
?g=profileu={0}.When the default for this property is used, users are forwarded to a user’s profile page that is included with the forum control.
- ProfileLinkTarget
Determines the type of window that appears when you click a link in the server control.
- _Self (default)—opens in same window.
- _Top—opens in parent window.
- _Blank—opens in new window.
- _Parent—opens in the parent frame.
- ShowCategories (Boolean)
If set to True, when this server control appears, the user see a Filter by Category option. This option helps a site visitor zero in on relevant content. If False, the Filter by Category option does not appear.
- SuppressWrapperTags (Boolean)
Suppresses the output of the span/div tags around the control.
- True—Suppress wrap tags.
- False (default)—Allow wrap tags.
- TaxonomyCols (String)
Use this property to determine the number of columns on the Taxonomy screen available from this discussion board. In the illustration below, taxonomy categories are arranged in 3 columns (the default value).

- TaxonomyMarkupLanguage (String)
Identify the template markup file that controls the display of the server control. For example,
mymarkup.ekml. If the EkML file is located in the same folder as the Web form containing the server control, just enter its name. Otherwise, the path to the file can be relative or absolute. See also: Controlling Output with Ektron Markup LanguageControlling Output with Ektron Markup Language - Theme (String)
Enter the custom theme’s folder name. The theme can be relative to the site root or located in the current folder. For example:
- Relative—
Theme=”/workarea/csslib/themes/winter” - Current Folder—
Theme=”mytheme”
If you do not specify a theme, the property uses the location defined by the discussion board’s CSS theme property in the Workarea. See Also: Using a Custom Theme
- Relative—
- WrapTag (String)
Lets a developer specify a server control’s tag.
- Span (default)—designate an inline portion of an HTML document as a span element.
- Div—apply attributes to a block of code.
- Custom—Lets you use a custom tag.
Updating the Page Command
To prevent an error from appearing when a user posts a reply to the Web page that hosts the Forum server control:
- Open the Web form onto which you inserted the Forum server control.
- Access Source view.
- Go to the top line of the Web form, which begins with
@ Page.<%@ PageLanguage="VB"AutoEventWireup="false" CodeFile="Default2.aspx.vb"Inherits="Default2" %>
- Near the end of the line, enter
validaterequest=false. - Build the page.
Using a Custom Theme
This property lets you specify a custom location for your themes. By doing so, you prevent them from being overwritten when you upgrade.
If you do not specify a theme in the server control, Ektron uses what is defined in the discussion board’s properties CSS Theme field located in the Workarea.
To create a custom theme:
- Create a new subfolder on your site. In this example, we use a winter theme:
<web root>/<your site>/Workarea/csslib/winter.
- Copy all files in the
/Workarea/Threadeddisc/themesfolder to thewinterfolder. - Change the image files to match your theme. To find the name of an image:
- Right click on it while viewing it in a browser.
- Select Properties. The name appears at the top of the dialog box.
- Change the discussion board’s .css file to match your theme and save it with a custom name. (You do not need to do this if an existing .css file meets your theme’s needs.)
IMPORTANT: Make sure the CSS theme property in the Workarea is pointing to the proper CSS file.
- View the discussion board in a browser to see the changes.
Adding and Removing Toolbar Items From the Editor
WARNING! You cannot create new buttons and add them to the Forum Editor. You can only add and remove existing buttons.
You can add and remove toolbar items on the Forum Editor by editing the EditorToolbar property. This property contains a series of string values that represent each item, listed below.
- StyleMenu—Display a list of paragraph styles. Users can select from the list to apply a style to selected text.
- FontMenu—Display a list of available font styles, sizes and colors.
- ParagraphMenu—Controls the display of buttons that affect a paragraph. This includes:
- Numbered List
- Bullet List
- Outdent
- Indent
- Align Left
- Align Center
- Align Right
- Justify
- Horizontal Rule
- TextFormatMenu—Controls the display of buttons that format text. This includes:
- Bold
- Italics
- Underline
- LinkMenu—Controls the display of buttons that allow a user to add and remove hyperlinks links and work with the library. This includes:
- Hyperlink Manager
- Remove Link
- Library
- ClipBoardMenu—Controls the clip board buttons that allow a user to cut, copy and paste content. This item also controls the Undo and Redo buttons.
- SymbolsMenu—Controls the display of the Symbol button which allows users to insert symbols and special characters.
- EmoticonSelect—Controls the display of the Emoticon button.
- WMV—Controls the display of the Insert WMV button.
- Table—Controls the display of the Insert table button.
ActiveTopics Server Control
The ActiveTopics server control displays either the most active topics for a forum or the most recent ones. The most active are determined by how many new posts are added to a topic or how many replies a post receives. The most recent are determined by the date of the post. The following example shows 2 ActiveTopics server controls. One control is set to Active, the other is set to Recent.

The items in the list are clickable links, which open to the topic.
NOTE: On a PageBuilder page, you can drop the Recent Forum Posts widget, which displays a selected number of the most recent forum posts. See Also: Widget Reference
The following are Ektron-specific server control properties. You can find information about native .NET properties such as font, height, width and border style in Visual Studio® help.
- Authenticated (Boolean)
Indicates if you are logged into the CMS Explorer and can use it to browse to content, collections, and so on. See Also: Browsing Your Ektron Site Using CMS Explorer.
- BoardID (Long)
The ID of the board from which to get entries. If you don’t know the ID, click Ellipses (
), then sign in, browse to, and select a discussion board. - CacheInterval (Double)
The number of seconds that the server control’s data is cached. The default is 0 (zero). For example, if you want to cache the data for 5 minutes, set to 300. See Also: Caching with Server Controls.
- DisplayMode (eDisplayMode)
Choose between Active or Recent. In Active mode, the server control displays a list of the most active posts. In Recent mode, the server control displays a list of recently added posts. The default is Active.
- Active—display a list of the most active posts.
- Recent—display a list of the recently added posts.
- Active—display a list of the most active posts.
- DoInitFill (Boolean)
By default, Fill occurs during the Page_Init event. Set to false if you want to postpone the fill-action until later. In this case, Fill is automatically called during the Page Render event. You might do this if you need to set or change a property on the control in code-behind and have it render with your changes shown.
- Hide (Boolean)
Select False to display this server control on the page. Select True to suppress it.
- Language (Integer)
Set a language for viewing content; shows results in design-time (in Visual Studio) and at run-time (in a browser).
- MaxNumber (Integer)
The maximum number of topics listed. The default is 10.
- SuppressWrapperTags (Boolean)
Suppresses the output of the span/div tags around the control.
- True—Suppress wrap tags.
- False (default)—Allow wrap tags.
- URLPath (String)
Enter the path to the Forum server control’s Web page. For example:
http://<your site>/siteroot/forum.aspxor/CMS400Developer/forum.aspx. If your Forum page and your Active Topics page are in the same folder, you can just enter the name of the page. For example:forum.aspx. - WrapTag (String)
Lets a developer specify a server control’s tag.
- Span (default)—designate an inline portion of an HTML document as a span element.
- Div—apply attributes to a block of code.
- Custom—Lets you use a custom tag.
PostHistory Server Control
The PostHistory server control displays a list of forum posts for a given user. The posts are displayed in order, by date, and contain the following:
- Topic—the topic that contains the post
- Posted—the date the post was created
- Content—the content within the post

The following are Ektron-specific server control properties. You can find information about native .NET properties such as font, height, width and border style in Visual Studio® help.
- Authenticated (Boolean)
Indicates if you are logged in to the CMS Explorer and can use it to browse to Content, collections, and so on.
- BoardID (Long)
The ID of the discussion board from which to get a user's posts. If you don’t know the ID, click Ellipses (
), then sign in, browse to and select the discussion board. - CacheInterval (Double)
The number of seconds that the server control’s data is cached. The default is 0 (zero). For example, if you want to cache the data for 5 minutes, set to 300. See Also: Caching with Server Controls.
- DoInitFill (Boolean)
By default, Fill occurs during the Page_Init event. Set to false if you want to postpone the fill-action until later. In this case, Fill is automatically called during the Page Render event. You might do this if you need to set or change a property on the control in code-behind and have it render with your changes shown.
- Hide (Boolean)
Hides or displays the output of the control in design time and run time.
- True—Hide the control output.
- False—Display the control output.
- Language (Integer)
Set a language for viewing content; shows results in design-time (in Visual Studio) and at run-time (in a browser).
- MaxNumber (Integer)
The maximum number of posts listed. The default is 10.
- SuppressWrapperTags (Boolean)
Suppresses the output of the span/div tags around the control.
- True—Suppress wrap tags.
- False (default)—Allow wrap tags.
- URLPath (String)
The URL path to the page the where the Forum server control is located.
- UserID (Long)
The ID of the user for whom to get the post history.
- WrapTag (String)
Lets a developer specify a server control’s tag.
- Span (default)—designate an inline portion of an HTML document as a span element.
- Div—apply attributes to a block of code.
- Custom—Lets you use a custom tag.
![]()