Overview of Multi-language Workflow
This section describes language and locale settings used to support the creation and display of content in multiple languages. It also outlines the procedure for creating multi-language content or content in a specific language.
Locales
Central to the way that Ektron manages languages is the concept of a locale, which consists of a language and a region. An example is English (United States), which describes the variation of English used in the United States, as opposed to the English used in the United Kingdom (English U.K.).
Each locale's identifier consists of a language code and region code.
| Locale Identifier | Language | Region |
|---|---|---|
| fr-FR | French | France |
| pt-BR | Portuguese | Brazil |
| es_419-AR | Latin American Spanish | Argentina |
First, determine the locales in which your site’s content should appear (see Determining Which Languages are Available). Then, for any content, you can provide editions in each supported locale.
Creating Multi-language Content
To create multi-language content, you can either create new content or export, translate and import existing content.
NOTE: Alternatively, you can designate certain sections of text within a content item to be included or excluded from certain languages. See Also: Designating Content using Localize Section
All editions of content have the same ID number but are differentiated by a language attribute. As a result, a Web page template can link to a content item, but what appears is determined by the selected language. There are 2 ways that content’s language can be selected:
- a language cookie, which is created when a visitor browses to your site and selects a language
- the link to another page includes the language (
langType) parameter. For example,mytemplate.aspx?LangType=1033. For a list of the decimal values for each supported language, see Ektron Workarea > Settings > Localization > Languages and Regions.
The View Contents of Folder screen’s View > Language submenu lets you choose a language then view and create content in that language. You can also view all content in the folder, regardless of language. This menu makes it easy to find and work on content editions in a selected language.
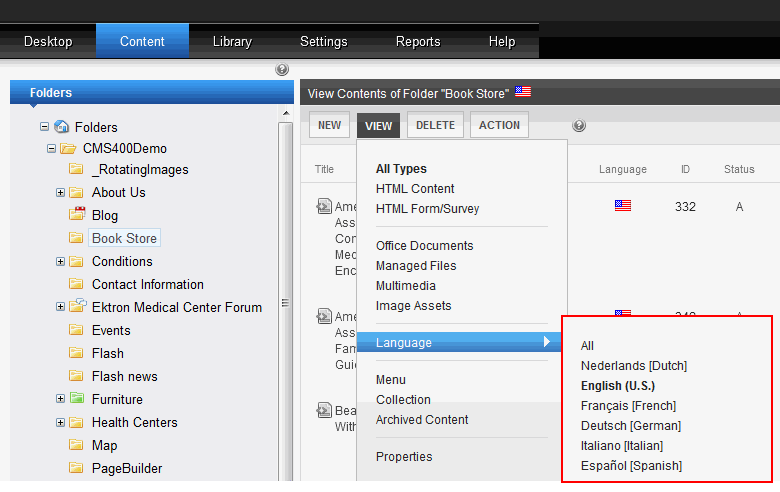
The View Contents of Folder screen also displays the language of each content item.

Finally, you can set up a separate approval chain for each edition of a content, and can create collections, menus, taxonomy categories, and tasks in any supported language.
Viewing Your Site in Another Language
To enable site visitors to view your site in any enabled language, your developer places a LanguageSelect server control on any template. See Also: LanguageSelect Server Control
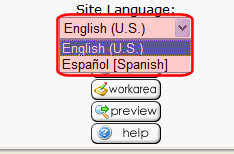
On the developer sample site provided with Ektron, this drop-down appears in the lower left corner of the home page.
You can also indicate a language-edition by adding the language parameter to a Quicklink. For example, products.aspx?LangType=1033 displays the English (US) edition of the products.aspx content. This syntax automatically sets the language cookie.
Ektron provides 3 language parameters.
|
Language parameter and type |
References |
Example using Spanish (U.S.) |
| loc (string) |
The unique locale identifier. The locale is an alphanumeric key uniquely identifying this language-region combination. This value may be used for the 'loc' Url parameter. This value may be customized to your needs. It does not need to conform to international standards |
products.aspx?loc=es-us
|
| lang (string) |
The language tag, which may not be unique and therefore ambiguous. The The language tag informs translators and browsers of the language and region of this content. This value must conform to the IETF BCP 47 (Best Current Practice), which at this date is defined by RFC 5646. The alphabet is the script subtag of the language tag, however, the script subtag is omitted from the language tag when it is the presumed script. For example, English is presumed written in Latin letters. The custom extension is the private use subtag of the language tag. However, it should be avoided unless absolutely necessary. The following sites provide more information about language tags: |
products.aspx?lang=es-us
|
| langType (decimal) | The unique locale ID | products.aspx?LangType=21514
|
The following image indicates the types of language parameters.

NOTE: For a list of the decimal and language tag values for each supported language, see Ektron Workarea > Settings > Localization > Languages and Regions.
See Also: Handling Language Availability
Handling Language Availability
When a site visitor selects a language then navigates to a page on your site, Ektron uses the following criteria to determine which language edition of content to display.
- Display content in the selected language, if available.
- If that edition is not available, check the language's Fallback Locale. If it is set and content is available in that language, display that. See Also: Set the Fallback Locale
- If content is not available in the Fallback Locale, display it in the default language. See Also: Set the Default Language
- If no editions are available, display nothing.
Determining Which Languages are Available
Prerequisite: Only members of the Administrator Group or those assigned to the XLIFF-Admin role can view, add, or edit language settings. See Also: Using the Roles Screens
To determine which locales are available for creating content, go to the Workarea and click Settings > Localization > Languages and Regions. The Edit Language Details screen lists all locales in which content can be created on your site. You can create a new locale, if needed.
See Also: Overview of Multi-language Workflow
To change the list:
- Click Enable (
 ). The Enable Language and Regions screen appears.

- Each language has 2 check boxes:
- To enable a language in the Workarea only, click (
 ). If this column is checked, the language populates the language drop-down lists within Ektron.
 - To enable a language in the Workarea and let site visitors select it when viewing the site, click (
 ).
).
- To enable a language in the Workarea only, click (
So, you can enable languages in the column while you are translating the site but are not ready to make that content publicly available. When you complete the translation, check the column.
NOTE: If you select , the check box in the column is checked automatically. This is because, if you let users view the language on the site, it must be enabled in the Workarea.
The default content language on a drop-down list is determined in the ek_DefaultContentLanguage element of the web.config file.
If you choose only one language on the Language Settings screen, fields that prompt the user to select a language do not appear in Ektron. Instead, all content is created in that language.
Disabling a Language
To disable any language, uncheck its checkbox on the Edit Language Setting screen. (For more information, see Determining Which Languages are Available.)
Before disabling the default language, you must assign a new one.See Also: Set the Default Language
If you disable a language for which content exists, that content remains in the database but no one can access it, either from within Ektron or when visiting your site. If you later enable that language, the content is once again available.
Creating a New Locale
Ektron provides locales for every language and region supported by your Windows server. However, you can create a new locale on the Edit Language Details screen by picking a combination of language and region, as defined by the Unicode Common Locale Data Repository.
On Windows Vista and later versions, you may use the Microsoft Locale Builder to create custom, supplemental ASP.NET cultures. Custom cultures are most helpful if no ASP.NET culture matches either the language or the region, for example, eo-150 (Esperanto in Europe). You may also create custom cultures for new combinations, for example, fr-US (French in U.S.). For information about custom cultures and the Locale Builder, see the following Ektron Knowledge Base article: Using Locale Builder to create custom locales.
After you create a locale, Ektron authors can create content, menus, collections, and so on in that locale, and your site visitors can view content based on it.
You can also use this screen to edit information about any locale. See Also: Editing a Language's Languages & Regions Information
To access this screen in the Ektron Workarea, go to Settings > Localization > Settings and Regions.
Select a Language
The new locale must be based on an existing language or region/country. As an example, you could create the locale French in the United States (using an existing language and country). The Language field can display the major languages in every country (via the Show All radio button), or the most common world languages (use the Common radio button).
If you are unsure of which languages are used in a country, move to the Region field, select a country, and click the Recommended radio button. Then, go back to the Languages field. At this point, you see all languages spoken in the selected country by percentage.

Select a Country or Region
The Region field provides several options for finding the new locale's region or country.
- If you selected a language above, you can select from a list of countries that use the language. To do that, click Recommended and scroll below the list of multinational regions. Click the country of the locale you are defining.
- To select from an alphabetical list of all countries, click Show All and scroll below the list of multinational regions.
- If the language's locale is not tied to a specific country but is connected to a region, select the region from the regions list.
Assign a Locale ID
Use the Locale field to assign a locale ID to the new language. This section of the screen contains important information about this field.
The locale ID must be unique, but is free-form, so you may customize it as you wish. It could be based on a target market, for example, “youth” for English US young adults, or “euro” for English in Europe, or even “klingon”. Typically, the suggested value is adequate.
Determining the Default Locale ID
The selected language determines the first part of the default Locale ID (for example, en-US). The selected country or region determines the second part of the default Locale ID (for example, en-US).
See Also: Set the Fallback Locale
Set a Language Tag
Use the Language Tag field to assign a language code to the language. This section of the screen contains important information about this field.
IMPORTANT: Unlike the Locale field, the Language Tag field must conform to the IETF BCP 47 (Best Current Practice).
Choose an Alphabet
Some languages can be written in more than one alphabet. For example, Serbian can be written using the Latin or Cyrillic alphabet. In such cases, use the Alphabet field to define the alphabet in which this locale's content will be written.
This section of the screen contains additional information about this field.
Choose a Custom Extension
You can choose from 2 strategies when exporting content for translation: pseudolocalization and machine translation.
Using a PseudoLocalization Strategy
NOTE: For background information, see http://en.wikipedia.org/wiki/Pseudolocalization.
When you export content for translation and apply the PseudoLocalization strategy, Ektron converts the content to pseudo-language text and the immediately imports it..
The following is an example of how to implement the strategy. See Also: Customizing Behavior with Extensions
<objectFactory>
       <objectStrategies>
        <add name="PseudoLocalization">
        <strategies>
        <add name="PseudoLocalizationStrategyTemplate"
             type="Cms.Extensions.Templates.
             PseudoLocalizationStrategyTemplate,
             Cms.Extensions.Templates"/>
        </strategies>
        </add>
        </objectStrategies>
        <objectImplementations>
        </objectImplementations>
        </objectFactory>
Here's an example of how to override the PseudoLocalize method.
public override void PseudoLocalize(ref string content,
   PseudoLocalizationEventArgs eventArgs)
Here are the PseudoLocalizationEventArgs properties.
LocaleData Locale
        LocalizableCmsObjectType ObjectType
        long ObjectId
Developers use the PseudoLocalize property to write custom code that programmatically starts the export process. Here is an example: Ektron.Cms.Localization.LocalizationExportJob.PseudoLocalize = true;
Ektron applies the PseudoLocalization strategy if either of the following conditions is met:
- The target locale’s language tag contains
x-pseudo. - The export job’s
PseudoLocalizeproperty istrue.
Applying PseudoLocalization Strategy to a Locale
You can apply PseudoLocalization Strategy to a locale's language tag in the Workarea. Use the Settings > Localization > Languages and Regions screen's Custom EXT field, as illustrated in the following figure. Programmatically, LocaleData.XmlLang contains x-pseudo.

Using a MachineTranslation Strategy
When you export content for translation and apply the MachineTranslation strategy, Ektron translates the content using machine translation then immediately imports it. See Also: Machine Translation
The following is an example of how to implement the strategy. See Also: Customizing Behavior with Extensions
<objectFactory>
   <objectStrategies>
	<add name="MachineTranslation">
	<strategies>
	<add name="MachineTranslationStrategyTemplate"
        type="Cms.Extensions.Templates.
              MachineTranslationStrategyTemplate,
              Cms.Extensions.Templates"/>
	</strategies>
	</add>
    </objectStrategies>
    <objectImplementations>
    </objectImplementations>
</objectFactory>
Overriding the Translate Method
Here is an example of overriding the Translate method.
public override void Translate(ref string content,
MachineTranslationEventArgs  eventArgs)
The MachineTranslationEventArgs have intellisense, but the following is a list of its properties.
LocaleData SourceLocale
LocaleData TargetLocale
LocalizableCmsObjectType ObjectType
long ObjectId
Ektron applies the Machine Translation strategy if either of the following conditions is met.
- The target locale’s language tag contains
x-mt - The export job’s
MachineTranslateproperty istrue
Developers use the MachineTranslate property to write custom code that programmatically starts the export process. Here is an example: Ektron.Cms.Localization.LocalizationExportJob.MachineTranslate = true;
Applying Machine Translation Strategy to a Locale
You can apply Machine Translation Strategy to a locale's language tag in the Workarea. Use the Settings > Localization > Languages and Regions screen's Custom EXTfield. Programmatically,LocaleData.XmlLang contains x-mt.
Set the Culture
You can set a custom culture, or use cultures specified by ASP.NET properties:
- For instructions on setting a custom culture, see the following Ektron Knowledge Base article: http://dev.ektron.com/kb_article.aspx?id=31465
- The ASP.NET Culture specifies the region for formatting dates, times, currencies, and so on. This value is assigned to the ASP.NET
Cultureproperty. See Also: http://msdn.microsoft.com/en-us/library/bz9tc508.aspx - ASP.NET UICulture specifies the natural language of resource strings. This value is assigned to the ASP.NET
UICultureproperty. See Also: http://msdn.microsoft.com/en-us/library/bz9tc508.aspx
Choose a Flag Icon
Flags are used in the Ektron Workarea as quick, visual indicator of the locale. So, it is important for each locale to have a unique flag.
Ektron provides several flags, which are installed to the /siteroot/WorkArea/images/application/flags/ folder. Any flags with elements in common with the locale's language and region appear as choices. If there is no flag next to the locale you are creating (for example fr-017, French in Africa), you can create an image, assign that name to it, and place it in the designated folder. Then return to this screen, select the locale, and select the image.
Flag files must be 16x16 pixel .gif images.
Editing a Language's Languages & Regions Information
To edit any locale, go to Settings > Localization > Languages and Regions and click Edit (![]() ). All enabled locales appear. Next to each are 2 edit buttons.
). All enabled locales appear. Next to each are 2 edit buttons.

For details on all editable fields, see Creating a New Locale
Use the Edit Enabled Languages and Regions screen to quickly edit:
- English and Native Name—see Set Names
- Fallback Locale—see Set the Fallback Locale
To change these values, click Rename or change fallback locale ( ) on the row of any language. After you make e changes, click Save (
 ) in that row.
From this screen, you can also click Edit ( ) to edit a locale's details. For more information, see Creating a New Locale .
Set the Fallback Locale
For every language, you can set a Fallback Locale, a language in which content appears if it is not available in the selected language. If content is not available in the fallback locale, Ektron looks for content in the fallback locale's Fallback Locale. If content in that language is not found, Ektron looks for up to 4 additional fallback locales. At that point, if content is still not found, Ektron tries to display the content in the default language.
NOTE: If you set None as the Fallback Locale for any language, and content is not available in the selected language, nothing appears on the page and no other languages are checked.
For example, your Web site's default language is US English. You have some content in Swiss German (de-CH). The fallback language for that is Austrian German (de-AT), and the fallback language for Austrian German is German (de-DE). If the content on a page is not available in Swiss German, Ektron tries to find an Austrian German edition. If it cannot find that, it looks for a German edition. If that is not available, it tries to display an English edition.
NOTE: The fallback language must be enabled. See Also: Determining Which Languages are Available
To set a language's fallback locale:
- Workarea > Settings > Localization > Languages and Regions.
- Click Edit (
 ).
). - Click Rename or Change Fallback Locale (
 ) for the language of interest.
 - Use the pulldown in that language's Fallback Loc column to select a fallback locale.

- Click Save () in the row of the language you are changing.
NOTE: You can also set/update the Fallback Locale on the Edit Language Details screen. See Also: Creating a New Locale
In certain situations, you may want no fallback locale. That is, you want to display nothing if content is not available in the selected language. To accommodate this, None is an option in the Fallback Locale drop-down list.
If you set a language's Fallback Locale to None and the language is part of a fallback chain, if content is not available in that language, the chain terminates there.
Set the Default Language
- The default language determines which edition of content to display if a site visitor does not select a language.
- The default language is used if a visitor selects a language other than the default, then navigates to page for which content does not exist in the selected language. In that case, Ektron looks for the selected language's Fallback Locales. For more information, see Set the Fallback Locale. If content is not available in any of its Fallback locales,Ektron displays that content in the default language (if available).
When you install Ektron, the default language is US-English (1033). Use the following procedure to change the default language for your multi-language Web site.
IMPORTANT: You must enable a language before setting it as the default. See Also: Determining Which Languages are Available
- Open
yourwebsite\web.config. - Set the value of
ek_DefaultContentLanguageto the locale id of the default language. For example, 1031 for German. For a list of locale ids, see Ektron Workarea > Settings > Localization > Languages and Regions.
- Save
web.config.
Creating New Content in Any Language
Prerequisite: You have permission to add content to the folder.
- Navigate to the content folder in which you want to create the content.
- Choose View > Language and select the language in which you want to create the content. If the desired language is not available, see Determining Which Languages are Available.
- Click Add Content (
 ) and create the content as you would any content. See Also: Creating HTML Content
 - To add metadata to content, metadata definitions must have been created for the selected language. See Also: Working with Metadata
Translating Content
You have 3 options for translating content. They are listed in order of preference.
- Language Export Feature— best option for translating, whether in-house or outsourcing. Use an XLIFF editor, such as Heartsome’s (www.heartsome.net) or SDL Trados.
- Free XLIFF editors may not adequately support the XLIFF standard so may not be compatible.
- Supports batch processing of several content blocks.
- The XLIFF file is sent to a translation agency and returns translated to the new language(s). Then, import the translated files into Ektron.
- See Also: Using the Language Export Feature
- Manual Translation—Copy original content to a new content item in new language. Then, translate content manually.
- Error prone because some translatable text is hidden (for example, ‘alt’ text in images). On the other hand, some text may be translated that shouldn’t be translated (for example, Smart Form choice field values).
- Only one content block at a time.
- See Also: Translating Content Manually
- Machine Translation—Use the computer-based translation tool provided with Ektron.
- Results in a poor quality translation.
- Readily available as a browser add-on.
- See Also: Machine Translation
Translating Content Manually
Use this procedure to initialize new foreign language content with content from a source language, then translate the content manually. The copying should facilitate the translation.
For example, an editor is translating content from French to German. The editor copies the French edition to new content whose language is German. As the editor translates the French edition into German, he deletes the French content. Any images in the content would usually remain, and all formatting (tables, bullets, and so on) is retained.
Follow these steps to translate content manually.
- Go to the View Contents of Folder screen for the content you want to translate. Its status must allow editing (it cannot be submitted or pending).
- Choose View >Language and select an original language.
- Click the content you want to translate.
- It appears on the View Content screen.
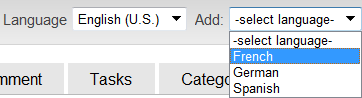
- Use the Add drop-down list in the upper right corner to select a language into which you want to translate the content.
- The original language content appears. Translate into the new language then delete the original content. At this point, you can click Translate Content (
 ) to have the software translate the content. You can then edit as needed to perfect the translation. When done, click the Paste Content button.
NOTE: You cannot translate XML Smart Forms using the Translate Content (
) button. - Translate the Title and Summary.
- To add metadata to content, metadata specifications must have been created for the selected language. See Also: Working with Metadata
- When you save the content, it is saved as the edition of that content in the selected language.
Machine Translation
Ektron includes a machine translation feature, which can automatically translate content from/to the following languages.
- Chinese Simplified
- Chinese Traditional
- Dutch
- English
- French
- German
- Greek
- Italian
- Japanese
- Korean
- Portuguese (Brazilian)
- Russian
- Spanish
NOTE: Machine translation is not supported for all languages in the Language Settings screen.
NOTE: You cannot translate XML Smart Forms using this method.
Like most software-based translation, someone fluent in the new language should verify that the translation is appropriate within the context of the page.
The machine translation feature lets you choose a glossary (that is, a field, industry, or subject area). This helps the software find the best translation for a term or phrase in that field.
Follow these steps to use the machine translation feature.
- In the Workarea, navigate to the folder that contains content you want to edit.
- Choose View > Language and select an original language (that is, the language from which it will be translated).
- Click the content you want to translate. Its status must allow editing (that is, its status cannot be submitted or pending). It appears on the View Content screen.
- Use the Add drop-down list in the upper right corner to select a new language for the content. If you do not see the language on the drop-down, you need to enable the language. See Also: Determining Which Languages are Available
- The original language content appears. Edit the title if appropriate.
- Click Translate Content (). The Translation screen appears.

- Select the source (old) and target (new) languages.
- If the content should refer to a specific glossary, select one from the drop-down list.
- Click Translate. The translation appears.
- If the translation looks OK, click Paste Content. The translated content replaces the original content in the editor. Modify as needed.
- Translate the Title and Summary.
- To add metadata to content, metadata specifications must have been created for the selected language. See Also: Working with Metadata
- When you save the content, it is saved as the edition of that content in the selected language.
NOTE: When the View Contents of Folders screen reappears, it is probably set to the source language. In this case, you do not see the new content in the target language. To see it, click View > Language and select All or the target language.
![]()