Using Ektron to manage Web content is easy once you know the basics of setting up and maintaining your site. This documentation explains how to maintain an Ektron site.
Ektron is a powerful, easy-to-use, and affordable XML content management solution that lets any valid user take an active role in managing Web content and optimizing online strategies. It streamlines site management, automates workflow processes, and supports collaboration. Ektron reduces costs, saves time and makes Web sites, extranets, and intranets more effective – while generating rapid ROI.
Ektron manages the lifecycle of content, from creation through approval and publication. It helps your organization set up a process for overseeing changes to a Web site, indicate content’s status within that lifecycle, and inform the next approver that it is their turn to review the content.
Business users, like marketing or public relations professionals, can author, manage and publish Web content, build and deploy Web forms, and collect and leverage visitor information. The browser-based editor supports the industry’s best in-context editing environment, ensuring user adoption and project success.
Ektron helps to move paper-based forms processes to the Web. The editor lets users create Web forms such as expense reports, health records, and insurance forms, deploy them to internal users, collect data, apply validation and math functions, and run forms through workflow—all within a browser.
Organizations want a Web site that is updated frequently with the latest information. They also want to decentralize the process of updating information, so that non-technical users from any department can make changes. Further, organizations want oversight over those changes to ensure the accuracy of the information, that the content adheres to corporate guidelines, and so on.
For more information about the Ektron editor, see Using the Ektron Editor.
Understanding Types of Content
A Web site consists of several pages. Each page is made up of one or more blocks of content as shown in the following example from the home page of one of Ektron’s sample sites.

Every piece of content in Ektron is one of the following types.
- HTML content—Content designed to be published on the World Wide Web. See Using the Ektron Editor
- XML Smart Forms—Online forms, polls, or surveys designed to collect information from site visitors and save it in an XML format. See Working with Smart Forms
- HTML form/survey—Online forms, polls, or surveys designed to collect information from site visitors and save it in an HTML format. See Working with HTML Forms
- DMS Documents—consists of Office documents, managed files, and multimedia files. See Working with Assets in the Document Management System.
- Office documents—Files normally created and edited using Microsoft Office. See Managing Microsoft Office Assets
- Managed files—Files created outside of Ektron, such as PDFs and .jpeg files. You cannot create or edit these files within Ektron—you can only store them. See Managing Assets
- Multimedia—Files that run in a media player, such as sound and movie files. See Managing Multimedia Assets
- Blogs—A blog is a form of online information sharing and is often set up so a group of people can share their thoughts on a subject. See Working with Blogs
- Web Calendars—Web Calendars keep visitors informed about upcoming events. They can be displayed to all visitors to your Web site, and any authorized user can add events to a calendar. See Working with Calendars
- Discussion Boards—The Discussion Board feature provides an opportunity for topic discussions on your Web site. A site or membership user with Add Topic permission creates a topic and posts a starter question. Site visitors can then reply. See Working with Discussion Boards
When creating new content, you must assign a type.
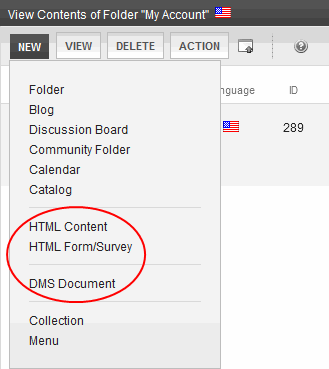
The New menu lists all types of content you can work with.
Click Edit ( ) or a menu option to open content for editing. You can enter text, then select it and click a button to change its display properties. For example, you can make text bold, change the color, or copy and paste it. You can also insert images, tables, links to other Web pages, and check spelling. See Also: Using the Ektron Editor.
After you edit content, you typically submit it for approval to one or more individuals who oversee changes to your Web site. These people can review, edit and approve the change. When the last approver signs off, the new content becomes available on the Web site.
In some cases, you are one of the content approvers where you receive an email notifying you that content needs approval. You look it over, change it as needed, then pass it on to the next approver. If you do not agree with the changes, you can decline the request. In this case, the user who made the edits is informed that the change is not approved. The following graphic illustrates the content approval cycle.

To help track content’s position in this workflow, Ektron assigns a status to each content item. The status determines what you can do with it, and indicates what must occur for it to get published to the Web site.
Logging In and Out
When your Webmaster or administrator installs Ektron, you need the following items before you can use it.
- URL (Web address) of you Web site
- Username and password
When you acquire both, you can log into Ektron and begin managing Web site content.
Logging into an Ektron Web Site
To sign on to an Ektron site:
- In your Web browser, navigate to the URL of your Ektron Web site. Your system administrator provides this.
- Click the Login button. The Login dialog box appears.

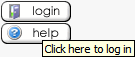
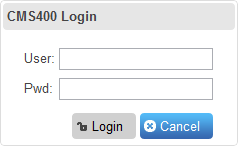
- Enter your username and password.
If you are using one of Ektron’s sample sites, you can use any of 3 standard users that demonstrate Ektron’s flexible user-permissions model. The following table shows the username and password needed to log in as each user type, as well as the permissions assigned to each user.
User Type
Username
Password
Permissions
Administrator
admin
admin
All
Standard user
jedit
jedit
Basic (for example, add/edit content, manage library files, etc.)
Membership user
jmember
jmember
Read-only permission to private content
- Click the Login button. The Web page appears.
You can navigate around the Web site as you could before signing in, but the content is either surrounded by a border or has an access point (
 ) in the top left corner of the content.
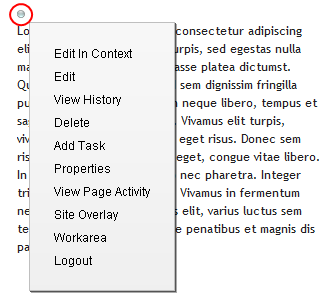
 on the Web page. The Logout confirmation box appears.
Previewing a Site
While logged into Ektron, you can preview the Web site as it would appear to visitors, or view it in regular view.
|
Button Appearance |
Status |
Description |
|
|
Regular View |
The most recently published version of content appears. In this mode, colored borders surround content when you move the cursor over it. In regular view, click Preview to switch to preview mode. |
|
|
Preview Mode |
Content appears as last edited. The advantage of this mode is that you can see a Web page as it will appear when published to your site. Continue editing until you are satisfied with its appearance. In Preview mode, click Preview to switch to regular mode. |
To toggle site preview on and off:
- Navigate to a page that includes the login/logout button.
- Click
 . The Web site is now in preview mode.
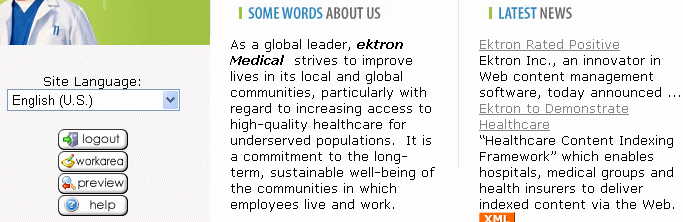
- To turn preview mode off, click
 on the login screen.
Managing Logins and Passwords
This section describes how to restrict login attempts and manage passwords.
Restricting Login Attempts
Ektron has a login security feature that locks out a user after 5 unsuccessful attempts to log in on one computer. You control login security by changing the ek_loginAttempts element in the web.config file.
WARNING! If you want your Ektron eCommerce feature to comply with PA DSS certification, the ek_loginAttempts value must be between 1 and 6.
- any number between 1 and 254—The number of unsuccessful login attempts after which the user is locked out
- 0—Lock out all users
- -1—Disable feature; unlock all locked users
- -2—Lock out Ektron users only; membership users can log in
You can control the following capabilities.
Changing the Number of Unsuccessful Login Attempts
If a user unsuccessfully tries to log in 5 times, this error appears: The account is locked. Please contact your administrator. Afterwards, even if the user enters the correct password, the user is locked out.
NOTE: You can change the error message text in the resource file. See Also: Procedure for Translating Workarea Strings.
To change the number of login attempts prior to lockout, edit the ek_loginAttempts element in the siteroot/web.config file. For example, to allow 3 unsuccessful logins before lockout, change the value to 3. You can enter a value of up to 254.
Disabling the Login Attempts Feature
To disable the Login Attempts feature, set the value of the ek_loginAttempts element in the web.config file to -1. If you do, any user can try to log in as many times as the user wants. The error message never appears, and the user is not prevented from entering a password.
NOTE: Setting the ek_loginAttempts element in the web.config file to -1 unlocks all locked accounts.
Unlocking a Locked Account
When an account is locked out, the Account Locked field is checked on the Edit User screen.
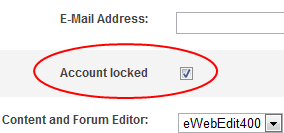
To unlock the account, an administrator user (or a user assigned to the user-admin role) accesses the Edit User screen and unchecks the box. At this point, the user can sign in again.
NOTE: To unlock all users, set the ek_login Attempts element in the siteroot/web.config file to -1. See Also: Disabling the Login Attempts Feature.
Manually Locking a User from Signing On
You can use the Account Locked field to manually lock a user out of Ektron.
- Go to the Edit User screen.
- Identify the user.
- Check the Account Locked field.
That user cannot sign in until either you uncheck the box or change the value of the ek_loginAttempts element in the web.config file to -1.
Changing Images Used for Logging In and Out
You can change the images used for the login and logout buttons. To do so:
- Move the new images to the following folder: siteroot\Workarea\images\application.
- Open the
web.configfile in your Web site’s root directory. - Change the images in this section of the file:
<add key="ek_Image_1" value="btn_close.gif" />
<add key="ek_Image_2" value="btn_login.gif" />
<add key="ek_Image_3" value="btn_login_big.gif" />
NOTE: You must update the images and
web.configwhenever you upgrade Ektron.
Resolving a Problem with the Login Screen
You may find that in certain browsers, the login screen occupies the entire browser window instead of just a small box. Browsers such as Internet Explorer 8 and Firefox have a feature called tabs. When the login window pops up, it may appear as a new tab. You can change this behavior by turning off tabs within the browser.
Managing Passwords
This section contains the following topics relating to managing passwords.
Editing the Builtin Username and Password
The builtin user is an emergency user if you cannot log in to Ektron as the administrator. The builtin user is defined in the Ektron setup screen.
- From the Workarea, choose Settings > Configuration > Setup. The Application Setup screen appears with the General Tab showing.
- Click Edit to modify the settings.
- Locate the Built In User field.
- Change the username and password.
- Click Update.
The builtin user can log in to Ektron whether or not Active Directory or LDAP is enabled. The builtin user's default username and password combination is builtin/builtin. For security reasons, You should change them during installation.
If you log into the Workarea as the builtin user, you can access only the following screens on the Settings tab.
- Active Directory
- Asset Server Setup
- Setup
- User
- User Group
WARNING! Use the builtin user only to correct a bad or expired license key. It is not designed for regular Ektron operations. If you try to edit content while signed on as a builtin user, you will generate errors.
If you cannot sign in to Ektron because the builtin user password was changed and you don’t know the new password, use the BuiltinAccountReset.exe utility. This resets your Ektron user password to Builtin \ Builtin. This utility is located in C:\Program Files\Ektron\CMS400versionnumber\Utilities.
Making Passwords Case Sensitive
By default, passwords are case insensitive. So for example, if the password is TOKEN and the user enters token, the signon is successful.
If you want to make passwords case sensitive, change the value of the ek_passwordCaseSensitive element of the siteroot/web.config file from false to true.
If you do, and the password is TOKEN and the user enters token, the signon is unsuccessful. The user would have to enter TOKEN to successfully sign on.
Enforcing a Password Change Every 90 Days
Ektron has a password security feature that forces an administrator or user with the Commerce Admin role to change his password at least every 90 days. This feature is only enabled when the ek_ecom_ComplianceMode key in the site’s web.config file is set to true.
When such a user goes 85 days without changing his password, a dialog box appears at next log-in, asking to change the password. If they do not want to do so at that time, they can click Skip. They are allowed to do this for the next 5 days. When 90 days have passed, they must change their password before they can log into Ektron.
Enforcing Login After Time of Inactivity
Ektron has a password security feature that automatically logs out an administrator or user with the Commerce Admin role after 15 minutes of inactivity. Activity is based on requests made to the server.
This feature is enabled when the site’s web.config file‘s ek_ecom_ComplianceMode key is set to true. In addition, if you are using IIS7, the line in red below needs to appear between the <modules> tags in the web.config file. This line is a part of the default install. You should make sure it has not been removed.
<modules>
  <add name="MyDigestAuthenticationModule"
    type="Ektron.ASM.EkHttpDavHandler.Security.DigestAuthenticationModule,
    Ektron.ASM.EkHttpDavHandler" />
  <add name="ScriptModule"
    type="System.Web.Handlers.ScriptModule, System.Web.Extensions,
    Version=1.0.61025.0, Culture=neutral,
    PublicKeyToken=31bf3856ad364e35" preCondition="integratedMode" />
  <add name="EkUrlAliasModule" type="UrlAliasingModule"
    preCondition="integratedMode" />
</modules>
If you are using IIS 6, the line in red below needs to appear between the <httpModules> tags in the web.config file. This line is a part of the default install. You should make sure it has not been removed.
<httpModules>
  <add name="DigestAuthenticationModule"
    type="Ektron.ASM.EkHttpDavHandler.Security.DigestAuthenticationModule,
    Ektron.ASM.EkHttpDavHandler " />
  <add name="ScriptModule"
    type="System.Web.Handlers.ScriptModule, System.Web.Extensions,
    Version=1.0.61025.0,
    Culture=neutral, PublicKeyToken=31bf3856ad364e35"/>
  <add name="EkUrlAliasModule" type="UrlAliasingModule" />
</httpModules>
Enforcing a Minimum Password
Ektron has a password security feature that forces an administrator or user with the Commerce Admin role to use at least 7 characters in his password. Further, the password must contain at least one alphabetic and one numeric character.
This feature is enabled only when the ek_ecom_ComplianceMode key in the site’s web.config file is set to true.
Enforcing a No-match Password
Ektron has a password security feature that forces an administrator or user with the Commerce Admin role to create a password that does not match his last 4 passwords. This feature is enabled only when site’sweb.config file has the ek_ecom_ComplianceMode key is set to true and the ek_ecom_PasswordHistorykey is set to at least 4.
You can set ek_ecom_PasswordHistory to a number higher than 4 if you want a higher level of security. If you set this key to less than 4 and the ek_ecom_ComplianceMode key is set to true, Ektron enforces at least 4.
Creating a Custom Password Strategy
The Ektron password validation provider lets developers create custom password validation strategies for Ektron. These providers can enforce custom password rules inside the system, beyond the out-of-box capabilities.
This section explains how to create a custom password validation provider for Ektron.
- Create a class library project in Visual Studio.
- Import the namespaces you need. Add references to:
- Ektron.Cms.Commerce
- Ektron.Cms.Common
- Ektron.Cms.ObjectFactory
- Microsoft.Practices.EnterpriseLibrary.Validation.dll
- System.Configuration
- Ektron.CMS.User
- Ektron.CMS.DataRW
- Add the following using statements.
using System;
using System.Collections;
using System.Configuration.Provider;
using Microsoft.Practices.EnterpriseLibrary.Validation;
using Ektron.Cms;
using Ektron.Cms.Common;
using Ektron.Cms.Commerce;
using Ektron.Cms.Commerce.PasswordValidation.Provider;
using System.Collections.Generic;
using System.Text;
using System.Text.RegularExpressions;
- Change the namespace to Ektron.Cms.Extensibility.Commerce.Samples, rename your class to CustomPasswordProvider, and inherit from the Ektron.Cms.Commerce.PasswordValidation.Provider.PasswordValidationProvider class and the Ektron.Cms.Commerce.IPasswordValidation interface.
namespace Ektron.Cms.Extensibility.Commerce.Samples { public class CustomPasswordProvider : Ektron.Cms.Commerce.PasswordValidation.Provider. PasswordValidationProvider, Ektron.Cms.Commerce.IPasswordValidation - Add the following constructor.
#region constructor, member variables public CustomPasswordProvider() { } #endregion - Add
GetRegexFormethods required by the PasswordValidationProvider base class. These methods return the regexs that will validate passwords in Ektron for specific user types.- GetRegexForMember—Returns one or more regular expressions used for client side validation of membership users, along with corresponding error messages to be used when client-side validation fails.
- GetRegexForAuthor—Returns one or more regular expressions used for client side validation of Ektronauthors, along with corresponding error messages to be used when client-side validation fails.
- GetRegexForCommerceAdmin—Returns one or more regular expressions used for client-side validation of eCommerce administrators, along with corresponding error messages to be used when client side validation fails.
- GetRegexForAdmin—Returns one or more regular expressions used for client-side validation of Ektronadministrators, along with corresponding error messages to be used when client side validation fails.
NOTE: This example enforces a minimal requirement for authors/members, and adds a length and diversity requirement for administrators.
#region public methods public override string GetRegexForAdmin() { return "[/.{7}/, Password must contain at least seven characters]" + ",[/[0-9]+/, Password must contain at least one number]" + ",[/[a-zA-Z]+/, Password must contain at least one alphabetical character]" + ",[/^[^ \t'\"%#]+$/, Password cannot contain spaces, tabs, single-quotes, double-quotes, percent-signs, or pound-signs]"; } public override string GetRegexForAuthor() { return "[/.{1}/, Password too short]" + ",[/^[^ \t'\"%#]+$/, Password cannot contain spaces, tabs, single-quotes, double-quotes, percent-signs, or pound-signs]"; } public override string GetRegexForCommerceAdmin() { return "[/.{1}/, Password too short]" + ",[/^[^ \t'\"%#]+$/, Password cannot contain spaces, tabs, single-quotes, double-quotes, percent-signs, or pound-signs]"; } public override string GetRegexForMember() { return "[/.{1}/, Password too short]" + ",[/^[^ \t'\"%#]+$/, Password cannot contain spaces, tabs, single-quotes, double-quotes, percent-signs, or pound-signs]"; } #endregion - Implement the
ValidateFormethods, which use the regexs to validate passwords. We use the generic functionValidateto which we pass parameters.public override ValidationResults ValidateForAdmin(string password) { return Validate(password, GetRegexForAdmin()); } public override ValidationResults ValidateForAuthor(string password) { return Validate(password, GetRegexForAuthor()); } public override ValidationResults ValidateForCommerceAdmin(string password) { return Validate(password, GetRegexForCommerceAdmin()); } public override ValidationResults ValidateForMember(string password) { return Validate(password, GetRegexForMember()); } protected ValidationResults Validate(string password, string regexErrorMessage) { ValidationResults results = new ValidationResults(); string regex, errorMessage; string[] parts; string[] raw = regexErrorMessage.TrimStart('[').TrimEnd(']').Split( new string[] { "],[" }, StringSplitOptions.None); foreach (string combined in raw) { parts = combined.Split(new string[] { "/," }, StringSplitOptions.None); regex = parts[0].Trim('/'); errorMessage = parts[1].Trim().TrimStart('"').TrimEnd('"'); if (!Regex.IsMatch(password, regex)) { results.AddResult(new ValidationResult(errorMessage, this, "", "", null)); } } return results; } - Tell the system whether to enforce password expiration on users. There are 2 requirements.
- PasswordExpirationEnabled—Enabled password expiration globally, which allows the RequiresPasswordExpiration to be called.
- RequiresPasswordExpiration—Returns whether password expiration is enforced for a user.
NOTE: The system handles password expiration dates. Setting PasswordExpirationEnabled and RequiresPasswordExpiration tells Ektron to check and enforce those values.
NOTE: When compliance mode is on, password validation cannot be disabled.
public override bool PasswordExpirationEnabled() { return RequestInformation.CommerceSettings.ComplianceMode; } public override bool RequiresPasswordExpiration(long userId) { return (userId == 1); } - Build the project, and copy the assembly to the Ektron site's bin directory.
- Register the provider, and direct Ektron to use it. The
siteroot/web.configfile lets you manage password providers within Ektron.- Locate the
passwordValidationProvidersection in theweb.configfile. - Add a reference to the class created earlier in the
<providers>key. - Change the defaultProvider attribute, as shown below.
<passwordValidationProvider defaultProvider="CustomPasswordProvider">
<providers>
<add name="CustomPasswordProvider"
type="Ektron.Cms.Extensibility.Commerce.Samples.CustomPasswordProvider,
  CustomPasswordProvider" />
</providers>
</shipmentProvider>
- Locate the
Logging in through Facebook
Facebook Login, an alternative to Ektron's standard login, lets users log in using their Facebook username and password instead of creating an Ektron username and password. Here is an example of Facebook Login control.

This control lets Membership and Ektron users log into an Ektron Web site. If users have an Ektron user profile, they can be prompted to link the Facebook username and password with that profile.
Facebook Login allows log in only—it provides no other Facebook features, such as viewing profiles or sending messages.
NOTE: The Facebook Login feature does not support Active Directory.
These sites include samples of Facebook Login.
- Developer Sample site > Social Networking > Facebook Connect
siteroot/developer/FacebookConnect/Login.aspxsiteroot/developer/FacebookConnect/CustomSignup.aspx
- The OnTrek site's home page has a Facebook Login on the
NOTE: The user experience is enabled only after a developer sets up the feature. See Also: Setting Up Facebook Login
If a user clicks a Facebook Login button but is not logged into Facebook, the following screen appears.

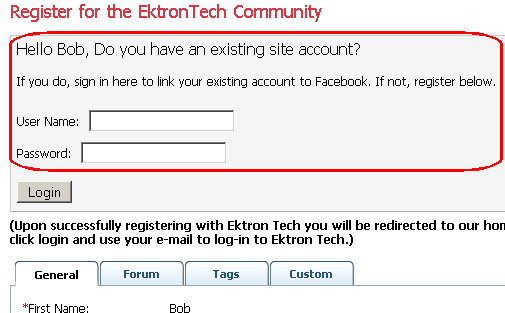
When you complete this screen or if you are already logged into Facebook, you are forwarded to a page that prompts you to register with or log into Ektron.
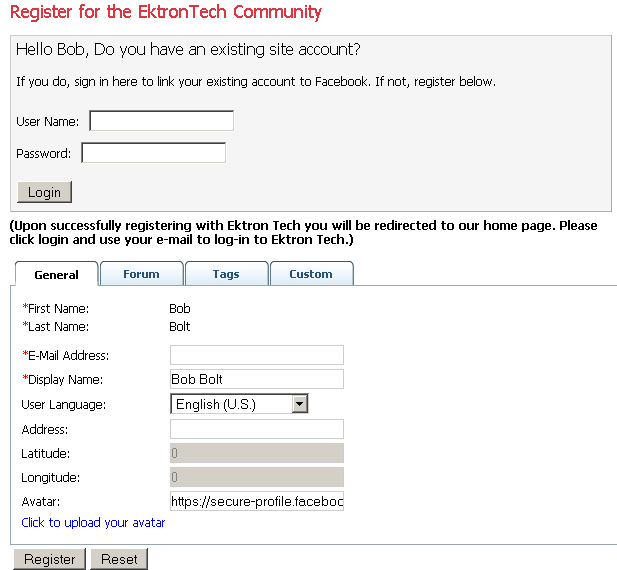
This screen asks if you have a membership account. If so, do you want to connect this Facebook username and password with the Ektron account? If you agree, you will access your membership account via the Facebook Login with Facebook credentials from now on. If you do not have a membership account, complete the lower half of the screen. This is the same screen that new members use to create Ektron accounts. From then on, you can click the Facebook Login button to log into Ektron using a Facebook username and password.
When you log out of Ektron, that action does not log you out of Facebook. Conversely, if a user logs out of Facebook, you are not logged out of Ektron.
NOTE: Facebook often caches information in your browser. If you see JavaScript errors or other odd behavior, clear the browser cache, close all browser windows, and try again.
Setting Up Facebook Login
To set up the Facebook Login feature:
Step 1: Connect Facebook to Your Ektron Web Site
Follow these steps to obtain Facebook keys, paste them into the web.config file, and identify your site to Facebook.
- In you don't have one, create a Facebook account. Go to
www.facebook.comand follow the sign up instructions. - Sign in to the Facebook Developer site, http://www.facebook.com/developer.
- Click +Create New App.
- Enter an App Name and APP Namespace for your application. The name cannot include
facebookor any variations, such asFB. Click Continue. A new screen appears, showing your App ID and AppSecret.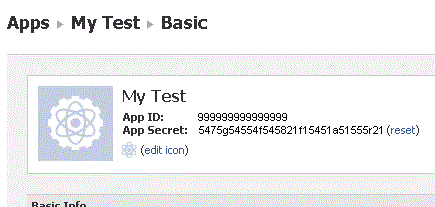
- Open your Web site's root folder/
web.configfile. - Copy the Facebook keys into these
web.configelements.- APP ID—
ek_FacebookApiKey - App Secret—
ek_FacebookSecret
NOTE: Keys shipped in Ektron sample sites are for localhost. Also, make sure the Facebook keys were generated for the host header/URL to which you're applying them. And, if you are testing secure site setup, verify that the
web.configelementek_useSSListrue. - APP ID—
- Save and close
web.config.NOTE: After you update
web.configwith Facebook keys, wait a few minutes before logging into the Ektron site via the Facebook Login server control. - Return to the Facebook Basic screen.
- Under Select how your app integrates with Facebook, click Website.
- In the Site URL field, enter your Web site's URL.
- for a public site, enter its URL. For example, http://www.example.com.
- for a shared server or if you are accessing the site from a remote machine, use the IP address. As examples, http://192.168.14.10, http://192.168.14.10/QA
- for a local server, use localhost. As examples, http://localhost, http://localhost/EktronTech
- Save and close the Facebook screen.
- After setting up your application, you can return to this screen at any time to view the keys, edit the Site URL, etc.
Step 2: Create or Modify a Facebook Login/Signup Page
A Facebook form appears if a user clicks a Facebook Login button and is not currently logged into Facebook.
The form is created by Facebook, not Ektron. You can customize parts of it, such as the title and site image, using Facebook's Application settings.
When the user completes the form, the user is forwarded to an Ektron form that prompts him to register or log in to Ektron.
You specify which form appears via the Facebook Login server control's SignupTemplate property.
The default form in the Developer sample site, siteroot/Developer/FacebookConnect/register.aspx, is shown above. You can use the default form as is, modify it, or create your own.
The logic to connect a Facebook user with an Ektron account (circled) is not part of the Facebook Login server control. However, sample code for that functionality is included in the Ektron Tech sample site's register.aspx page.
Alternative to Redirecting to the Signup Form
If you do not want to redirect the user to a signup form after Facebook login, you can hook the Ektron_FacebookNewMemberLoggedIn JavaScript event and do whatever you want with it. For example, you could raise a modal dialog with a short signup form. .
Step 3: Place the Facebook Login Server Control on a Page
- In Visual Studio, open the template onto which you want to place a Facebook Login server control. See Also: Working with Ektron Server Controls
- Drag and drop the control.
- Use the following information to complete its properties.Facebook Login server control properties
The following are Ektron-specific server control properties. You can find information about native .NET properties such as font, height, width and border style in Visual Studio® help.
- Authenticated (String)
Indicates if you are logged into the CMS Explorer and can use it to browse to content, collections, and so on. See Also: Browsing Your Ektron Site Using CMS Explorer.
- FacebookButtonText (String)
Enter the Facebook Login button text. The default is Connect with Facebook.
- Hide (Boolean)
Hides or displays the output of the control in design time and run time.
- True—Hide the control output.
- False—Display the control output.
- InstructionDetail (String)
Enter additional text that appears above the Facebook Login button. The default is Sign in using your Facebook account.
- InstructionHeader (String)
Enter text that appears above the Facebook Login button. The default is Sign in using your Facebook account.
- Language
Set a language for viewing content; shows results in design-time (in Visual Studio) and at run-time (in a browser).
- SignupTemplate (String)
Enter the path to the template that appears after a user completes the Connect with Facebook screen.
- Authenticated (String)
You can customize the markup for the form using the LoginTemplate and LogoutTemplate server controls.
Using Facebook Connect Extension with the Targeted Content Widget
Facebook Login lets you retrieve the following Facebook profile information, using Facebook Connect Extension.
- Age
- Gender
- Marital Status
- Likes
- Employment
To learn how to do this, see the Knowledge Base article "INFO:Targeted Content Widget: Facebook Connect Extension" (http://dev.ektron.com/kb_article.aspx?id=32156). See Also: Creating Conditions with the Targeted Content Widget
Login Server Control
The Login server control paints a login button on the template when displayed in a browser. When the Login server control is inserted and the project is built, the control displays the following buttons on a Web page.
![]() —When user is not logged in, this button appears. Clicking the button opens the login window, where a user can enter a username and password. Upon authentication, the user is logged in to the Ektron Web site.
—When user is not logged in, this button appears. Clicking the button opens the login window, where a user can enter a username and password. Upon authentication, the user is logged in to the Ektron Web site.
![]() —After a user logs in, this button replaces the login button to let the user log out.
—After a user logs in, this button replaces the login button to let the user log out.
![]() —When logged in, this button appears under the logout button, allowing the user to access the Workarea.
—When logged in, this button appears under the logout button, allowing the user to access the Workarea.
![]() —Lets the user preview the entire Web site as if all checked-in content were published.
—Lets the user preview the entire Web site as if all checked-in content were published.
![]() —Turns off site preview mode.
—Turns off site preview mode.
 —Launches online help for Ektron.
Placing a Login Button
You can add any number of login buttons to a template. You can insert a login button on each template, or set up a special Web page, called login.aspx, from which users can log into the Ektron site without the public being able to access the page.
Login Server Control Properties
The following are Ektron-specific server control properties. You can find information about native .NET properties such as font, height, width and border style in Visual Studio® help.
- Authenticated (String)
Indicates if you are logged into the CMS Explorer and can use it to browse to content, collections, and so on. See Also: Browsing Your Ektron Site Using CMS Explorer.
- AutoAddType (Common.EkEnumeration.AutoAddUserType)
When using Single Signon, the Login Server Control can be used to add users to Ektron. In this scenario, when a user signs on with his Active Directory credentials, that user is created within the Ektron database. Use this property to define the type of user that is automatically added to Ektron. See Also: Single Sign On
- Author—Ektron user
- Member— membership user
- AutoLogin (Boolean)
If this property is set to true and Active Directory Integration is enabled, users are automatically logged in using Active Directory authentication. They do not need to enter a username or password.
- True—Use Active Directory authentication when logging in.
- False (default)—Do not use Active Directory authentication when logging in.
NOTE: For this property to function properly, you must be using Active Directory authentication with your Ektron Site. See Also: Active Directory
- True—Use Active Directory authentication when logging in.
- DoInitFill (Boolean)
By default, Fill occurs during the Page_Init event. Set to false if you want to postpone the fill-action until later. In this case, Fill is automatically called during the Page Render event. You might do this if you need to set or change a property on the control in code-behind and have it render with your changes shown.
- Hide (Boolean)
Hides or displays the output of the control in design time and run time.
- True—Hide the control output.
- False—Display the control output.
- Language (Integer)
Set a language for the Login server control. This property shows results in design-time (in Visual Studio) and at run-time (in a browser).
- OnlyAllowMemberLogin (Boolean)
Allows only membership users to log in. This property prevent users from logging as an Ektron user and accessing the Ektron Workarea. If an Ektron user tries to log in using this control, this message appears: “Only members are allowed to login here.” The default is False.
- True—Only membership users can log in
- False—Ektron users and membership users can log in
- True—Only membership users can log in
- PromptLogout (Boolean)
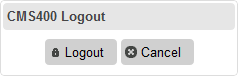
When set to False, the logout process omits the Logout window (shown below).
- True—Users must click Logout to log out.
- False—The Logout window does not appear
- SuppressHelpButton (Boolean)
Hides the Help button that appears below the Login button when set to true.
- True—Do not display the Help button.

- False (default)—Display Help button.

If you are editing this server control from a text file and want to suppress the Help button, add the following code to the login tag source:
<CMS:Login ID="Login1" runat="server" SuppressHelpButton="True" /> - True—Do not display the Help button.
- SuppressWrapperTags (Boolean)
Suppresses the output of the span/div tags around the control.
- True—Suppress wrap tags.
- False (default)—Allow wrap tags.
- WrapTag (String)
Lets a developer specify a server control’s tag.
- Span (default)—designate an inline portion of an HTML document as a span element.
- Div—apply attributes to a block of code.
- Custom—Lets you use a custom tag.
Modifying Setup Information
In the setup section of the configuration folder, you can enter or edit information for the Ektron Web site including:
- License keys
- Default language
- Summary sizes
- email notification
- Physical library folders on file server
- Builtin user information
- Editor options
- Work page size settings
You must complete this before any user can access your Ektron Web site.
NOTE: Only Administrator Group members can view and edit the Application Setup screen.
To update setup information from the Ektron Workarea, choose Settings. The Application Setup screen appears with the General Tab showing. Click Edit to modify the settings.
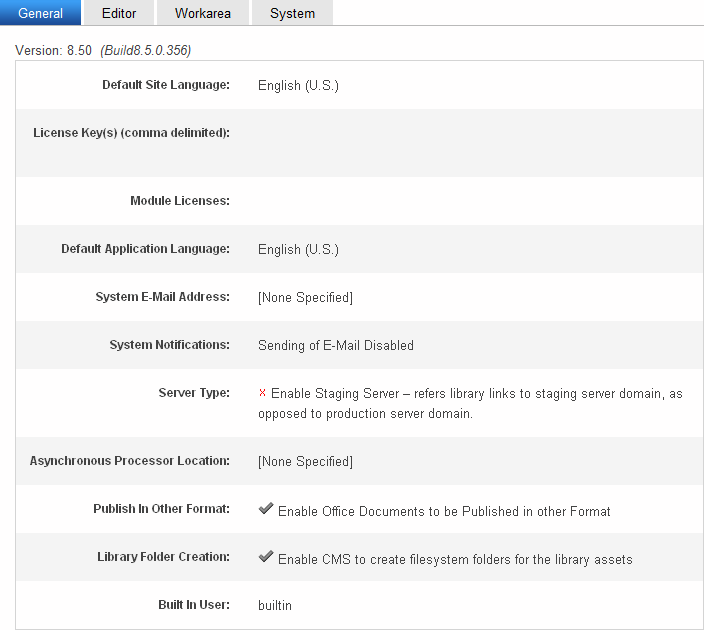
General Tab
|
Field |
Description |
|
Version |
This number shows the Ektron version and build numbers. This number is important to know if you place a call to Ektron Support. |
|
Enter the license key sent to you from Ektron. |
|
|
Module Licenses |
Enter the license key for WebImageFX that was sent to you via email. See for more information. |
|
Select a default language for Ektron. How User Application Language Affects Use of Ektron This user’s language determines the screens and messages that appear in Ektron. How System Default Language Relates to User Language Setting In the user profile, you can set any user’s language to system default. Each user set to system default uses the language assigned here. NOTE: Do not confuse the default application language with the ek_ DefaultContentLanguage variable in |
|
|
In characters, specify a maximum size (in characters) for each content item. If a user creates or updates content that exceeds this limit, the user is told to reduce the content before the user can save it. The size cannot be less than 1,000,000 characters. NOTE: This field only appears if editor is set to eWebEditPro in the |
|
|
In characters, specify a maximum size (in characters) for the content summary. If a user creates or updates a summary that exceeds this limit, the user is told to reduce the summary before the user can save it. The size cannot be less than 65,000 characters. NOTE: This field only appears if editor is set to eWebEditPro in the |
|
|
Enter a valid email address. This address will appear in the From field in the notification emails. See Also: Configuring email for Tasks and Content |
|
|
Server Type: Staging Server |
Check this box if you want your library links to refer to the staging server domain, as opposed to the production server domain. This would help you verify that the linked items exist on the staging server. See Also: Step 3: Assign Multi-Site Capabilities in Ektron WARNING! Checking this box disables the Web Alerts feature on your server. |
|
If your site uses the Web Alerts feature, enter or update the location of the asynchronous processor Web Services file. The default location is “[none specified].” See Also: Setting Up Message Queuing and the Asynchronous Processor |
|
|
Check the box to allow Ektron to render Office documents in PDF format. When a checked, PDF generation is available for individual folders.See Also: Generating PDF Content |
|
|
Enable CMS to create file system folders for library assets |
Check the box if you want to create physical folders on your file system server that match the Ektron library folder tree. See Also: |
|
Builtin User |
Edit the username and/or password for the built in user. By default, the username and password combination is builtin/builtin. WARNING! Ektron strongly urges you to change the default password assigned to the builtin user. An opportunity to do this is presented during installation. See Also: |
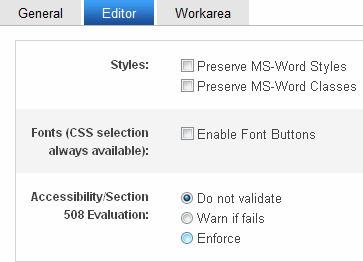
Editor Tab
|
Field |
Description |
|
When Microsoft Word content is pasted into the editor, it removes some Word styles by default. Check this box if you want to prevent the editor from removing them. NOTE: Ektron does not recommend enabling this feature. |
|
|
Similar to styles, when Microsoft Word content is pasted into the editor, it removes some Word classes by default. Check this box if you want to prevent the editor from removing them. |
|
|
Checking this option displays the following font-related buttons on the editor toolbar:
|
|
|
Accessibility/Section 508 Evaluation |
If your editor is eWebEdit400: Setting Up Accessibility Validation |
Workarea Tab
|
Field |
Description |
|
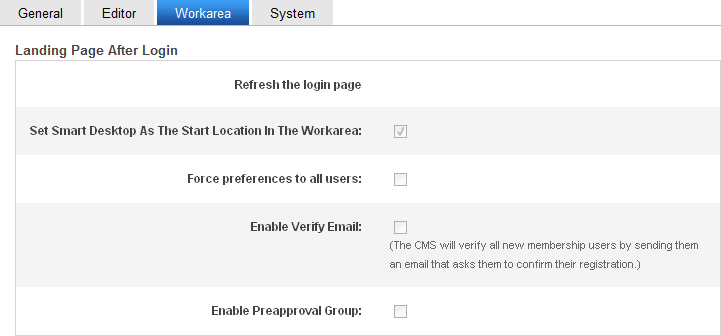
The following fields change
The default values are automatically applied to all new users, and to all existing users when you upgrade. Normally, you can modify these values for any user via the Edit User screen. But, you can force these values on all users, removing the ability to personalize them. |
|
|
If you want one page in your Web site to appear after users sign in, enter the URL to that page. You can click Select Page to browse to the landing page. The last published version of the page appears. If the page has never been published, nothing appears. By default, the page from which the user logged in reappears. IMPORTANT: If you are logging in from the OnTrek sample site, this field is ignored. OnTrek has its own landing page after login, regardless of this setting. |
|
|
If you want the Smart Desktop to appear as soon as users enter the Workarea, click this box. By default, the user sees the Smart Desktop after sign in. If you leave this check box blank, when you enter the Workarea, you go to the folder of the content specified at theLanding Page after login field. |
|
|
If desired, change the width of the screen in which Ektron appears. The width in pixels must be between 400 and 2400. This field accommodates users who have larger monitors and/or prefer a higher resolution, such as 1280 x 1024. The default value is 790. |
|
|
If desired, you can change the height of the screen in which Ektron appears. The height in pixels must be between 300 and 1800. This field accommodates users who have larger monitors and/or prefer a higher resolution, such as 1280 x 1024. The default value is 580. |
|
|
Force Preferences to all users |
To force these settings on all Ektron users, check this box. If you do, users can see the values in the user profile screen but not change them. If you leave this box blank, users can personalize these values in their User Profile. |
|
Enable Verify email? |
Check this box if users should be notified whenever they subscribe to an email notification list. See Also: What Happens if Verification email is Used WARNING! When using the Checkout Server Control on an eCommerce site, the Enable setting must be unchecked. Otherwise, new users will receive an error message when they sign-up using this control. See Also: Checkout Server Control |
|
Enable PreApproval Group |
Use this field to enable Automatic Task Creation. See Also: Automatically Creating Tasks Associated with Content |
System Tab

Use this button to clear Ektron's cache, which recycles the application pool. For example, you updated the web.config file but cannot yet see the changes.
Under certain circumstances, Ektron's support group may instruct you to click this button.
Administrators would use this button if they cannot access the hosting servers yet need to reset their Web site. The button is an alternative to submitting a request to their IT department or hosting company.
Impact on Ektron
After you click Restart, the first request takes longer than usual since the application needs to recompile. Subsequent requests should be processed normally.
To minimize the impact on site visitors, visit your home page immediately after the restart, so that your request is the first "hit."
See Also: How Application Pools Work (IIS 6.0) and Managing Application Pools in IIS 7
Creating File System Folders with Ektron
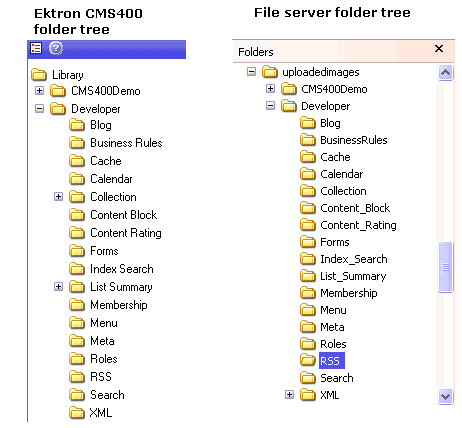
If this option is enabled, each time you create a new content or library folder in Ektron, a corresponding physical folder is created on the file system to organize library assets on your file server. The following image shows a library folder tree and its corresponding system folder structure.
NOTE: If you are upgrading, the installation does not create sample Web site folders on the file server. You must add these folders manually. However, all folders that you create are also created on the file server when enabled.
Enabling WebImageFX
When purchasing Ektron, you had the option to purchase Ektron WebImageFX as well. WebImageFX is an imaging application that allows users to edit images online.
If you purchased WebImageFX when you purchased Ektron, you should have received an email with a license key for WebImageFX as well.
To enable WebImageFX within Ektron, from the application setup page, insert the WebImageFX license key in the Module License field.

![]()