Logging into a System that Uses AD Integration
Because AD usernames and passwords are stored by domain, the AD sign-on procedure requires the user to select a domain. When AD integration is enabled the sign-on screen includes a domain drop-down list. For more information about logging in, see Logging In and Out.
Single Sign On
The Single Sign On feature retrieves a user’s login information from Active Directory to authenticate access to Ektron. The user does not need to enter a password. After clicking Login, he is immediately logged in.
Single Sign On uses a variable called User.Identity.Name. This maintains the user's account and domain in Active Directory, and has the format [domain]\[username]. For example, EKTRON1\ssmith. The variable's value is set when a user authenticates against a Windows server.
When a user clicks the Login server control, if the variable passes successfully and Active Directory is enabled, the server control opens the autologin.aspx page. Next, the opening window refreshes just like a normal login, except the user is not prompted for a username, password, and domain.
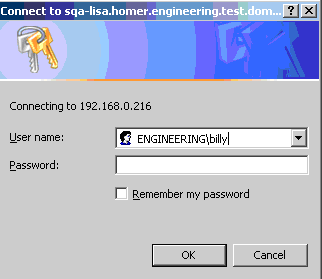
However, if the user‘s computer is not on a domain, not on the same domain as Ektron, or does not include the Ektron server as a trusted site, the following login screen appears.
If Active Directory is not enabled, the normal login.aspx page appears.
Single Sign On uses the autologin.aspx file in the workarea/SSO directory. When set up, user authentication is enabled from any domain that this server can reach. For example, if Ektron is located in a third level domain, users from third, second, and first level domains can authenticate.
See Also: Enabling NTLM Authentication (Automatic logon) (http://dev.ektron.com/kb_article.aspx?id=22100).
Use the setup instructions that correspond to the IIS version running on your server:
- IIS6
- IIS7 or IIS7.5
After completing these procedures, enable Active Directory within Ektron (if it isn’t already enabled). See Also: Setting Up Active Directory
You should enable the automatic addition of users and groups. See Also: Setting Up Active Directory
Setting up Single Sign On Using IIS6
Setting up Single Sign On with IIS 6 involves modifying the web.config file, editing security settings, and adjusting settings for the Login sever control.
Modifying Web.config for Single Sign On
- Open your site root folder.
- Open the
Web.configfile. - Find the
ek_AUTH_protocolelement. - Change its value to LDAP. For example:
<add key="ek_AUTH_Protocol" value="LDAP" /> - Find the
authenticationelement. - Change the value of
authentication modeto Windows. - Change the value of
impersonateto False. It should look like this:<authentication mode="Windows" /><identity impersonate="false" userName="" password=""/>
Adjusting Security Settings for the Site Root Folder
- Go to Windows Control Panel > Administrative Tools > Internet Information Services.
- Within IIS, go to Web Sites and select your Ektron site.
- Right click your Ektron site folder and select Properties.

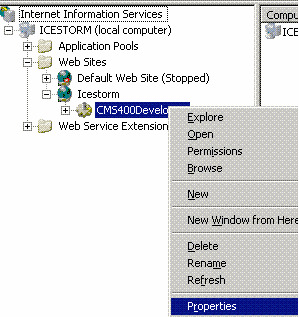
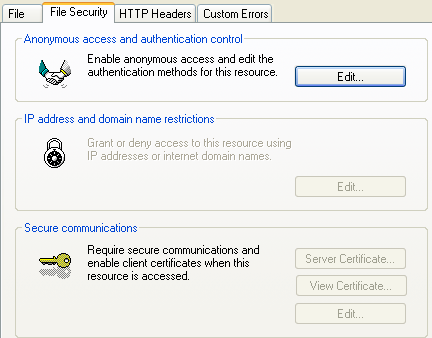
- Click the File/Directory Security tab then the top Edit button.
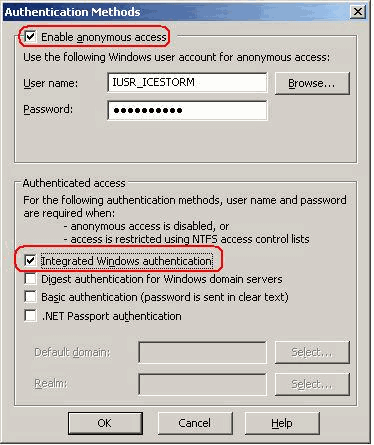
- Uncheck everything except Enable anonymous access and Integrated Windows authentication. The anonymous access account should be a domain account, preferably the root of the Active Directory tree.
Adjusting Security Settings for autologin.aspx
- Go to Sites > your site root folder > Workarea > SSO > autologin.aspx.
- Right click
autologin.aspxand select Properties. - Click the File security tab and the top Edit button.
- Under Authenticated Access, uncheck all except Integrated Windows authentication. As a result of these settings,
autologin.aspxpasses credentials from the logged-in user's desktop.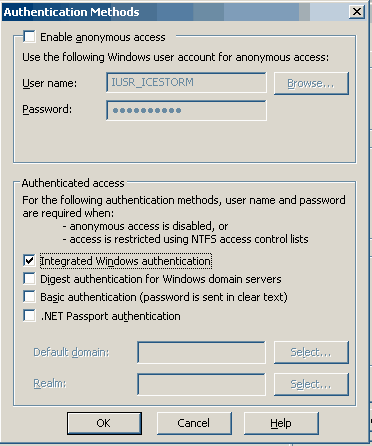
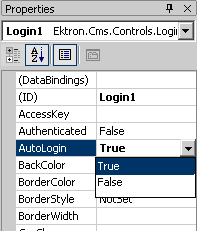
Adjusting the Login Server Control
In Visual Studio.NET, open the Login server control and set the AutoLogin property to True. See Also: Login Server Control
Setting up Single Sign On Using IIS7 or IIS7.5
Setting up Single Sign On with IIS 7 or IIS7.5 involves modifying the web.config file and editing security settings.
Modifying Web.config for Single Sign On
- Open
site root/Web.config. - Find the
ek_AUTH_protocolelement and change its value to LDAP:<add key="ek_AUTH_Protocol" value="LDAP" /> - Find the
authenticationelement and change the value ofauthentication modeto Windows. - Change the value of
impersonateto False:<authentication mode="Windows" />
<identity impersonate="false" userName="" password=""/> - Comment out the MyDigestAuthenticationModule only.

<modules>
<!--add name="MyDigestAuthenticationModule"
  type="Ektron.ASM.EkHttpDavHandler.Security.DigestAuthenticationModule,
  Ektron.ASM.EkHttpDavHandler" /-->
<add name="ScriptModule" type="System.Web.Handlers.ScriptModule,
  System.Web.Extensions, Version=1.0.61025.0, Culture=neutral,
  PublicKeyToken=31bf3856ad364e35" preCondition="integratedMode" />
<add name="EkUrlAliasModule" type="UrlAliasingModule" preCondition="integratedMode" />
</modules>

Adjusting Security Settings for autologin.aspx
- Make sure that Windows Authentication is installed on this server. To do this:
- Open Start menu > Administrative Tools > Server Manager.
- Click Roles > WebServer (IIS) Role Services > Security > Windows Authentication.
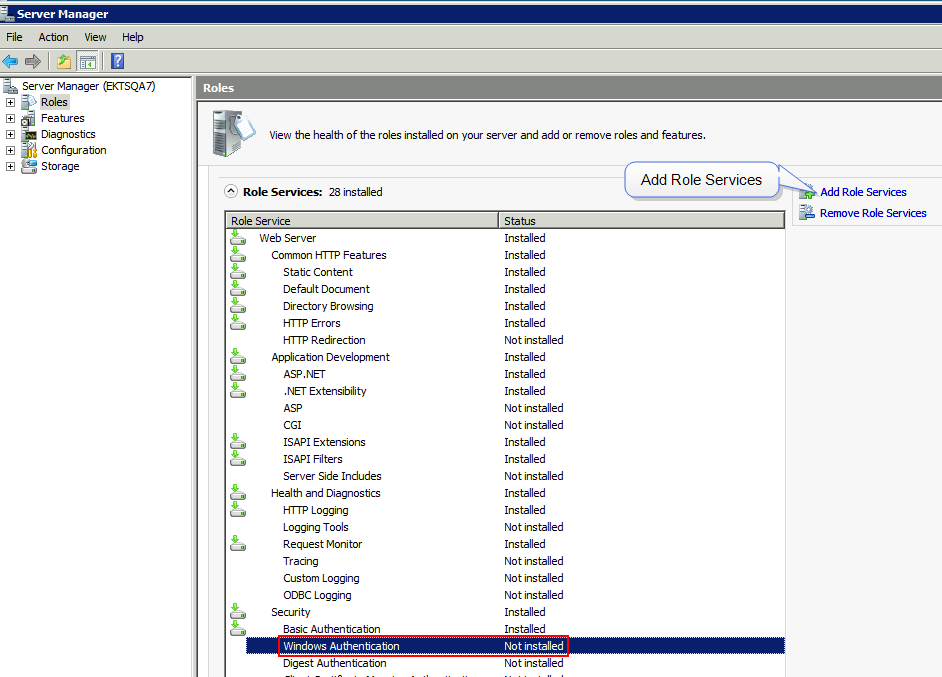
- If the status of Windows Authentication is Installed, proceed to Step 2.
If the status of Windows Authentication is Not Installed, click Add Role Services.
- The Add Role Services screen appears.
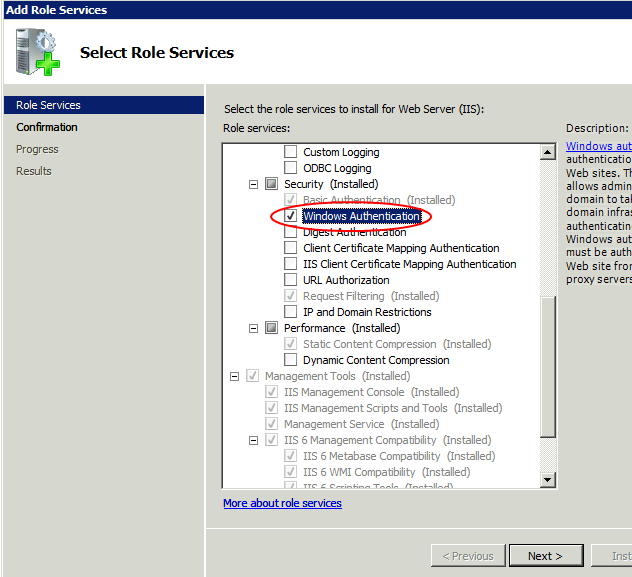
- Check Windows Authentication.
- Click Next and follow the prompts to install Windows Authentication.
- Close Server Manager.
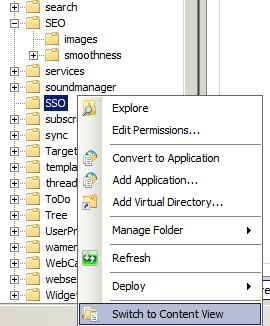
- Open IIS Manager.
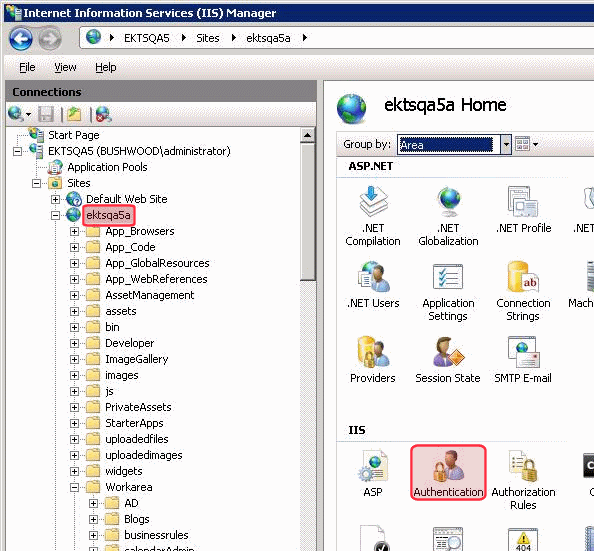
- Go to Sites > your Web site’s root folder > Workarea > SSO and right click Switch to Content View.
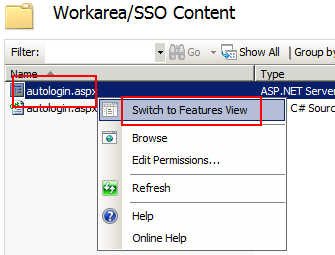
- In the center panel, right click autologin.aspx and select Switch to Features View.
- In the center panel, click Authentication.
- From the center panel, check the status of Windows Authentication. If it is disabled, enable it by selecting it, right clicking, and choosing Enable from the menu.
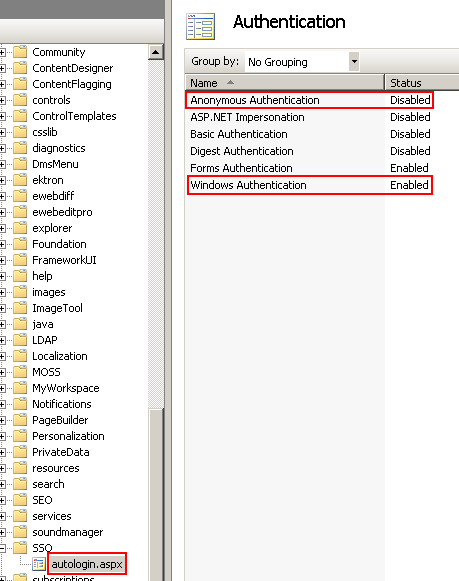
- From the center panel, check the status of Anonymous Authentication. If it is enabled, disable it by selecting it, right clicking, and choosing Disable from the menu. As a result of this procedure,
autologin.aspxpasses credentials from the logged-in user's desktop.
![]()