The library folder stores images, files, quicklinks, and hyperlinks that can be inserted into editor content. Before you can insert them into content, you must copy them from your computer to a larger, file server computer that everyone editing your site can access.
See Also: Storing External Files as Library Items vs. Assets
- An image is any graphic file, which can include illustrations and photos. Common image file extensions are .gif., .jpg, .tiff, and so on.
- A file is type of computer file that can be launched from a browser, such as Internet Explorer. Examples include a Microsoft Word document and a .PDF file.
- A hyperlink is a commonly used or hard to remember Web address (also known as a URL). After you add hyperlinks to the library, users can easily apply them to editor content. For example, if the editor content is “Contact Ektron,” the user can select the text, click the library button, select hyperlinks to find the Ektron hyperlink, and apply that hyperlink to the text. When the page is published, a person reading it can click the text to “jump” to the Web address
www.ektron.com. - A quicklink is a special kind of hyperlink that jumps to another content item on your Web site. (A regular hyperlink jumps to a Web page on the internet.)
- A form is a quicklink to HTML form content. Whenever content is created, a form link is automatically created for it.
Working with the Library
Performing Actions on Library Items
The library is made up of images, files, form Quicklinks, hyperlinks, and regular Quicklinks that were added by Ektron users. The following table displays the actions that can be performed for each library item type.
|
Action |
Files |
Images |
Hyperlinks |
Quicklinks |
Form Quicklinks |
|
Add |
|
|
|
|
|
|
Edit |
|
|
|
|
|
|
View |
|
|
|
|
|
|
Overwrite |
|
|
|
|
|
|
Delete |
|
|
|
|
|
|
Remove from server |
|
|
|
|
|
|
Check links |
|
|
|
|
|
|
Update URL |
|
|
|
|
|

Most actions can be performed by a user who is granted permission to do so.
Whenever a new content folder is created and permissions given to it, a corresponding library folder is created. The new library folder inherits permissions from the content folder.
Items added to library folders are only accessible by users with permission to the corresponding content folder. If items are added to a library folders directly under the main library folder, all users with at least library Read-Only permissions can use those library items in their content.
Conversely, if a library item is uploaded to a folder to which only one person has permissions, that is the only user who can use that library asset.
To add, edit, overwrite, or delete a library item a user must either be a member of the administrators group or have the following combination of folder permissions.
| Add | Edit file name, summary, metadata | Overwrite file | Delete | |
|---|---|---|---|---|
| Library images | Add Images | Add Images | Overwrite library | Delete and Add Images |
| Library files | Add Files | Add Files | Overwrite library | Delete and Add Files |
| Library hyperlinks | Add Hyperlinks | Add Hyperlinks | Overwrite library | Delete and Add Hyperlinks |
Accessing the Library
- Click Workarea > Library. The Library folder appears.

- The sub-folders appear in the left frame. Files in the root folder (library) appear in the right frame.
You can use the drop-down list (circled above) to change the type of library files that appear.
To work with any library file, click it. When you do, the View Library screen appears, providing additional information about the item. From here, you can
- edit its title, file name, or description
- overwrite it
- find content linked to it
- delete it
The following table explains the toolbar buttons on the library screen.
NOTE: Your system administrator determines which library folders you can access, and which functions you can perform on library items within the folders.
|
Button |
Description |
|
|
Search library; Searching the Library |
|
|
View the library’s properties screen; Accessing Library Folder Properties |
|
|
Add an image, file, quicklink, or hyperlink to the library; Copying a File to the Library |
|
|
Select the type of Library file to work with |


Accessing Library Folder Properties
The library folder properties screen lets you view and update image and file types may be uploaded.
Administrators have permission to change library properties.
To view the properties of the library folder:
- Access a library folder, as explained in Accessing the Library.
- Click Properties (
 ). The Library Management window appears, displaying the following settings.
- Image Extensions—The types of image files that a content contributor can upload to the library. You can add as many image file extensions as you want, or have none. If no extensions appear, no one can upload image files to the specified folder.
- Image Upload Directory—Specifies where the uploaded images are saved on the Web server. By default, the image upload directory is
Web root/ek_sitepath/uploadedimages. Theek_sitepathvalue is set in theweb.configfile.See Also: Managing the web.config File
- Make Directory Relative to this Web site—If you want to specify the image upload directory’s location as relative to your Web site root, check this box. (Your Web site root’s location appears to the right of Make Directory Relative to this Web site.)
- File Extensions—Specify the types of non-image files that a content contributor can upload to the library. You can add as many non-image file extensions as you want, or have none. If no extensions appear, no one can upload non-image files to the specified folder.
- File Upload Directory—Specifies where the uploaded files are saved on the Web server. By default, the file upload directory is
Web root/ek_sitepath/uploadedfiles. Theek_sitepathvalue is set in theweb.configfile.NOTE: You must create the directory in your Web root manually, before adding it in Ektron.
See Also: Managing the web.config File
- Make Directory Relative to this Web site—If you want to specify the file upload directory’s location as relative to your Web site root, check this box. (Your Web site root’s location appears to the right of Make Directory Relative to this Web site.)
Searching the Library
NOTE: New and updated library items are available only after the next crawl completes. See Also: Understanding the Search Crawl
You can search the library to find items when you only know some information about them. For example, you know that an image’s name includes Ektron but don’t know its filename or folder.
To search the library, first select the folder in which you want to begin the search. The search only considers files in that folder and its child folders. To search the entire library, select the Library (root) folder.
Next, click Search ( ) from the library toolbar. When you do, a search screen appears with 2 tabs (shown below).
The left tab, Search Published, finds both library items and content that satisfies the search criteria.
- Matches selected language
- Search text is contained in title, summary, filename, or path.
- If the search text is more than one term, all terms must be found. So, multiple terms have an AND relationship.
To force an OR relationship, enter OR between search terms.
The right tab, Advanced Search, has several fields that let you further narrow your search.
- Enter Keyword(s)—Specify one or more keywords that the search will use. The search looks for keywords in the file’s title. (The title is assigned by the user when the file is added to the library.) If a file’s title matches the keywords, the file appears on the search results screen.
The search also uses keywords to search through the file’s
- internal name (for example, airplane.gif) if the Filename Search checkbox is checked
- description if the Description search checkbox is checked
A keyword can be a complete or partial word. But, you can only enter a partial term for one word. For example, you can enter Adv and have the search return the content titled “Adverse Drug Reactions.” But if you enter Adv Drug, the search returns nothing.
You can enter several complete search terms but they must be in the correct sequence. For example, to find the topic titled “Adverse Drug Reactions,” you can enter Adverse Reactions but cannot enter Reactions Adverse.
To find all files in a selected library folder, enter nothing in this field. Or, to find all files in a selected library folder of a type (for example, images), select the type and enter nothing in this field.
- All Types—The search considers all library asset types.
- Images only—The search only considers images.
- Quicklinks Only—The search only considers quicklinks.
- Forms Only—The search only considers forms.
- Files Only—The search only considers files.
- Hyperlinks Only—The search only considers hyperlinks.
- Description Search—If you check this box, the search considers the library item’s description when returning search results. Otherwise, the search ignores the description. For example, if you enter Ektron into the keyword field, the search returns all library files that include that string.
- Filename Search—If you check this box, the search considers the file name when returning search results. Otherwise, the file name is not considered by the search. For example, if you enter ppt into the keyword field, the search returns all files that include that string (such as all Powerpoint presentations).
- Only search items last edited by myself—The search only considers library assets that were last modified by you.
- One or more search criteria set by your system administrator in the Metadata Definitions screen.
NOTE: Some search field check boxes are circles while others are squares. If the box is a circle, you can only choose one option. If it is a square, you can choose several.
The search displays library items that meet the search criteria. You can click any item to view its properties (such as Library ID number, Last Edit Date and Description).
Working with Files
Copying a File to the Library
You must copy files to the Ektron library before users can insert them into content. To copy a file to the library:
IMPORTANT: You should use the Document Management system to add files. Unlike library files, DMS files can be part of an approval chain, maintain a history, are searchable, and can have a summary, schedule, metadata, taxonomy categories, and so on.
NOTE: Microsoft lets users upload files of any name. However, IIS security blocks files with names that contain an ampersand (&), colon (:), or percentage sign (%). Source: http://support.microsoft.com/kb/826437/en-us
To allow these characters, add the following registry key to your Web server then reset IIS.
Reg Key: DWORD HKEY_LOCAL_MACHINE\SOFTWARE\Microsoft\ASP.NET VerificationCompatibility = 1.
- In the Workarea, browse the library folder and select a folder to which you want to copy a file.
- When you copy a file to a folder, only users with permissions to that folder can insert the file into content. A list of files in that folder appears.
- Click Add. The Add Library Item to Folder screen appears.

- Enter the necessary information according to the following list.
- Title—Enter a title for the file to be copied.
- Filename—Enter the path to the file to be copied. You can use the Browse button to find it.
- Description—You can enter a full text description to help other users identify this file. The Description appears on the View File screen. It also accompanies the file on the Search Results screen.
Click Save to copy the file. Users with permissions to the selected folder can insert the file into their content.
NOTE: When an image is uploaded to the Media tab for a product in the eCommerce feature, the original image and any thumbnails associated with it are added to the Library. For example, if you add an image named “TestImage” (actual file name: “case.jpg”) with a 150px and 50px thumbnails, you will see the following entries in your library (File Name - Path):
TestImage - /~siteroot~/uploadedImages/case.jpg
case[filename]150 - /~siteroot~/uploadedImages/case[filename]150.jpg
case[filename]50 - /~siteroot~/uploadedImages/case[filename]50.jpg
Viewing a File
When a file is copied to the library, you may preview it. To preview a copied file:
- Navigate to the library folder to which the file was copied.
- Click the file you want to preview. The View File screen appears.
- Title—Title assigned by user who copied or edited it.
- Filename—Filename and location on the server.
- Library ID—ID number assigned by Ektron when file was originally copied.
- Parent Folder—File’s parent folder. Users need permissions to this folder to insert the file into content.
- Last User to Edit—Last user who changed file.
- Last Edit Date—When file was last edited.
- Date Created—When file was originally copied to library.
- Description—Optional, full-text description of file.
If the file can be displayed in your browser, a preview of it appears at the bottom of the screen. If it cannot display in the browser, a link to preview it in its host application appears instead.
NOTE: You may need to download some files before you can be view them (for example, .mdb, .mp3, .zip, and so on).
Searching Library Links
Link searching indicates all content that includes a library link. It is useful when you want to delete a library item. With the click of a button, you see all content that you need to update to reflect the change you are making.
To perform a library item link search:
- Access the View Library Item for any type of library item and click Link Search (
 ).
). - A list of all content that references the library item appears.
You should edit that content before deleting the item.
Adding a Library File to Content
After a file is copied to the library, users can add it to content. You can also insert an item into the library while adding it to content.
If you insert an image file, it appears within the content. If you add any other type of file, the file name appears as a hyperlink within the content. When a site visitor viewing that page clicks the hyperlink, the inserted file is launched.
NOTE: The following procedure applies to files, forms, hyperlinks, images and quicklinks.
- Invoke the editor by adding or editing content in Ektron.
- Place the cursor within the content where you want the library file to appear.
- Click Library (
 ). The Library screen appears.
 - Navigate to the folder that contains the file you want to insert.
- From the file types drop-down list, select the kind of file (file, form, hyperlink, image, or quicklink) you want to insert. All library files of that type in the selected folder appear on the screen.
- Click the file you want to insert.
- Click Insert (
 ) to insert the file. The content appears in your editor. In this example, inserting the file creates a link in your content. If you select an image, the image appears.
If you select Files from the file types list, and Aliasing is enabled for your Web site, the following screen appears.
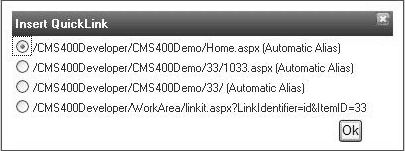
For guidance on these choices, see http://dev.ektron.com/kb_article.aspx?id=26950.
Adding a File to the Library and Inserting it into Content
Use this procedure to insert an image into content that has not yet been copied to the library. This procedure inserts the item into the library then into the content.
- Invoke the editor by adding or editing content in Ektron.
- Place the cursor where you want the library item to appear.
- Click Library (). The library opens.
- Navigate to the folder that will contain the file after you insert it.
- Select the type of file (file, form, hyperlink, image, or quicklink) you want to insert from the File types drop-down.
- Click Add Library. A new screen appears.
- Browse to the file you want to insert, or you can click Search () to search for a file to insert.
- Enter a Title for the file.
- If metadata is required for the library item, you must complete it. Metadata fields may appear in the lower section of the screen.
- Click Add Library. The file is inserted into the selected library folder and the content.
Overwriting a File
If a library file or image becomes out-of-date or the wrong version was copied, you can replace it with a new version. Overwriting files lets you minimize disk space and the number of library files.
NOTE: The ability to overwrite a library file is a privilege granted by the system administrator. If you do not see an Overwrite button on the View Library Item in Folder screen, you do not have permission to overwrite. You can only overwrite images and files. The new image or file must have the same file extension as the file being replaced.
When overwriting an image, the new image uses the same size dimensions and file extension as the older image. Be sure that the 2 images have the same file extension and size or make the adjustments at each occurrence of the image.
Remember, all links that point to the overwritten file now point to the new file.
To overwrite a library file:
- Navigate to the View File screen for the file you want to overwrite and click Overwrite (
 ). The Overwrite File screen appears.
- Click Browse. A window lets you navigate to the new file.
- Select a file, then click Open. You return to the Overwrite File screen with the path to the new file in the Filename field.

- Optionally, enter a description for the new file.
- Click Update to overwrite the current version of the file with this version. A message appears before you can continue.
- Click OK to overwrite the file.
Deleting a Library Item
You can delete obsolete items from the library. By deleting an item, you prevent users from adding it to their content. A deleted hyperlink, quicklink or form quicklink remains on your Web server, so any existing links to them are not broken.
On the other hand, if an item is a file or image, the delete window displays an additional prompt, Remove from the server, that lets you remove the item from the server. This feature is available to help reduce disk space taken up by these files. Before removing an image or file from your server, you should review all content with links to it and remove or update the link.
To delete an item from the library:
- Access the View Library Item for any type of library item and click Delete (
 ). The Delete Library Item screen appears.
 - If appropriate, check the box next to Remove from the server.
- Click Delete ().
Adding a Quicklink or Form to Content
Users can insert a quicklink to it within any content. To do so, follow the procedure described in Adding a Library File to Content. The only difference is that you add a quicklink or form instead of a file.
You can apply a quicklink to text or an image within the content. If you do, and a site visitor moves the cursor over the text or image, the cursor indicates that a hyperlink is available. If the link is clicked, the source content or image appears.
If you do not select text or an image before inserting a quicklink, place the cursor where you want it to appear. The title of the “jumped to” content appears in the content.
To test a quicklink or form, select hyperlinked text or image and double click it.
When the page is published, a reader can click the link to jump to the quicklink or form page.
Viewing Quicklinks or Forms
To view a quicklink or form, follow the procedure described in Viewing a File. The only difference is that you view a quicklink or form instead of a file.
The following list describes each field on the quicklinks display.
- Title—Title given to the hyperlink or form by the user who added it, or last edited it.
- URL Link—URL link for the quicklink or form.
- Library ID—ID number assigned automatically by Ektron when the quicklink or form was originally added.
- Parent Folder—Parent folder that the quicklink or form belongs to. Users need permissions to this folder to be able to access the quicklink or form.
- Last User to Edit—Last user that made changes to the quicklink or form.
- Last Edit Date—The date the quicklink or form was last edited.
- Date Created—The date and time the quicklink or form was originally added to the Ektron library.
To preview a quicklink or form, click the link at the bottom of the page.
Updating the Default Template for Multiple Quicklinks
WARNING! This procedure is only necessary if Link Management is set to false in your web.config file. If if Link Management is set to true, Ektron automatically updates the template within the quicklink when content is moved. See your system administrator for help with the web.config file.
When content is moved in Ektron, its quicklink does not get changed. After it is moved, you need to update the default template called in the content’s quicklink.
NOTE: This action can only be performed on quicklinks.
To update the default template for one or more quicklinks:
- In the library, access the quicklinks folder containing quicklinks you want to update.
- Click Update Quicklink (
 ). The Update URL Link Template Quicklinks screen appears.
 - Check the quicklinks you want to update.
NOTE: Check the box in the table header to select or deselect all.
- In the To: text field, enter the name of the template you want to apply to the selected quicklinks.
- Click Update Quicklink () to update the changes. A confirmation message appears.
- Click OK to continue. The selected quicklinks are updated to use the specified template.
![]()