Setting Up the Digital Experience Hub
The Digital Experience Hub (DxH) lets users of SharePoint®, HubSpot®, Salesforce®, Marketo® Lead Management, Microsoft Dynamics® CRM seamlessly interact with your Ektron-powered website.
- SharePoint—After an Ektron administrator sets up DxH to map SharePoint content to Ektron, an end user only needs to place content in a SharePoint folder to update their Ektron-powered website; the content is automatically transferred to the EktronWorkarea. See Why SharePoint Can Make Your Web Content Management Project Successful.
You also can manually import SharePoint content from the Ektron Workarea.
- HubSpot, Salesforce, Marketo Lead Management, Microsoft Dynamics CRM—transfer content from Ektron HTML forms to the external application. A site visitor can submit a form, questionnaire, or survey that automatically creates a record with that data in the external application.
Connections and mappings are key concepts in DxH configuration.
- A connection specifies an endpoint (URL or API path) and authentication credentials that allow communication between 2 software instances. First, you connect Ektron to DxH, then you connect DxH to external applications.
- An inbound connection is a special type that updates Ektron content as content is changed in an external application.
- A mapping determines what data is passed between 2 software instances in a connection. Each mapping varies according to the needs of the external application.
- Mapping to SharePoint involves importing content from a SharePoint site into Ektron.
- Mapping to Marketo, Microsoft Dynamics, HubSpot, or Salesforce creates a relationship between fields in an Ektron HTML form and fields in the external application. When a site visitor submits a mapped form, its data is routed from Ektron through DxH to the external application.
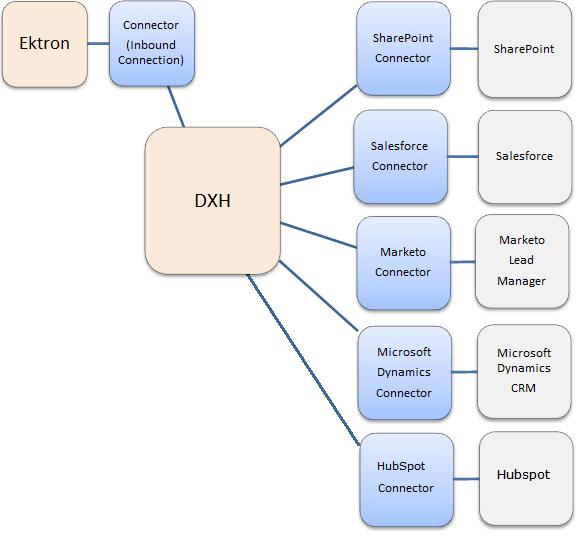
DxH architecture connects Ektron to external systems, and shares data and content with third-party applications. DxH includes these components:
- Digital Experience Hub—The core component that transfers information between Ektron and external applications through application-specific connectors.
- Inbound Connector—Transfers information between Ektron and DxH.
- HubSpot Connector—Transfers information between HubSpot and DxH.
- Marketo Connector—Transfers information between Marketo Lead Manager and DxH.
- Microsoft Dynamics® Connector—Transfers information between Microsoft Dynamics CRM and DxH.
- Salesforce® Connector—Transfers information between Salesforce and DxH.
- SharePoint® Connector—Transfers information between SharePoint and DxH.
The following figure shows the relationship among DxH components, Ektron, and external applications.
You want to let customers alert you about an issue on your website and use that information to create a Salesforce case and subsequent customer contact.
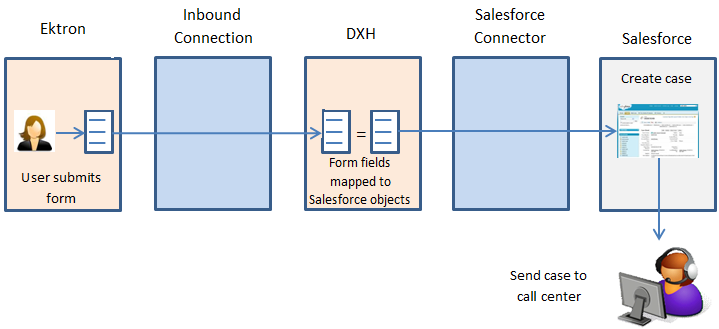
- An Ektron administrator has previously set up:
- an inbound DxH connection, which exchanges information between Ektron and DxH
- a Salesforce connection, which coordinates with the Salesforce administrator to determine path and authentication information
- The Ektron user coordinates with their Salesforce business partner to determine what data is required to create a Salesforce case.
- The Ektron user creates a form to capture customer information concerning an issue, such as name, contact information, product name, issue type and description.
- The Ektron user maps the form's fields to fields in Salesforce.
- The Ektron user publishes the form to the website.
- A customer accesses the website and submits the form reporting an issue.
- The form goes to DxH, which uses the Salesforce Connector to route the data to Salesforce.
- Salesforce creates a case and, if applicable business logic is in place, routes the case to a call center.
For details about the using Salesforce with DxH, see Configuring DxH for Mapping Form Data.
You want to capture site visitor information, create a lead based on it, then display targeted content when that visitor revisits the site.
The Targeted Content widget lets you personalize your site visitors' experience by providing content that matches their interests, thereby placing your site information in the context of your users. For example, the search keywords used to find your site might determine the best offer to show a prospect. Or, site members might explicitly state their interests by adding to their user profile or filling out a survey. For information about the Targeted Content widget, see Using Widgets.
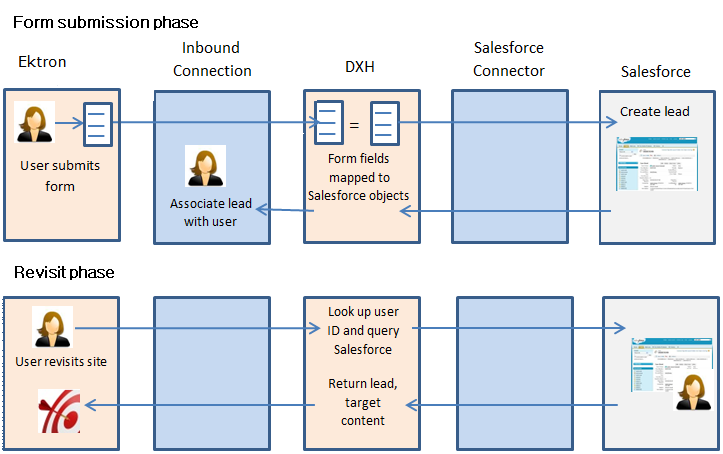
- An Ektron administrator has previously set up:
- DxH inbound connectionA special DxH connection type that updates Ektron content in response to content changes made in an external application.
- Salesforce connection, coordinating with the Salesforce administrator to determine path and authentication information
- Ektron user coordinates with a Salesforce business partner to determine data required to create a Salesforce lead.
- Ektron user creates a form to capture required information from a customer, such as name, contact information, and product of interest.
- Ektron user maps the form's fields to fields in Salesforce.
- A customer accesses the website and submits the form.
- The form goes to DxH, which uses the Salesforce Connector to route the data to Salesforce.
- Salesforce creates a lead and, using the mapping, associates it with the visitor.
- When the visitor returns to the site, DxH queries Salesforce for the associated lead properties.
For details about the DxH > Targeted Content connection, see Using the Targeted Content Widget with External Application Data.
You want to display SharePoint content on your website. The content is updated when changes are made in SharePoint.
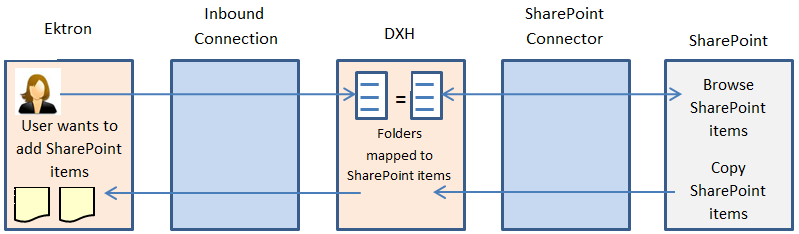
- An Ektron administrator has previously set up:
- a DxH inbound connectionA special DxH connection type that updates Ektron content in response to content changes made in an external application.
- a SharePoint connection, coordinating with the SharePoint administrator to determine path and authentication information.
- A user places content into a SharePoint folder that is mapped to the Ektron Workarea. A copy of the content is updated in the Workarea.
- As that content is updated in SharePoint, it is automatically updated in the Workarea.
For details on the DxH > SharePoint connection, see Setting Up the Import of SharePoint Files to Ektron.
Installing and Configuring DxH
- Ektron 8.6 or higher
- DxH version 1.1—See Also: Upgrading DxH to Version 1.1
- Server—Same as Installing Ektron
- Network—By default, DxH uses port 808 to communicate between Ektron and external applications. Whichever port you use, ensure it is open on your firewall.
- You must enable the Microsoft Windows Net.TCP Port Sharing Service (see How to: Enable the Net.TCP Port Sharing Service).
- External applications
- SharePoint®
- SharePoint 2010: Foundation, Standard, or Enterprise Editions
- Salesforce®—Group, Professional, Enterprise, and Unlimited Editions
- Marketo—Spark, Professional, and Enterprise Editions
- Microsoft Dynamics® CRM—Microsoft Dynamics CRM 2011, Workgroup, Professional, Enterprise, and Service Provider Editions
- HubSpot®—Enterprise
- SharePoint®
- You have administrator privileges or privileges to install DxH and create database
Installing DxH
You can install DxH on the Ektron server or on its own server.
NOTE: If you previously installed DxH, you can upgrade to the current version. See Also: Upgrading DxH to Version 1.1
- Contact your Ektron account manager to obtain a link to download the Digital Experience Hub. See Also: Contact Ektron.
- If you want to install DxH on the Ektron server, log into the Ektron server as an administrator (or as a user with privileges to create a database).
- Download
DxHInstaller.exeto the server to which you will install it. - Run
DxHInstaller.exe. - Accept the license agreement and click Next. The port setup screen appears.
Port 808 is the default value. If you want to use a different port, change it on this screen then follow Step 14.
- The SQL Server DB Setup screen appears. In the Server field, enter the machine hosting the Microsoft SQL database. By default, the field is populated with
(local). If you are using SQLExpress, usemachine_name\SQLExpress.You can use either a domain or SQL Server account when creating the DB. For Ektron, we typically create a dedicated domain or SQL Server account for the database.
- Enter the Username and Password for the server. For Trusted Connections, leave the fields empty.
- Click Next. The database connection is tested. If the test is passed, the Ready to Install the Program screen appears.
- Click Install. The Setup Status screen appears, followed by several screens indicating components being installed.
-
The finish screen appears, displaying the URL for connecting to DxH from Ektron. Save this information for later use.
NOTE: You can access this information at any time via the Windows Start button > All Programs > Ektron > Dxh > Dxh Connection URL.


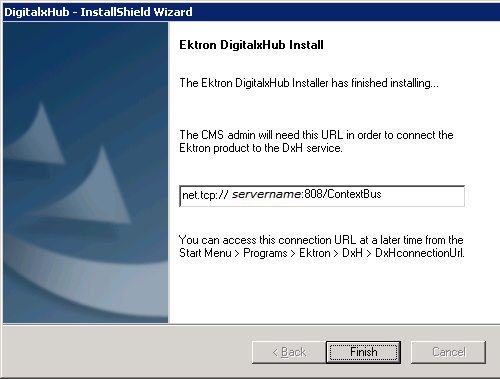
- Click Finish.
- Open your
siteroot/web.configfile and find this tag:<endpoint address="net.tcp://localhost:808/EktronConnector/tcp/EktronFormService" binding="netTcpBinding" bindingConfiguration="ContextBusNetTcpBinding" contract="IEktronFormService" name="NetTcpBinding_IEktronFormService" /> - Change
localhostto the site domain where DxH is installed. For example, if DxH is installed to the domainmyDxhService, the endpoint address would benet.tcp://myDxhService:808/ContextBus/EktronConnector/tcpEktronFormService. - If you changed the port in Step 5, edit the port number in the following line of
web.config.<endpoint address=”net.tcp://localhost:808/EktronConnector/tcpEktronFormService” binding=”netTcpBindding” contract=”IEktronFormService” name=”NetTcpBinding_IEktronFormService” />
Upgrading DxH to Version 1.1
Prerequisite
You downloaded DxH version 1.1. If you have not done that, contact your Ektron account manager.
To upgrade from version 1.0 to 1.1 of DxH:
-
Identify the port and database used by DxH. To find this information:
- Navigate to the folder
C:\Program Files (x86)\Ektron\DigitalxHub\ContextBusServiceHost. - Open the
CBSvcHost.exe.configfile. - Find the
<endpointtag.<endpoint name="ContextBus_IEventManager" address="net.tcp://SQA003:1234/ContextBus" binding="netTcpBinding" bindingConfiguration="ContextBusNetTcpBinding" contract="Ektron.DxH.Events.IEventManager">
- To find the port within the
endpointtag, locate theaddressfield, following the server name. Write down the port number (red in the above example). - Within
CBSvcHost.exe.config, find the<connectionStringstag.<add name="CBDatabase" providerName="System.Data.SqlClient" connectionString="server=(local);database=EktronDxH;Integrated Security=true;user=;pwd=;" /> - To find the database within the
addtag, locate thedatabasefield's first value (red in the above example).
- Navigate to the folder
- Using SQL Server, back up the database you identified in Step 1f.
- Uninstall DxH 1.0. If you are prompted to reboot, do so.
- Install DxH 1.1. See Installing DxH.
- When asked for port, use the port number you found in Step 1d.
- Open
C:\Program Files (x86)\Ektron\DigitalxHub\ContextBusServiceHost\CBSvcHost.exe.config. - Edit the
CBDatabaseentry to point to the database name you found in Step 1f.
Setting up a DxH Connection to Ektron
After installing DxH, set up a connection between DxH and Ektron.
NOTE: If you are setting up a SharePoint connection, and your SharePoint version contains multiple sites, create a connection for each SharePoint site with which you want to connect.
- Go to Workarea > Settings > Digital Experience Hub > Connect to DxH. The Connection to the Digital Experience Hub screen appears.
- Insert the URL that you obtained in Step 10 of Installing DxH and click Test Connection.
NOTE: You can access this information from Windows Start menu > All Programs > Ektron > DxH > DxH Connection URL.
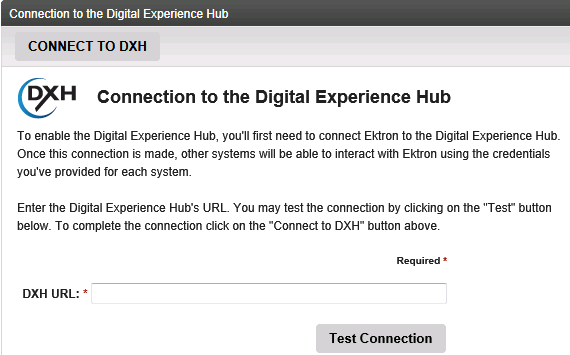
- Click Connect to DxH. If everything is working properly, you see a message that the connection was successful.
- You are prompted to set up an inbound connectionA special DxH connection type that updates Ektron content in response to content changes made in an external application.. See Configuring an Inbound Connection.
Editing a DxH Connection
IMPORTANT: Editing a DxH connection may change the relationship between Ektron and DxH, which may interrupt data transfer between external applications and Ektron.
- Go to Workarea > Settings > Digital Experience Hub > Connections. The View All Digital Experience Hub Connections screen appears.
- Hover over a DxH connection and choose Edit. The Edit Connection to the Digital Experience Hub dialog appears.
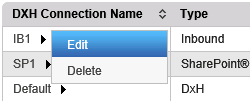
- Edit the information as required.
- Click Test Connection. If the test fails, an error message appears. Verify that you have the correct URL and that it was entered correctly.
- Click Update Connection.
Deleting a DxH Connection
IMPORTANT: Deleting a connection stops data transfer between Ektron and an external application.
- Go to Workarea > Settings > Digital Experience Hub > Connections. The View All Digital Experience Hub Connections screen appears.
- Hover over a DxH connection and choose Delete. The Delete Connection to the Digital Experience Hub dialog appears.

- Click Confirm.
Configuring an Inbound Connection
After installing and connecting DxH to Ektron, you can establish an inbound connectionA special DxH connection type that updates Ektron content in response to content changes made in an external application., which lets you transfer information between Ektron and DxH. From DxH, the information can be sent to external applications. See Also: Setting Up the Digital Experience Hub
- Go to Workarea > Settings > Digital Experience Hub > Connections. The View All Digital Experience Hub Connections screen appears.
- Click Add Connection > Add Inbound Connection. The Add Inbound Connection dialog appears.
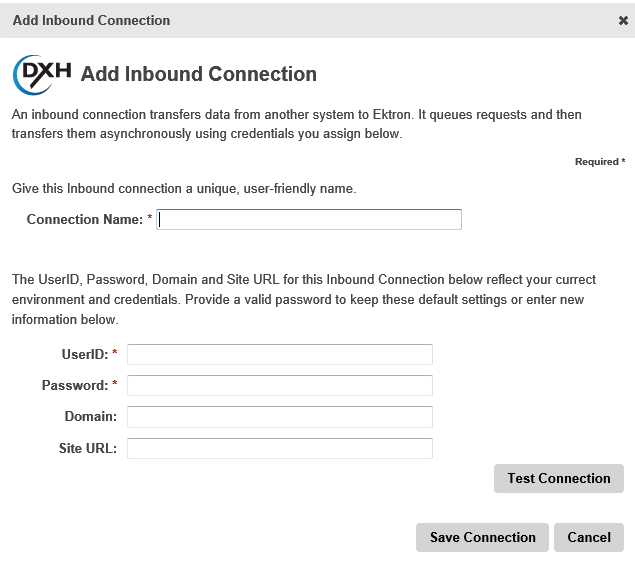
- In the Connection Name field, enter a unique, user-friendly name.
- Optionally change the UserID field (which defaults to the logged-in user) to the Ektron administrator who will act as the connection manager.
IMPORTANT: Enter an Ektron Administrators group member. Many DxH features use the Inbound Connector user, not the logged-in user, to perform DxH functions. Administrative privileges are required to complete many DxH tasks.
- Enter the password for the user.
- If Active Directory is being used for authentication, enter your Active Directory server Domain.
- If you are using a multi-site setup, select another instance in the Site URL field (which defaults to the current Ektron instance).
- Click Test Connection. If the test fails, check your credentials and Site URL and try again.
- When the connection test is successful, click Save Connection.
- Click OK. The View All Digital Experience Hub connections screen appears.
Configuring a Connection to an External Application
Adding an External Application Connection
Prerequisites
- You are a member of the Ektron Administrators group or assigned a DxH Administrator role.
- The following components are installed and configured: DxH, DxH connection, and inbound connectionA special DxH connection type that updates Ektron content in response to content changes made in an external application.. See Installing DxH.
- You have access information for external applications that will connect with Ektron via DxH. Obtain this information from the external application administrator before adding a connection.
IMPORTANT: After you create a connection, you cannot change its name. This restriction prevents you from accidentally overwriting a connection. To rename a connection, delete it then add it again with a new name, as described in Deleting Connections to External Applications.
To add an external application connection:
- Go to Workarea > Settings > Digital Experience Hub > Connections. The View All Digital Experience Hub Connections screen appears.
- Hover over Add Connection and select a connection. The Add Connection dialog appears.
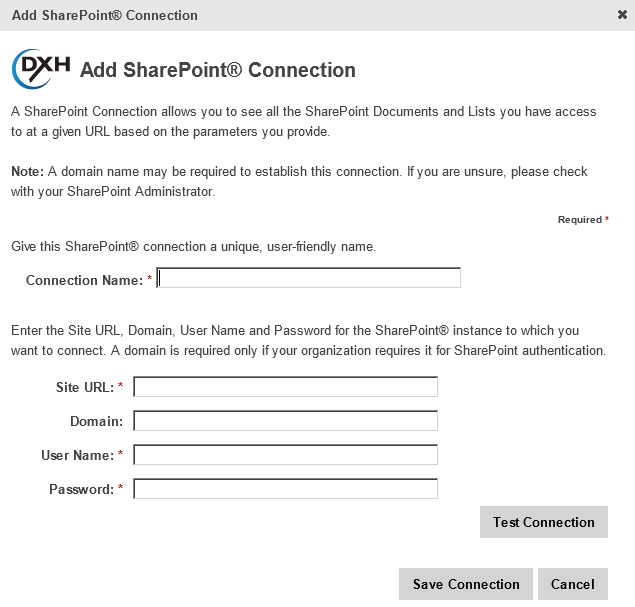
- Enter a unique, user-friendly name in the Connection Name field.
- Enter required information.
- Click Test Connection.
- If the test is successful, proceed to the next step.
- If the test fails, an error message appears. Verify that you entered the correct connection information.
- If the test is successful, proceed to the next step.
- Click Save Connection.
Editing a Connection to an External Application
IMPORTANT: If you rename a SharePoint Connection, the associated Workarea folder is also renamed.
- Go to Workarea > Settings > Digital Experience Hub > Connections. The View All Digital Experience Hub Connections screen appears.
- Hover over the connection and choose Edit from the pop-up menu. The Edit Connection dialog appears.

- Edit the path or authentication information as required. You cannot edit the connection name.
- Click Test Connection. If the test fails, an error message appears. Verify that you have the correct path and authentication information
- Click Save Connection. The View All Digital Experience Hub connections screen appears.
Deleting Connections to External Applications
IMPORTANT: Deleting a connection removes the relationship between the instance of the external application and DxH.This action stops all data transfer.
- Go to Workarea > Settings > Digital Experience Hub > Connections. The View All Digital Experience Hub Connections screen appears.
- Hover over the connection and choose Delete from the menu. A confirmation dialog appears.
- Click Delete.
Setting up the SharePoint Receiver
The SharePoint Receiver automatically transfers updated SharePoint content to Ektron. Any edit to a SharePoint document/file or its properties triggers an update.
After you import SharePoint content to Ektron (as described in Importing SharePoint Files, Lists, and Libraries to Ektron), the receiver monitors that content, and transfers updated files from SharePoint to Ektron with no intervention. The imported file overwrites the current version, if one exists.
This section explains how to set up the SharePoint Receiver.
NOTE: Do not confuse the SharePoint Receiver (described above) with a SharePoint connection. A connection specifies an endpoint (URL or API path) and authentication credentials that allows communication between 2 software instances.
Prerequisites
- The SharePoint Receiver installation file. Contact your Ektron account manager to obtain a link to download this file.
- Permission to install and edit files on the SharePoint server.
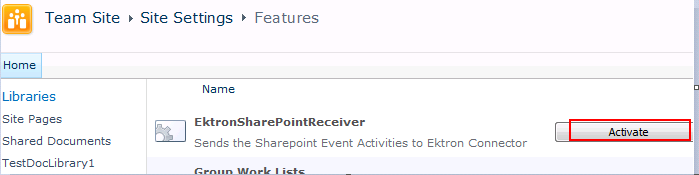
Setting Up the SharePoint 2010 Receiver
- Run the SharePoint Receivera software module that automatically transfers updated SharePoint content to Ektron. installation file on a SharePoint server.
- Go to the SharePoint Central Administration screen > System Settings > Manage Farm Solutions. Make sure the status of
ektronsharepointreceiver.wspis Deployed. - Log into your SharePoint Web application.
- Access the Site Settings screen > Manage Site Features.
- Click Activate to activate the EktronSharePointReceiver.
- Place the following bindings into each SharePoint Web application's top-level
web.configfile (which resides within the content root folder). Insert bindings within the<system.servicemodel>section.
<bindings> <netTcpBinding> <binding name="SharePointConnectorNetTcpBinding" portSharingEnabled="true" closeTimeout="00:02:00" openTimeout="00:02:00" receiveTimeout="00:10:00" sendTimeout="00:02:00" maxBufferSize="2147483647" maxConnections="10" maxReceivedMessageSize="2147483647"> <readerQuotas maxStringContentLength="2147483647" maxArrayLength="2147483647" maxBytesPerRead="2147483647" maxNameTableCharCount="2147483647"/> <security mode="None"> </security> </binding> </netTcpBinding> </bindings> <client> <endpoint name="SharePointAdapter_ISharePointEventReceiver" address="net.tcp://localhost:9002/SharePointConnector/tcp/SharePointEventReceiver" binding="netTcpBinding" bindingConfiguration="SharePointConnectorNetTcpBinding" contract="Ektron.DxH.SharePointConnector.Common.ISharePointEventReceiver"> </endpoint> </client> - In the <
endpoint>addressproperty, update the text followingnet.tcp://(in red above) to indicate the path and port to which DxH is installed.
Deactivating the SharePoint Receiver
To suspend automatic updating of SharePoint content in Ektron:
- Log into your SharePoint Web application.
- Access the Site Settings screen > Manage Site Features.
- Deactivate the Ektron SharePoint Receivera software module that automatically transfers updated SharePoint content to Ektron..
Monitoring DxH Transactions
Use the DxH Error Log to monitor transactions related to DxH connections and troubleshoot problems. For example, connection failures involving multiple connector types may correspond to network outages, or a specific connector failure may correspond to an event such as an application upgrade in progress.
- Go to Workarea > Settings > Digital Experience Hub > Connections. The View All Digital Experience Hub Connections screen appears.
- Click View Error Log. The DxH log includes the following information:
- Severity—The category of log entry:
- Log ID—The system-assigned identifier for the event. Use this ID when communicating with others about issues to help them locate the specific event.
- Date/Time—The date and time that the event occurred, displayed in the time zone of the server hosting DxH, and formatted based on the user's language settings. The Coordinated Universal Time (UTC) variance is shown in the bottom right corner to facilitate sharing log information between time zones.
- Source—The component in which the event was detected.
- Event ID—An identifier indicating the type of event detected.
- Message—Text describing the error. Message is truncated at 180 characters. To display the remainder, click
more...
- Severity—The category of log entry:
You can sort and filter the DxH log as required.
Setting Up the Import of SharePoint Files to Ektron
NOTE: For background about how DxH can import SharePoint content, see Setting Up the Digital Experience Hub.
This section explains how to set up the import of SharePoint files to Ektron. Before beginning the import process, you should
- Install DxH, set up an inbound connectionA special DxH connection type that updates Ektron content in response to content changes made in an external application. then a SharePoint connection—see Installing and Configuring DxH
- Install the SharePoint Receivera software module that automatically transfers updated SharePoint content to Ektron., which handles the automatic update of content imported from SharePoint to Ektron—see Setting up the SharePoint Receiver
After completing these tasks, you select SharePoint content to import. This involves selecting SharePoint lists, libraries or individual files. Once the import is set up, the SharePoint Receivera software module that automatically transfers updated SharePoint content to Ektron. automatically transfers the following changes to the Ektron import folder.
- Within selected SharePoint lists or libraries, content is added or updated
- Selected content is updated
Importing SharePoint Files, Lists, and Libraries to Ektron
This section explains the importing of SharePoint files to Ektron. This process, which maps SharePoint lists, libraries, or individual files to an Ektron folder, accomplishes 2 tasks:
- Immediately starts to import selected SharePoint files, lists, and libraries.
- If the SharePoint Receivera software module that automatically transfers updated SharePoint content to Ektron. is activated, all updates to SharePoint files trigger an automatic update to the version stored in Ektron. Also, new files added to SharePoint lists and libraries are automatically copied to the mapped Ektron folder.
- DxH is installed See Also: Installing and Configuring DxH
- An inbound connectionA special DxH connection type that updates Ektron content in response to content changes made in an external application. is established See Also: Setting up a DxH Connection to Ektron
- A SharePoint connection is established See Also: Configuring a Connection to an External Application
- SharePoint Receivera software module that automatically transfers updated SharePoint content to Ektron. is installed See Also: Setting up the SharePoint Receiver
- Library files are imported as Ektronassetan external file, such as a Microsoft Word document or image, stored in Ektron. It can be managed like native Ektron content.s.
NOTE: Only files types listed in the Asset Management Configuration screen's File Types field may be imported. See Also: Configuring Document Management
- Libraries and folders are not imported, but items within them are imported. Any folder hierarchy is lost upon import.
- Custom List items, including these data types
- Single line of text (String)
- Multiple lines of text (String, HTML)
- Choice from menu (Select)
- Number, such as 11.0, 100 (Number)
- Currency, such as $, ¥, € (Formatted number)
- Date and time (DateTime)
- Yes/No check box (Boolean)
- Hyperlink or picture (Hyperlink, Image)
- Calculation, based on other columns (String)
- SharePoint List items are imported as an Ektron Smart Form of the type
CustomList.- Each field in a SharePoint list item is created as a Smart Form field. Field types are matched appropriately.
- Attachments to list items are not imported.
- The import procedure adds fields to an Ektron Smart Form to manage ongoing updates, such as: created and modified date/time, version, and if any files are attached.
To set up the SharePoint-to-Ektron mapping:
- On the Ektron Workarea's Content tab, navigate to the destination folder.
- Choose New > DxH Content > Add SharePoint Content.
-
Select a SharePoint connection from the drop-down menu and click Next.
- Select SharePoint content to import. You can select:
- One or more document libraries and custom lists—click the top radio button. —More information—
You can choose any number of libraries and custom lists. After you choose libraries and custom lists, they appear in the lower section of the screen. As indicated, you can remove items from the list before importing.
IMPORTANT: If you select a document library or custom list, all child folders, their documents or list items are automatically selected. And, any files added to that folder in the future will be automatically imported into Ektron by the SharePoint Receivera software module that automatically transfers updated SharePoint content to Ektron..
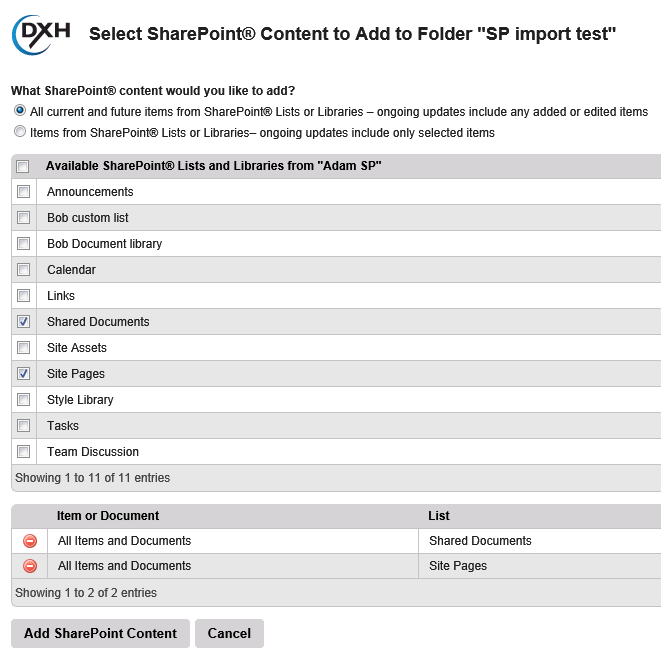
- Items from lists and libraries—click the lower radio button. When you click a list or library, its items appear in the top right grid. As you check items to import, they appear in the lower grid.

- One or more document libraries and custom lists—click the top radio button.
SharePoint-to-Ektron Import Notes
- If you import SharePoint content to an Ektron folder then later to the same folder, the second document is imported with different ID, and its title is appended with a unique number.
- Ektron authors can edit content imported from SharePoint. But if the content is updated in SharePoint and the SharePoint Receivera software module that automatically transfers updated SharePoint content to Ektron. is active, the version in the Ektron folder is automatically updated, overwriting the file (and any edits the Ektron author made).
- SharePoint content can depend on other SharePoint files. These are handled as follows:
SharePoint content items that include other content (for example, a SharePoint document that includes a SharePoint image) are stored in Ektron as separate items. Changes to SharePoint content are automatically updated in Ektron.
Also, you can manually update any imported file at any time. See Also: Updating SharePoint Content Manually
NOTE: Files attached to a custom list are not imported.
- If SharePoint content includes a link to other content, such as a hyperlink to another document, only the selected content is copied to Ektron.
For example, SharePoint Document A includes a hyperlink to SharePoint Document B. When Document A is copied to Ektron, Document B is not. If Document B is not copied to Ektron, the link in Document A does not resolve correctly.
- You can search content imported from SharePoint if it is tagged as searchable. See Also: Ensuring Your Content is Searchable
- You can delete Ektron content imported from SharePoint as you delete other Ektron content. See Also: Deleting Content. However, if SharePoint content is deleted, the corresponding Ektron content is not affected.
- When importing SharePoint content, you cannot choose a language—the default language is assigned to the content. See Also: Setting the Default Language, Changing the Language of Imported Content
- Imported content's last editor is the user set to log into the Inbound ConnectionA special DxH connection type that updates Ektron content in response to content changes made in an external application.. It is not the user who completed the Add SharePoint Content screen.
- Do not copy imported SharePoint content from its import folder to another Ektron folder.
- If a SharePoint library document does not have a title, its file name is used for a title in Ektron. If a SharePoint custom list does not have a title, it is imported with
(no title)as the title. If several items are imported to the same folder with no title, an integer is appended. For example:(no title)(1). - Checked-out Ektron content may be updated automatically (by the SharePoint Receivera software module that automatically transfers updated SharePoint content to Ektron.) or manually.
- If you import a SharePoint custom list into Ektron, and then a SharePoint user adds a column to that list, you cannot update it in Ektron, neither automatically nor manually. You must either import it to a different Ektron folder, or delete it in Ektron and then re-import it from SharePoint.
- If the Ektron folder receiving SharePoint content requires metadata or a taxonomy category, the content is imported without prompting the Ektron user to assign that information. That content's status is set to Checked In (I). If you try to publish the content, you must first supply required metadata or category values. See Also: Requiring Users to Enter Metadata; Requiring the Assignment of at Least One Category
- To improve the performance of the SharePoint import, Ektron sets a caching value of 900 seconds in the following siteroot/web.config file key:
<add key="ek_dxh_sharepoint_cache" value="900" />. You may disable caching by changing this value to zero (0). If you do, the import screen's performance may be a bit slower.
Changing the Language of Imported Content
NOTE: You can translate content imported from SharePoint, but the translated content resides only in Ektron and is not associated with SharePoint. See Also: Creating Multi-language Content
Prerequisite
You need the ID of the language in which SharePoint® content will be imported. To obtain the language ID, go to Workarea > Settings > Localization > Languages and Regions, and look in the ID column.
By default, SharePoint content is imported in US English (ID 1033). To import it in another language:
- Open
C\Program Files (x86)\Ektron\DigitalxHub\ContextBusServiceHostCBSvcHost.exe.config. - Find the
<appSettings>section. - Add the following line
<add key=”ek_DefaultContentLanguage” value=”xxxx” />
where xxxx is the desired language ID. For example, the ID for Español [Spanish] is 1034.
- Restart the Ektron ContextBus Service Host service.
Updating SharePoint Content Manually
This section explains how to manually transfer SharePoint files to Ektron. Typically, the SharePoint Receivera software module that automatically transfers updated SharePoint content to Ektron. handles this task for you. You only need the manual import if the SharePoint receiver is not installed or is inactive. See Also: Setting up the SharePoint Receiver
Prerequisite
You have 1 of the following Ektron designations:
- Administrators group member
- DxH Connection User RoleA limited or specific administrator privilege that you can assign to users who do not require full administrator privileges.
- Folder-Admin role
- Edit permissionPermissions determine which actions users and user group members can perform on content, library items, and content folders. You can set permissions for a folder and content.s for the folder containing SharePoint content
Use the manual update feature to transfer a file to Ektron immediately. You also can manually transfer an updated image file that is embedded within SharePoint content. Without a manual update, that image only transfers to Ektron when the related SharePoint content is updated.
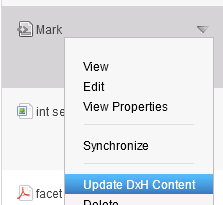
- In SharePoint, edit either the SharePoint document/file or its properties.
- Navigate to the folder that contains the content you want to update.
- Click the arrow to the right of the content title.
- Click Update DxH Content.
NOTE: When a user imports a SharePoint content item to an Ektron folder that already contains the item, that action also updates the Ektron content.
Configuring DxH for Mapping Form Data
This section explains how to map an Ektron HTML form to an external application. For example, you create a form that prompts a site visitor for contact information (name, mailing address, physical address, and phone number) to create a sales lead. After completing the mapping, you publish the form on your Ektron website. As site visitors complete the form, its information is sent to the external application. For background on using DxH to transfer Ektron form data to an external application, see Example: Adding a case to Salesforce and Example: Targeting content based on a lead.
This section also explains how to use information collected through Ektron forms and stored in an external application in a Targeted Content widget. See Also: Using Widgets
Creating a Mapped Form
Prerequisites
- DxH and inbound connectionA special DxH connection type that updates Ektron content in response to content changes made in an external application.s are established See Also: Setting Up the Digital Experience Hub
- A connection to an external application is established (Salesforce, HubSpot, Marketo, or Microsoft Dynamics) See Also: Configuring a Connection to an External Application
- Either you have permission to publish the form, or it was already published
- Obtain the following from the external application's administrator:
- Form/record name
NOTE: Only these forms are supported:
* Marketo Lead Management—Lead
* Salesforce—Lead, Contact, Account
* Microsoft Dynamics CRM—Lead, Contact, Account
* HubSpot—Contacts - Form fields that you will map to an Ektron form.
- Data type for each form field. Only these types are available in Ektron, so the external application field's data types must match one of them.
 Checkbox—User’s response is checked or unchecked (boolean)
 Choices—Several choices available. User selects any number of choices
 Calendar—A date
 Text—Free text
IMPORTANT: Coordination is critical when mapping form fields to external applications. Before creating a form, contact your business partner for the application and determine which fields are required to complete the desired action.
- Form/record name
- Create a new HTML form. See Also: Creating a Form
NOTE: You may only create a form in the Ektron default language.See Also: Working with Multi-Language Content
- On the second screen of the Create Form wizard, check DxH Mapping.
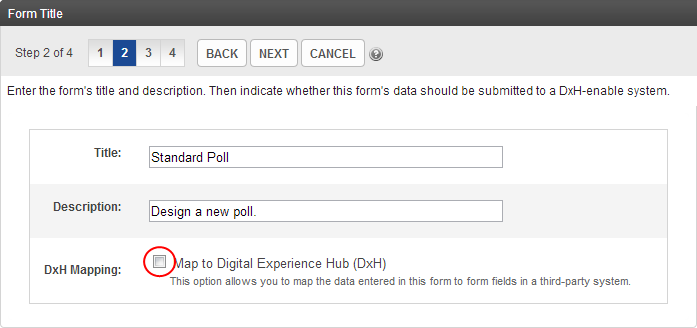
- Complete the steps for creating the form. When inserting form fields, refer to information collected in Step 1.
- Publish the form.
- Edit the form and, from its toolbar, click Map to DxH. The Map Form to DxH screen appears.
- Enter a name for this mapping. It must be unique and easy to recognize.
- Select the connection to the external application. You created this in Configuring a Connection to an External Application.
- From the Object Type drop-down, select the external form with which to map this Ektron form. The following forms are supported:
- Marketo Lead Management—Lead
- Salesforce—Lead, Contact, Account
- Microsoft Dynamics CRM—Lead, Contact, Account
- HubSpot—Contact
NOTE: You obtained the form name in Step 1.
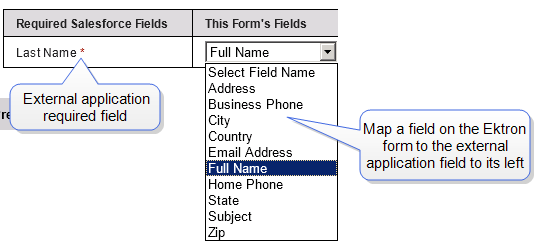
- Click Next. The Map Required Form Fields screen appears. All required external fields appear in the left column. Use the drop-down in the right column to map one Ektron form field to each required field.
IMPORTANT: The external application field's data type must match the Ektron form field .
- When the Map Optional Form Fields screen appears, follow instructions in Step 10 to map Ektron form fields to optional external fields.
- Click Publish. The Form Mapping Completed screen appears.
- Click Test Form Mapping. A new form appears, showing fields that you mapped.
- Enter sample data into each field and click Test Mapping. You are notified if the sample data is valid.
- Click OK.
IMPORTANT: The Form Mapping Complete dialog indicates that mapping between form fields and the external application object has been established, but does not indicate that the mapping is valid. You should perform end-to-end system testing to ensure that form fields pass successfully between systems.
When a site visitor submits a mapped form, the external application creates a record (Lead, Account, or Contact). You may edit the record in the external application.
Mapping an Existing Form to an External Application
- Go to Workarea > Content > the folder that contains the form.
- Click the form. The View Form screen appears.
- Click Map to DxH. The Map Form to the Digital Experience Hub dialog appears.
- Enter a name for this mapping. It must be unique and easy to recognize.
- Select the connection to the external application. You created this in Configuring a Connection to an External Application.
- From the Object Type drop-down, select the external form with which to map this Ektron form. The following forms are supported:
- Marketo Lead Management—Lead
- Salesforce—Lead, Contact, Account
- Microsoft Dynamics CRM—Lead, Contact, Account
- HubSpot—Contact
NOTE: You obtained the form name in Step 1.
- Click Next. The Map Required Form Fields screen appears. All required external fields appear in the left column. Use the drop-down in the right column to map one Ektron form field to each required field.
IMPORTANT: The external application field's data type must match the Ektron form field .
- When the Map Optional Form Fields screen appears, follow instructions in Step 7 to map Ektron form fields to optional external fields.
- Click Publish. The Form Mapping Completed screen appears.
- Click Test Form Mapping. A new form appears, showing fields that you mapped.
- Enter sample data into each field and click Test Mapping. You are notified if the sample data is valid.
- Click OK.
Editing a Form Mapping to an External Application
After a form is mapped to an external application, you can edit the map properties.
- Go to Workarea > Content > the folder that contains the form.
- Click the form. The View Form screen appears.
- Click Edit DxH Mapping. The Map Form to the Digital Experience Hub dialog appears.
- Edit the form properties as required.
- Click Publish. The Form Mapping Completed dialog box appears.
- Click Close.
Using the Targeted Content Widget with External Application Data
You can use data collected through Ektron forms and stored in an external application in a Targeted Content widget. When a user submits a mapped form, the external application connector writes a user ID for that login back to Ektron. This enables the delivery of targeted content based on the user's identity.
You can use the Targeted Content widget to personalize a Web page by displaying content based on information from a user-completed form. For example, if the Salesforce lead's industry is healthcare, the page may display content of interest to healthcare professionals. See Also: Using Widgets
To use DxH with a Targeted Content widget:
- Determine Targeted Content widget criteria from the external application forms and fields in the
siteroot/dxhTargetingRules.configfile. The following sample shows a portion of this file (which arein the file by default).
—Sample of dxhTargetingRules.config file—<dxhRules> <Adapter name="Salesforce"> <AdapterObject name="Lead"> <add name="Company Name" value="Company"/> <add name="Industry" value="Industry"/> <add name="Number of Employees" value="NumberOfEmployees"/> <add name="Revenue" value="AnnualRevenue"/> <add name="Products Owned" value="Products Owned"/> <add name="Product Interest" value="ProductInterest"/> <add name="Score" value="Rating"/> </AdapterObject> </Adapter>
—Tag Descriptions—dxhRules—The file's root tag.Adapter—The adapter for which to display object rules, such as Salesforce or MSDynamics. It is not the connection name (for example,marketingSF).AdapterObject—The system name of the object within the specified adapter. For example, to enter a Salesforce lead, insert the system name Lead (case-sensitive).add—The field. Thenameattribute contains text that the end user sees (as shown in the following image). Thevalueattribute contains the system name of the field.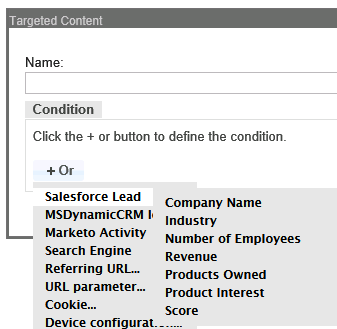
NOTE: The field's datatype is recognized and automatically surfaced into the correct rule type; numeric rule for an integer or decimal, string rule for a string, a multi-select rule for a pick list, and so on.
- Access either a Targeted Content widget or a Targeted Content configuration. See Also: Using Widgets; Using Targeted Content Configurations
- Click the Or+ button to add a criterion for the widget.
- Select an adapter and field. For example, Salesforce Lead > Industry.
- Enter additional fields as you would in any Targeted Content widget or configuration.
- Save the widget and test it.
Troubleshooting Broken Connections
After creating connections to external applications and mapping forms to those applications, you should test the mappings before exposing the forms on a production site. The following errors can occur:
- System errors—DxH or the external application connection is not available.
- Business rule errors—DxH or the external application connection is available, but the contents of the form violate the external application's business rules
- Validation errors—DxH or the external application connection is available, but the contents of the form violate the external application's form field validation rules
Network or server issues may cause a DxH connection to become unavailable. If this happens, a message displays on the View All Digital Experience Hub Connections screen, and the connections are shown as disabled.
Access to SharePoint content is dependent on the following connections:
- An active DxH connection—If the DxH connection is unavailable, no content is imported into the CMS and no form data is submitted to external applications.
- An active inbound connection—If the inbound connectionA special DxH connection type that updates Ektron content in response to content changes made in an external application. is unavailable, DxH cannot communicate with the Ektron.
- An application-specific connection—If a specific external application connection is inactive, no content is imported into Ektron or no form data is submitted to that external application, but other application connections continue to work normally.
To address the problem, choose from these options:
- Click Retry to attempt to re-establish the connection using the same URL as when the connection was first established.
- Select Add Connection > Connect to DxH or click on the link in the error message to display the Connect to the Digital Experience Hub page. This lets you change the DxH URL if required.
- Contact your IT Administrator.
An external application or SharePoint connection can become unavailable due to network issues, user account changes, or issues with the server hosting the application.
Use the DxH log to display recent information, warning, and error messages about DxH, inbound, and external application connections, as described in Monitoring DxH Transactions.
Using DxH with HubSpot
DxH's HubSpot connectors help marketers customize and personalize the site visitor experience. These visitors benefit from a consistent message, as marketers can access customer data available from HubSpot, resulting in more meaningful conversations and enhanced customer experience.
When a prospect submits a form on an Ektron-powered website, a HubSpot lead is automatically created, and campaign information is updated. This process can trigger a HubSpot business rule, which sends an email response to the customer, and routes the lead to the appropriate sales representative.
This section explains how to implement the Ektron DxH to HubSpot connection.
- Contact your HubSpot partner to obtain
- authentication information (a hapikey)
- fields to be collected on the HubSpot form (typically, only an email address)
- After installing DxH, create an inbound and a HubSpot connection. See Configuring an Inbound Connection, Configuring a Connection to an External Application
- Create an Ektron HTML form to capture customer information. On the second screen of the Create Form wizard, be sure to check DxH Mapping. Map the form fields to HubSpot fields. See Creating a Mapped Form.
- Publish the form to your Ektron website.
- A visitor to your website submits the form.
- The form goes to DxH, which uses HubSpot Connector to route the data to HubSpot.
- HubSpot creates a contact and, if applicable business logic is in place, associates the form information with the visitor.
- Use HubSpot contact information in the Targeted Content widget to create a personalized experience when the site visitor return to your site. See Using the Targeted Content Widget with External Application Data, Managing Web Experience With DxH and HubSpot.
The Targeted Content widget can determine page content based on information transferred to HubSpot via DxH, such as:
- lifecycle stage, for example, sales qualified lead
- title, for example, Chief Marketing Officer
Use HubSpot's website to learn how to maximize the information collected above. See Also: HubSpot Academy
You can also use Ektron's HubSpot/Aloha plugin to bring HubSpot keywords into the editor experience. The plugin enables content authors to see how well they are targeting keywords as they create content. See Also: Using Hubspot with the editor