Most of your time in Ektron is spent creating, editing, and performing other activities with contenttypes of content include HTML, XML Smart Forms, forms, polls, surveys, DMS documents, Office documents, multimedia, blogs, Web calandars, discussion boards, assets, and content imported from Sharepoint.. Content encompasses all of the articles, news, forms, blogs, discussion forums and even calendars that appear on your website. Authors can conveniently update content directly from the website (after logging in). To access the full functionality, however, users complete tasks within the Workarea.
You can manage Ektron content using 1 or more tools.
- Web Page Editing—You can interact directly on the Web page anywhere you see a silver access point (
 ), which lets you edit the content on the page.
 - Workarea—depending on permissions, lets you access all content, assets, reports, and settings.
- Smart Desktop—Lets you organize information that is relevant to you in the Workarea.
Using the Workarea
The Workarea is a central location where you can perform most tasks for managing your website. The Workarea is similar to Microsoft Outlook in its ability to manage email, calendars, tasks, and so on.
NOTE: To access the Workarea, you must be logged in to your Ektron website.

Workarea Quick Reference
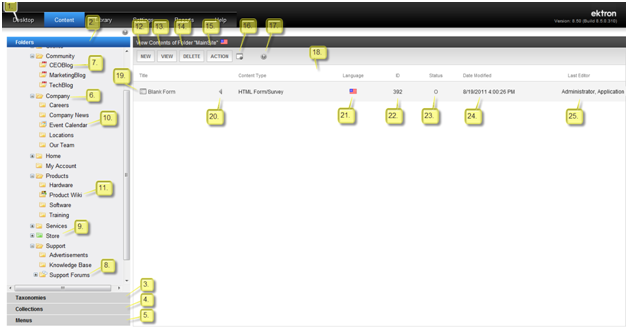
- 1—Workarea Tabs
- Desktop—Smart personalization desktop.
- Content—Folders, contents, DMS, taxonomies, collections and menus.
- Library—Content folder structure which organizes the storage images, files , hyperlinks and quicklinks.
- Settings—Manage CMS Settings based upon permissions.
- Reports—Content reports and Site analytics.
- Help—In Workarea and in context help section.
- Content Tab Types
- 2—Folder Tab—Select to view folder architect structure of CMS.
- 3—Taxonomy Tab—Select to view Taxonomy Structure and options.
- 4—Collections Tab—Select to view Collections and options.
- 5—Menu Tab—Select to view Menus and options.
- Folder Types
- 6—Content Folder—Regular folder for contents, select to view contents in that folder.
- 7—Blog Folder—Select to view the posts and comments on this blog.
- 8—Forum Folder—Select to view the discussion forums, categories, topics, and replies.
- 9—eCommerce Folder—Select to view the eCommerce items.
- 10—Calendar Folder—Select to view and plan events on the calendar.
- 11—Community Folder—Folders for membership uses to edit content, select to view contents.
- Dropdown Menus
- 12—New menu—Create new content, forms documents, Folders menus and collections.
- 13—View menu—View Language, Properties and archivethe state of content upon reaching its end date. What happens next is determined by your choice at the content's Schedule tab > Action on End Date options field. Choices are * Archive and remove from site (expire) * Archive and remain on site * Add to CMS Refresh Reportd content and more.
- 14—Delete menu—Used to delete multiple items. Administrators can delete folders.
- 15—Action menu—Export for translation, search, move/copy content, eSync.
- 16—DMS/ Add asset—Pop up the window for drag and drop documents from local machine.
- 17—In Context Help—Click to get in context help anywhere in the Workarea.
- 18—Content Organization Bar—Ability to sort content by the title.
- Content Types
- 19—Content Items—HTML Content, Forms, DMS, or Multimedia Content.
- 20—Quick Edit Menu—For content editing, properties and content eSync.
- 21—Language Flag—Indicate the content language version.
- 22—Content ID—Automatically generated by system.
- 23—Content Status—Shows the current status of a piece of content.
- (A) Approved Published and on the website.
- (O) Checked Out Only available for editing by the content editor who checked it out.
- (I) Checked In Available for editing.
- (S) Submitted Currently in the approval chain. Waiting for acceptance.
- (M) Deletion Marked for deletion.
- (T) Awaiting Tasks Currently awaiting completion of tasks.
- (P) Pending Awaiting scheduled start date.
- (D) Pending Deletion Pending deletion but created with a future start date.
- 24—Date Modified—Last modified date of the content.
- 25—Last Editor—Editor who made the last modification.
Workarea Tabs
The Workarea has 6 tabs in the upper left corner. Use them to access all other pages.

The following list shows the Workarea's main pages.
- Desktop—Personalizing the Smart Desktop
- Content—Managing Content
- Library—Storing Files in the Library
- Settings—contains these folders.


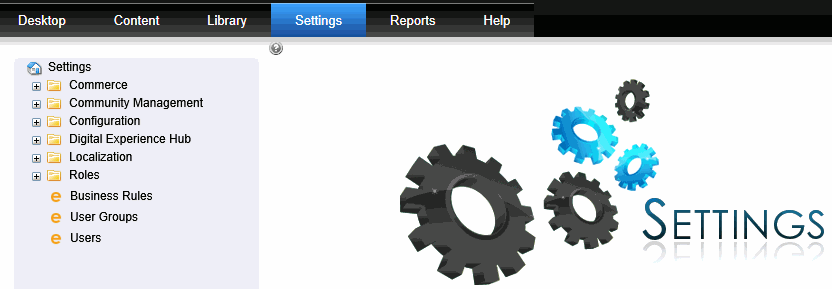
- Commerce—Conducting eCommerce
- Community Management—Managing User Communities
- Configuration—See feature-specific topics
- Digital Experience hub—Setting Up the Digital Experience Hub
- Localization—Importing Translation Files
- Roles—Defining Roles
- Business Rules—Creating Business Rules for Your Website
- User Groups—Managing User Groups
- Users—Managing Users
- Reports—contains these folders:
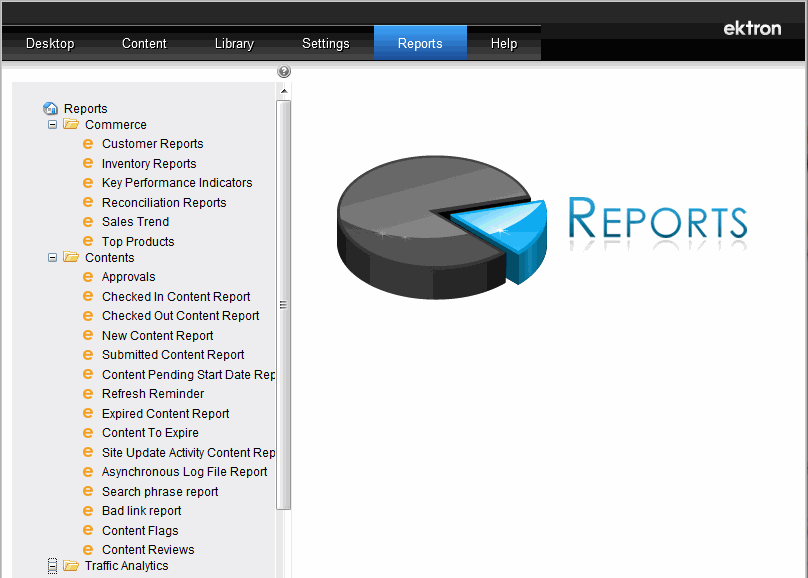
- Commerce—Generating eCommerce Reports, Widgets, and Logs
- Contents—Working with Content Reports
- Traffic Analytics—Web Traffic Analytics
- Business Analytics—Templates
- Tasks—Assigning and Managing Tasks
- Help
Workarea Style Sheets
The Workarea uses 2 primary style sheets:
Ektron.workarea.css—the primary CSS file for the workarea. It replaces the previous Ektron version’s global.css file.Ektron.workarea.ie.css—is used for Internet Explorer browsers, and generally targeted at IE7 or less. It includes overrides for some CSS rules in Ektron.workarea.css that get around IE CSS bugs or deficiencies.
Using widely accepted style sheet classes and class attributes, you can modify the Workarea, including colors, spacing, fonts, and so on. Also, if you later upgrade or re-install Ektron, you can reuse this file and retain your changes.
NOTE: Several language specific Images are used at the top of the Workarea. They reside in the language folders and always start with the word “Workarea” and end with “_top.” These images are 467 pixels wide by 77 pixels high. Their width can change but the height cannot. There are approximately six images in each language folder. an Adobe Photoshop file, Workarea_top.psd, can be found under \Workarea\images\English folder. You can modify these images as needed.
Accessing the Workarea
To access the Workarea, log into your website and click Workarea. The Smart Desktop is the default tab.
NOTE: The Application Setup screen lets you determine the initial screen that appears when you access the Workarea. See Also: Modifying Setup Information
The Smart Desktop contains useful information that pertains to you. You may personalize this page by adding, moving or deleting Workarea widgets. See Also: Personalizing the Smart Desktop
Using the Smart Desktop
Personalizing the Smart Desktop
To personalize your Smart Desktop, you choose and arrange widgetWidgets are mini-applications that you place on a Web page using PageBuilder; a widget provides either specific functionality (calculators, search, social bars, etc.) or areas into which you can add content (content blocks, list summaries, collections, and so on).s that pertain to your work. To access the Smart Desktop, click the Desktop tab in the Workarea.
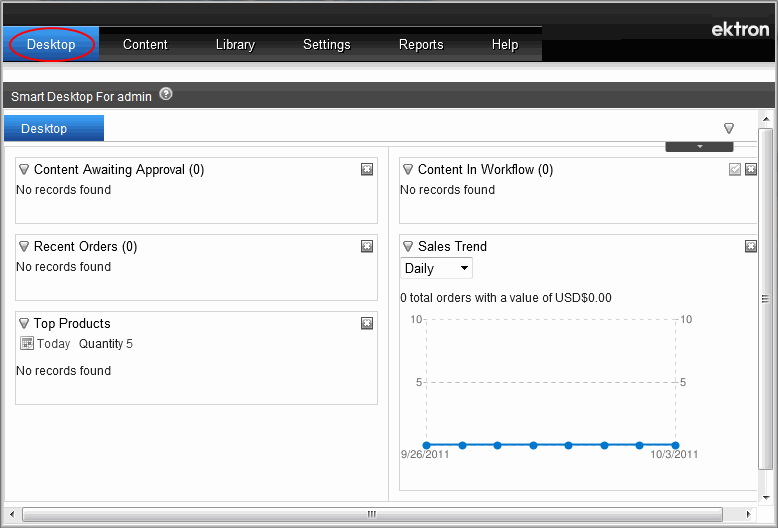
The default Smart Desktop displays several widgets with information about your website. You can create new tabs on a Smart Desktop to add, move, delete, and organize widgets by subject. Each tab consists of 1 or more columns, which you can create to further arrange widgets on a tab. The following screen has 2 columns.
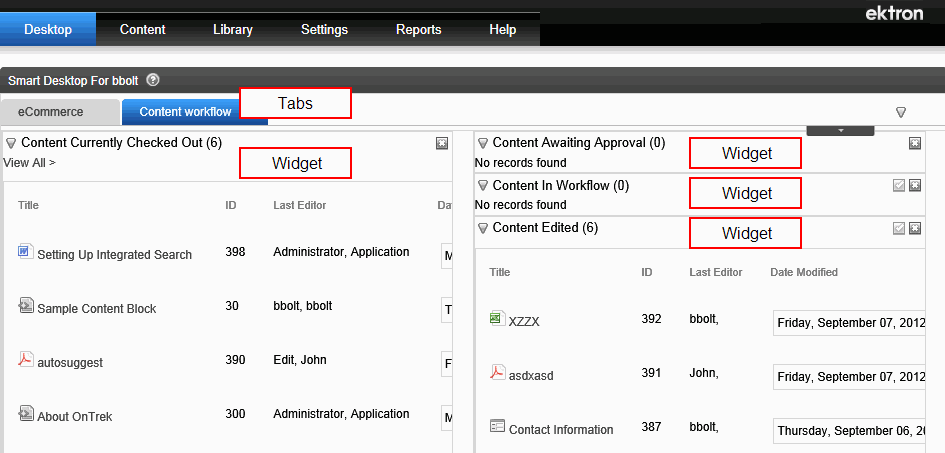
Smart Desktop widgets are stored in a widget tray. Drag and drop widgets from the tray to any tab and column on the Smart Desktop.
Enabling Smart Desktop Widgets
Prerequisite
You are a member of the Administrators group.
You must complete this procedure before administrators can create a default Smart Desktop.
- Workarea > Settings > Configuration > Personalizations > Widget Space.
- Click Edit (
 ) next to UserSmartDesktop.
 - Select widgets that users can place on their Smart Desktop.
- Click Click here to save widget space.
Setting the Default Smart Desktop
The following procedure shows how an administrator creates a default Smart Desktop consisting of a unique arrangement of widgets, tabs, and columns. The default desktop becomes every user's Smart Desktop until modified by the user. A user can reset the Smart Desktop to the default setting by running the Reset Widgets command (see Restoring Tabs and Widgets).
NOTE: If you change the default Smart Desktop, that action does not affect existing users' desktops. Those desktops are set to default settings only if the user runs the Reset Widgets command.
- Go to Workarea > Desktop.
- Choose Options (
 ) > Edit Default Widgets on the right side of the Smart Desktop. A confirmation dialog box appears.
- Click OK.
- Arrange the Smart Desktop with widgets, tabs, and columns that you want to be the default. See Also: Adding a Widget to the Smart Desktop, Adding a Tab to the Smart Desktop, Adding a Column
- Choose Options () > Done.
Adding Smart Desktop Widgets
Smart Desktop widgets are located in the Web server's workarea\widgets folder. You can also make Personalization and PageBuilder widgets available to the Smart Desktop.
IMPORTANT: Some Personalization and PageBuilder widgets may not work properly on the Smart Desktop. Test them before notifying users.
Prerequisite
You have access to the Ektron Web server's file system.
- On the Web server, copy desired widget files from the
siteroot\widgetsfolder to thesiteroot\Workarea\Widgetsfolder. Be sure to copy all widget-related files and folders. The following image shows all Calendar widget folders (with their files inside).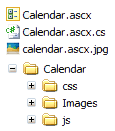
- Click Workarea > Settings> Configuration > Personalizations > Widgets.
- Click Synchronize Widgets....
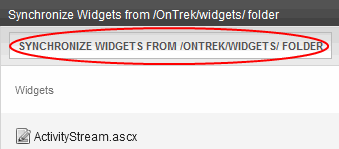
- At the prompt, click OK.
- Go to Workarea > Settings > Personalizations > Widget Space.
- Click Edit () next to UserSmartDesktop.
- Select the new widget (you may have to scroll down to see it).
- Click Click here to save widget space.
- Users many now add the widget to the Smart Desktop. See Adding a Widget to the Smart Desktop.
Customizing the Smart Desktop
An end user can do the following when customizing a Smart Desktop:
Adding a Widget to the Smart Desktop
Prerequisite
Smart Desktop widgets have been enabled. See Also: Enabling Smart Desktop Widgets
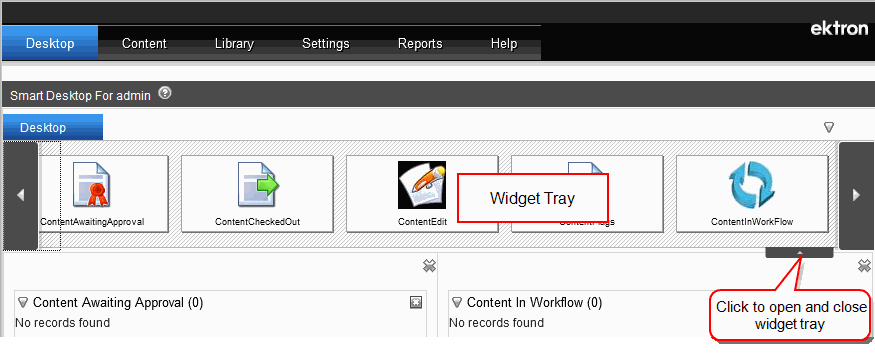
- Go to the Workarea > Desktop.
- Click the Toggle widget tray arrow, located in the upper right corner of the Smart Desktop (circled).
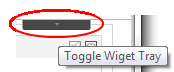
- The widget tray appears, containing widgets you can drag and drop to your Smart Desktop. Use the left arrow (
 ) or right arrow (
 ) buttons to see more widgets.
 - To choose a widget, drag it from the tray and drop it into the Smart Desktop panel.
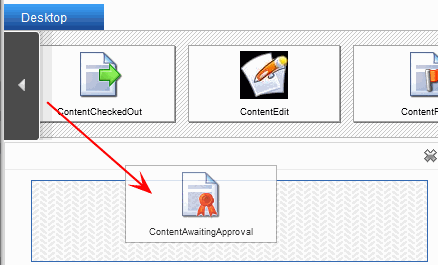
After placing a widget on the Smart Desktop, you may drag it to any desktop location.
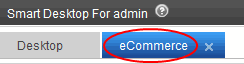
Adding a Tab to the Smart Desktop
Tabs help you organize your Smart Desktop. You may add or remove tabs. For example, you create an eCommerce tab on which to drop orders widgets. To add a tab:
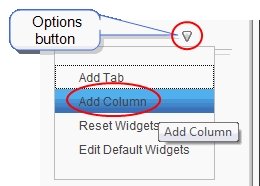
- Choose Options () > Add Tab. The Add Tab dialog window appears.
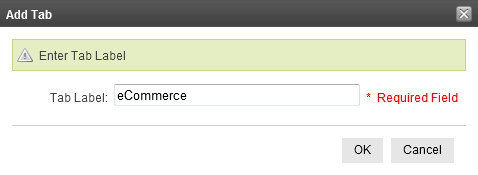
- Enter a Tab Label. For example, eCommerce.
- Click OK. The new tab appears at the top of the Smart Desktop.
 ) (circled) inside the column you wish to delete.
Restoring Tabs and Widgets
A user can restore the Smart Desktop to the default widget and tab set.
WARNING! This action removes all tabs and widgets you have modified on your Smart Desktop. After you restore, the default tabs and widgets appear.
- Click the Options button on the right side of the Smart Desktop.
- Click Reset Widgets.
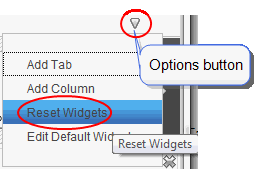
- A dialog appears. Click OK.
Standard Desktop Widgets
The following list describes the standard Smart Desktop widgets. See Also: Adding Smart Desktop Widgets
 Content Awaiting Approval—Content awaiting your approval; Approvals
  Content Checked Out—Content in checked-out status; Checked Out Content Report
 Content Edited—Content edited within the last week; Working with Ektron Content
 Content Flags—The 10 most recently-added content flags; Defining Flags for Content
 Content In Workflow—Content that has been part of an approval chain within the last week;Setting Approval Chains
 Content Reviews—Content reviews awaiting moderation; Moderating Reviews
 Content to Expire—Content that will expire between today and a number of days you specify; Content to Expire
 Forum Topics and Posts—Forum posts that require approval; Approving a Post
 Order on Hold—eCommerce orders on hold; Managing Customer Orders
 Recent Orders—Recent eCommerce orders; Managing Customer Orders
 Customer List—The top 5 eCommerce customers ranked according to account date, sales, and orders;Customer Report
 Key Performance Indicators—Compares eCommerce sales and orders for 2 time periods; Key Performance Indicators Report
 Reconciliation report—Lists payments for a specific time period; Reconciliation Reports
 Sales Trend—The number of eCommerce orders for the past 8 periods; Sales Trends Report
 Top Products—The most popular products on your eCommerce site; Top Products Report
 Analytics Report—The Direct Traffic report for the past 7 days; Viewing Analytics Data
Controlling Available Fonts
As an administrator, you can add, edit, and delete fonts to and from the Ektron application. By adding fonts, you are allowing the content contributors to use them when creating content. Administrators can also edit the name of a font, and delete a font from the system.
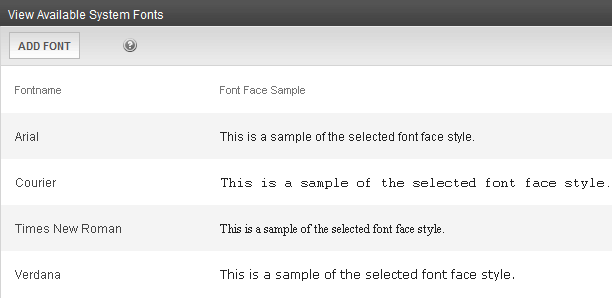
Minimizing the number of available fonts makes the website look more uniform. The following figure shows the Font Manager screen.
NOTE: Only members of the Administrator User Group can view, add, or edit fonts.
Adding Fonts
- From the Workarea, choose Settings > Configuration > Fonts.
- Click Add Font. The Add Font screen appears.

- Enter the font name or family into the text field; (Kristen ITC in this example).
- Click Save.
The new font is available to use when adding or editing content if the Application Setup screen’s Enable Font Buttons field is checked. See Also: Getting Started with Ektron
Editing Fonts
When you edit a font, the font or family name is changed. Editing does not change any fonts in existing content.
- From the Workarea, choose Settings > Configuration > Fonts.
- Click the font you want to edit.The view font screen appears.
- Click Edit. The Edit Font screen appears.
- Edit the font name or family in the text field specified.
- When finished, click Update.
Deleting Fonts
By deleting a font from the system, you are taking away the content contributors’ use of that font in their content.
- From the Workarea, choose Settings > Configuration > Fonts.
- Click the font you want to delete.The view font screen appears.
- Click Delete (
 ). A confirmation message appears.
 - Click OK. The screen is refreshed, and the updated fonts table appears.
NOTE: When you delete a font from Ektron, you do not delete it from your computer.
Additional Topics About Managing Content
The following topics explain about managing content in Ektron.
- Working with Ektron Content
- Working with Assets in the Document Management System
- Storing Files in the Library
- Displaying Content on Your Website
- Working with Collections
- Working with Metadata
- Working with Templates
- Working with HTML Forms
- Working with Smart Forms
- Working with Blogs
- Working with Calendars
- Working with Discussion Boards
- Working with Content Reports
- User-Ranking of Content
- Using the Map Server Control