Custom User Properties
Custom User Properties let you create custom fields that contain information about a user beyond the standard Ektron user properties. Examples of custom properties include employee ID, phone number, start date, position, department, and user's machine IP address. These custom fields appear on the User Properties and Membership User Properties screens on the Custom tab, and on the Membership server control.
NOTE: Only members of the Administrator User Group can work with Custom User Properties.
The View Custom Properties Screen
Use the View Custom Properties screen (Settings > Configuration > Custom Properties) to create custom properties for users and membership users. From the View Custom Properties screen, you can:
- add a new custom property. See Adding a Custom User Property
- edit a custom property. See Editing Custom User Properties
- reorder the way custom properties appear on the users and membership users screen. See Setting the Order of Custom User Properties
- work with custom properties in different languages. See Custom User Properties—Image: View User Custom Properties—

- Add—Add custom user properties. See Adding a Custom User Property.
 Reorder—Change the order in which the custom user properties appear on the Users or Membership User Properties screen. See Setting the Order of Custom User Properties.
 Language Selection drop-down list —lets you view custom user properties by language. See Viewing Custom User Properties By Language.
 Object Type drop-down list—lets you choose users or taxonomies whose custom user properties you want to manage.See Adding a Custom User Property and Assigning Custom Properties to a Taxonomy.
- Title field—Displays the title of a custom user property. When viewing by language, the title changes to the title used in a specific language if it has been defined. Click a Title to edit the property. See Editing Custom User Properties. The title and label are the same field. On some screens, Title is used; on others Label is used.
- ID—A unique property identifier assigned by the system. This field is not editable.
- Type field—Shows the Type that was chosen for a custom user property. See Type Field.
Adding a Custom User Property
- In the Workarea, click Settings > Configuration > Custom Properties.
- From the Object Type pulldown, select User.
- Choose the standard language used in your Ektron Workarea.
- Click Add. The Add User Custom Property screen appears.
 —Field descriptions—
- Label—Title of the property you are adding. For example, Employee ID.
NOTE: The Title and Label are the same field. On some screens the word Title is used, on others the word Label is used.
- Type—The property’s data type. When a type is selected and saved, you cannot change it. You must delete the custom property and re-enter it. See Type Field.
- Input Type—Choose how a user is able to enter a response to the property. See Input Type Field.
- Validation—Ensures the right type of data is entered in a text box or text area. See Validation Field.
- Min Value—If desired, enter the minimum value you want to allow. The Min Value only appears when the following Validation methods are used: Numeric Only, Date Only and U.S. Zip Code. The following is an example of a Date Only Min Value: 01/01/1900.
- Max Value—If desired, enter the maximum value you want to allow. The Max Value only appears when the following Validation methods are used: Numeric Only, Date Only and U.S. Zip Code. The following is an example of a Date Only Max Value: 01/01/1987.
- Message—A message that appears when information entered in a user property violates the validation criteria. For example, if the validation is U.S. Zip Code, you might use the following message: Please enter a valid zip code
- Label—Title of the property you are adding. For example, Employee ID.
- Click Save. The new property appears on the View Custom User Properties screen.
Type Field
|
Types |
Input Types Available |
Validations Available |
|
String—Accepts all alpha, numeric, and symbol characters. See Also: ”Validation” on page 15-23 |
|
All validations |
|
Boolean—Accepts a true or false response |
|
|
|
Numeric—Accepts numbers only |
|
|
|
Date—Only a date can be entered. |
|
|
|
SelectList—Select a response from a list of choices. See Also: SelectList Field |
NA |
NA |
|
Multi SelectList—Select any number of responses from a list of choices. See Also: MultiSelectList Field |
NA |
NA |
|
Category—A system-defined type that appears when the first subscription is created. One entry covers all subscriptions. See Also: Defining Subscriptions. |
NA |
NA |
Input Type Field
|
Input Type |
Description |
An Option When Used With |
|
Text Box |
Creates a standard text box. Below is an example of a text box.
|
|
|
Text Area |
Creates a multi-lined area for entering text. Typically used when more than one line of text needs to be added. Below is an example.
|
|
|
Hidden |
Hides the input field. This can be used by an administrator to add additional values at postback time. This requires a developer to add client-side JavaScript. NOTE: If you change a String field’s Input Type from Text Box or Text Area to Hidden, then sign in as a member of the Administrators group, the field and its value still appear on the user’s profile. |
|
|
Check Box |
Creates a checkbox. Used when the field requires a boolean (true / false) response. Below is an example of a check box.
|
|

 = True
  = False
Validation Field
|
Validation |
Description |
An Option When Used With |
|
No Validation |
The entry is not checked. |
|
|
Cannot be blank |
A response must be entered. |
|
|
Numeric Only |
The response must be a number. |
|
|
Text Only |
The response must be characters (any combination of alpha, numeric, and symbol ). |
|
|
Date Only |
The response must be entered in the following format: |
|
|
Email Only |
The response must be entered as an Email address. For example, |
|
|
Credit Card Only |
The response must be entered as a credit card number. For example, |
|
|
Social Security Only |
The response must consist of 9 digits in this pattern: |
|
|
U.S. State Code |
A 2-letter state code. For example: NH = New Hampshire. |
|
|
U.S. Zip Code |
The response must consist of 5 ( NOTE: If you use the Numeric Type, you cannot have a dash or space when using a 9 digit Zip Code |
|
|
Valid US Phone Number |
The response must consist of a 10 digits in this pattern: |
|
|
Canadian Postal Code |
The response must consist of 6 ( |
|
|
Time HH:MM or HH:MM:SS or HH:MM:SS.mm |
Time is entered in one of the following 3 formats.
|
|
|
IP Address |
The response must be in the form of an IP address. |
|
|
Dollar Amount |
This validation works differently depending on the Type used. If used with the String Type, you can have a dollar sign ($) along with the money amount in the text field. When used with the Numeric Type, you are not allowed to have a dollar sign ($) in the text field. The following are examples of each type with validation:
|
|
|
Canadian Social Insurance Number |
The response must consist of 9 digits in this pattern ( |
|
SelectList Field
Use a SelectList field to present the user completing the User Information or Membership User Properties screen with a list of choices.
When you create a custom user property and specify its type to be Select List, the screen changes, allowing you to add, change, or remove list entries.
Completing a SelectList Field Entry
To add an item to the list, enter its text in the Text field, then click Add . Added items then appear in the larger box on the left. You can then:
- remove any item from the list by clicking it. It appears in the Text field. Click Remove.
- change the text of any list item by clicking it. It appears in the Text field. Make changes then click Change.
- change the sequence of list items by selecting an item then clicking the up or down arrow to move the item
Using the First List Item to Prompt a Response
You can use the first list item to prompt the user to make a selection instead of being a valid response. For example, the first list item may say Select from a list of choices. To do this, check the First item is not a valid selection for example, “[Select]” check box.
If this option is selected, the field has an asterisk (*) next to it (indicating it is required) on the User Information and Membership User Properties screens. The user completing the screen must choose any selection other than the first item. If he tries to file the screen without choosing a different item, the following error message appears: Please fill in all required fields (*)
MultiSelectList Field
Use a MultiSelectList field to present the user completing the User Information or Membership User Properties screen with a list of choices. The user can choose as many responses as appropriate.
Selected items are indicated by a blue background.
When you create a custom user property and specify its type to be MultiSelect List, the screen changes.
For information about completing the screen, see Completing a SelectList Field Entry.
Features Field
This field is automatically included on the User or Member profile Custom Tab to allow the profile owner to edit events on a Web calendar. When this is checked, it cannot be unchecked. For more information about Web Calendar, see Adding System Calendar Events.
Private Profile Field
This field is automatically included on the User or Member profile Custom tab. It lets the profile owner determine which other users can see his community activities. For example,Using the ActivityStream Widget on a PageBuilder Page explains how this setting affects other users' ability to see your activities.
The Private Profile field value also determines if a user's profile is visible on a forum. See Also: Using Discussion Boards on Your Web Site
When a Micro-message server control is placed on a page in TimeLine mode, micro-messages only appear for users whose Private Profile setting is set to Public. See Also: TimeLine Mode
Time Zone Field
The Time Zone property field is a special field used by the Web Calendar feature.

Select the time zone of the User or Member here. When they are logged in, appointment times will show in this time zone. For more information, See Also: Adding System Calendar Events.
Editing Custom User Properties
Click a custom user property’s title to display the Edit Custom Property Screen. From this screen, you can edit and delete a custom property or create a version of the custom property in a non-English language. When you edit a custom user property, the changes are applied to all users and membership users when the Save button is clicked. These changes are also applied to any other language versions of the custom user properties that exist.
- In the Workarea, click Settings > Configuration > Custom Properties.
- From the Object Type pulldown, select User.
- Click the Title of the Custom User Property you want to edit.
- Choose the field you want to change. You can edit the following fields:
- Label
- Input Type
- Validation
- Min Value
- Max Value
- Message
- Click Save.
- When you click a user or membership user, you see your changes. For descriptions of these fields, see Custom User Properties.
NOTE: You cannot edit the Type field. If you need to change the type, you must delete the custom user property and create a new one.
WARNING! If you delete a custom user property, it is removed from all users and membership users. Any information that has been collected about users and membership users for that property will be lost. In addition, any language versions of the custom user property are deleted.
Deleting a Custom User Property
If you delete a custom user property, it is removed from all users and membership users. Any information that has been collected about users and membership users for that property will be lost. In addition, any language versions of the custom user property are deleted.
- In the Workarea, click Settings > Configuration > Custom Properties.
- From the Object Type pulldown, select User.
- Click the Title of the custom user property you want to delete.
- Click Delete (
 ).
). - A dialog box appears asking if you are sure you would like to delete the item.
- Click OK. The View Custom User Properties screen appears, and the property is no longer available.
Setting the Order of Custom User Properties
- In the Workarea, click Settings > Configuration > Custom Properties.
- From the Object Type pulldown, select User.
- Click Reorder (). The Reorder User Custom Properties screen appears.

- Click a property.
- Click the Up or Down arrows to move the property up or down the list.
- Click Save.
- On the View Custom User Properties screen, you now see the properties in the new order. If you go to the User or Membership User Properties screen, the order of the properties there reflects the changes.
Creating a Custom User Property for a Non-English Language
Like content, custom user properties have a language attribute. This is useful if you have users or membership users that only use a specific language. It can also be used if you want a custom user property to appear in the language in which the user is signed in.
Unless a language other than English is defined for a custom user property, the property defaults to the English version. For example, if you have 2 properties called Birthday and Phone Number in English and you can translate the French version of Birthday to Anniversaire, when you view the properties in French, you see the English version of Phone Number and the French version of Birthday.
When creating a custom user property, it must be created in English then translated to the desired language. This is done by editing the property, changing languages, filling out the Translate Custom Property Label screen and saving the property.
WARNING! All custom user properties in languages other than English are tied to the English version of the property. If you delete the English version of the property, all other language versions of the properties are deleted also. However, you can remove a non-English language version of the custom properties without deleting the English version. See Removing a Non-English Custom User Property Title
To translate the Title/Label of a property into French.
- In the Workarea, click Settings > Configuration > Custom Properties.
- From the Object Type pulldown, select User.
- Choose a custom property to be defined in another language.
- Choose a language from the language select drop-down box. The Translate Custom Property Label screen appears.
- Enter a Label for the property in the language you have chosen. For example, if you are creating a French version of a Birthday custom user property, you would enter Anniversaire in the label text field. For information on the Label property, see Adding a Custom User Property
- Click Save.
Removing a Non-English Custom User Property Title
Removing a non-English version of a custom user property title does not remove the English version of the property. When you remove the non-English version of a property, you are basically removing the label for that specific language in the custom property.
- In the Workarea, click Settings > Configuration > Custom Properties.
- From the Object Type pulldown, select User.
- Choose the language in which the custom user property appears from the Language drop-down box.
- Click the Title you want to delete. The Translate User Custom Property Label screen appears.
- Click Delete (
 ). A dialog box appears asking if you would like to remove the translated custom property title.
 - Click OK. The English version of the Edit Custom Property screen appears.
- Click Back (
 ).
).
WARNING! Do not click the delete button on the Edit Custom Property screen. This action deletes the English version of the custom user property. If you click the delete button, you lose all information collected by the property and all language versions of the property.
Viewing Custom User Properties By Language
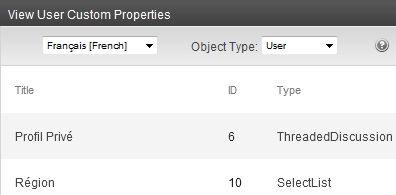
From the View Custom User Properties screen, you can view the custom users properties by languages. When viewing by languages, it is important to remember that if there is only an English version of the property, the English version appears in all the languages.
All custom user properties, in languages other than English, are tied to the English version of the property. If you delete the English version of the property, all other language versions of the properties are deleted.
To view the custom user properties by language:
- In the Workarea, click Settings > Configuration > Custom Properties.
- From the Object Type pulldown, select User.
- Choose the language in which to view the properties from the language drop-down box. The View User Custom Languages screen for that language appears.
- In the example below, some properties have not been translated, so the English versions appear instead.
![]()