Using the Language Export Feature
The Language Export feature lets you copy content into XLIFF files that can be submitted to a translation agency or translated "in house." When the translation is complete, you import translated content to Ektron.
The Language Export feature lets you translate the following kinds of CMS information.
content, including summary, comments, and metadata
a portion of a content (See Designating Content using Localize Section)
forms, including response message, comments, and metadata
all menus (you cannot choose individual menus)
file assets (Office documents, managed files, etc. You cannot export. zip files.)
taxonomies
This section also contains the following topics.
- What is XLIFF?
- Overview of Exporting/Importing Translation Files
- Creating the .zip File
- Importing Translated Files into Ektron
- Working with Metadata that does not work with XLIFF
What is XLIFF?
XLIFF (XML Localization Interchange File Format) is a format used to exchange localization data between participants in a translation project. This format lets translators concentrate on the text to be translated, without worrying about its layout. The XLIFF standard is supported by a large group of localization service providers and localization tools providers.
To learn more about XLIFF, visit these Web sites:
http://www-106.ibm.com/developerworks/xml/library/x-localis/
See Also:
- Overview of Exporting/Importing Translation Files
- Creating the .zip File
- Importing Translated Files into Ektron
- Designating Content using Localize Section
Supported Versions of XLIFF
Ektron supports versions 1.0, 1.1, and 1.2 of the XLIFF standard. You specify the version you are exporting in the web.config file, using the ek_XliffVersion element. Any listed version can be imported.
SDL Trados Studio 2009
Trados is a commonly used translation tool. SDL Trados Studio 2009 supports XLIFF 1.1 and 1.2, which are the recommended versions for use with Ektron CMS.
If you are using Trados (an earlier version of the product), it only supports XLIFF 1.0. Note that Ektron 6.1.4 and older default to XLIFF 1.1. In this case, change the XLIFF version in the web.config file as described in Supported Versions of XLIFF.
Overview of Exporting/Importing Translation Files
1. You select content to translate. You can select:
- a content item
- a folder - all content in the folder is selected; you may include subfolders of the selected folder
- all menus
- all taxonomies
Alternatively, you can select a Translation Package. See Also: Creating a Multilanguage Translation Package.
NOTE: Only content whose state is markedReady for translation is copied to in the xliff file.
2. Ektron converts the selected content to XLIFF files. You can prepare the files for translation into several languages at once.
A separate .xlf file is created for each item. Then, all .xlf files for a language are compressed into one .zip file. A separate .zip file is created for each language.
3. Transmit the.zip files to a translation agency.
4. The translation agency translates and returns the files.
Alternatively, the files can be translated "in house."
5. Import the files into Ektron. If the editions of the content do not exist in the target language, they are created.
Creating the .zip File
To create one or more .zip files for translation, follow these steps.
See Also: Using the Language Export Feature
Prerequisite: Only members of the Administrator User Group or those assigned to the XLIFF-Admin role can create or import XLIFF files. See Also: Using the Roles Screens.
1. To translate one content item, navigate to its folder then click it.
To translate all content in a folder (and, if desired, all of its subfolders), navigate to its View Contents of Folder screen.
To translate a menu, go to Content Tab > Menus.
To translate a taxonomy, go to Content Tab > Taxonomy and check the taxonomies to translate.
To translate a Translation Package, see Creating a Multilanguage Translation Package.
2. Click Export for Translation (
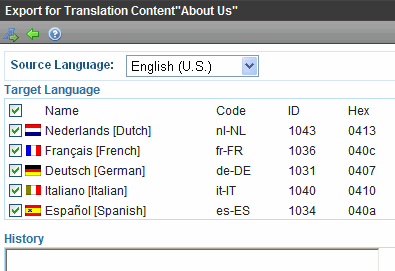
3. The Export for Translation screen appears.
NOTE: The Include Subfolders field only appears if you click Export for Translation from the View Contents of Folder screen.
4. To include content in all of a selected folder’s subfolders, check Include Subfolders.
5. The language of items being translated appears in the Source Language pull-down. If this is not the correct source language, select the correct one.
6. All enabled languages are selected under Target Language. (See Also: Working with Multi-Language Content).
7. To translate the content into all languages, proceed to the next step.
To translate the content into some languages, uncheck the languages that you do not want. You can uncheck the box in the header row (illustrated below) to uncheck all, then only check the ones you want.

8. Click Create XLIFF Files for Translation (
9. Ektron creates one .zip file for each language. The .zip file includes an XLIFF file for each selected content item.
NOTE: If content in a target language was edited more recently than the source language edition, that content is excluded from the .zip file. Also, the content's translation state must be ready. See Also: Mark Translation Statuses
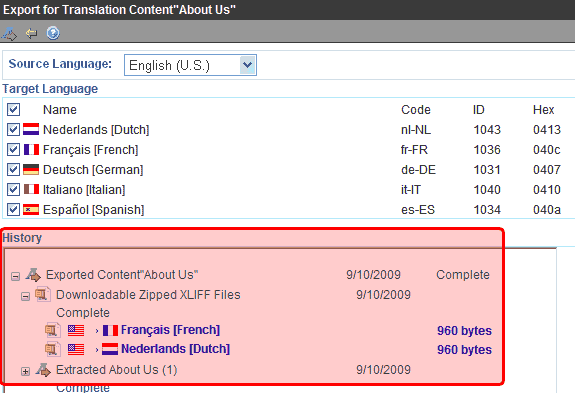
The History section of the Export for Translation screen displays the translated files.
The history lists the .zip file created for each language. (.zip files are indicated by the WinZip icon ( ).) To the right of the icon are
- the flag of the source language
- an arrow indicating the direction of the translation
- the flag and name of the destination language
- the zip file size
NOTE: The top of the history window displays the most recently exported/imported files.
10. To review the items in a zip file, click + next to Extracted. When you do, each content item’s ID number, title, and last edit date appear.
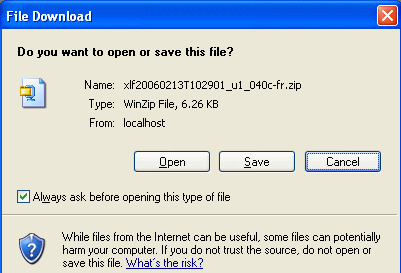
11. Click the blue text of a .zip file. The File Download window appears.
NOTE: If you want to review the XLIFF files within the .zip file, click Open.
12. Click Save.
13. The Save As window appears. Navigate to the folder where you want to place the zip file and click Save.
14. Transmit the files to the translation agency.
NOTE: When the translation agency returns XLIFF files, their extension must be .xlf or .xml. Other than that, the file name is not important.
File Naming Patterns
|
File |
Pattern |
|
XLIFF |
item identifier[item ID]_[new language hexadecimal code][two letter new language code].xlf item identifier options: - content: cont - form: form - menu: s - menu item: s - taxonomy: t item ID varies, depending on whether the item is content, a form, a menu, or a menu item - content: content ID number - form: form ID number - Menu: menu ID number - Menu item: menu ID number |
| ZIP |
xlf[timestamp in format yyyymmddThhmmss]_u[user ID] _ [new language hexadecimal code]-[two letter language code].zip The user ID indicates which user performed the export or import. |
Importing Translated Files into Ektron
To import translated files into Ektron, follow these steps.
See Also: Using the Language Export Feature
Prerequisite: Only members of the Administrator User Group and those defined in the Manage Members for Role: XLIFF-Admin screen can create or import XLIFF files. See Also: Using the Roles Screens.
IMPORTANT: Make sure the files have been translated before you import them.
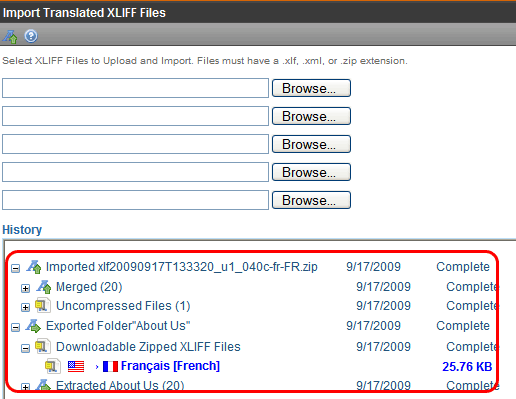
1. From the Ektron Workarea, choose Settings > Import XLIFF Files.
2. Click Browse and navigate to the folder that contains the translated files.
3. Select the files to import.
4. Click Upload and Import (
5. Ektron creates new or updates existing foreign-language editions of the imported content/menu/taxonomy.
6. Information about the imported file appears in the history area of the Import XLIFF Files screen. You can click plus signs (+) to see increasing levels of information about the imported content.
When you import a file, the comment Translated appears next to it.
For each new edition:
If the content title is the same as the source edition, the next available number is appended to the title to distinguish it from the source. For example: Henry Williams(1).
its status matches the source content's status. Typically, its status is checked out. When imported, the content can enter the approval process just like other content.
its history indicates it was checked in at the time the report was run
for content, the following properties are inherited from the original content:
- Smart Form See Also: Working with Smart Forms
- content searchable See Also: The Content Searchable Field
- approval method See Also: Using the Approval Method
date created and last edit date are captured from when the content is imported
the last user to edit is captured by user who imported the file
After you import the translation files, Ektron removes them from the file system.
NOTE: If an error exists in any of the files, the erroneous files are moved into a subdirectory. The directory is created using a timestamp. For example: uploadedFiles\localization\merged\xlf20060208T141841_u1\error\.
Mark Translation Statuses
Prerequisite: Member of Administrators group, or assigned to the Translation State Admin or XLIFF Admin role See Also: Defining Roles
Each Ektron content item has a translation status. Only content marked "ready for translation" is included when you create an .xlf file.
To see a content item's status, hover over Mark Translation Status on the View Content screen.

The Mark Translation Status button may have any of three icons (described below), which indicate the content's status.
|
Button image |
Status |
Details |
|---|---|---|
|
|
Ready for translation |
Automatically applied when content status changes to Approved. See Also: Content Statuses Manually applied when authorized user clicks button and changes status to Ready for Translation. NOTE: You may apply this status to unapproved content if it needs translation before the site goes live. |
|
|
Not ready for translation |
Automatically applied when content status changes to anything other than Approved. See Also: Content Statuses Translation status changes if authorized user clicks button and chooses ready for translation content's status changes to approved |
|
|
Should not be translated |
Lets you prevent content from being translated. Translation status changes only if authorized user clicks button and chooses ready for translation. |
If you click Mark Translation Status (![]() ), a menu appears that lets you change its status.
), a menu appears that lets you change its status.

Note that Export ( ) appears on the toolbar only if the content's translation status is Ready for Translation.

If you create an .xlf file for a folder, only content whose translation status is ready is included in the file.
NOTE: The Localization Dashboard provides an overview of translation activity occurring in Ektron.
Applying Translated Metadata to Translated Content
Prior to version 8.5, translated metadata is ignored when importing XLIFF files. Starting with version 8.5, new key metadata fields are recognized in the XLIFF process and will be imported/exported.
Metadata that Works with XLIFF Export and Import
The following metadata field names may be used for translation using the XLIFF export and import process.
- XliffReferenceSource - Content Selector
- XliffReference - Content Selector
- XliffGlossary - Content Selector
- XliffNote - Meta Data
Working with Metadata that does not work with XLIFF
This section describes how to have translated metadata applied to the translated content that does not use the above special names.
Background Information
Although metadata exists in the XLIFF files, it does not appear in the content's metadata even if metadata is defined for that language. This is because metadata definitions have unique IDs across languages.
NOTE: While a content ID is the same for a corresponding content block in other languages, the same is not true for metadata.
As a result, the ID for the source language (for example, English) metadata is not automatically mapped to metadata for other languages (for example, Spanish).
To solve this problem, create a mapping between the IDs of metadata definitions of different languages that are synonymous. For example, consider the following metadata definitions.
|
ID |
Name |
Language |
|
102 |
Paper form number |
en-US |
|
104 |
Original page count |
en-US |
|
106 |
Número de papel de la forma |
es-ES |
|
108 |
Cuenta de la página original |
es-ES |
|
110 |
Estado de la minoría |
es-ES |
In this example, IDs 102 and 106 are synonymous as are 104 and 108. Definition 110, however, only exists in Spanish.
The mapping is stored in an XML file. The mapping informs the XLIFF import process that metadata for ID 102 in English corresponds to ID 106 in Spanish and likewise with 104 and 108.
Setting up the Process to Apply Translated Metadata to Content
1. Open the folder site root/workarea/xslt/ and look for metadatadefinitions.xml. If it exists, go to step 2.
If it does not, download it from http://dev.ektron.com/uploadedFiles/DevCenter/Support/KB_Articles/XliffMetadata.zip. After unzipping the file, copy the .xslt files to the siteroot/workarea/localization/xliff folder. Copy the xml file to the siteroot/workarea/xslt folder.
2. Create metadata definitions in the other language(s). Be sure to use the same data type. To do this, log in, open the workarea, go to Settings > Configuration > Metadata Definition.
3. Make note of the definitions in the original language (for example, English).
4. Switch to view another language (for example, Spanish) and add a new definition. Assign it the same data type and other properties as the original. Note the new ID numbers.
5. Create metadata definitions in all languages you wish to support. You may add other languages and define more metadata definitions at any time.
6. Edit workarea/xslt/metadataDefinitions.xml. For each Metadata Definition, enter a <dd> element within the <dl> element. The <dd> element has the following form.
<dd title="Name of the metadata definition">
            <dfn id="ID" xml:lang="language-country code"/>
            <dfn id="ID" xml:lang="language-country code"/>
            :
        </dd>
For example:
 <dl>
       <dd title="Paper form number">
            <dfn id="102" xml:lang="en-US"/>
            <dfn id="106" xml:lang="es-ES"/>
       </dd>
       <dd title="Original page count">
             <dfn id="104" xml:lang="en-US"/>
             <dfn id="108" xml:lang="es-ES"/>
       </dd>
</dl>
The definition for ID 110 is not included because it applies to only one language.
Now, the XLIFF import process accesses the metadataDefinitions.xml file to determine which definitions in the target language (for example, Spanish) correspond to the definitions in the source language (for example, English).


