![]()
Additional Taxonomy/Category Tasks
Viewing All Taxonomies
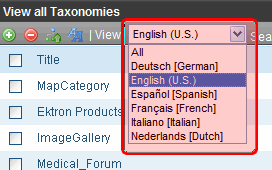
The View All Taxonomies screen displays all taxonomies currently in Ektron CMS400.NET. The language pull down lets you filter the list by a language. To work with any taxonomy, select it. When you do, it appears within the View All Categories of Taxonomy screen.
Viewing a Taxonomy
The View All Categories of Taxonomy screen exposes all categories in a selected taxonomy. Use this screen to perform tasks on a taxonomy or one of its categories, such as adding new categories, assigning content to a category, and changing the order of items.
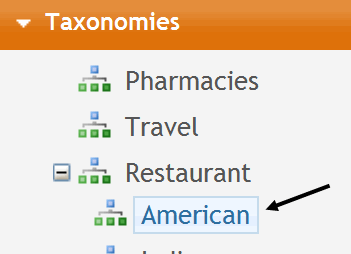
Note: On the View All Categories of Taxonomy screen, a box indicates the selected Taxonomy/Category (see below).
To access the View All Categories of Taxonomy screen, follow these steps.
1. From the Ektron CMS400.NET Workarea, go to Content > Taxonomies
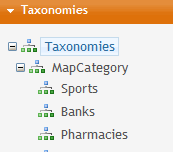
2. Click on the top Taxonomy node to see all taxonomies.
3. Use the language pull-down to select the language of the taxonomy you want to work with.
4. Click a taxonomy. The View Taxonomy screen appears.
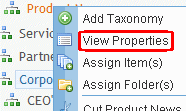
Alternatively, you can navigate the Taxonomy structure in the left panel, click a taxonomy category, and select View Properties.
Tasks you can perform from this screen are listed below.
|
Task |
How to initiate |
For more information, see |
|
View Languages |
Choose the language of the taxonomy you wish to view/change.
|
|
|
View Types |
Choose the type of taxonomy you wish to view/change.
|
|
|
Add a taxonomy category |
1. Select the taxonomy/category under which the new category should appear. 2. Click Add Category (
|
|
|
Change the order of items in a taxonomy/category |
1. Select the taxonomy/category you wish to reorder 2. Click Reorder ( |
|
|
Assign content items to a category |
1. Select the taxonomy/category to which you wish to add items. 2. Click Assign Items ( Alternatively, right click the category and choose Assign Item(s). |
|
|
Assign folders to a category |
1. Select the taxonomy/category to which you wish to assign folders. 2. Click Assign Folders ( Alternatively, right click the category and choose Assign Folder(s). |
|
|
Edit a taxonomy’s properties |
Click Edit ( |
Edit a Taxonomy/Category’s Fields |
|
Export a taxonomy Note: This option appears for taxonomies only. It does not appear when viewing a category. |
Click Export Taxonomy toolbar button ( |
|
|
Move or copy a taxonomy category to an other taxonomy or category. |
Copying and Moving a Taxonomy | |
|
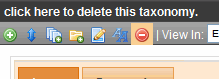
Delete a taxonomy or category |
Click Delete ( Alternatively, right click the category and choose Delete category name. |
|
| Remove items (content, folders, users or community groups) from a taxonomy/category | Select items then click  . . |
Remove Content from a Taxonomy/Category |


 )
)  ) from the toolbar.
Edit a Taxonomy/Category’s Fields
To edit a Taxonomy’s fields, follow these steps.
Note: Only administrators or users to whom the Taxonomy Administrator role has been assigned see the Content > Taxonomies option. See Also: Defining Roles
1. From the Workarea, go to Content > Taxonomies.
2. Select the taxonomy from the list of taxonomies.
Alternatively, hover the cursor over a taxonomy/category, right click the mouse, and click View Properties.
3. Click Edit ( ).
).
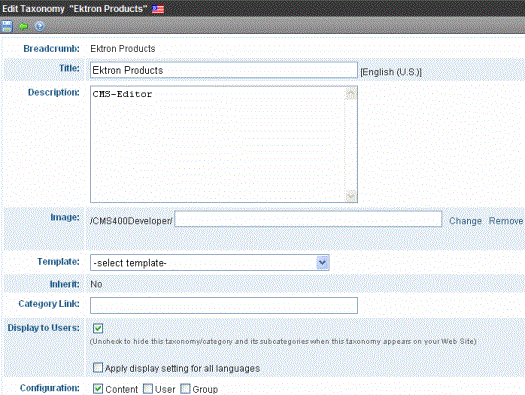
4. For a description of these fields, see Taxonomy Field Description
Copying and Moving a Taxonomy
You can move any taxonomy category to any other taxonomy or category. There are two ways to do this.
Copy/Move a Taxonomy Category using a Toolbar Button
Copy/Move a Taxonomy Category using Menu Options
Copy/Move a Taxonomy Category using a Toolbar Button
1. From the Content > Taxonomies area of the Workarea, open the category that you want to move or copy.
2. Click Move/copy ( ).
).
3. A dialog appears. Select a taxonomy/category to which you want to move/copy the current category.

4. Click
right arrow (
) to move the taxonomy/category to the new location
copy (
See Also: Taxonomy
Copy/Move a Taxonomy Category using Menu Options
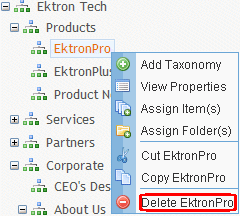
1. Right click a category.
2. Choose Cut category name or Copy category name.
3. Hover over the destination category
4. Click Paste Taxonomy.
Delete a Taxonomy/Category
There are two ways to delete a taxonomy or category.
Deleting a Taxonomy from View All Taxonomies Screen
Deleting a Category from View All Categories Screen
After you delete a taxonomy, it can no longer be assigned to content and folders. Further, existing links to content (via the Category tab) are deleted. And, if a taxonomy was assigned to a folder (via the Folder Properties screen), it is no longer assigned.
See Also: Deleting a Taxonomy in a Multi-Language Environment
Deleting a Taxonomy from View All Taxonomies Screen
Note: Only administrators or users to whom the Taxonomy Administrator role has been assigned see the Content > Taxonomies option. See Also: Defining Roles
1. From the Workarea, go to Content> Taxonomies.
2. From the View All Taxonomies Screen, check the box to the left taxonomy you want to delete.
3. Click Delete ( ).
).
Alternatively, you can hover the cursor over a taxonomy/category in the left panel, right click the mouse, and click Delete name.
Note: The delete button does not appear if the language selector is set to All.
Deleting a Category from View All Categories Screen
1. From the Workarea, go to Content > Taxonomies.
2. Select a taxonomy from the list of taxonomies.
3. The taxonomy items and properties appear on the right.
4. Click Delete ( ).
).
5. A confirmation message appears. Click OK.
Add a Category to a Taxonomy/Category
Follow these steps to add a category to a taxonomy, or to add a subcategory to a category.
Note: Only administrators or users to whom the Taxonomy Administrator role has been assigned see the Content > Taxonomies option.See Also: Defining Roles
1. From the Workarea, go to Content Tab > Taxonomy.
2. Select the taxonomy or category under which you want to create a new category.
3. Click Add ( ) from the menu.
Alternatively, you can hover the cursor over a taxonomy/category in the left panel, right click the mouse, and click Add Category.
4. The Add Category screen appears.
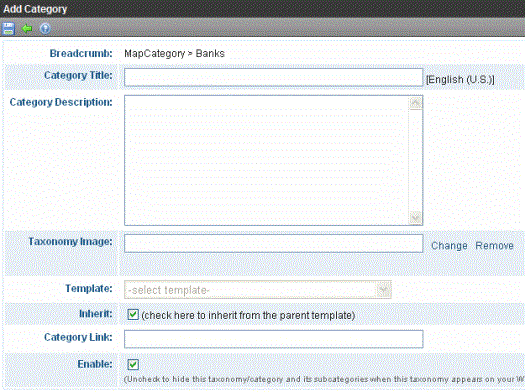
5. Complete the fields for the new category. See Also: Taxonomy Field Description
6. Click Save ( ).
).
Remove Content from a Taxonomy/Category
Note: Only administrators or users to whom the Taxonomy Administrator role has been assigned see the Content > Taxonomies option. See Also: Defining Roles
1. From the Workarea, go to Content > Taxonomies.
2. Select a taxonomy or category from the left panel.
3. Check the box to the left of content you want to remove.
Tip! To remove all content, check the box in the title bar.

4. Click (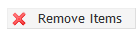 ).
).
Remove Folder from a Taxonomy/Category
Note: Only administrators or users to whom the Taxonomy Administrator role has been assigned see the Content > Taxonomies option. See Also: Defining Roles
Steps for Removing a Folder from a Taxonomy
Background Information
If you assign a content folder to a taxonomy category, the internal relationship is between the folder’s content and a taxonomy category. A folder is merely a convenience for creating this relationship. There is no data connection between a folder and a taxonomy category.
Therefore, if you delete a content folder from a taxonomy category, all content in that folder remains assigned to it. To remove the folder’s content from the category, see Remove Content from a Taxonomy/Category.
However, after deleting a content folder, the connection between the folder and taxonomy category is broken. So, content subsequently added to the folder is not assigned to the taxonomy.
Steps for Removing a Folder from a Taxonomy
1. From the Workarea, go to Content > Taxonomies.
2. Select the taxonomy or category that has the folder that you want to delete.
3. From the View dropdown, select Folder(s).
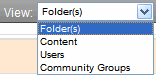
4. Check the box to the left of folders you want to remove.
Note: To remove all folders, check the box in the title bar.
5. Click ().
Change Order of Categories Assigned to a Taxonomy/Category
Note: Only administrators or users to whom the Taxonomy Administrator role has been assigned see the Content > Taxonomies option. See Also: Defining Roles
You can reorder (that is, change the sequence of) the categories below a taxonomy or one of its categories. Reordered subcategories appear only within the Ektron CMS400.NET Workarea.
To reorder the categories assigned to a taxonomy or category, follow these steps.
See Also: Add a Category to a Taxonomy/Category
1. From the Workarea, go to Content Tab > Taxonomy.
2. Select the taxonomy or category that has content that you want to reorder.
3. Click Reorder ( ).
).
4. Set the Type pull-down list to Category.
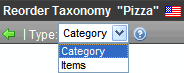
5. Select an item that you want to move up or down.
6. Click the up or down arrow to move the item in that direction.
7. Continue steps 5 and 6 until all content is in the desired order.
8. If there are several language versions of this taxonomy, you can automatically reorder all versions. To do that, check Apply ordering for all languages.
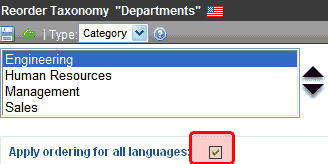
9. Click Save ().
Change Order of Content Assigned to a Taxonomy/Category
You can reorder (that is, change the sequence of) content within a category. Reordered content appears within the Ektron CMS400.NET Workarea and can appear on your Web site of the Directory server control’s ItemSortOrder property is set to taxonomy_item_display_order.
To reorder the content assigned to a category, follow these steps.
Note: Only administrators or users to whom the Taxonomy-Administrator role has been assigned see the Content > Taxonomies option. See Also: Defining Roles
1. From the Workarea, go to Content > Taxonomies.
2. Select the taxonomy or category that has the folder that you want to reorder.
3. Click Reorder ().
4. Set the reorder pull-down list to items.
5. All items assigned to the category appear.
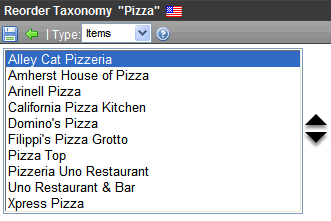
6. Select a content block that you want to move up or down.
7. Click the up or down arrow to move the item in that direction.
8. Continue steps 6 and 7 until all content is in the desired order.
9. Click Save ().
Importing and Exporting a Taxonomy
You can export any taxonomy as an xml file. Then, you can reuse it or send it to someone else, who would import it in order to bring a copy of it onto their computer.
You can use the Export/Import feature like a “save as” feature. For example, you want to create a taxonomy that is similar to an existing one but has some differences. The easiest way to do this is to export an existing one, import it under a new name, and edit it.
<ArrayOfTaxonomyData xmlns:xsi="http://www.w3.org/2001/XMLSchema-instance" xmlns:xsd="http://www.w3.org/2001/XMLSchema">
<TaxonomyData>
<TaxonomyId>959</TaxonomyId>
<TaxonomyName>Bob Taxonomy</TaxonomyName>
<TaxonomyLanguage>1033</TaxonomyLanguage>
<TaxonomyLanguageName>English (U.S.)</TaxonomyLanguageName>
<TaxonomyDescription>Sample</TaxonomyDescription>
<Taxonomy>
<TaxonomyData>
<TaxonomyId>960</TaxonomyId>
<TaxonomyName>Subnode</TaxonomyName>
<TaxonomyLanguage>1033</TaxonomyLanguage>
<TaxonomyLanguageName>English (U.S.)</TaxonomyLanguageName>
<TaxonomyDescription />
<Taxonomy />
</TaxonomyData>
</Taxonomy>
</TaxonomyData>
</ArrayOfTaxonomyData>
Exporting a Taxonomy
Exporting a taxonomy means saving it as an .xml file on your computer or network drive. To export a taxonomy, follow these steps.
1. From the Workarea, go to Content > Taxonomies.
2. Select the language of the taxonomy that you want to export.
3. All taxonomies in that language appear.
4. Click a taxonomy that you want to export.
5. Click Export Taxonomy ( ).
).
6. You are prompted to select a folder into which to save it.
Importing a Taxonomy
1. From the Workarea, go to Content > Taxonomies > Taxonomies.
2. Click Import Taxonomy ( ).
).
3. The Import Taxonomy screen appears.
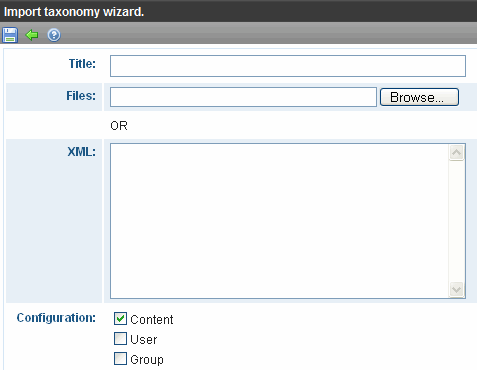
4. In the Title field, enter a name for your new taxonomy.
5. Click Browse.
6. Navigate to the taxonomy file you want to import.
7. The path appears in the Files field.
Note: Alternatively, you can enter or paste the xml into the XML box.
8. Determine the taxonomy’s configuration. See Also: Assigning a Taxonomy Configuration
9. Click Save ().
Note: If you assign a name that is already given to a taxonomy, Ektron CMS400.NET appends a number to the title, beginning with 1.


![]()