![]()
Flexible Menu Server Control
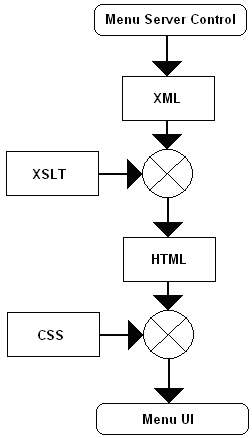
The FlexMenu server control displays a menu on a Web form. Although it looks and acts like a Smart Menu, its architecture is substantially different. Specifically, a FlexMenu creates XML. So, you can modify its behavior using an XSLT file, and change its appearance using a cascading style sheet (.css) file. This design is illustrated below.
Note: Before you can use this server control, you must create one or more menus in the Ektron CMS400.NET Workarea. To learn about creating menus, see Working with Menus.
See Also: Contrasting Menu Server Controls
Sample Menus
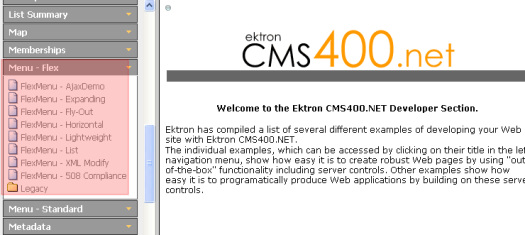
To facilitate the deployment of Flex menus, Ektron CMS400.NET provides several sample menus that show their capabilities. You can use whichever sample meets your needs, then modify it for your site.
The sample menus can be viewed from the Developer Sample Page (siteroot/Developer/default.aspx) > Menu - Flex.
Description of the Sample Menus
Note: The FlexMenu server control generates the same XML for all samples, and identical copies of the Demo.xsl create identical markup for all samples. The different manifestations in the samples are due to the CSS styling rules in the related files.
Copying and Editing Sample Menus
To create a menu based on a sample, follow these steps.
1. Examine the sample menus and decide which one best meets your needs for a particular page. See Description of the Sample Menus.
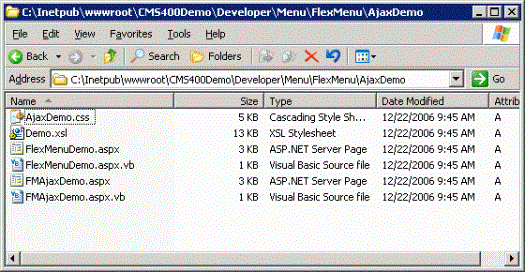
2. If you want to create a new template (.aspx page) for the menu, place the new template in a new folder. Then, copy all files in the sample menu folder to the new folder and rename each file. For example, change Ajaxdemo.aspx to myflexmenu.aspx, AjaxDemo.css to myflexmenu.css, and demo.xsl to myflexmenu.xsl.
To insert a FlexMenu server control onto an existing template, copy the .css and .xsl file into the folder that contains the template.
Warning! If you specify an external file, do not store it in your site's Workarea folder to prevent it from being overwritten when you upgrade.
Important: The renamed .css file name must be all lowercase.
3. Open the .aspx page. Update the stylesheet and DisplayXslt properties to refer to the new .css and .xsl files.
If the files do not reside in the template’s folder, indicate their relative path using the syntax where slash (/) indicates the site root.
4. Open the .css file. Update the parent class name to match the new file name. For example, if you copied the AjaxDemo.css file, the top of it looks like this.
.ajaxdemo .ekflexmenu
{
/* DIV; wraps the entire menu */
/* (the outer-most non-user container element) */
color: rgb(0, 0, 255);
/*width: 148px;*/
font-size: 12px;
font-family: Sans-Serif;
}
.ajaxdemo .ekflexmenu_submenu,
.ajaxdemo .ekflexmenu_submenu_hover,
.ajaxdemo .ekflexmenu_submenu_parent,
.ajaxdemo .ekflexmenu_submenu_parent_hover
{
/* DIV; holds submenu items, such as a submenu title and links. */
top: 0px;
left: 0px;
}
.ajaxdemo UL
{
/* UL; a container for menu list items (useful for non-graphical browsers). */
/*list-style: none;
/*margin: 0px;
padding: 0px;*/
}
Notice that every class begins with the file name, .AjaxDemo. Replace all occurrences of this with the new file name. To continue the above example, begin all classes with .myflexmenu.
Working with the Flex Menu Xslt File
This section explains some non-intuitive elements of the *.xslt file.
|
Element |
Context |
Description |
|
MenuFragment |
<xsl:when test="/MenuDataResult
menuFragment='false'"> |
A flag that indicates the XML data is not complete. Instead, it’s a fragment that begins deeper than the top level (for example, a submenu fragment). Because the data is incomplete, the XSLT processes the fragment differently. For example, don’t generate JavaScript startup code. |
|
menuConst |
<xsl:attribute
ekflexmenu</xsl:attribute> |
Each menu generates several elements, which the client code (JavaScript) accesses via a unique ID. For example, JavaScript needs to identify the selected submenu or item when a user clicks on an element. menuConst is only used is when creating elements without a corresponding XML block, such as when creating a structure to hold the menu. |
|
#NoScroll |
<xsl:attribute name="href"># NoScroll</xsl:attribute> |
NoScroll is sent to the href portion of a link when there is nothing to put there (for example, when the link is supposed to run JavaScript). NoScroll prevents the page from refreshing, going to another page, or scrolling when it should not. |
|
event |
<xsl:attribute name="onkeydown">return ekFlexMenu.menuBtnKeyHdlr( event);</xsl:attribute> |
To make the xslt cross-browser compatible, it must support different methods of obtaining/passing the event object. In this example, the global event object is passed to the handling function. Note: event corresponds to window.event. window. is implied. |
How the FlexMenu Server Control Determines Which Item is Selected
The FlexMenu server control has the ability to select (highlight) options in a Flex menu as site visitors navigate around the Web site. For example, a site visitor arrives at a Web page through a link in an email. If the QueryString matches the an item in a Flex menu, the item is shown as selected.
Below is the logic the Flex menu uses to decide when a menu item should show as selected. The list is presented in the order in which the code checks to see if an item should be highlighted.
If any menu item is selected, its parent menu is marked selected. If any menu is selected, all ancestor menus are selected. When all tests have been performed and no matches are found, the Flex menu is rendered with no items selected.
Warning! As soon as one condition is satisfied, the item is shown as selected and the testing stops.
Note: Steps 2 through 9 are each repeated recursively throughout the menu data hierarchy until either a match is found or the end is reached. If there are no matches for a test, the control continues with the next one.
1. Inspects the QueryString to see if the ekxmensel parameter is present with a matching menu node ID. This parameter is used to specify the exact node a user clicked. The node, its parent, and ancestor menus are all marked as selected.
2. Inspects the QueryString to see if a Content ID parameter value matches a menu item. If the Content ID in the QueryString matches a menu item, it is highlighted. For example, the QueryString includes ExamplePage.aspx?id=123, and a menu item links to Content ID 123.
3. Inspects the QueryString to see if a Form ID parameter value matches a menu item. If the Form ID passed in the QueryString matches a Flex menu item, it is highlighted. For example, the QueryString includesExamplePage.aspx?ekfrm=456, and a menu item links to Form ID of 456.
4. Inspects the QueryString for a direct match with a menu item link. If there is a match, the menu item is selected. For example, if the QueryString has ExamplePage.aspx and there is an item on the menu that matches, the menu item is shown as selected.
5. Inspects the QueryString for a id, ekfrm or pageid parameter. If one is found, the control looks for a folder association between submenus and the folder that contains the object with the given ID. If the association exists, the menu item is shown as selected.
6. Inspects the QueryString to see if there is a direct match with a menu button link. If there is a match, the menu button is selected. For example, the QueryString has ExamplePage.aspx and there is a button on the menu that matches.
7. Inspects the QueryString to see if there’s a template association with the filename. If there’s a match, the menu item is shown as selected.
8. Inspects the QueryString for the id or ekfrm parameter and whether a value greater than zero is associated with it. If so, the control checks menu buttons for use of LinkIt.aspx. If a button is using LinkIt.aspx and either id or ekfrm parameter matches, the menu button is selected.
9. Tests to see if there is a URL Aliasing issue. When the FlexMenu server control’s UseAliasRealId property is set to True, the control scans the data to see if there is a MenuData item ID match.
Flex Menu Server Control Properties
The Flex Menu server control properties are described in this table.
Note: The following table only lists Ektron-specific properties. It does not describe native .NET properties such as font, height, width and border style. For documentation of these properties, see Visual Studio help.
|
Property |
Value |
Data Type |
|
Authenticated |
Indicates if you are logged in to the CMS Explorer and can use it to browse to Content, Collections, etc. See Also: Using CMS Explorer to Browse Your Ektron CMS400.NET Site |
Boolean |
|
AutoCollapseBranches |
If you set to true, whenever a new submenu opens, all other submenus close. If false, other submenus remain open when a new one opens. |
Boolean |
|
CacheInterval |
Sets the amount of time the server control’s data is cached. The default is 0 (zero). This is the amount of time, in seconds, a control’s data is cached. For example, if you want to cache the data for five minutes, set this property to 300 (three hundred). See Also: Caching with Server Controls |
Double |
|
DefaultMenuID |
The ID of a menu that appears where you insert this server control if no other menu is identified or available. If you don’t know the ID number of the menu, use the CMS Explorer to browse to it. See Also: Using CMS Explorer to Browse Your Ektron CMS400.NET Site Note: If you want to change the Default menu's Starting menu, use the StartMenuID property. |
Long |
|
DisplayXslt |
The xsl file used to render the menu. If nothing is specified, the menu is output as raw XML. Flex menus are designed to use the xsl file to control the menu’s behavior, and the .css file to control its display. Ektron CMS400.NET provides several sample menus, and each has an xslt file. If this is a new menu, you may find it easier to copy and edit an xslt file provided with a sample menu. See Also: Sample Menus Warning! : If you want to edit this file, it is strongly recommended that you make a copy, change its name and move it outside of your site's Workarea folder. If you make changes to this file and do not move it out of the Workarea, this file and the changes will be lost when you upgrade. |
String |
|
DoInitFill |
By default, Fill occurs during the Page_Init event. Set to false if you want to postpone the fill-action until later. In this case, FIll is automatically called during the Page Render event. You might do this if you need to set or change a property on the control in codebehind and have it render with your changes shown. |
Boolean |
| EnableAjax |
Set to true to enable Ajax, which only downloads sub-menus as needed. See Also: AjaxDemo |
Boolean |
|
EnableMouseOverPopup |
If you set to true, submenus appear as soon as the cursor moves over them. If you set to false, submenus only appear if a site visitor clicks them or a keyboard equivalent. |
Boolean |
|
EnableSmartOpen |
If you set to true, any submenu on the Smart Menu can be set to open automatically. To learn about how to do this, see Assigning Folders or Templates to a Menu If you set to false, even if all required conditions are present, submenus on a Flex Menu do not automatically open. This property lets you prevent submenus from opening by default. Under some circumstances, such submenus look cluttered. |
Boolean |
| IncludeJS |
Enter false if you want the menu to ignore the default JavaScript that normally loads when the menu is loaded. This would be useful if you redefine the menu's output with an XSLT. Enter true if you want the menu's JavaScript to load as normal. |
Boolean |
|
MasterControlId |
Only use this property if you are setting up a master/slave menu relationship, and this menu is the slave. If both are true, enter the ID of the master menu. See Also: Flexible Menu Server Control |
String |
|
MenuDepth |
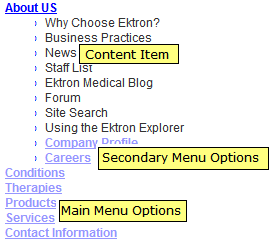
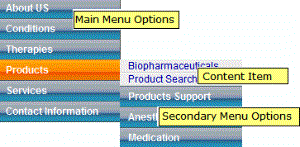
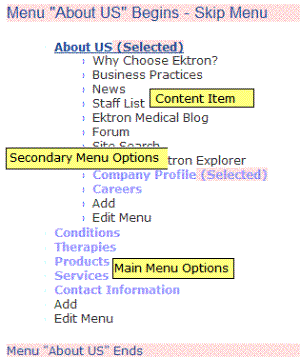
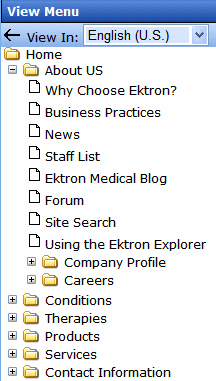
To let site visitors browse through all menu levels, enter zero (0). To restrict site visitors to a menu level, enter the number of the lowest level. In the following example, if you set this property to 1, a site visitor can browse through the About Us menu options but would not see the level 2 options (Company Profile and Careers).
|
Integer |
|
StartCollapsed |
If you set to true, when the menu first appears, all submenus are closed. |
Boolean |
|
StartLevel |
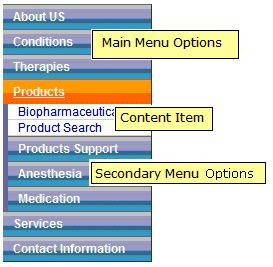
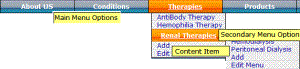
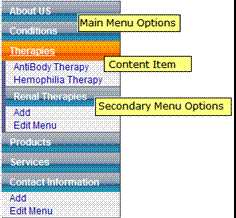
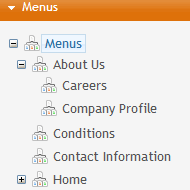
Enter a number to indicate the level at which you want this menu to display when it first appears. To begin the menu display at the root level, enter zero (0). In the following example, the Home folder is level 0. The others are level 1.
A site visitor can click a menu option to navigate to folders below the displayed level. Note: If you set a StartMenuID, the StartLevel property is ignored. |
Integer |
| StartMenuId |
Use this property to have the default menu begin somewhere other than its root.That is, at any submenu under the default menu. For example, menu ID 46 (Products) is the default menu. However when that menu displays, you only want to show its submenus, beginning with Products Support (ID 58). In this case, enter 46 into the DefaultMenuID property and 58 into the StartMenuID property. Note: If you set a StartMenuID, the StartLevel property is ignored. |
Integer |
|
Stylesheet |
Enter the style sheet that will determine the appearance of the menus. Flex menus use an .xsl file to control their behavior, and a .css file to control their display. Ektron CMS400.NET provides several sample menus, and each has a .css file. If this is a new menu, you may find it easier to copy and edit a .css file provided with a sample menu. See Also: Sample Menus |
String |
|
SuppressAddEdit |
When set to True, suppress the Add and Edit buttons on the menu when a user is logged in to Ektron CMS400.NET. The default is False. True - suppress the Add and Edit button when a user is logged in to Ektron CMS400.NET. False - show the Add and Edit buttons when a user is logged in to Ektron CMS400.NET. |
Boolean |
|
SuppressWrapperTags |
This property is set to false because Ajax uses <div> tags to rewrite the region around the tag. You cannot change the value to true. |
Boolean |
|
WrapTag |
Allows a developer to specify a server control’s tag. The default is Span. Span - Use the <span> tag to designate an inline portion of an HTML document as a span element. Div - Use the <div> tag used to apply attributes to a block of code. Custom - Use a custom tag. |
String |


![]()