The Web Alert feature lets you generate email for a list of registered users whenever new or existing content is published. Interested site visitors register to be notified when new information about your product is published. When content is published, the users receive an email with a link to the new/updated page. The recipient clicks the link to access the page.
As a result, a self-selected group of users are notified of changes relating to their interests. When the Web Alert feature is set up, you don’t need to do anything—everything happens in the background.
Prerequisite
Only members of the Administrator Group or users assigned to the Folder User Admin role can work with Web Alerts
How Web Alert Works
The following explains the Web Alert feature.
- Content is published.
- Ektron checks the Staging Server checkbox on the Settings > Configuration > Setup screen. If it is unchecked, proceed to the next step. If the box is checked, no Web alerts are issued for this server.
- Ektron checks to see if any subscriptions are assigned to folders or content.
- If no subscriptions are assigned, the Web Alerts tab does not appear when editing content.
- If any subscription is assigned, Ektron checks to see if an email should be created for this content. The settings appear under the Web Alerts tab. For example, some content only triggers an email when first published, while other items always generate an email.
- If an email should be generated, Ektron composes the email by retrieving information from the Folder Properties screen > Web Alerts tab > Web Alert Contents fields.
- Ektron determines which subscription lists should receive the email. These are identified on the Available Web Alerts area of the Web Alerts tab. The lists contain subscribers' email addresses.


Server Configuration
The following is a typical Web Alerts server configuration.

- Firewall—the Ektron business tier (which maintains the Ektron files) must have Web access to the asynchronous server. This configuration enables proper communication between Ektron and the asynchronous processor.
- The asynchronous processor must have port 25 (SMTP) access to a valid mail server to send emails
- The mail server (omitted from the illustration) must be allowed to send out port 25 (SMTP) traffic and can reside on the asynchronous server
- Queuing—Message queuing must be enabled on the asynchronous server.
- You must create a message queue on the asynchronous machine and record its name. The message queue is specified in the exe.config file for the service, and in the
web.configfile for the Web Service interface.
- You must create a message queue on the asynchronous machine and record its name. The message queue is specified in the exe.config file for the service, and in the
- CMS—The
web.configfile includes a key for the location of the asynchronous processor. This needs to be verified as working. - Other—IIS must be installed on the asynchronous processor. IIS allows a Web service call to schedule a file download and send commands.
- The asynchronous machine should only allow HTTP traffic from Ektron servers. This provides additional security on the asynchronous processor.
Verifying Connections
- You can verify the Web service > queue connection by
- leaving the Ektron asynchronous processor service off, submitting content with notifications, and verifying that a message arrived in the queue
- turning on journaling for the queue. Submit a message in the queue. The Ektron asynchronous processor service picks it up and places it in the journaled messages.
- turning on logging for the Ektron asynchronous processor service
- To verify the Ektron > Web service connection, open the asynchronous processor location inside a Web browser and test the Web services.
- To verify the writing of files, ensure that Ektron has write access to the
[sitepath]subscriptionsdirectory and submit content that will trigger notifications. This action places a file inside that directory.
- To verify the writing of files, ensure that Ektron has write access to the
- To verify that the Ektron asynchronous processor service can download a file, open a Web browser on the asynchronous machine and connect to the location of the notification command files. Attempt to download one.
Enabling the Web Alert Feature
- Set up message queue and asynchronous processor.
See Also: Setting Up Message Queuing and the Asynchronous Processor - Create messages—Define components of the email to be sent to subscribers.
See Also: CreatingMessage Components - Define subscriptions—Categories of information on your site. Site visitors can subscribe to be notified when content in a category is added or updated.
See Also: Defining Subscriptions - Assign Web Alert information to folders and content—For each folder or content item to which you assign subscriptions, determine
- activities that trigger emails (for example, initial publishing of content)
- the email content
- subscription lists to which the email is sent
See Also: Assigning Web Alert Information to Folders and Content
- Create and publish site visitor registration page—Create a new Web form and drop the membership server control onto it. Then, publish that form on your website. See Also: Membership server control
NOTE: This task is typically done by a developer.
- Site visitors subscribe to lists of interest—Someone signs up to be notified when changes in a selected subscription (category) are published. See Also: How Users Sign up for Subscriptions
- Ektron users can also subscribe. See Also: CMS User Subscription Sign Up
- Subscribers are notified when content is first published or updated—If at least one subscription is assigned to the content or its folder, email is sent according the folder's Web Alert settings.
Message Components
A Web Alert email is made up of the following components, defined on the Folder properties Web Alerts tab. See Also: Assigning Web Alert Information to Folders and Content

NOTE: If you reached this screen while creating an eCommerce message, see Configuring eCommerce.
NOTE: To set or modify this information, you must have permission to edit the folder.
- From address (required)—See Creating “From” Addresses
- Recipient (required)—Users who signed up for subscriptions that are enabled for the folder. See Also: How Users Sign up for Subscriptions.
- Subject line—The Subject field on the Web Alerts tab of the Folder Properties screen.
See Assigning Web Alert Information to Folders and Content - Default message—See Creating Default Message Text.
- Opt out message (required)—See Creating Opt Out Message Text
- Content summary—The Summary of the content whose creation or change generates the email. See Also: Writing a Summary for Content.
NOTE: The Summary can include variables that retrieve information about the content. See Including Variables in the Default Message.
- Content link—Link to content whose creation or change generates the email.
- Any CMS content item—You may include Ektron content in the email.
- Unsubscribe message (required)—See Creating Unsubscribe Message Text.
The elements appear in the sequence shown above.
Setting Up Message Queuing and the Asynchronous Processor
After installing Ektron, set up Microsoft Message Queuing and the Ektron Asynchronous Processor. The installation places the following directories and files on your server.
C:\Program Files\Ektron\CMS400versionnumber\EktronAsyncProcessor_Service\C:\inetpub\wwwroot\siteroot\bin\EktronAsyncProcessorWS.dllC:\inetpub\wwwroot\siteroot\Workarea\webservices\EktronAsyncProcessorWS.asmx
NOTE: If you need to move Web services file, use the Asynchronous Processor Location field in the Configuration > Setup screen to specify the new folder location.
Setting Up Message Queuing and the Asynchronous Processor
- On the server that hosts Ektron,
- If you are using Windows 7 or 2008 R2, go to Control Panel > Add/Remove programs > Add/Remove Windows Components.
NOTE: In some Windows versions, you access Turn Windows features on or off then select Microsoft Message Queue (MSMQ) Server.
- If you are using Windows 8 or 2012,
- If it is not checked, check Message Queuing Services.Windows 2008 R2

Windows 7

- If Message Queuing Services was checked when you viewed it, go to step 5. If it was not checked, click Next. A wizard creates the component.
The rest of this procedure employs a wizard that saves several manual steps. If you have a problem using the wizard, or prefer to install Web Alerts manually so you can track the files being installed to your server, see Manual Setup of Message Queue and Asynchronous Processor.
- From the Windows Start Menu, click All Programs > Ektron > CMS400vxx > Utilities > Web Alert Setup. The Web Alert Wizard setup screen appears.
- Click Next. The wizard begins installing the Web Alerts feature.
The following screen appears.

- At Message Queue Name, enter the name of the message queue that will manage the Web Alert email.
- At SMTP Port, enter the port number that sends Web Alert email.
- At SMTP Server, enter the name of the server that hosts your Ektron website.
- Enter the username and password that will be used to send and receive email.
- If you want a very detailed log file, click Logfile Verbose.
- If your Asynchronous Processor service is not running, the following message appears. If you see this message, click OK then click Finish.

- Go to Control Panel > Administrative Tools > Computer Management > Services and Applications > Services.
- Start the Ektron Async Processor service.
- When specifying the SMTP port in Step 7, if you entered a port number other than 25
- Open
C:\Program Files (x86)\Ektron\CMS400vxx\EktronAsyncProcessor_Service\Ektron.Services.EktronAsyncProcessor.exe.config. - Change the value of
ek_SMTP_EnableSsLtoFalse.
- Open
Manual Setup of Message Queue and Asynchronous Processor
This section describes manual steps for setting up the Message Queue and Asynchronous Processor. You can use this procedure if you had a problem using the wizard, or you want to know which files are being installed on your server.
- Go to Control Panel > Administrative Tools > Computer Management > Services and Applications > Message Queuing.
NOTE: In some Windows versions, you access this screen by clicking Start > Computer > Manage.
- Right click the Services and Applications > Message Queuing > Private Queues folder and select New > Private Queue.

- Create a private queue named
msmq_web. - Right click
msmq_weband select Properties. - Go to the Security tab. You can give the Everyone group Full Control if you are in a testing environment. If you are on a production server or want better security, delete the following permissions for the local system account (the account under which the EktronAsyncProcessor Service runs):
- Receive Message
- Peek Message
- Send Message
- Give the ASP.NET account (the account under which the Web services interface runs) Send Message permission.
- Click OK.
- Open the following file:
C:\Program Files\Ektron\CMS400vxx\EktronAsyncProcessor_Service\RegEktron.Services.EktronAsyncProcessor.bat - Review and update as necessary the paths to the .NET directory and
Ektron.Services.EktronAsyncProcessor.exefile. - Update the paths to the .NET Directory and the .exe file if necessary.
- Execute the .bat file. Or, from a command line or Start Menu > Run, enter:
C:\Windows\Microsoft.NET\Framework\v2.0.50727\installutil“C:\program Files\Ektron\CMS400vxx\EktronAsyncProcessor_Service\Ektron.Services.EktronAsyncProcessor.exe” - Open the following file and enter your SMTP connection settings:
C:\Program Files\Ektron\CMS400vxx\EktronAsyncProcessor_Service\Ektron.Services.EktronAsyncProcessor.exe.config. - Go to Control Panel > Administrative Tools > Computer Management > Services and Applications > Services. Start the Ektron Async Processor Service.

CreatingMessage Components
Before you can create an email message, define the following components.
- default message text
- opt out message
- unsubscribe message
- “from” address
You can define several of each item. You must define at least one opt-out message, unsubscribe message, and “from” address to use the Web Alert feature.
After setting up message components, they are referenced on the folder's properties screen's Web Alerts tab. See Also: Message Components
Including Variables in the Default Message
The default message can include variables that retrieve content information into the message text. The variables are surrounded by at signs (@). For example
The following content was recently updated: @AppContentLink@
The email text might read:
The following content was recently updated: The Effect of Coumadin on Cardiac Patients
Use the following variables in a Web Alert message.
- @appContentTitle@—The title of the content block.
- @appCRLF@—A carriage return. Moves text down one line.
- @appContentLink@—The link to the content block on the website.
NOTE: You must be logged in to see the changes.
- @appContentURL@—The URL of the content, from the quicklink and domain.
- @appSubscriptionNames@—Comma separated list of subscriptions that a user selected.
- @appComment@—The comments for the content block.
- @appSubmitterFirstName@—The first name of the user who submitted the content block.
- @appSubmitterLastName@—The last name of the user who submitted the content block.
Creating Opt Out Message Text
An Opt-Out message appears as the first line of every email. It directs the reader to the Unsubscribe message at the bottom. Here is an example:
You have subscribed to receive alerts from the Ektron email alert system.
  See below for removal instructions.
You can add variables to the Opt Out text. See Also: Including Variables in the Default Message
- Go to Settings > Configuration > Web Alerts > Messages.
- Click Add Email Message.
- Enter a Title that describes the Opt-Out message.
- At the Type field, select OptOut.
- In the editor, enter the message text.
- Click Save.
Creating Unsubscribe Message Text
An Unsubscribe message helps an email recipient remove himself from the subscription list. You can add variables to the Unsubscribe text. See Also: Including Variables in the Default Message
- Go to Settings > Configuration > Web Alerts > Messages.
- Click Add Email Message
- Enter a title that describes the Unsubscribe message.
- At the Type field, select OptOut.
- In the editor, enter the message text.
- Click Save.
Defining Subscriptions
Create a subscription for each type of information site visitors might want to be notified about. For example, if your site sells electronics, create subscription for televisions, computers, and smart phones. Site visitors subscribe to areas of interest. Ektron and membership users can also sign up for subscriptions.
Appearance of Subscriptions on Custom User Properties Screen
When you create a subscription, a new entry is created on the User Properties screen's Custom tab. By default, its name is Subscriptions, and its type is Category.

Subscriptions appear on the
- Site Visitor Registration screen
- Membership user information screen > Custom tab
- User information screen > Custom tab
- User group information screen > Custom tab
By default, the label Subscriptions appears on the screen. To change it to something more helpful, such as Select Areas of Interest:
- In the Workarea, go to Settings > Configuration > Custom Properties.
- In the Object Type field, select User.
- Click Subscriptions.
- Edit the Label field.
The following graphic illustrates the relationship among the Subscriptions, Custom Properties, and the Site Visitor Registration screen's Custom tab.

Using Subscriptions in a Multi-Language System
When you create a subscription, a version is created for every enabled language. You can edit the subscription name and Enabled value for any language, but cannot change the ID number.

- Choose Settings > Configuration > Web Alerts > Subscriptions.
- From the View Languages drop-down list, select the language into which you want to translate the subscription.
- Click the subscription that you want to translate.
- Click Edit.
- In the Name field, enter the translation for the subscription name. If desired, you can check or uncheck the Enabled checkbox. Only enabled subscriptions appear.
- Click Update.
Assigning Web Alert Information to Folders and Content
After creating messages (as explained in CreatingMessage Components) and subscriptions (as explained in Assigning Web Alert Information to Folders and Content), you identify which folders include content that, when updated, trigger a Web Alert. For example, new product announcements are placed in the Marketing folder.
NOTE: To set or modify Web Alert information, you must have permission to edit the folder. See Also: Managing Folder Permissions
For each folder, you can assign the following kinds of message information.
- whether Web Alert information is inherited from a parent folder or customized
- when email is sent: always, only on initial publication, or never
- the content of the Web Alert email
- the subscriptions assigned to the folder. These determine which recipients receive the Web alert email.
Customizing Web Alert Information for a Folder
Like other folder-level information in Ektron, Web Alert information is inherited from a parent folder. By default, all folders inherit Web Alert settings from the root (Content) folder. However, you can break inheritance and customize the settings for any folder or content item. See Also: Assigning Web Alert Information to Content
To modify folder-level Web Alert information:
Prerequisites
- You defined at least one opt-out message, unsubscribe message, and “from” address. See Also: CreatingMessage Components
- You defined at least one subscription. See Also: Defining Subscriptions
- You have edit permissions for the folder
- Navigate to the folder whose Web Alert information you want to edit.
- Click View > Properties.
- Click the Web Alerts tab. The Web Alert options appear.

- Inherit parent configuration—To inherit Web Alert settings (described below) from this folder’s parent folder, leave this box (Break Inheritance) checked.
- To assign custom Web Alert settings for this folder, uncheck this box and use the fields below.
- Restore Web Alert inheritance to the content in this folder—Check this box if Web Alert inheritance has been broken for some content in the folder, and you want to restore inheritance. If you do, all folder content uses the Web Alert properties applied to this folder.
- Options—Check when Web Alert emails are sent as content in this folder is published.
- Notify Always—send email whether content is being published for the first time or updated
- Notify Only on Initial Publication—send email only the first time content is published. After that, email is not sent.
- Notify Never—email is never sent for content in this folder.
- Web Alert Subject—Enter the email's subject line.
- Web Alert email From Address—Select the address from which email for this folder is sent. See Also: Creating “From” Addresses
- Web Alert Contents—Check the following components to determine the email text . See Also: Message Components
- OptOut Message—see Creating Opt Out Message Text
- Use Default message—see Creating Default Message Text
- Use Summary—include the content summary in the email
- Use Content—You may include Ektron content in the email.
NOTE: If the content item is an Office document or a managed file, a link to that item appears within the email, not the item itself.
- To select existing content, click Select next to the Use Content checkbox. Then, navigate to the content item.
- To select the content whose creation or change triggers the Web Alert, click Use Current.
- To create new content to be inserted into the Web Alert message for this folder, click Select next to the Use Content checkbox. When the folder navigation window appears, click Add Content. Then, see Creating New Content.
- Unsubscribe message—See Creating Unsubscribe Message Text. The components appears within the email in the order listed above.
- Available Web Alerts—All enabled subscriptions set up in the Subscriptions screen appear. Check those to be notified when content in this folder is added or updated. See Also: Defining Subscriptions
IMPORTANT: If you uncheck all subscriptions, you disable the Web Alert feature for this folder and all of its content, even if unique subscription information is assigned to content within the folder.
Previewing the email Message
To preview the email message, click Preview (![]() ) on the Web Alerts tab.
) on the Web Alerts tab.

Assigning Web Alert Information to Content
You can customize Web Alert settings for any content item. If you do, you break the inheritance from its folder. From then on, the content’s Web Alert settings are independent of the folder’s settings.
IMPORTANT: If all subscriptions are unchecked for a folder, the Web Alert feature is disabled for all content in the folder. This applies even if unique Web Alert information is assigned to content.
To customize the Web Alert settings for any content item:
- Navigate to the folder that contains the content.
- Click the content. The View Content screen appears.
- Click Edit.
- Click the Web Alerts tab.
NOTE: The Web Alerts tab only appears if required messages, “from” email addresses, and at least one subscription are assigned to the content’s folder.
The Web Alert settings for the content appear

- Options—Check when Web Alert emails are sent as this content is published.
- Notify Always—send email whether content is being published for the first time or updated
- Suspend Next Notification (override)—check this box to suspend the next email to be sent for this content. You might use this feature if you noticed a small error in the content and don’t want to notify subscribers that the page was updated.
NOTE: - This setting only applies until the next time this content is published. When that happens, this box is automatically unchecked.
- Notify only on Initial Publication—send email the first time content is published. After that, email is not sent.
- Send Next Notification (override)—send email to all subscribers the next time this content is published. Use this checkbox to send a one-time mailing to all subscribers about content that was already published.
NOTE: - This setting only applies until the next time this content is published. When that happens, this box is automatically unchecked.
- Notify Never—email is never sent when this content is published.
- Subject—Same as for a content folder.
- email From—Same as for a content folder.
- Contents—Same as for a content folder.
- Available Alerts—Only Web Alerts assigned to the folder appear. Check ones that you want to assign to this content item.
Restoring Folder-level Web Alert Information to Content
If you customize Web Alert information for content and later decide to standardize that information for all content in a folder, use the Restore Web Alert Inheritance checkbox on the folder properties Web Alerts tab. This action copies the folder's Web Alert information to every content item in the folder, replacing any content-level information.
How Dragged and Dropped Content is Handled
Web Alert emails are not generated for files that are dragged and dropped into Ektron and immediately published. To generate email for these files, you must manually publish them. Like HTML content, these files must reside in a folder for which the Web Alert feature is enabled.
How Users Sign up for Subscriptions
After setting up subscriptions, you create a Web page that lets site visitors subscribe to areas of interest.

To place this form on a Web page, your developer inserts a Membership Server Control. See Also:
Any user who subscribes via the above screen becomes an Ektron membership user, and is automatically added to the All Members user group. For more information, see Membership Users and Groups.
NOTE: The email address collected on the screen is used as the membership Username field.
What happens next depends on the Enable Verify email check box in the Application Setup screen (shown below).

What Happens if Verification email is Not Used
If the Enable Verify email checkbox is not checked, everyone who signs up automatically becomes a membership user.
What Happens if Verification email is Used
IMPORTANT: When using the Checkout Server Control on an eCommerce site, the Enable Verify Email setting must be unchecked. Otherwise, new users will receive an error message when they sign-up using this control. See Also: Using the eCommerce Server Controls
Typically, when managing a self-subscribe list, you want new users to confirm their intention of being on the list. This prevents people from being subscribed without their permission.
If the Enable Verify email checkbox is checked, everyone who signs up is placed on the Users Not Verified list. (To see this list, go to Workarea > Settings > Community Management > Memberships > Users Not Verified.)
These people then receive an email. (You define its content in Workarea > Settings > Community Management > Messages.) The email should direct the unverified user to a Web page that asks for confirmation of the person's interest in the subscription. (See Customizing the Verification Message.) New users are activated when the subscriber confirms interest.
To create this page, your Web developer creates or updates a Web Form using the Membership Server Control. Set the control’s DisplayMode property to AccountActivate.
NOTE: Users can also be manually activated or removed via the View Not Verified Users screen. For more information, see The View Not Verified Users Screen.
Customizing the Verification Message
By default, Ektron supplies a generic message asking the user to confirm the password and directing the person to your website's activateuser.aspx page. To customize that message:
- Go to Workarea > Settings > Community Management > Messages.
- Click AddEmail Message.
- Assign a title to the message, such as Verification Message.
- In the Type drop-down, select Verification.
- Click the check mark in the Default box.
- In the Subject field, enter a subject line for the message.
- Enter the message. You must insert the
@appQueryLink@variable in the message to create a link to the confirmation page. For example:Welcome to example.com. You registered to be notified of updates to our site. Before we can do this, you need to activate your account. To do so, please visit @appQueryLink@.The
@appQueryLink@variable gets resolved as follows (one line):http://sitepath/workarea /activateuser.aspx?uid=[username]&acc=[accountID]
For example (one line):
http://www.example.com/Workarea
  /[email protected]&acc=ce5w84o936477
You can insert these membership variables into the confirmation message.
- @appEmail@—email address
- @appActivateId@—Account ID
- @appUserName@—UserName
- @appFirstName@—First name
- @appLastName@—Last name
- @appDisplayName@—Display name
- @appAvatar@ —Avatar
- @appSignature@—Signature
The View Not Verified Users Screen
Users who signed up for a subscription but who have not been verified appear on the View Not Verified Users Screen. This screen is available via Settings > Community Management > Memberships > Users not Verified.
On this screen, you can activate accounts by selecting users then clicking ActivateUsers. Alternatively, you can delete members by selecting and clicking Delete ( ).
).
NOTE: The ek_PageSize setting in the web.config file determines the maximum number of users that can appear on a page before it “breaks.” When a page breaks, additional entries appear on another screen, and the following text appears near the bottom of the list: Page 1 of 2 [First Page] [Previous Page] [Next Page] [Last Page]
To select all members, click the check box next to Username.

You can also change the way membership users are sorted, or use the Search button to find users that match your criteria (for example, users whose username includes example.com.)
Setting up Other Web Pages for Site Visitors
You can set up other Web pages that let subscribers perform these actions:
- Activate their account
- Reset their password
- Unsubscribe
To create these pages, place a Membership server control on the page. Then use its DisplayMode property to determine the kind of screen you want to place. For example, to create a screen that lets the user reset a password, set the control’s DisplayMode property to ResetPassword. See Also: Membership server control
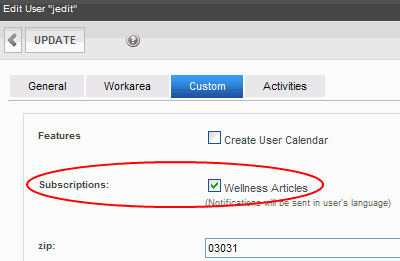
CMS User Subscription Sign Up
CMS users can subscribe to any subscription list. This is particularly useful on an intranet where, for example, employees are notified when job-related information is updated.
Another example is your internet site. The Marketing manager can sign up to be notified whenever Marketing content is added or updated. To do so, go to Settings > Users > Edit User > Custom tab.
See Also: Using eSync with Web Alerts