Synchronizing Servers Using eSync
Ektron’s eSync keeps websites up-to-date efficiently. From single sites, global multi-sites, and server farms, eSync provides scalable, geo-synchronization capabilities that let you easily update exactly what you want, when you want to update it. The following video introduces eSync: eSync—Website Synchronization With Ektron.
Ektron’s eSync lets users update content anywhere safely by employing certificate-based authentication to secure your website, whether it is on a production server or a development environment. Also, your updates can take place on the safe side of your firewall before being moved to the live site. Within complex IT infrastructures, eSync can synchronize content, assetan external file, such as a Microsoft Word document or image, stored in Ektron. It can be managed like native Ektron content.s, HTML pages and other website components, whether they are managed by Ektron or not.
eSync efficiently makes updates and eliminates site downtime by moving only the changes you want to move; single pieces of content to entire sites. With its intelligent synchronization technology, eSync securely moves selected content bidirectionally: Web 2.0 sites have a wealth of user-generated content and membership information which can be synchronized back to the development side of the firewall. To track changes to Ektron data between syncs, eSync sets up a c:\sync folder structure that mirrors your site’s Windows folder structure. This structure is created on each server when sync relationships are first established. No Ektron files reside in the \sync folders. Instead, each folder has four .sync files that monitor changes to Ektron files in the corresponding folder.
eSync manages content dependencies. Ektron content can reference other files, such as images. eSync automatically handles the synchronizing of such content dependencies, so you do not need to worry about these extra files. Adjusting Relationship Settings explains how to control content dependency sync.
You can synchronize at any time with single or multiple servers; strategic times that assure optimal performance, while facilitating site updates; low-traffic times to coordinate global multi-site setups. You also can schedule time-sensitive events.
If conflicting versions of content exist, eSync’s configurable conflict resolution engine ensures that you will not lose your most recent content. The version that isn’t posted is saved in a history log (along with other previous versions), letting you track changes or restore if the need arises.
If you have multiple development servers, eSync can create a copy of the live site to work with. As your developers changes the site, their updates can by synchronized to the staging and production servers. eSync also can support advanced infrastructures, including load balancing and failover server configurations.
Every server in a sync relationship is assigned a unique number. The originating server is 1, the first server with which it establishes a relationship is 2, and so on. The server number is stored in the c:\sync\serverinfoXX.xml file.
<SyncServerInfoList>
  <SyncServerInfo IsSyncRunning="false" Migrated="false" MaxId="2" ServerNumber="1" ...
All Ektron data is assigned a unique ID number to distinguish it from similar objects. Examples are content (see illustration), folders, menus, users, and so on.
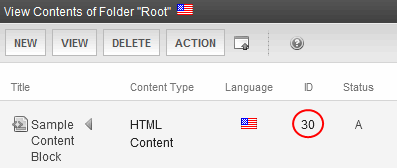
When you create a sync relationship, Ektron applies a new ID numbering range to each server to ensure that, from then on, objects created on either server have a unique ID. This prevents collisions when synchronizing between servers. For example, since membership users created on a production server have a different ID number range from those created on the staging server, eSync does not overwrite them.
To view a server’s ID number range, open its C:\sync\serverinfoXX.xml file, and check the MaxId value as shown in the following example.
<SyncServerInfoList>
  <SyncServerInfo IsSyncRunning="true" MaxId="2" ServerNumber="1"....
Multiply that number by 1 trillion to get the largest ID number which that server can assign. For example, if MaxId = 3, ID numbers range from 2,000,000,000,001 to 3,000,000,000,000.
Setting Up eSync
This section explains several scenarios for installing and setting up eSync.
To use eSync, you must have the following:
- Ektron software and files
- Ektron Version 8.5 or higher
IMPORTANT: The version of Ektron on every server in the sync relationship must match. You cannot upgrade nor downgrade Ektron using eSync.
- An Ektron base installation file (for example,
cms400Base8x.exe). Use to install a second site with which to sync your current site. - Ektron licenses that support Enterprise or Professional with eSync on every server being synched
- Matching security certificates on every server being synched See Also: Managing eSync Security Certificates
- Ektron Version 8.5 or higher
- Microsoft Software
- See Ektron System Requirements
- Microsoft Sync Framework 2.1
NOTE: It is not a problem if your templates were created using the 2.0 Framework.
Database servers may use different SQL server versions. (For example, your development server uses SQL 2008 Express, and your production server uses SQL Server 2008 R2.)
- User Permissions
- You are a member of the Ektron Administrators group or assigned the Synchronization Admin role. See Also: Defining Roles
- The user performing the sync is assigned the following SQL database roles
- db_owner (needed for initial sync only; after that is complete, you may remove this role)
- db_datawriter
- db_executor (created by Ektron installer when setting up database)
- db_ddladmin
db_datareader
- Server
- GMT time on each server’s clock must be within 5 minutes of each other.
Characteristics of eSync
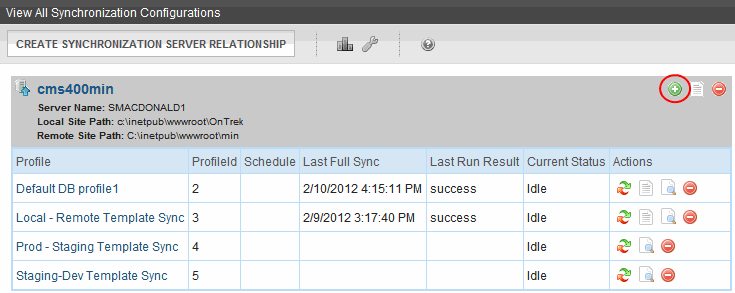
You administer eSync through the Workarea > Settings > Configuration > Synchronization> Profiles screen. The screen lets you establish a sync relationship between 2 websites, then specify any number of sync profiles for each relationship.
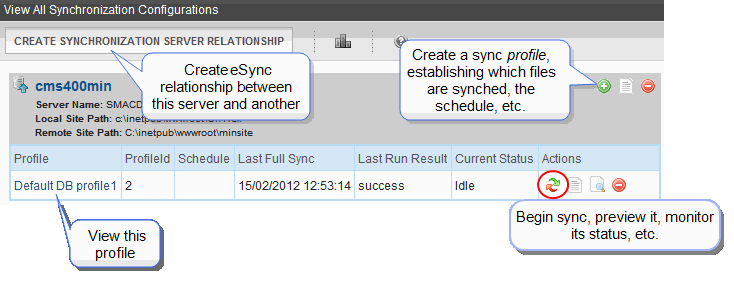
A profile lets you specify data to sync, a direction, and a schedule. You can sync immediately by clicking Sync ( ).
).
You create profiles to sync these kinds of data.
- database objects (content, menus, users, and so on).
- Workarea folder files
- remaining site files
File types or individual files can be included or excluded from a sync profile. Alternatively, you can sync content or folders. See Also: Synchronizing Content and Folders
Sync Relationships
You can synchronize any server to or from any other server with one important exception: you cannot initiate a sync from a server outside the firewall. You can only initiate a sync from a server inside the firewall because an outside server does not know the address of servers inside the firewall. However, your staging server can push to and pull from a production server.
IMPORTANT: All eSync transmissions use port 8732. This is not configurable.
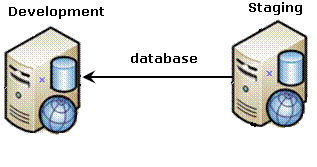
Relationship 1: One Staging Server, One Production Server
The most basic eSync relationship involves a staging and a production server. Each server has a database and one site.
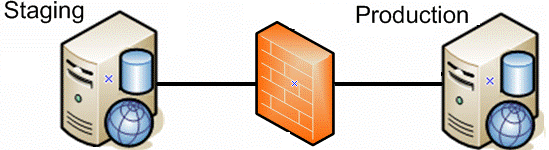
eSync can automatically create a production server from your staging server. See Also: Initializing a New Site
For installation instructions for this relationship, see Scenario 2: Synchronizing a Local Server with a Remote Server.
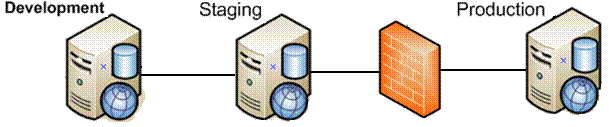
Relationship 2: One Development, One Staging, One Production Server
This relationship includes a development server. Developers can use it to create new features and modify existing ones. When they are done, they can sync changes to the staging server, where they can be verified before being moved to production.
For installation instructions for this relationship, see Scenario 3: Setting up a Development > Staging > Production Environment.
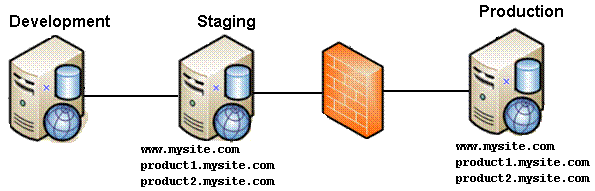
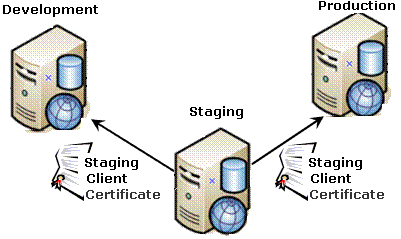
Relationship 2a: Multi-site Staging and Production Servers
The following relationship illustrates synchronizing several sites on a staging server with those sites on production.
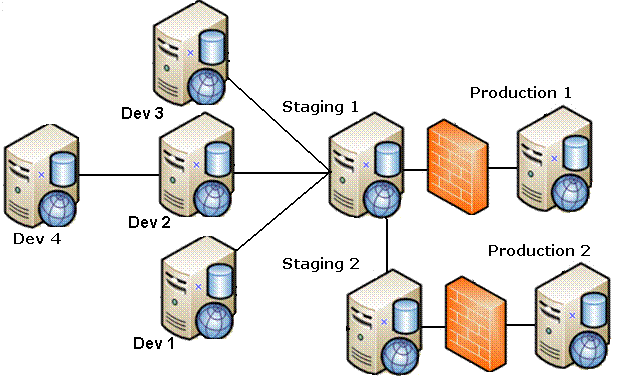
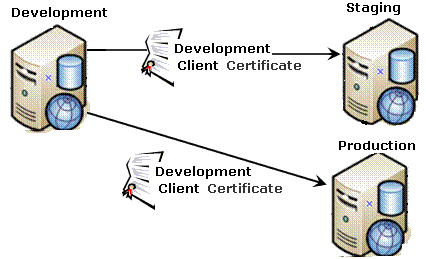
Relationship 3: Several Dev. Servers, One Staging, One Production Server
As shown in the illustration, any number of development servers can sync to each other and your staging and production servers.
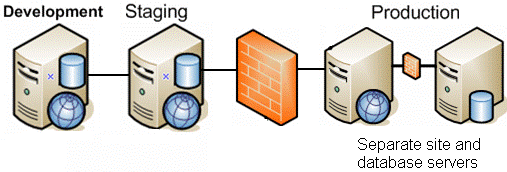
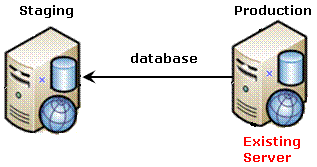
Relationship 4: One Dev., One Staging, One Production Site, One Production DB Server
In this relationship, the production site has 2 servers: one for site files, and another for the database.
To synchronize these servers, set up several eSync profiles. One syncs the database, assetan external file, such as a Microsoft Word document or image, stored in Ektron. It can be managed like native Ektron content.s, and templates to the production database server. Another profile syncs the staging server’s Workarea files with the production site server.
NOTE: When using separate site and database servers, assets are stored on the site server.
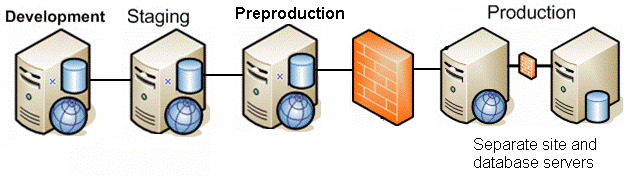
Relationship 5: Relationship 4 Plus Pre-Production Server
This relationship adds a server between staging and production. The preproduction server can be used for review and testing of changes before they are moved to production.
Relationship 6: Multi-site: Each Site and DB on own Production Server
In this relationship, each production server has its own database plus the site files. As an alternative, you could have a separate server for each production database, with all sites on one production server.

NOTE: The above relationship also supports separate site and database servers.
To synchronize this type of relationship, set up several eSync profiles, one for each site.
- 3 database and template profiles
- 3 Workarea profiles
Initializing a New Site
Typically, before you begin using eSync, one server hosts an Ektron website, and you want to bring other servers into the relationship. After the servers are synchronized, one is the staging server, the one on which content is created or updated, then published. Another server, production, hosts your live website.
IMPORTANT: The names of the site and all folders must match on both servers. This is because paths to images, XSLTExtensible Stylesheet Language Transformations files, and so on, refer to a site and its folders. If the names do not match, the links break.
First, use eSync to initialize new servers from the existing one. Afterwards, use eSync to periodically sync updated content, folders, users, menus, and so on.
Scenario 1: Synchronizing 2 Sites on the Same Server
It is unlikely that you will use this relationship in “real-life” situations, but it provides the simplest way to begin testing and learning eSync.
IMPORTANT: Only use this scenario in a test environment. For a live environment, use either Scenario 2: Synchronizing a Local Server with a Remote Server or Scenario 3: Setting up a Development > Staging > Production Environment.
- Log into your Ektron server using the credentials of the service account used by Ektron Windows Service 4.0 and your site's AppPool.
- Begin to install the first site. See Also: Installing Ektron.
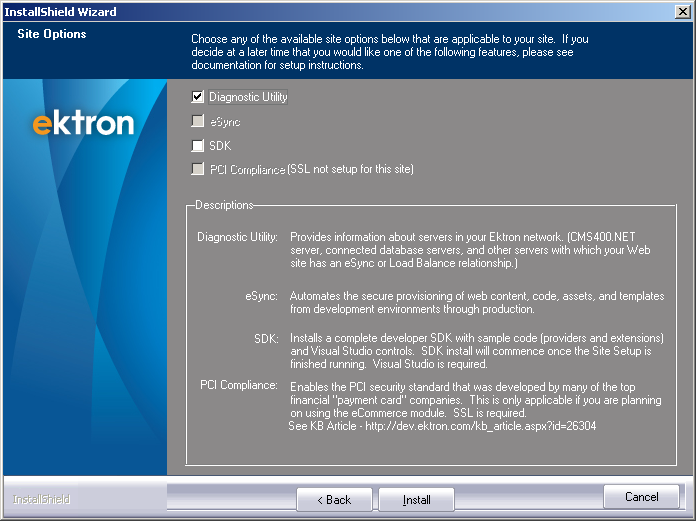
- During installation, the following dialog appears. Check eSync.


- Near the end of the installation, the following dialog appears.
- At the Site Name drop-down, select the site you just installed.
- Check the radio button next to Generate Certificates.
- Click Generate.
- Install a second site on the same server, again using the credentials of the service account used by Ektron Windows Service 4.0 and your site's AppPool.
IMPORTANT: Install both sites to a physical folder relative to the root folder. Do not install one site to a physical folder relative to the root folder and the other site to a virtual directory.
- Repeat Steps 2 and 3 above for the second site.
- Click the Windows Start button > All programs > Ektron > CMS400 v8x > Utilities > Security Configurator. Right click and choose Run As Administrator. The security configurator screen appears.
- In the Web Site Description drop-down, select the first site.
- Click Apply Remote Server Certificates.
- Click Browse next to that field.
- Browse to
C:\Program Files (x86)\Ektron\CMS400vxx\Utilities\SOFTWARE\SecurityConfigurator. - Click Apply.
NOTE: Ektron Windows Services stop and restart at this point.
- Repeat Step 7 through 11 for the second site.
Now that both sites’ security certificates are configured, continue from Part 3: Connect Local and Remote Servers.
Scenario 2: Synchronizing a Local Server with a Remote Server
To sync a local to a remote server, install a minimal Ektron site to a new, remote server. Next, use eSync to upload your Ektron site from the local to the remote server. After the you complete the initial and template syncs explained in this chapter, the 2 sites are mirror images of each other.
Follow these steps to configure 2 servers to sync with each other.
Prerequisite
Part 1: Set up a Min Site on the Remote Server
- Upgrade the local server to the latest version of Ektron if necessary.
- On the remote server, install a minimum Ektron site whose version matches the local server by running the Ektron base installation file (
CMS400Base8x.exe). For more information, see System Requirements.IMPORTANT: Install both sites to a physical folder relative to the root folder. Do not install one site to a physical folder relative to the root folder and the other site to a virtual directory.
- If the local site is pre-compiled, you must also pre-compile the remote site.
Part 2: Generate and Copy Security Certificates
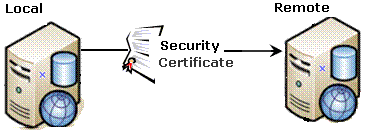
Security certificates authorize file synchronization between servers. In this part, you generate security certificates on the local server, then copy them to the remote.
IMPORTANT: Near the end of the installation procedure, you are prompted to generate security certificates. If you completed that screen, skip steps 2 through 6.
- Sign on to the local server using the credentials of the service account used by Ektron Windows Service 4.0 and your site's AppPool.
- Click the Windows Start button > All programs > Ektron > CMS400 v8x > Utilities > Security Configurator. Right click and choose Run As Administrator. The following screen appears.
- At the Web Site Description field, select the website on the local server.
- Click Generate.
- Click Yes. The certificates are created on the local server.
NOTE: Ektron Windows Services stop and restart at this point.
- Close the dialog.
- Open 2 Windows Explorer windows side-by-side: one showing the local server’s file system, and the other showing the remote server’s file system.
- In the remote server window, create a folder underneath the root folder. Name the folder local security certificate.
WARNING! Do not create the new folder under the Web root, C:\inetpub\wwwroot.
- In the local server window, open the following folder:
32-bit:C:\ProgramFiles\Ektron\CMS400vxx\Utilities\Software\SecurityConfigurator
64-bit:
C:\ProgramFiles (x86)\Ektron\CMS400vxx\Utilities\Software\SecurityConfigurator - From that folder, copy these files.
- servername_SyncClient.pfx
- servername_SyncClient.pvk
- servername_SyncClient.cer
- servername_SyncServer.pfx
- servername_SyncServer.pvk
- servername_SyncServer.cer
- Paste the files into the remote folder you created in Step 8. Make sure there are no other security files in the folder.
- Close both windows you opened in Step 7.
NOTE: After copying security certificates to the remote folder, they need to be registered and moved to the correct folders. The Security Configurator screen does this.
- Sign on to the remote server using the credentials of the service account used by Ektron Windows Service 4.0 and your site's AppPool.
- Click the Windows Start button > All programs > Ektron > CMS400 v8x > Utilities > Security Configurator. Right click and choose Run As Administrator. The security configurator screen appears.
- Click Apply Remote Server Certificates.
- Click Browse next to that field.
- Browse to the local security certificate folder where you pasted the security certificates in Step 11.
- Click Apply.
NOTE: Ektron Windows Services stop and restart at this point.
- Click Yes to continue.
- The security configurator copies the certificates you pasted in Step 11 to the correct folder, and configures them for the remote server.
- Click OK when you see All sites are now configured for eSync.
- Next, generate security certificates on the remote server, then copy them to the local.
To accomplish this, repeat the steps in Part 2: Generate and Copy Security Certificates, but this time, treat the remote server as the local server and vice versa.
Part 3: Connect Local and Remote Servers
WARNING! Back up your database before beginning this procedure.
- On the local server, sign on to the Workarea > Settings > Configuration > Synchronization
- Click Create Synchronization Server Relationship. This screen appears.
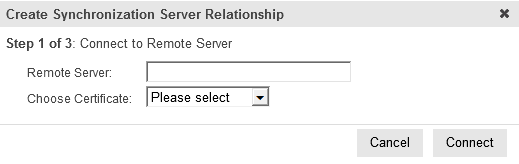
- At the Remote Server field, enter the remote server name. The remote server appears in the Choose Certificate field.
- Click Connect. A screen shows the remote server's databases.
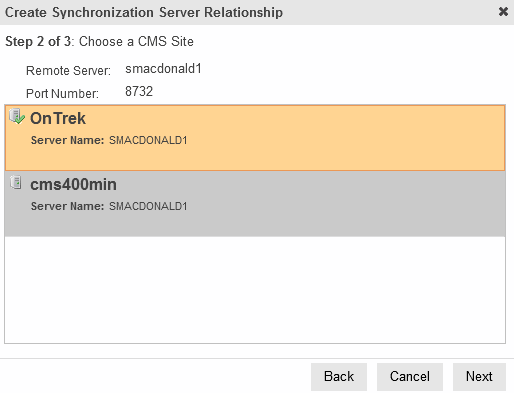
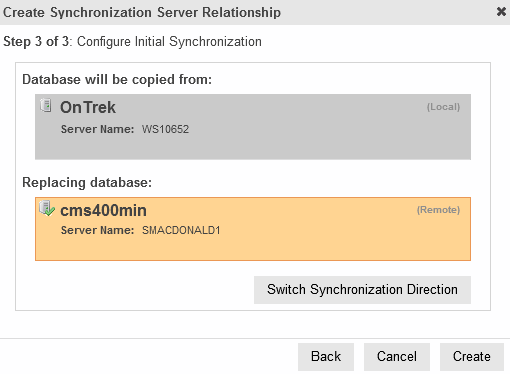
- Click the database with which you want to sync then Next. A screen appears, showing both servers.
- Click Switch Synchronization Direction. The screen indicates that the database will be uploaded from your local server to the remote server.
- Click Create. This action connects the local and remote servers.
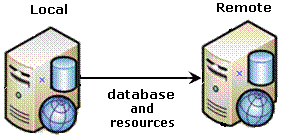
Part 4: Upload the Local Server’s Database and Resources to the Remote Server
NOTE: If your Ektron has a very large database or number of assetan external file, such as a Microsoft Word document or image, stored in Ektron. It can be managed like native Ektron content.s, and you want to reduce the time required to complete the initial sync, see Minimizing the Time of the Initial Sync.
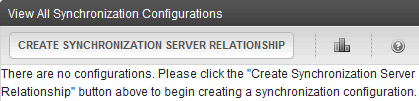
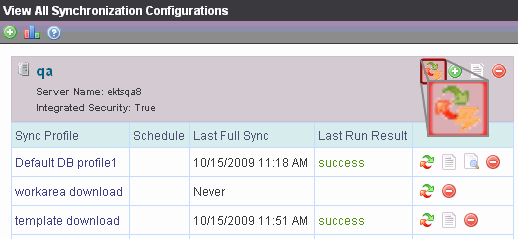
- From the View All Synchronization Configurations screen, click Start Initial Sync (
 ).
).
- The initial sync uploads the local server’s database and resources to the remote server. A screen tracks the progress.
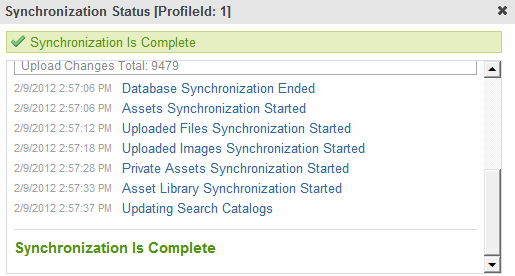
- When the sync is finished, Synchronization is Complete appears.
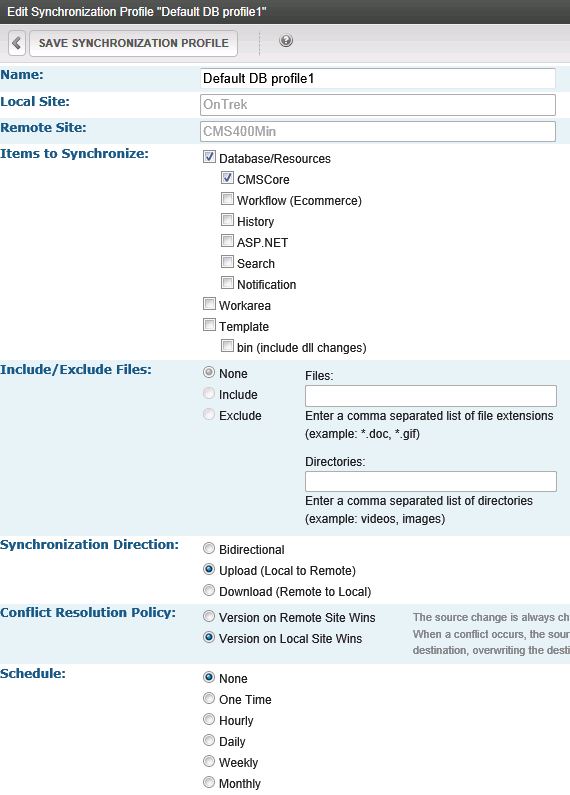
The initial sync creates a default database profile. The profile remembers sync information, such as source and destination databases, sync direction, and items to synchronize. You can reuse this profile to sync database/resource files in the future.
Minimizing the Time of the Initial Sync
Use the following procedures if you have a large database or number of assetan external file, such as a Microsoft Word document or image, stored in Ektron. It can be managed like native Ektron content.s and want to minimize the time to complete an initial sync. In both cases, you use a tool other than eSync for the initial copy. From then on, use eSync to sync your servers.
Copying the Initial Database
To quickly copy a database between servers:
- On your Ektron server, open the folder
C:\Program Files (x86)\Ektron\EktronWindowsService40. - Open Ektron.ASM.Services40.exe.config.
- Set the
<add key="skipDataSyncChanges">element to true. - Restart the Ektron Windows Service.
- Back up the database of the local server.
- Restore that backup to the remote server.
- Run an initial sync.
- Restart the Ektron Windows Service.
- Update your license key.
For example, if the original database is backed up from staging and restored on production, the license key in the database may be for theStaging.abc.comdomain. But, on the production server, you need a production domain key, such asabc.com. See Also: License Keys - Change the
<add key="skipDataSyncChanges">element to false.
Copying Initial Assets
Assets consist of files in these folders:
- siteroot/assets
- siteroot/privateassets
- siteroot/uploadedfiles
- siteroot/uploadedimages
- C:/assetlibrary
If your Ektron has a large number of assets, you may want to reduce the initial sync time. To copy asset files between servers quickly:
- On your Ektron server, open
C:\Program Files (x86)\Ektron\EktronWindowsService40\Ektron.ASM.Services40.exe.config. - Set the
<add key="skipFileSyncChanges">element to true. - Restart the Ektron Windows Service.
- Using Windows Explorer, copy the folders listed above from the local to the corresponding folders on the remote server.
- Run an initial sync.
- Change the
<add key="skipFileSyncChanges">element back to false. - Restart the Ektron Windows Service.
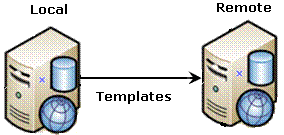
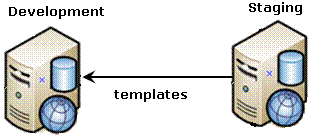
Part 5: Upload Local Server’s Templates to Remote Server
- From the View All Synchronization Configurations screen, click Add Sync Profile (
 ). The Add Synchronization Profile screen appears.
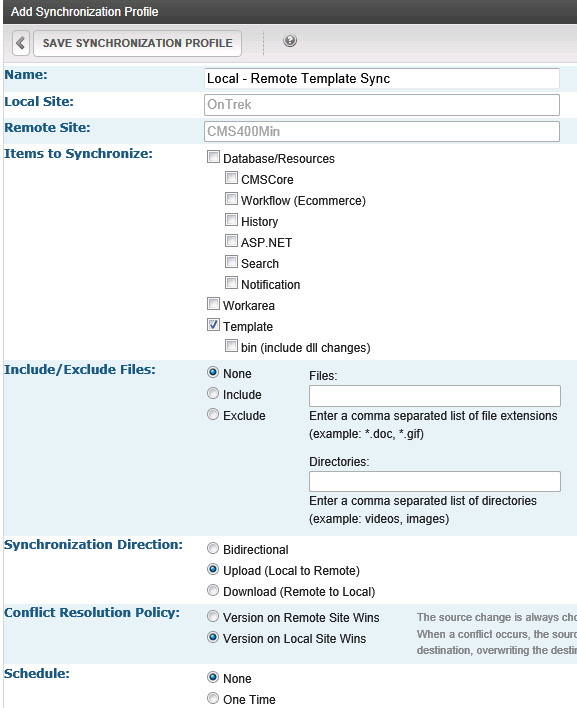
- At the Synchronization name field, give this profile a name, such as Local - Remote Template Sync.
- At the Items to Synchronize field, select Template.
- Check bin to include dlls and assembly changes.
- For Synchronization Direction, choose Upload.
- For Schedule, choose None.
- Save the profile.
- Click Sync () to the right of the template profile.
- A screen tracks the sync’s progress. When it is complete, Synchronization is Complete appears. You can use the template profile to sync templates in the future.
Scenario 3: Setting up a Development > Staging > Production Environment
Before
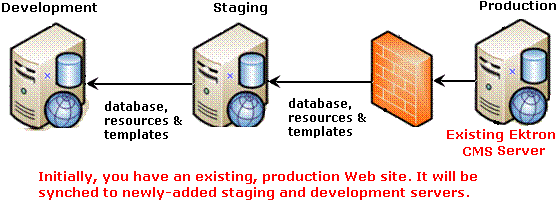
>After
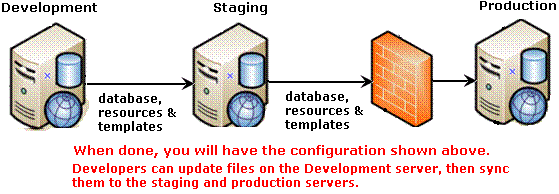
In this scenario, Ektron initially resides on one server. Consider that your production server and use it to initialize the staging and development servers.
NOTE: In this scenario, you cannot sync between the development and production servers. The sync can only be run between Development and Staging or Staging and Production.
Prerequisite
Part 1: Set up Min Site on the Staging and Development Servers
- Upgrade your server to the current version of Ektron if necessary.
- Install a minimum site on the staging and development servers by running the Ektron base installation file (CMS400Base8x.exe). See System Requirements.
IMPORTANT: Install both sites to a physical folder relative to the root folder. Do not install one site to a physical folder relative to root and the other sites to virtual directories.
Part 2: Generate and Copy Security Certificates
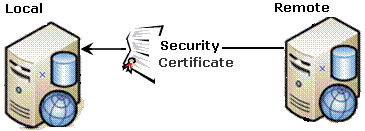
Security certificates authorize synchronization between servers. In an eSync relationship, every server needs a security certificate from every other server, as shown below.
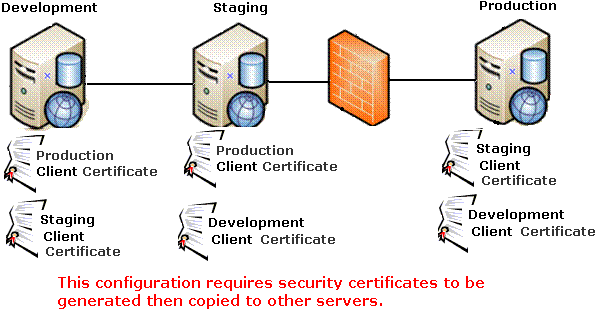
To generate and copy these certificates:
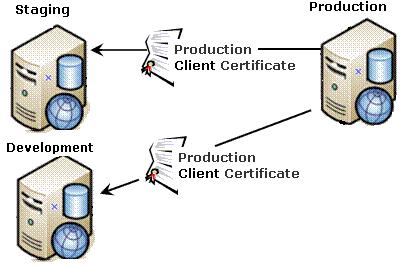
2a. Generate Certificates on Production and Copy to Staging and Development
IMPORTANT: Near the end of the installation procedure, you are prompted to generate security certificates. If you completed that screen, skip steps 2 through 4.
- Sign on to the production server using the credentials of the service account used by Ektron Windows Service 4.0 and your site's AppPool.
-
Click the Windows Start button > All programs > Ektron > CMS400 v8x > Utilities > Security Configurator. Right click and choose Run As Administrator. The following screen appears.
- In the Web Site Description field, select the production server website.
- Click Generate. The certificates are created on the production server.
- Open 2 Windows Explorer windows: one showing the production server’s file system, and the other showing the staging server’s file system.
- In the staging server window, create a folder underneath the root folder. Name the folder Prod security certificates.
WARNING! Do not create the new folder under the Web root, C:\inetpub\wwwroot.
- In the production server window, open the following folder:
C:\ProgramFiles\Ektron\CMS400vxx\Utilities\Software\SecurityConfigurator. - From that folder, copy these files.
- servername_SyncClient.pfx
- servername_SyncClient.pvk
- servername_SyncClient.cer
- servername_SyncServer.pfx
- servername_SyncServer.pvk
- servername_SyncServer.cer
- Paste the files into the folder you created in Step 6. Make sure there are no other security files in the folder.
- Close both windows.
After copying security certificate files to the staging folder, they need to be registered and moved to the correct folders. The Security Configurator screen does this.
- Sign on to the staging server using the credentials of the service account used by Ektron Windows Service 4.0 and your site's AppPool.
- Click the Windows Start button > All programs > Ektron > CMS400 v8x > Utilities > Security Configurator. Right click and choose Run As Administrator. The security configurator screen appears.
- Click Apply Remote Server Certificates.
- Click the browse button next to that field.
- Browse to the folder to which you pasted the security certificates in Step 9.
- Click Apply. The security configurator copies the certificates you pasted in Step 9 to the correct folder, and configures them for the staging server.
- Follow the same procedure to move production certificates to the development server. To do this, begin at Step 6 and follow all steps. Wherever the instructions mention a staging server, substitute the development server.
2b. Generate Certificates on Staging and Copy to Development and Production
- Sign on to the staging server using the credentials of the service account used by Ektron Windows Service 4.0 and your site's AppPool.
IMPORTANT: Near the end of the installation procedure, you are prompted to generate security certificates. If you completed that screen, skip steps 2 through 4.
-
Click the Windows Start button > All programs > Ektron > CMS400 v8x > Utilities > Security Configurator. Right click and choose Run As Administrator. The following screen appears.
- At the Web Site Description field, select the staging server website.
- Click Generate. The certificates are created on the staging server.
- Open 2 Windows Explorer windows: one showing the staging server’s file system, and the other showing the production server’s file system.
- In the production server window, create a folder underneath the root folder. Name the folder staging security certificates.
WARNING! Do not create the new folder under
C:\inetpub\wwwroot. - In the staging server window, open the following folder:
C:\ProgramFiles\Ektron\CMS400vxx\Utilities\Software\SecurityConfigurator. - Copy these files.
- servername_SyncClient.pfx
- servername_SyncClient.pvk
- servername_SyncClient.cer
- servername_SyncServer.pfx
- servername_SyncServer.pvk
- servername_SyncServer.cer
- Paste the files into the folder you created in Step 6. Make sure there are no other security files in the folder.
- Close both windows opened in Step 5.
NOTE: After copying the security certificate files to the production folder, they need to be registered and moved to the correct folders. The Security Configurator screen does this.
- Sign on to the production server using the credentials of the service account used by Ektron Windows Service 4.0 and your site's AppPool.
- Click the Windows Start button > All programs > Ektron > CMS400 v8x > Utilities > Security Configurator. Right click and choose Run As Administrator. The security configurator screen appears.
- Click Apply Remote Server Certificates.
- Click the browse button next to that field.
- Browse to the folder to which you pasted the security certificates in Step 9.
- Click Apply. The security configurator copies the certificates you pasted in Step 9 to the correct folder, and configures them for the production server.
- Follow the same procedure to move staging certificates to the development server. To do this, begin at Step 6 and follow all steps. Where the instructions mention a production server, substitute the development server.
2c. Generate Certificates on Development and Copy to Staging and Production
- Sign on to the development server using the credentials of the service account used by Ektron Windows Service 4.0 and your site's AppPool.
IMPORTANT: Near the end of the installation procedure, you are prompted to generate security certificates. If you completed that screen, skip steps 2 through 4.
-
Click the Windows Start button > All programs > Ektron > CMS400 v8x > Utilities > Security Configurator. Right click and choose Run As Administrator. The following screen appears.
- At the Web Site Description field, select the website on the development server.
- Click Generate. The certificates are created on the development server.
- Open 2 Windows Explorer windows: one showing the development server’s file system, and the other showing the staging server’s file system.
- In the staging server window, create a folder underneath the root folder. Name the folder Dev security certificates.
WARNING! Do not create the new folder under
C:\inetpub\wwwroot. - In the development server window, open the following folder:
C:\ProgramFiles\Ektron\CMS400vxx\Utilities\Software\SecurityConfigurator. - Copy these files.
- servername_SyncClient.pfx
- servername_SyncClient.pvk
- servername_SyncClient.cer
- servername_SyncServer.pfx
- servername_SyncServer.pvk
- servername_SyncServer.cer
- Paste the files into the staging server folder you created in Step 6. Make sure there are no other security files in the folder.
- Close both windows you opened in Step 5.
- After copying the security certificate files to the staging folder, they need to be registered and moved to the correct folders. The Security Configurator screen does this.
- Sign on to the staging server using the credentials of the service account used by Ektron Windows Service 4.0 and your site's AppPool.
- Click the Windows Start button > All programs > Ektron > CMS400 v8x > Utilities > Security Configurator. Right click and choose Run As Administrator. The following screen appears.
- Click Apply Remote Server Certificates.
- Click the browse button next to that field.
- Browse to the folder you created in Step 6.
- Click Apply.
- The security configurator copies the certificates you pasted in Step 9 to the correct folder, and configures them for the staging server.
- Follow the same procedure to move development certificates to the production server. To do this, begin at Step 6 and follow all steps. Wherever the instructions mention a staging server, substitute the production server.
Part 3: Connect Staging and Production Servers
WARNING! Back up your database before beginning this procedure!
- On the staging server, sign on to Ektron.
- In the Workarea, go to Settings > Configuration > Synchronization> Profiles. The View All Synchronization Configurations screen appears.
- Click Create Synchronization Server Relationship. That screen appears.
- In the Remote Server field, enter the production server.
- In the Choose Certificate field, the name of the production server appears.
- Click Connect. This action connects the staging with the production server. A new screen appears showing the production server's database.
- Click Next. A new screen appears, showing both servers.
- Click Create. This action connects the staging and production servers.
Part 4: Download Production Server Database to Staging Server
NOTE: If your Ektron has a very large database or number of assetan external file, such as a Microsoft Word document or image, stored in Ektron. It can be managed like native Ektron content.s, and you want to reduce the initial sync time, see Minimizing the Time of the Initial Sync
- From the View All Synchronization Configurations screen, click Start Initial Sync ().
- The initial sync downloads the production server’s database and resources to the staging server. A screen tracks progress.
- Synchronization is Complete appears.
The initial sync creates a default database profile. The profile remembers information about the sync, such as the source and destination databases, sync direction, and which database and resource files are synched. You can use the profile to run database/resource syncs in the future.
Part 5: Download the Production Server’s Templates to Staging
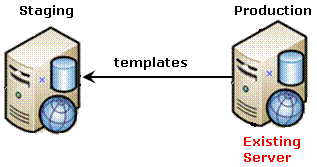
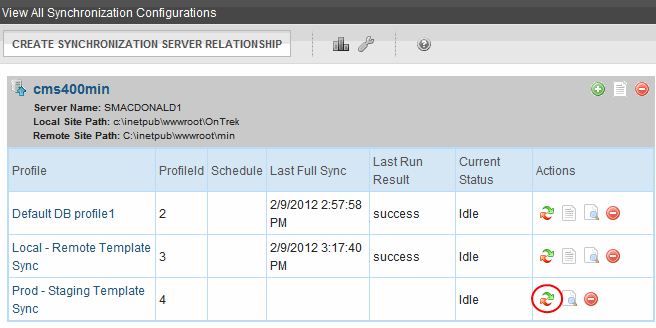
- From the View All Synchronization Configurations screen, click Add Sync Profile (). The Add Synchronization Profile screen appears.
- At the Synchronization name field, give this profile a name, such as Prod - Staging Template Sync.
- At the Items to Synchronize field, select Template.
- Check bin to include dlls and assembly changes.
- For Direction, choose Download.
- For Schedule, choose None.

- Save the profile.
- Click Sync () to the right of the profile. A screen tracks the sync’s progress.
- When the sync is complete, Synchronization is Complete appears. You can reuse the template sync profile in the future.
Part 6: Connect Development and Staging Servers
- Sign on to Ektron development server.
- In the Workarea, go to Settings > Configuration > Synchronization> Profiles. The View All Synchronization Configurations screen appears.
- Click Add (). The Create Synchronization Server Configuration screen appears.
- At the Remote Server field, enter the name of the staging server.
- At the Choose Certificate field, the name of the staging server appears.
- Click Connect. This action connects the development with the staging server. After you connect to the staging server, a new screen appears showing its database.
- Click Next. A new screen appears, showing both servers.
- Click Create. This action connects the development and staging servers.
Part 7: Download Staging Server Database to Development Server
NOTE: If your Ektron has a very large database or number of assets, and you want to reduce the initial sync time, see Minimizing the Time of the Initial Sync.
- From the View All Synchronization Configurations screen, click Start Initial Sync ().
The initial sync downloads the staging server’s database and resources to the development server. A screen tracks the sync’s progress.
- When the sync is complete, Synchronization is Complete appears.
The initial sync also creates a default database profile. The profile remembers information about the sync, such as the source and destination databases, sync direction, and the fact that it syncs the database and resource files (see example below). You can reuse this profile to sync the database/resources between these 2 servers at any time in the future.
Part 8: Download Staging Server Templates to Development
- From the View All Synchronization Configurations screen, click AddProfile (). The Add Synchronization Profile screen appears.
- At the Name field, give this profile a name, such as Staging-Dev Template Sync.
- At the Items to Synchronize field, select Template.
- Check bin to include dlls and assembly changes.
- For Direction, choose Download.
- For Schedule, choose None.
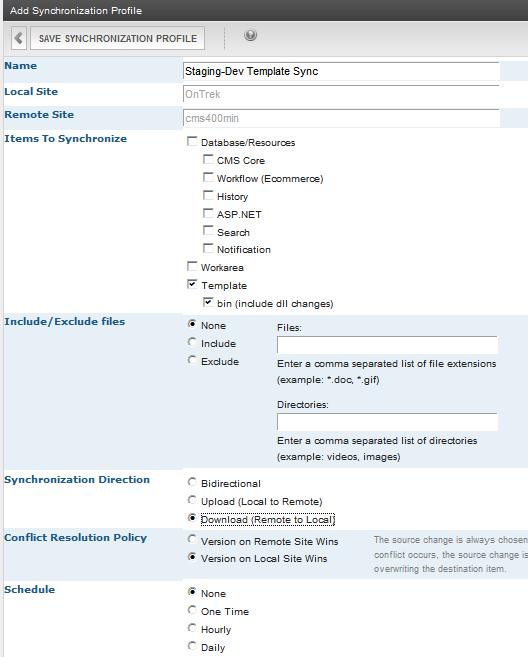
- Save the profile.
- Click Sync () to the right of the profile. A screen tracks the sync’s progress.
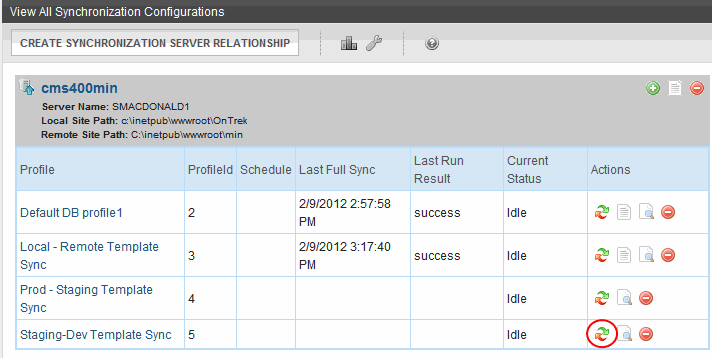
- When the sync is complete, Synchronization is Complete appears. You can reuse the profile to sync templates in the future.
Setting up eSync Profiles
To minimize data entry, eSync saves an job specifications in a profile. After you enter specifications once, select the profile when you want to sync using the same details. A profile contains the following information:
- source and destination databases
- type of data being synched
- files to include/exclude
- direction
- schedule
Use the Add/Edit Synchronization Profile screen to manage eSync profiles.

While Setting Up eSync, you created a default database and a template profile. This section explains how to modify those profiles and create new ones.
To sync a website, you need at least 2 profiles: one for the siteroot/Workarea folder, and another for all other site files. To create a profile for
- your
Workareafolder, check Items to Synchronize > Workarea - all other site files, check Items to Synchronize > Database/Resources, Template, and bin
The following list explains which files are synched by each grouping under Items to Synchronize.
- Database/Resources—Synchronizes database tables plus the following site root folders. See Also: Setting up a Profile to Sync a Database.
- assets
- PrivateAssets
- uploadedimages
- uploadedfiles
- Workarea—Synchronizes files in the site’s
Workareafolder. See Also: Setting up a Profile to Sync Workarea Files - Template—Synchronizes files in the site root folder. See Also: Setting up a Profile to Sync Template and Bin Files
IMPORTANT: If you run a template sync and Bin is checked, and one server is running is 32-bit mode while the other is running in 64-bit mode, users will not be able to drag and drop DMSDocument Management System; Ektron's way of managing assets (Microsoft Office files and other types of files) files on the staging server.
NOTE: If you perform an initial sync of a recently-installed min site with your staging site, the min site’s templates could overwrite templates on your staging site. This is because, when 2 templates have the same name, the most recently-modified one overwrites the other.
To avoid this, rename the only template installed with the min site (login.aspx) before performing the initial template sync. You should also rename login.aspx’s supporting files, such as login.aspx.vb. - Bin—Synchronizes the siteroot/bin folder, including DLLs and assemblies.
The following file types are not synched by default.
- .config files
- .txt files
- .sln files
You may add these file types to a Workarea or Template profile via the Include/Exclude Files field.
Setting up a Profile to Sync a Database
Prerequisite
- You created a Sync relationship and ran an initial sync. See Also: Setting Up eSync.
- If your profile is based on an eSync package, it has been set up. See Also: Synchronizing a Package.
To set up a profile:
- Go to the Settings > Configuration > Synchronization > Profiles screen.
- Click Add Sync Profile (
 ). The Add Synchronization Profile screen appears.
 - At the Name field, enter a name for this profile.
- At the Profile Type field, choose Scope or Local Package.
- To define a Scope, continue through the steps below.
- To define a Local Package, see Synchronizing a Package. After selecting the package, you still choose a Synchronization Direction, Conflict Resolution Policy, and a Schedule.
- At the Items to Synchronize field, select Database/Resources.
The following list describes the database scope filter checkboxes.
NOTE: The Include/Exclude Files field is available only for Workarea, Template, or bin syncs.
Database scope filtersUse these checkboxes to choose groups of database tables. You must choose one scope if you check Database/Resources.
NOTE: Click any label under Database/Resources to see the database tables synched by that scope.
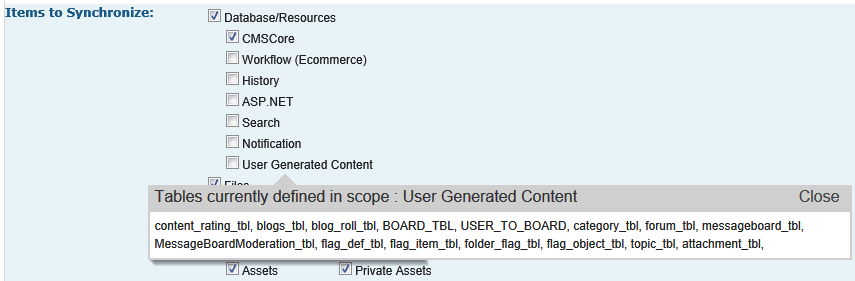
- CMS Core—essential Ektron tables; includes Targeted Content rules
- Workflow(eCommerce)—eCommerce event history
- History—content history. Lets users on the destination server review content changes (edited, published, and so on).
- ASP.NET—Microsoft .Net ASP provider
- Search—tables to support search functionality:
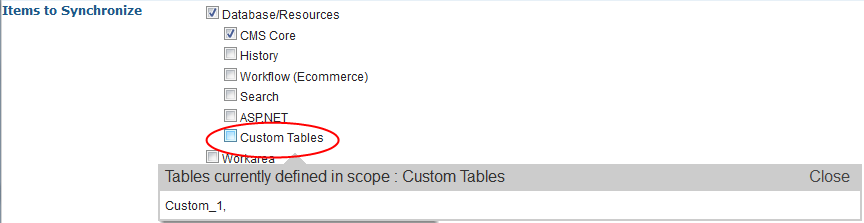
- Custom—Custom tables (if defined) See Also: Synchronizing Custom SQL Database Tables.
- Notification—Notification activities See Also: Sending Notifications to a Community.
- User Generated Content—Content created by membership users and other site visitors. For example:
- A membership user logs in and creates a new account
- A site visitor rates content
- Community members reply to forum questions and blog posts
- A Community member creates a community folder
Whenever user-generated content is synched, the profile of the user who created the content is also synched.
User-generated content is a subset of CMS Core, so you would not choose both for the same sync. But you may select user-generated content with any other scope.
When you set up a sync profile for user-generated content, you typically choose Bidirectional as the direction. In this case, if a membership user updates his or her profile on the production server, eSync copies the changes to staging. On the other hand, if your administrator changes that information on staging, the next eSync copies it from staging to production.
NOTE: Since notifications are part of the User Communities feature, they are automatically checked if you check User Generated Content.
- For the Include/Exclude files field, see Include/Exclude Files Field.
- At the Synchronization Direction field, select the direction of the copy. Your choices are:
- Bidirectional—Changed data on either server is updated on the other. If the same data (for example, a membership user profile) is updated on both servers, the conflict resolution policy determines the outcome. See Also: Choosing a Bidirectional Sync.
- Upload—database copied from the local server (the one to which you signed on) to the remote server (specified at the Remote Site field above). Items on the remote server are overwritten.
- Download—database copied from remote to local server. Items on the local server are overwritten.
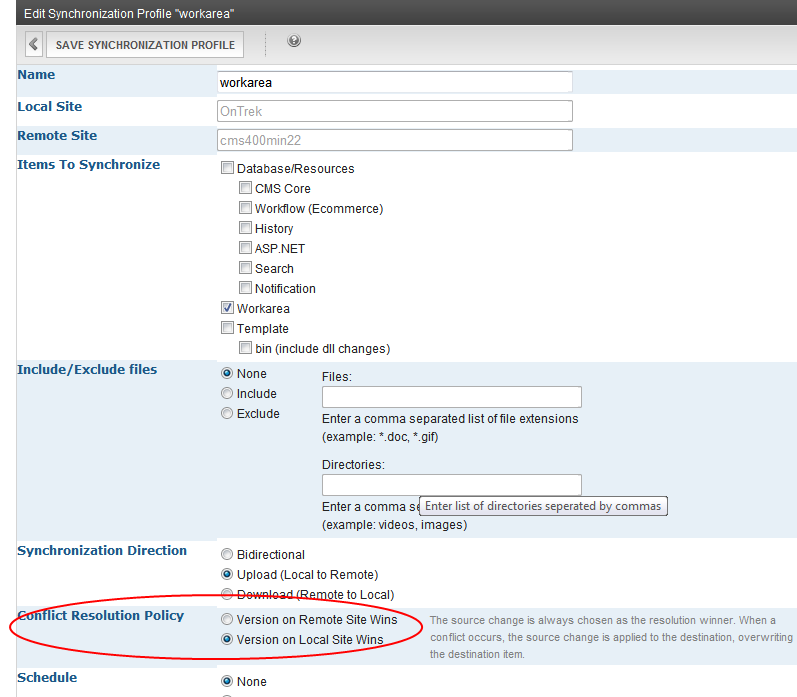
- At the Conflict Resolution Policy field, decide what to do if Synchronization Direction is Bidirectional, and the same data changed on both servers since the last sync. Your choices are:
- Version on Remote Site Wins—the remote version overwrites the local version
- Version on Local Site Wins—the local version overwrites the remote version
- If desired, select a schedule on which sync runs automatically. The choices are
- None—Don’t set up a schedule. Sync as needed via the Sync Profile screen‘s Sync Now button.
- One Time—specify a start time and date. The profile runs once at that date/time.
- Hourly—specify a start minute. The profile runs every hour at this minute.
- Daily—specify a start time. The profile runs every day at this time.
- Weekly—specify a start time and weekday. The profile runs on this day every week at this time.
- Monthly—specify a start time and calendar day (numbers 1 through 31). After the start date, the profile runs on this day every month at this time.
NOTE: If you enter a date greater than 28, the sync will not run in a month that does not include that date. For example, if you enter 31, the sync will not run in February, April, June, September, and November.
Setting up a Profile to Sync Workarea Files
Setting up a profile to sync Workarea files is the same as Setting up a Profile to Sync a Database with the following exceptions:
- At the Items to Synchronize field, select Workarea.
- You may use the Include/Exclude Files field to refine the files to be synched. See Also: Include/Exclude Files Field
Include/Exclude Files Field
Use the Include/Exclude Files field to include files not normally synched, or exclude files or directories that are synched by default. This screen section is active only if you choose a Template or Workarea sync and no Database/Resources scopes.
NOTE: By default, eSync ignores .config and .txt files.
For example, .txt files are not normally synched, but you want to sync several of them. In this case, check Include and enter *.txt into the Files field.
Examples of the Exclude Files option:
- you do not want to sync Flash (.swf) files. If you check the Exclude button, and enter .swf into the Files field, eSync ignores them.
- you do not want to sync files in the widgets folder. If you check the Exclude button, and enter widgets into the Directories field, eSync ignores them.
You can exclude file types and directories. eSync ignores files that satisfy either criterion.
Files Excluded from the Workarea Sync
Workarea synchronizes all files in the site’s Workarea folder, except files in these subfolders:
- ewebeditpro
- explorer
- ewebdiff
- foundation
- resources
- sync
Setting up a Profile to Sync Template and Bin Files
Setting up a profile to sync Workarea files is the same as Setting up a Profile to Sync a Database with the following exceptions:
- At the Items to Synchronize field,
- You may use the Include/Exclude Files field to refine the list of files to be synched.
Regardless of how you complete the Include/Exclude Files field, the following siteroot folders are not synched:
- App_GlobalResources
- App_WebReferences
- Workarea
- assetlibrary
- assetan external file, such as a Microsoft Word document or image, stored in Ektron. It can be managed like native Ektron content.s, privateassets, uploadedfiles, uploadedimages (
- latestchanges
- app_webreferences
- app_globalresources
Choosing Files and File Types via Include/Exclude Files
Within a template/bin sync's folders, you can select individual files. For example, you updated template files and related .css files on the staging server, and want to update the production server without moving everything else.
After saving the profile, click Synchronize files ( ) from the View Profiles screen to access the Sync Files screen. Here, you can select individual files. If you included files types, only they are available for selection. If you excluded file types or directories, they are unavailable.
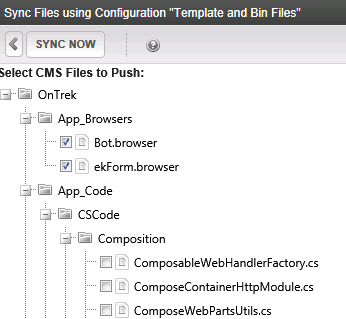
IMPORTANT: If you select one or more files on the Sync Files screen, the profile includes only those files. If you select no files, the profile includes all files indicated by your responses to the Include/Exclude Files field.
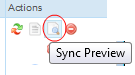
Previewing a Sync Profile
Before running a sync profile, you can view what will be synched. To do this, click Sync Preview.
Ektron recommends this feature to help confirm that tables, assetan external file, such as a Microsoft Word document or image, stored in Ektron. It can be managed like native Ektron content.s, private assets, uploaded files, uploaded images and assetlibrary files that you delete, add, or change will be synched between servers as you expect. Also, you can predict how long a sync will take, because the preview takes the same amount of time.
The Sync Preview produces Sync Log files. See Also: Viewing eSync Activity
NOTE: You cannot preview a sync profile that includes only Workarea files.
Pausing the Sync Schedule
If a sync profile runs on a schedule, you can pause it by clicking the profile's pause/play button.

While paused, the sync will not run. To resume the schedule, click the pause/play button again.
For example, a sync is scheduled to run every hour @ :50: 1:50, 2:50, 3:50, and so on. At 10:30 a.m., you pause the sync profile. So, at 10:50 a.m., the sync does not run. At 12:00 noon, you click the pause/play button again. The next sync starts at 12:50 p.m.
Choosing a Bidirectional Sync
Although most Ektron data is created and updated on the staging server, some data is collected on the production server. This information can be viewed and edited on the staging server. Here are some examples:
- membership users
- content ratings
- forum and blog posts
- community folders
When you set up a profile to sync this kind of data (maintained in the database), you typically choose Bidirectional as the direction
If the same file on both servers was updated since the last sync, your conflict resolution policy determines which data is saved.
NOTE: The first time you run a sync for templates or Workarea files, the sync is bidirectional, regardless of the direction you specify on the Synchronization Direction screen.
If you are using a bidirectional sync, and the same item changed on both servers since the last sync, eSync must decide which version to keep, and which version to overwrite.
NOTE: If you use bidirectional sync and only one version was updated since the last sync, the updated version overwrites the unchanged version.
Use the Synchronization Profile screen's Conflict Resolution Policy field to determine which version ends up on both servers after synchronization. The choices are:
- Version on Remote Site Wins—the remote version overwrites the local
- Version on Local Site Wins—the local version overwrites the remote
Managing eSync Security Certificates
eSync uses security certificates to secure communication between servers. All servers in an eSync relationship must have matching, encrypted security certificates to establish an eSync relationship.
NOTE: If your relationship includes separate database servers, you do not need to install security certificates on them. You only need to install certificates on servers that host Ektron.
See Also: Create eSync Security Certificates for a Load Balanced Cluster
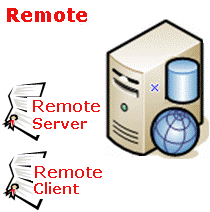
Before you can establish an eSync relationship between servers, each server must have its own (local) security certificates and certificates from every other server in the relationship.
As another example, if an eSync relationship consists of 5 servers, each server requires 5 security certificates: one local and 4 remote.
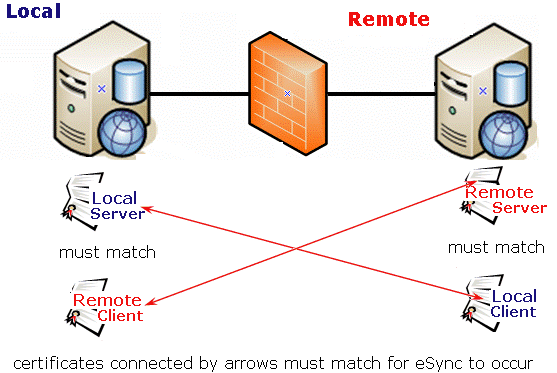
Each server creates 2 certificates: a server and a client. Then, you copy the client certificate to the other servers in the relationship. The local machine’s server certificate must match a client certificate on the remote server, and vice versa.
You typically copy certificates only when establishing an eSync relationship between servers. After that, any eSync activity triggers a background check, and you can only proceed if certificates match.
Each certificate consists of these files.
- Server certificate
- servername_SyncServer.pfx
- servername_SyncServer.pvk
- servername_SyncServer.cer
- Client certificate
- servername_SyncClient.pfx
- servername_SyncClient.pvk
- servername_SyncClient.cer
The security certificates can apply to one site or all sites on a server. You determine this when installing them.
Viewing Security Certificates
Use Certificate Manager to view security certificates installed on your server. Check marks indicate the certificates. You can also delete all certificates for a server.
NOTE: You can only remove certificates from remote servers. You cannot remove them from the server to which you are logged in.
To view (and delete) certificates:
- Right click Start > Program Files > Ektron > CMS400vxx > Utilities > Security Configurator > right click and choose Run as Administrator.
- Click Manage Certs. Your server's security certificates appear.
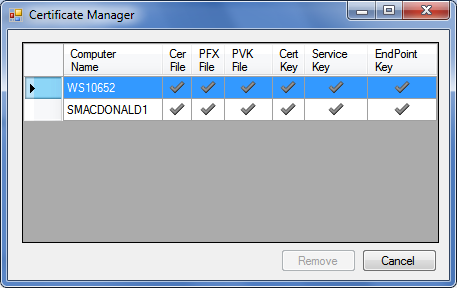
- To remove a remote server's certificates, select that row and click Remove.
Installing Security Certificates
Prerequisite
Permission to copy and paste files between local and remote servers
To create and place eSync security certificates in the correct locations:
Step 1: Create Security Certificates on Your Local Server
-
Log on using the credentials of the service account used by Ektron Windows Service 4.0 and your site's AppPool.
- During the Ektron installation, you are asked if you want to install eSync security certificates. The eSync checkbox (second from the top) is only accessible if your license key contains an eSync modifier.
- If you check eSync, near the end of installation, the following screen prompts you to create the certificates.
NOTE: You can access this screen at any time screen by clicking the Windows Start button > All programs > Ektron > CMS400 v8x > Utilities > Security Configurator > right click and choose Run as Administrator.
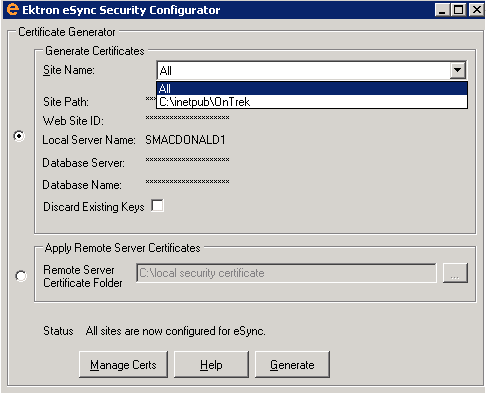
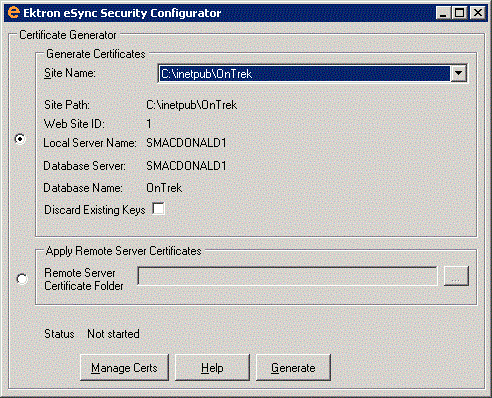
- Use the following information to understand this screen.
- Generate Certificates—Use this screen area to create security certificates that must be copied to a remote server with which you want to sync.
- Site Name—If more than one site is installed on this server, use the pull-down list to select the website for which you are installing security certificates. Or, click All to apply certificates to all sites on the server.
- Apply Remote Server Certificates—Use this screen area to apply security certificates that were copied from a remote server to your local server. See Also: Step 3: Copy Local Client Certificate to Remote Server
- Click Generate.
- Local security certificates are created and configured.
NOTE: Only click Generate once. The status field at the bottom of the screen updates as it progresses. If you click OK more than once, you delay the certificates’ creation.
Step 2: Create Security Certificates on the Remote Server
- Sign on to the remote server using the credentials of the service account used by Ektron Windows Service 4.0 and your site's AppPool.
- Generate security certificates for the remote server, following instructions in Step 1: Create Security Certificates on Your Local Server.
Step 3: Copy Local Client Certificate to Remote Server
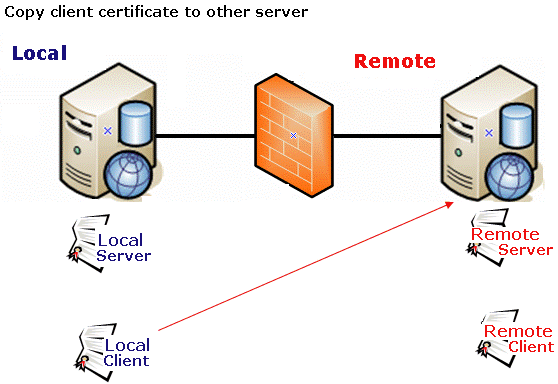
- On the local server, open 2 Windows Explorer windows: one showing the local server’s file system, and the other showing the remote server’s file system.
- On the remote server window, create a folder underneath the root folder. The folder name is not important.
IMPORTANT: Do not create the folder under the Web root folder, for example
C:\inetpub\wwwroot. - In the local server window, open the following folder:
C:\ProgramFiles\Ektron\CMS400vxx\Utilities\Software\SecurityConfigurator. - Copy the following files.
- servername_SyncClient.pfx
- servername_SyncClient.pvk
- servername_SyncClient.cer
- servername_SyncServer.pfx
- servername_SyncServer.pvk
- servername_SyncServer.cer
NOTE: These files were created when you completed the eSync Security Configurator Screen in Step 1.
- Paste the files to the remote server folder that you created in Step 2. Make sure there are no other security files in the folder.
After you copy the local server’s security certificates to the remote server, they need to be registered and moved to the correct folders. The Security Configurator screen does this.
- Log into the remote server, using the credentials of the service account used by Ektron Windows Service 4.0 and your site's AppPool.
- Open the security configurator screen using this path: Windows Start Button > All programs > Ektron > CMS400 v8x > Utilities > Security Configurator > right click and choose Run as Administrator.
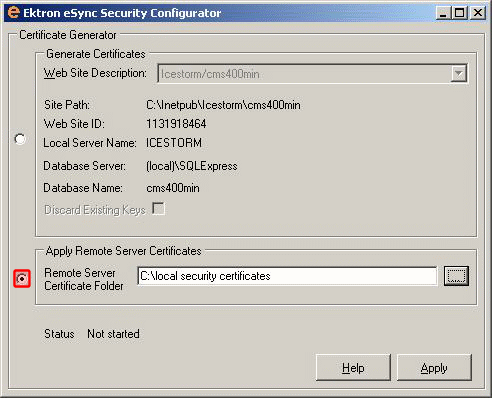
- The security configurator screen appears.
- Click Apply Remote Server Certificates (circled above).
- Click the browse button next to that field.
- Browse to the folder to which you pasted the security certificates in Step 5.
- Click Apply.
- The utility copies the security certificates you pasted in Step 5 to the correct folder, and configures them for the remote server.
Step 4: Copy Remote Client Certificate to Local Server
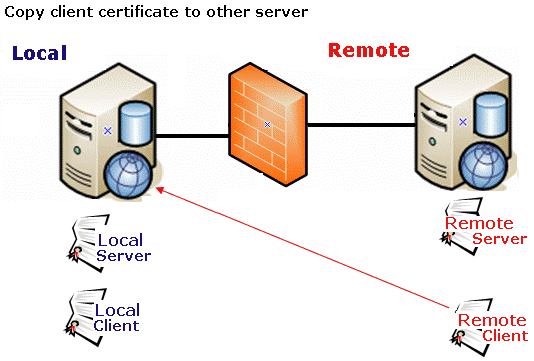
- Sign on to the remote server using the credentials of the service account used by Ektron Windows Service 4.0 and your site's AppPool.
- Follow the steps described in Step 3: Copy Local Client Certificate to Remote Server, except substitute remote for local.
Step 5: Test the Security Certificates
- From the local server, sign on to Ektron using the credentials of the service account used by Ektron Windows Service 4.0 and your site's AppPool.
- In the Workarea, go to Settings > Configuration > Synchronization> Profiles.
- Click Create Synchronization Server Configuration.
- Enter the name of the Remote Server.
- Select the security certificate you are testing.
- Click Connect. If the next screen appears, the security certificates are working properly.
Regenerating Security Certificates
Follow these steps to regenerate security certificates. You would do this if they stop working, or you are concerned about a security breach.
- Log into the Ektron server using the credentials of the service account used by Ektron Windows Service 4.0 and your site's AppPool.
- Access the eSync Security Configurator screen via Windows Start Button > All programs > Ektron > CMS400 v8x > Utilities > Security Configurator > right click and choose Run as Administrator.
- Use the Web Site Description field to select a site on your server, or choose All sites.
- Check the Discard Existing Keys box (circled below).
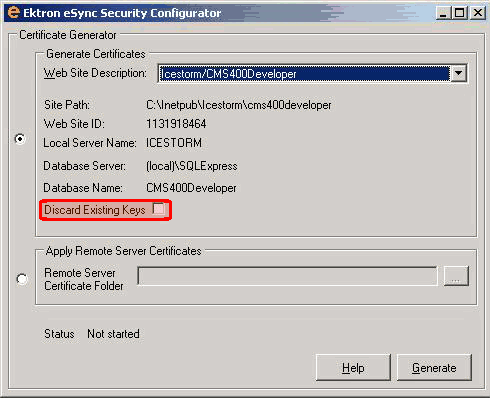
- Click Generate. Security certificates are removed from your local server.
- Reopen the Security Configurator screen.
- Choose the correct website, verify the other settings, and click Generate. See Also: Step 1: Create Security Certificates on Your Local Server. This action creates new security certificates on your server.
- Copy the new certificates to all other servers in the eSync relationship. This is explained in Step 3: Copy Local Client Certificate to Remote Server.
Troubleshooting Security Certificates
Could Not Connect Error
When trying to connect to a remote server, after selecting a security certificate, you may see the following message.
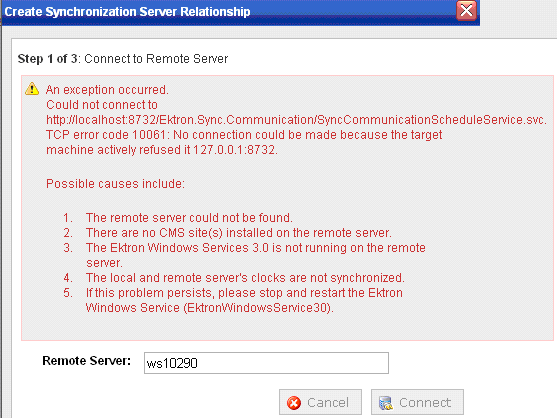
To resolve the problem:
- Check the Windows Event Viewer > EktronL2 log for the error. If the service is hosted but already exists, stop then start the service (do not restart).
- The certificates may be corrupted. To resolve this, see Regenerating Security Certificates.
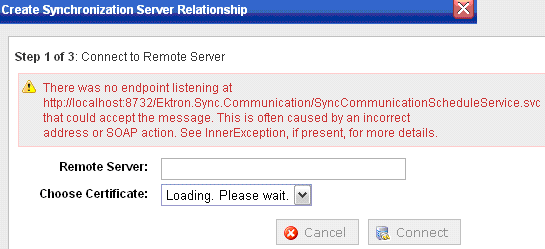
No Endpoint Error
The following error indicates that
- the remote site may not be on the same Ektron version as the local site, or
- the Ektron Windows Service is not started
Specifying eSync Settings
The eSync Settings screen lets you define many eSync settings.
Workarea > Configuration > Synchronization > Settings.

- Maximum configured memory for an eSync session (kb)—Define a maximum amount of memory that your server uses during a sync. The default is 32 MB. You can change it to any size up to the amount of RAM in your eSync server.
- Remote SQL connection type—Data sync runs in one of 3 contexts: Direct, Proxy, or Auto detect.
- Auto detect: Try to connect using TCP. If successful, the mode is switched to direct. Otherwise, the mode is proxy. Auto detect is the default.
- Proxy: Use Windows Communication Foundation (WCF) service.
- Direct: Direct SQL Connection (direct TCP connection used instead of WCF connection)
- Application transaction size—This value is typically the same as Maximum configured memory for an eSync session. The commit occurs after the data reaches this size.
- Encrypt scripts—If you check this box, all stored procedures and triggers are encrypted.
The default value is false because Azure does not support encryption. You should only check this box if you are using eSync in an on-premises environment.
- Backup action, Backup location—Define when you want to run the backup (only initially or each time) and the backup file location. See Also: Backing up the Destination Server During an eSync
- Types of data (for which e-sync collisions will be resolved)—Select data types for which you want to resolve collisions. See Also: Determining which Collisions are Resolved
Running eSync
IMPORTANT: The names of the site and all folders must match on both servers. This is because paths to images, xslt files, and so on, refer to a site and its folders. If the servers’ site and folder names do not match, the links break.
NOTE: You cannot run 2 syncs simultaneously.
Optional Steps before Running a Sync
You may want to adjust the web.config and db.config settings before running a Sync. The following topics explain eSync features that you control via the .config files.
- Synchronizing Content and Folders
- Using eSync with Web Alerts
- Using eSync with eCommerce
- Forcing the Initial Sync
- Replacing the File Sync
- Synchronizing Servers Using eSync
- Adjusting Relationship Settings
Replacing the File Sync
Some Ektron customers prefer a tool other than eSync to sync assetan external file, such as a Microsoft Word document or image, stored in Ektron. It can be managed like native Ektron content.s; for example RoboCopy. To disable eSync's asset sync:
- On your Ektron server, open
C:\Program Files (x86)\Ektron\EktronWindowsService40\Ektron.ASM.Services40.exe.config. - Set the
<add key="disableFileSyncProvider">element to true. - Save
Ektron.ASM.Services40.exe.config. - Restart the Ektron Windows service.
From now on, eSync will not copy assets. Set up your replacement tool to do that.
Adjusting Relationship Settings
You can modify settings in the Ektron Windows service (EWS) config file (C:\ProgramFiles (x86)\Ektron\EktronWindowsService40\Ektron.ASM.EktronServices40.exe.config) to accommodate your preferences. The settings are:
- DebugEnabled—By default, this is set to zero (0). If PDB files are present in the EWS folder or it is a DEBUG build, this value is set to 1. Setting this value to 2 works as in version 8.5.
- DependencyImageSyncExtensSprtForThumbnls—All valid image file extensions. This list determines if a content item being synched is an image. If true, a thumbnail is also synched. If this value is BLANK, no thumbnails are synched while synchronizing dependent images (including the file sync retry and content dependency sync).
- DependencySyncRecursionDepth—The depth of recursion for the content dependency sync. Zero (0) indicates that all dependencies are evaluated, regardless of the number of recursions necessary. If you enter a number more than zero, EWS only evaluates as far as the specified depth.
- DownloadFileStreamsInParallel—If this is set to true on a server with more than 1 processor,, then it will download file streams from the remote server in parallel, using as many threads as specified in MaxNumberOfParallelThreads. Ensure that BOTH the local and remote server has enough resources to handle normal load if the number of MaxNNumberOfParallelThreads processors run at 100% CPU.
- EnableMetadataEvalInDependencySync—If set to True, metadata evaluation occurs during the content dependency sync. If set to False, files specified in metadata are not synched during a content sync. Default value is True.
- EnableRecursiveDependencySync—If set to True, recursive dependency sync is enabled for content sync. This means that if a content's metadata or HTML references other content blocks, their dependencies are also evaluated and synched. Default value is True. See Also: Resource Selector , Creating and Deploying a Related Content Definition
- EnableSiteFileHashIndexingAtStartup—If set to true AND if UseFileHashForFolderSyncChangeDetection OR UseFileHashForFilteredFolderSyncChangeDetection are also true, then the EWS will start indexing all the files in the site which are synced using file sync, without using high CPU. This process starts 5 minutes after the service starts.
- FileSyncFailureMaxRetries—The maximum number of times the EWS tries to sync a file that was not synched in the initial try. Default value is 5.
- FileSyncFailureSleepBetweenRetriesInSeconds—The time (in seconds) the EWS "sleeps" before it attempts to retry a failed file sync. Default value is 5.
- LoadFileStreamsInParallel—If this is set to true on a server with more than 4 processors, then it will load file streams locally, in parallel, using as many threads as specified in MaxNumberOfParallelThreads. Ensure that the server has enough resources to handle normal load if the number of MaxNumberOfParallelThreads> processors run at 100% CPU.
- MaxNumberOfParallelThreads—Specifies the maximum number of threads created. You should increase this value if you have an adequate CPU resources to significantly improve performance.
- UploadFileStreamsInParallel—If this is set to true on a server with more than 1 processor, then it will upload file streams to the remote server in parallel, using as many threads as specified in MaxNumberOfParallelThreads. Ensure that BOTH the local and remote server has enough resources to handle normal load if the number of MaxNumberOfParallelThreads processors run at 100% CPU.
- UseFileHashForFilteredFolderSyncChangeDetection—Similar to UseFileHashForFolderSyncChangeDetection, but used for file syncs where folder sync is filtered by file name.
- UseFileHashForFolderSyncChangeDetection—Runs file sync in CompareFileStreams mode as described here: FileSyncOptions Enumeration
This is set to false by default because file hash mode can fail when the file is locked for reads.
Prerequisites for Running a Sync
- Prerequisites for Using eSync
- You created an eSync relationship and profiles. See Setting Up eSync.
- You are not signed on to a production server that is outside the firewall. You cannot sync from a production server outside the firewall to other servers—you can only sync to this production server.
Beginning a Sync
You can run eSync on a schedule, or on demand. To sync a profile immediately:
- Go to the Settings > Configuration > Synchronization> Profiles screen.
- If a profile is ready to sync, a sync button () appears in the right column.

- Click Sync ().
NOTE: If another sync is running, you are notified. You can only begin a new sync when the current one finishes.
- A screen monitors progress and indicates when the sync is complete.
NOTE: You can close the window and reopen it at any time by clicking Sync (). If you do, the sync’s current status appears.
IMPORTANT: If you performed a database sync and the site being synched uses URL aliasing, you must go to its URL Aliasing Settings screen and click Refresh ( ) to update its aliasing information.
Forcing the Initial Sync
Use the Force Initial Sync button to reinitialize a server that was previously initialized.
Here is an example of when to use Force Initial Sync.
- You initialized a test server from your current Ektron server.
- You experimented on the test server by adding new content, deleting content, and so on.
- You no longer want the test server’s database. Instead, you want to reinitialize the test server from your current Ektron server.
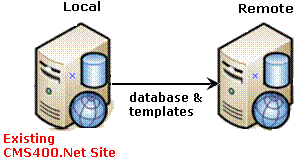
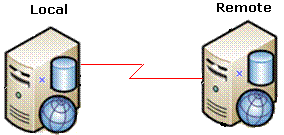
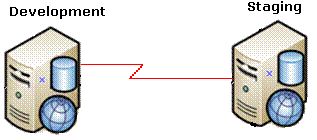
To accomplish step 3, use the Force Initial Sync button. The button only appears when all of the following conditions are present.
Forcing initial sync conditionsForcing Initial Sync Conditions
The Force Initial Sync feature requires these conditions.
- The server’s
web.configfile’sek_ForceReInitproperty is set totrue. - The site is not part of a multi-site relationship.
- The server has only one sync server relationship.
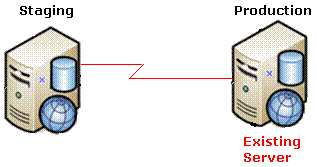
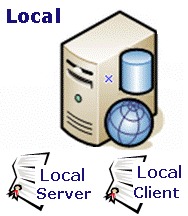
- The server is the destination (that is, on the download side) of the sync server relationship.
The following image illustrates the last 2 conditions.
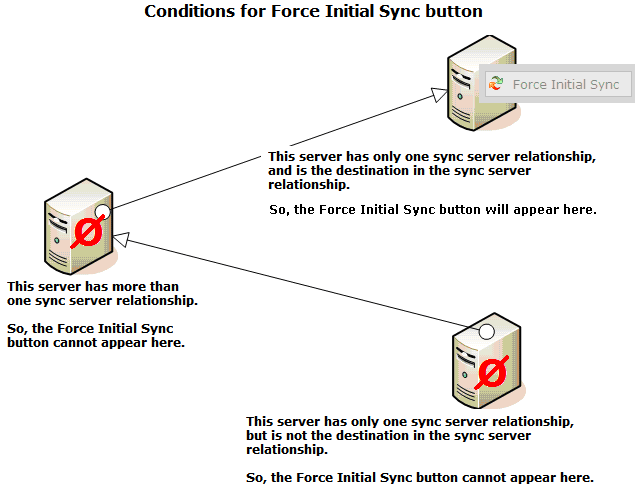
- The server’s
NOTE: The Force Initial Sync procedure ignores the checks that are normally made prior to synchronization:
* the destination database is smaller than the source database
* the site has not been previously staged
Backing up the Destination Server During an eSync
You can create a backup of the destination server’s database. If you do and problems occur during the sync, the database is restored to its pre-backup state. You can specify the backup to occur on the initial sync only, or every time you sync.
NOTE: No backup is made when you sync a
To set up database backup:
- Go to Workarea > Settings > Synchronization > Settings.
- At the Backup action field, select an option.
- Before initial sync—Run backup before the initial sync only.
- Before each sync—Run backup before each sync.
- At the Backup location field, enter a local or network path to the folder to which the backup file will be saved. The user account that runs the Ektron Windows Service must have read and write permission to the folder.
- Click Save.
The backup file format is [dbname][yyyy][mm][dd][hh][mm][ss][mmm].[product].bak. For example: cms400min20120216075946765.esync.bak.
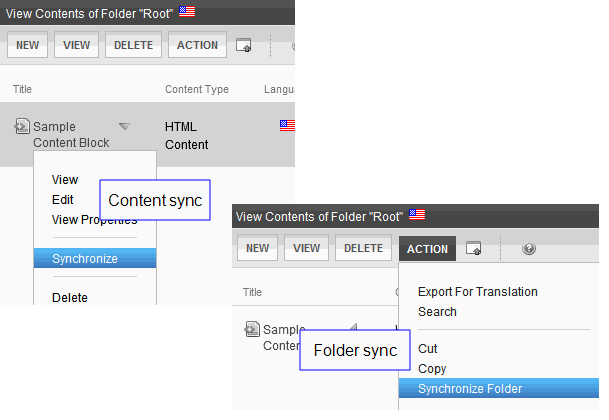
Synchronizing Content and Folders
This section explains how to sync content and folders using context menu options.
Prerequisites for Content/Folder Sync
See Also: Prerequisites for Using eSync
- You are a member of the Administrators group or assigned the Synchronization Admin RoleA limited or specific administrator privilege that you can assign to users who do not require full administrator privileges..
- Content/folder sync is enabled.
- On the server on which content editors will sync content and folders, open the site root/
web.configfile.- In the following area, set
eSyncEnabledtotrue.<eSyncSettings> <!-- Set this key to true to enable content/folder sync if the eSync feature is available --> <add key="eSyncEnabled" value="false"/> </eSyncSettings>- Save.
- The server has a sync relationship and its initial sync has been run.
Rules Governing Folder and Content Sync
Content Sync
- You can only sync content whose status is Approved.
- If you try to sync content, and its folder was created or modified since the last full sync, you are warned that you must sync the folder before synching the content.
- An example of folder modification is the assignment of a new metadata value.
- If new tags or taxonomy categories were added to content since the last full sync, you must run a folder sync before you can sync that content. You must also run a full sync for all other sync profiles that use those tags or taxonomya content-level categorization system that uses one-to-many relationships to create a scalable organization of content. A taxonomy lets you create a navigation system that is independent of the folder structure. categories. See also: Tagging Content, Library Items, Users, and Groups with Keywords.
- Forum posts are not synched.
- When you sync a content item, all physical files (DMS assets and library files) in the content’s folder are also synchronized.
Folder Sync
- blogshort for Web Logs and forum posts are not synched.
Synchronizing a Content Item
Content sync copies selected content to another server. The sync also copies all entities on which the content is dependent, such as
- library resources within that content, such as images and quicklinks
- content selector metadata, file selector metadata, image selector metadata See Also: Creating and Deploying a Related Content Definition
- aliases
NOTE: When you sync one content item, all physical files (DMSDocument Management System; Ektron's way of managing assets (Microsoft Office files and other types of files) assets and library files) in the content’s folder are also synched.
You can only synchronize Approved content. See Also: Prerequisites for Content/Folder Sync
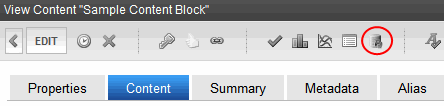
To sync a content item:
- In the Workarea, navigate to the content.
- Click the arrow to its right to see its drop-down menu.
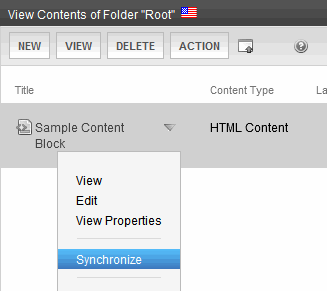
NOTE: A Synchronize button appears on the View Content screen.
- Click Synchronize.
- All profiles whose direction is Upload or Bidirectional appear. Select the appropriate one.
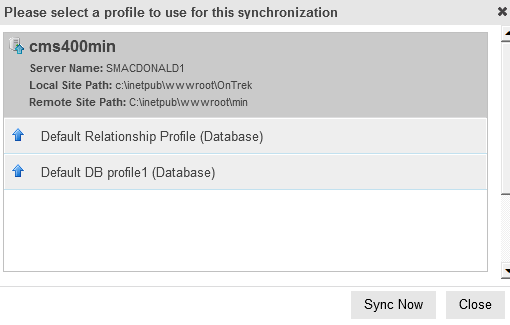
- Click Sync Now.
- The content is synchronized with the selected database.
Synchronizing a Folder
The folder sync updates all content in a folder with the same folder in another server. It does not affect content in folders underneath the selected folder.
See Also: Synchronizing Content and Folders
To sync a folder:
- Navigate to the folder.
- Choose Action > Synchronize Folder. A screen asks you to select a sync profile.
- Click Start Sync. All content in the folder is synched with the selected database.
Synchronizing Custom SQL Database Tables
You can use eSync to synchronize custom SQL database tables. To do this, you must create the custom table on all servers. eSync does not create the tables, but will follow rules for populating records in them.
IMPORTANT: Table names are case sensitive. Names must be identical on all servers.
Adding an Empty Custom Table to your Database on the Source and Destination Servers
Run the following SQL Query on the database. The table must have a primary key and cannot use identity columns.
Here is an example of a valid table.
Create table foo3(Id int not null primary key clustered,
  Id2 int not null, company nvarchar(50) null)
Here are examples of invalid tables, which incorrectly use identity columns.
create table foo1(Id int not null identity(1,1) primary key clustered,
  company nvarchar(50) null)
create table foo2(Id int not null primary key clustered,
  Id2 bigint not null identity(1,1),
  company nvarchar(50) null
Adding a Custom Table to an eSync Configuration
NOTE: The Manage Custom Table Configuration button ( ) appears only if your database has custom tables.
To add custom tables to an eSync Configuration, follow these steps on the source server.
- Go to Workarea > Settings > Configuration > Synchronization
-
Click Manage Custom Table Configuration (
). The Manage Custom Table Configurations screen appears.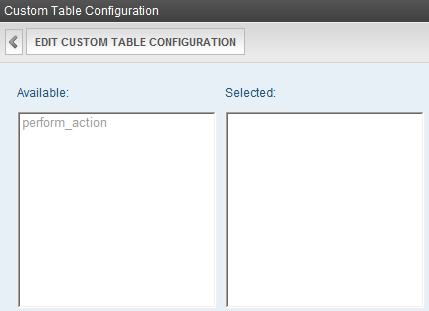
- Click Edit Custom Table Configuration.
- Click a custom table from the Available column to select it.
- Click the right arrow button to move it to the Selected column.
- Click Save Custom Table Configuration.
After you add a custom table, your eSync profile displays a new Database/Resource scope, Custom Tables. Select it to sync custom tables.
Synchronizing a Package
You can group Ektron objects (content, folders, taxonomies, and so on) into a package, which can be synched at any time. So, you can synchronize these objects without having to run a complete sync. Advantages of a sync package include:
- Much quicker than a full sync
- More granular control over which items are synched
- Can sync individual items even if their dependencies were modified
NOTE: As described in Prerequisites for Content/Folder Sync, eSync's content and folder sync has restrictions and dependencies. A sync package, on the other hand, includes modifications to parent objects. So, a package can sync content and folders whether or not a parent folder’s properties were edited recently.
- Can sync various object types in a single action
For example, you are developing a new marketing campaign which consists of content in 2 folders, all library files in those folders, and 2 menus. After assembling the items into a sync package, you can sync it from development to production at any time without affecting other site files.
![]() For a video tutorial on eSync packages, see eSync Packages (Ektron 8.6.1).
For a video tutorial on eSync packages, see eSync Packages (Ektron 8.6.1).
Objects that may be included in a package:
- Folders
- Content
- Library images and files
- Files within the site root folder and its children (for example, .css and .js files)
- Taxonomies—includes all assigned categories, content, users, and groups
- Menus—includes submenus along with content assigned to any menu in the "tree"
- Collections—includes all assigned content
- Other package definitions—do not include objects in those packages
Creating a Package
- Workarea > Settings > Configuration > Synchronization > Packages.
- Click Create Package.
- Enter a unique Name and optional Description.
-
Click the tab of objects you want to add to the package.
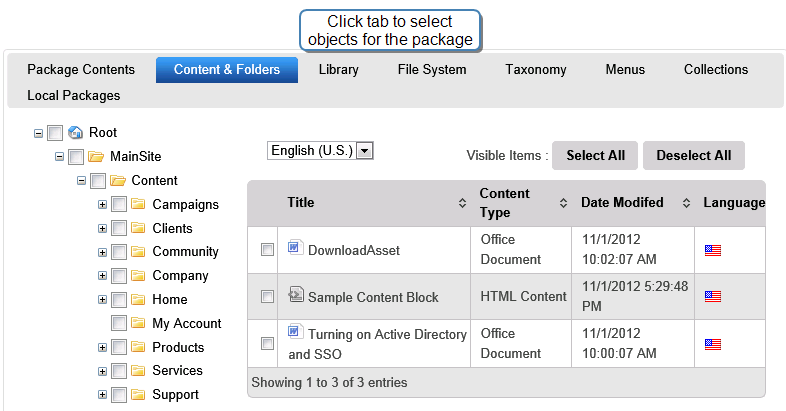
- Check items to include in the package.
- An item is added to the package as soon as you check it. There is no submit button. Click Save Package to save all items in a package.
- To view a package's contents at any time, click the Package Contents tab.
- When you view a tab, items in the package are checked.
- The Package Contents tab lists all objects in the package. Use the Show drop-down to display only objects of a selected type.
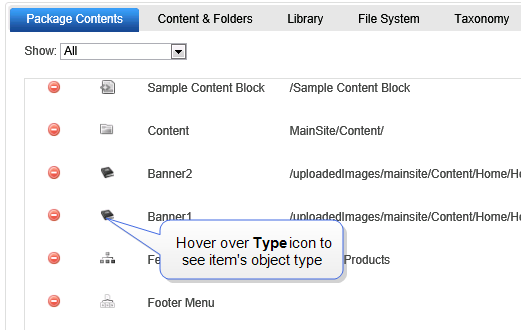
- Use the delete button (
 ) to remove items. You can also remove an item by clicking its tab and unchecking it there.
 - If you choose a taxonomya content-level categorization system that uses one-to-many relationships to create a scalable organization of content. A taxonomy lets you create a navigation system that is independent of the folder structure., menu, or collectionA list of Ektron content links for display on a Web page., only the top-level object appears on the Package Contents tab. However, all child objects (taxonomy categories, submenus, and so on) and all assigned content, users and groups are synched with the package.
- Use the delete button (
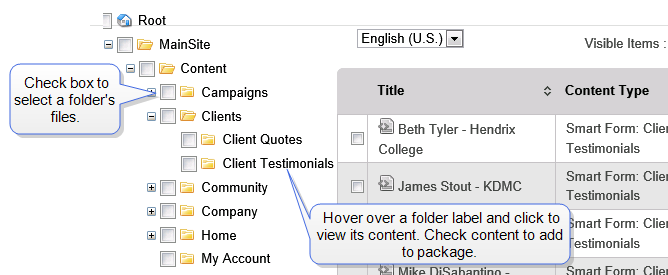
- Content and Folders tab lets you select folders or content within them.
IMPORTANT: You cannot select eCommerce catalog folders.
- Unlike content sync, content status does not affect your ability to sync it within a package.
- If you select a folder, the package includes the folder's content, in all languages, when the package sync is run.
- Folder selection is not recursive. So, you must select each child folder.
- If you view a selected folder, its content is checked and grayed out (see example below). This indicates that the content's folder is included in the package.
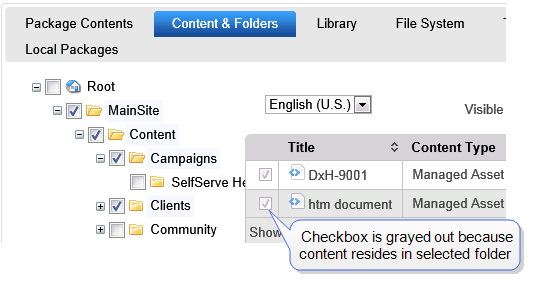
- Library tab lets you select libraryA folder that stores images, files, quicklinks, and hyperlinks that can be inserted into HTML content images or files. Do not choose those inserted into selected content, since they are automatically included.
- All attributes of folders (described in Content and Folders, above) apply to library folders.
- File System tab lets you select files within the siteroot folder and its children.
- Exception: You cannot add these file types to a package: thumbs.db, .cer, .pfx, .pvk, .refresh, .ekt, .config, .dll, .exe, .metadata, .sln, .svn, .tekt, ._svn, .log, metaconfig.doc. They do not appear in the selection grid.
- Taxonomy tab lets you select top-level taxonomies only. You cannot select categories within them. By selecting a taxonomy, you also add to the package
- all categories below it
- all content, users and groups assigned to the taxonomy and its categories
As a taxonomy's content changes, the package automatically includes the current files.
NOTE: If you add a taxonomy to a package, you automatically select all language versions of that taxonomy.
- Menus tab lets you select top-level menus only. You cannot select submenus. By selecting a top-level menu, you also add to the package
- all of its submenus
- all items assigned to the menu and its submenus: content, library assets, hyperlinks, and additional submenus
As a menu's content changes, the package automatically includes the current files.
Folders assigned to menus are not synched with them. See Also: Assigning Folders or Templates to a Menu
NOTE: If you add a menu to a package, you automatically select all language versions of that menu.
- Collections tab lets you select any collectionA list of Ektron content links for display on a Web page.. By selecting a collection, you also add to the package all content assigned to it. As a collection's content changes, the package automatically includes the current files.
- Local Packages tab lets you include other package definitions in the package. This lets you re-use the packages on other servers in your eSync relationship. Other package definitions do not include objects assigned to them (content, folders, and so on).
- Orphan Items tab lists records referenced in a package which, for some reason, are not in the database.
Synchronizing a Package
To sync a package, add it to a sync profile, then sync the profile.
IMPORTANT: The package sync requires but does not validate identical folder structure on both servers. You must verify that folder structures on both servers match before beginning a package sync.
Prerequisites
One or more eSync packages See Also: Creating a Package
- From the View All Synchronization Configurations screen, click Add Sync Profile (). The Add Synchronization Profile screen appears.
- In the Profile Type field, check Local Package.
- Use the Select Package drop-down to choose the package.
- Complete the remaining fields, which are documented in Setting up a Profile to Sync a Database.
- Click Save Synchronization Profile.
- From the View All Synchronization Configurations screen, click the profile.
- Click Sync Now (
 ).
).
Deleting a Package
- Workarea > Settings > Configuration > Synchronization> Packages.
- Click Delete in the right column of the package that you want to delete.
Viewing eSync Activity
eSync provides the following logs of sync activity.
Viewing Synchronization Configurations
The View All Synchronization Configurations screen lets you perform the following eSync-related activities.
- Work with eSync relationships
- Create a new one See Also: Setting Up eSync
- Run the initial sync for one See Also: Initializing a New Site
- View information about
- Delete
- Work with eSync profiles See Also: Setting up eSync Profiles
- Create
- View and edit
- Sync a profile See Also: Running eSync
- Delete
- Review Resolved Collisions
 ) next to the profile.
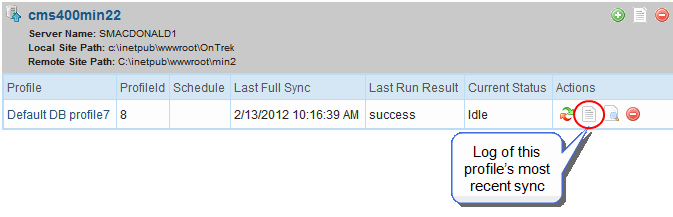
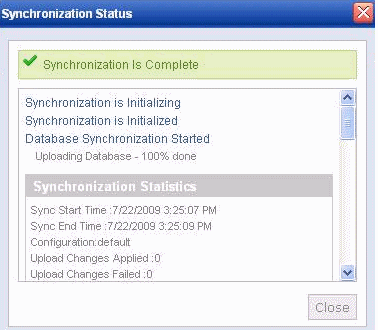

Viewing a Log of all Syncs for a Sync Server Relationship
The View All Synchronization Relationships screen provides a Synchronization Logs button ( ) that displays a chronological log of all syncs on your server, with the most recent at the top.
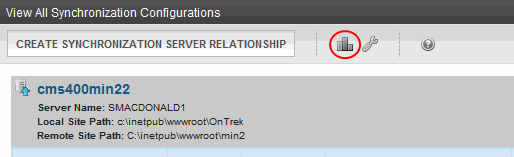
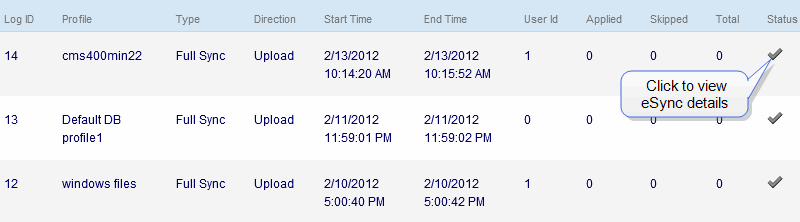
Click the icon in the Status column to view any sync's details. If the column contains a check mark, the sync was successful.
If the column contains a warning ( ), the sync failed for some items. If you click the icon, a screen lists causes for the failure, as shown below. Ektron support can use this log to troubleshoot the problem.
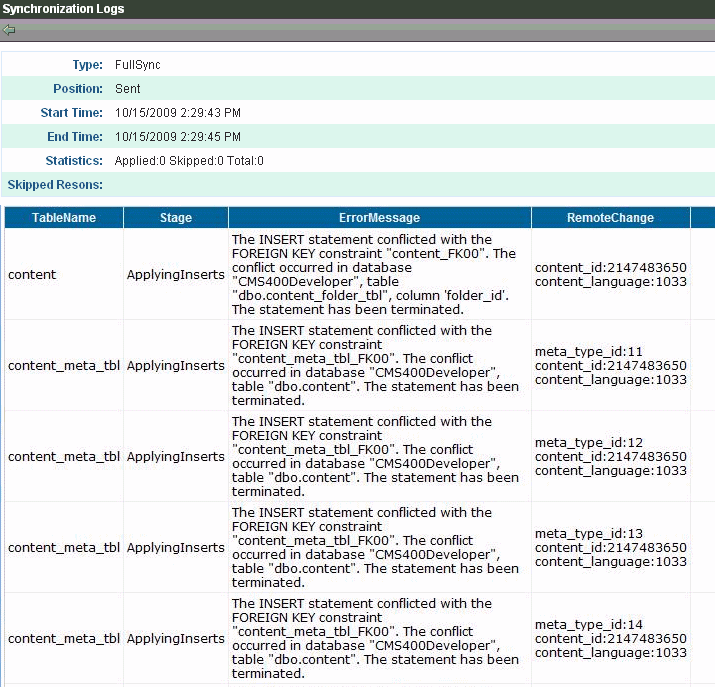
Reviewing Collisions
To verify the accuracy of the data being synchronized, eSync may check for and resolve collisions between the following matching items.
- user names
- folder names
- metadata definitions
- messages
- eCommerce products
- URL aliases
- tag entries
- tag statistics
- taxonomy counts
- eCommerce price entries
- multi-site staging URLs
- menus
For example, on the staging server, a user creates a folder under the root folder called Marketing, and a user on the production server does the same.
NOTE: * Folders only match if they have the same name and folder path.
* Both Ektron and membership users are included.
A collision only occurs if both items were entered since the last synchronization.
Although matching items have different ID numbers, their names are the same, so users may be unable to distinguish them. So, eSync appends a number to the more recently-created item. For example, the folder Marketing becomes Marketing11329. This is an example of a resolved collision.
To track resolved collisions, the View All Synchronization Configurations screen has a button ( ) that appears only after a collision is resolved. If the eSync direction is a download, the collision resolution information appears on the local server; if upload, then it appears on the remote server; if bi-directional, it appears on both servers.
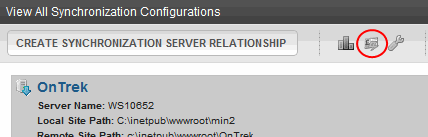
When you click the button, you are asked if you want to review resolved collisions. If you click Resolve, the following button appears on the toolbar.
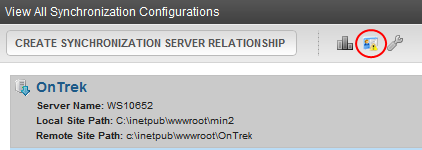
Click that button to see the Review Synchronization Collisions screen, showing the original and changed items.
Reviewing Resolved Collisions
This Review Synchronization Collisions screen shows resolved collisions. Upon viewing it, you should notify appropriate content authors, who may want rename the object.

After noting these changes, you can check the box in the left column, then click Mark Reviewed to remove it.
The Users tab has an additional button, Mark Reviewed and Email. Use it to remove the user from the screen and send an email to the user (using the address from the Add/Edit User screen’s E-Mail Address field). The email text is below.
lbl sync collision email subject = Your username has been changed
lbl sync collision email body = For security purposes, your username has been
  changed.
Your new username is {0}.  You will need to use this new username the next time
  you login.  Thank you.
NOTE: You can change the text in the resource file. To learn about editing it, see Translating the Workarea.
Determining which Collisions are Resolved
On the eSync Settings screen, use the Types of data field to identify objects for which you want to resolve collisions. Unchecked items are ignored.
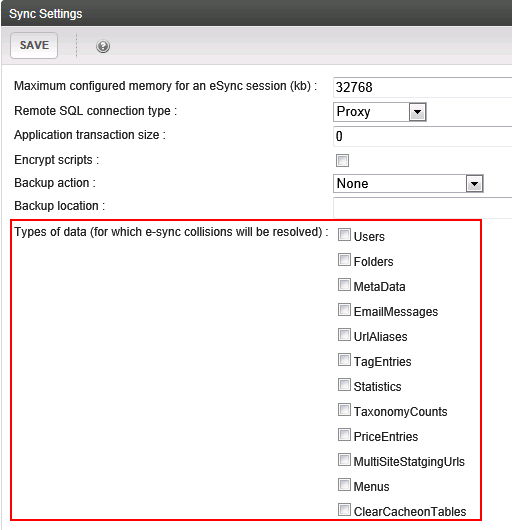
Ektron recommends disabling the Resolve Collisions during Synchronization boxes for everyday use, because resources required to search for collisions may negatively impact your website's performance.
While activity that might cause collisions occurs, you may temporarily enable checkboxes, then disable them again once the activity is complete.
Using Performance Counters to Monitor the Ektron Windows Service
You can use the Windows Performance Counter to view the progress of a file sync without affecting the EWSEktron Windows Service's performance. You can also use the Performance Counter to debug and monitor the EWS.
You can set up the Performance Counter to write to a file, so that you may monitor its activity over a few days or weeks.
You can use the Performance Counter to monitor a sync's progress, especially if it has been running for a long time. If the counter's values stop changing, nothing is happening. This information can help you determine that it is safe to stop the service.
Notes about using the Performance Counter
- Most counters increment over time—they do not rise and fall.
- Restarting the service resets the counters.
Performance Counter Display Options
- Line
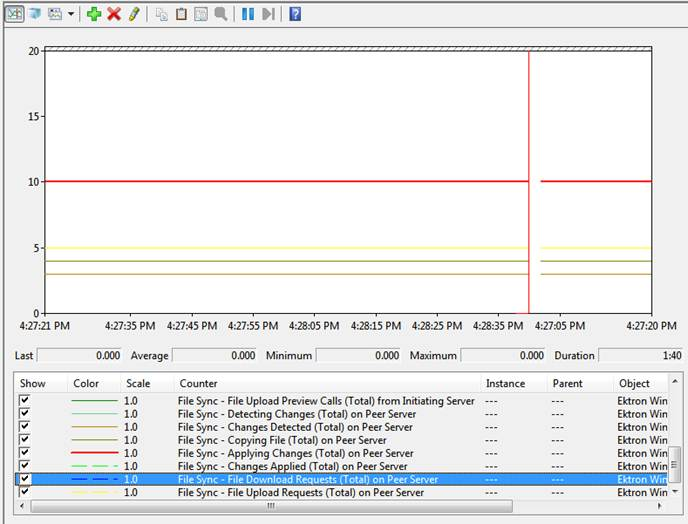
- Histogram
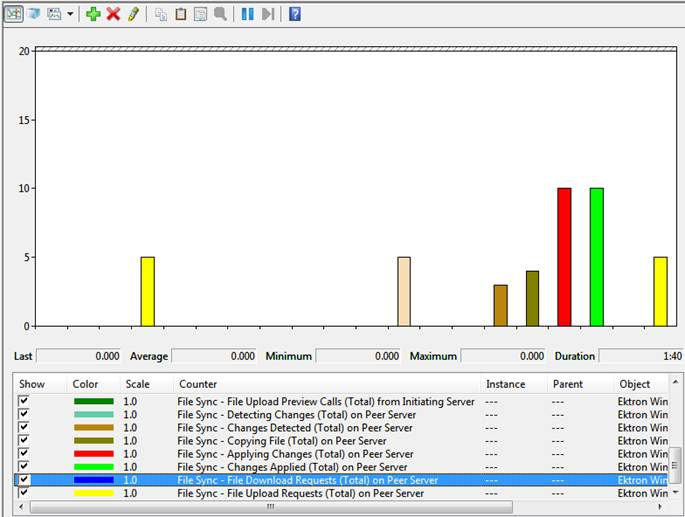
- Report
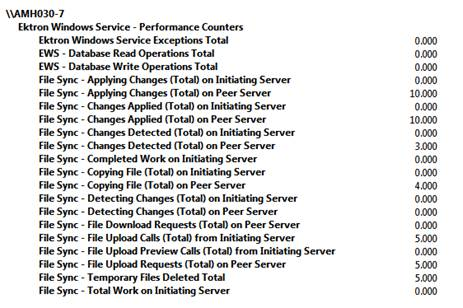
You have the following performance counters available to you:
NOTE: Definitions:
Initiating Server—The server from which file sync is initiated (via the website).
Peer Server—The other server(s) in a sync relationship.
Ektron Windows Service Data
- EWS Approximate Total Number of Threads Alive Currently—if eSync is running, at least one thread is alive
- EWS Approximate Total Number of Timers Alive Currently—increases as the number of scheduled syncs increases
- EWS Database Write Operations Total—increases when the EWS inserts/ updates or deletes rows in a site’s database.
- EWS Database Read Operations Total—increases when the EWS reads rows from a site’s database.
- EWS Exceptions Total—if eSync or load balancing exceptions occur while the service is running, they increment the performance counter and appear on the graph. A continual increase indicates a problem.
eSync Data
- eSync—Total Number of Remote WCF Calls Made from Service—increases when the EWS makes network calls to other EWS instances on the network.
File Sync Data
- File Sync—Applying Changes (Total) on Initiating and Peer Servers—incremented when a file change is about to be attempted
- File Sync—Changes Applied (Total) on Initiating and Peer Servers—counter is incremented when a file change is applied
- File Sync—Changes Detected (Total) on Initiating and Peer Servers—counter is incremented when a change detection pass is completed
- File Sync—Changes Skipped (Total) from Initiating and Peer Servers—eSync was supposed to do something but the action was skipped. This may occur if, for example, a file is locked.
- File Sync—Completed Work on Initiating Server—amount of work completed out of total work to be done
- File Sync—Conflicts Detected (Total) from Initiating and Peer Servers—indicates conflicts between servers in a sync relationship. This number always increases, never decreases unless someone restarts the EWSEktron Windows Service.
- File Sync—Copying File (Total) on Initiating and Peer Servers—incremented periodically to show progress while a file is being copied
- File Sync—Detecting Changes (Total) on Initiating and Peer Servers—incremented for every directory , including the root directory, during a change detection pass. This is incremented before change detection begins for that folder.
- File Sync—File Download Requests (Total) on Peer Server—total number of download requests
- File Sync—Files Skipped Change Detection (Total) from Initiating and Peer Servers—eSync was supposed to do something but the action was skipped. This may occur if, for example, a file is locked
- File Sync—File Upload Calls (Total) from Initiating Server—indicates the total number of upload calls from the initiating server to the remote EWS server
- File Sync—File Upload Requests (Total) on Peer Server—total number of upload requests received on the peer server
- File Sync—File Upload Preview Calls (Total) from Initiating Server—total number of upload preview calls made from the initiating server
- File Sync—Temporary Files Deleted Total—total number of temporary files deleted by EWSEktron Windows Service so far. This number should never be zero (0) on the destination server while a sync is running.
- File Sync—Total Work on Initiating Server— total work to be done by file sync
Setting up the Performance Counter Display
To set up the display of the Ektron Windows Service performance counters:
- Click the Windows Start button > Administrative Tools > Performance Monitor.
- Click the Add button (
 ).
). - From the list in the upper left corner, click Ektron Windows Service - Performance Counter, then Add and OK.
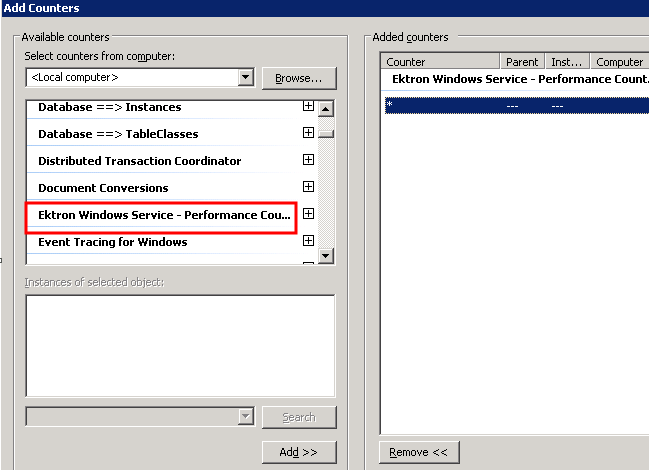
Using eSync with Other Ektron Features
eSync in a Load Balanced Environment
Ektron supports a load-balanced environment, in which several servers share your website’s processing load. This feature is explained in Balancing the Load on Your Servers.
If your site uses load balancing, you can set up eSync so that, after one server in a load balance cluster is synchronized, the other servers are automatically synchronized. Note that if a separate database server is outside the load balance cluster (as shown below), eSync only synchronizes documents and files used by the search among the clustered servers. It does not touch the database.
Beginning with Ektron version 8.5, the load-balance chain of servers is updated automatically, and servers that are not available are removed. A typical load balanced cluster is below.
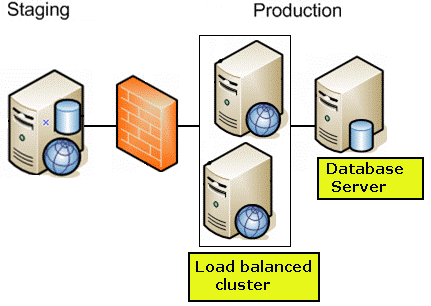
IMPORTANT: In a load balanced environment, only update templates on the staging server. Do not update them on the production server and assume they will be synchronized with the staging server.
IMPORTANT: Assume your load balanced cluster consists of 2 staging servers (S1 and S2) and 2 production servers (P1 and P2).
If you add/modify/delete a file on S1, to get the file to S2, you must run either a download sync on S2, or an upload sync on S1, or a bidirectional sync from either server. If you run a download sync on S2, you also need to run an upload sync to push the file to P2, which will then Load Balance with P1.
The best way to make sure that the added/modified/deleted file is changed on all servers is to initiate the sync from the server on which the file was changed. In this example, since you changed the file on S1, if you initiate a sync from S1, it will be automatically updated on S2, P1, and P2.
Prerequisites
- The connection string on all servers in the cluster matches
- You must initiate eSync relationships, and the actual synchronization, from a staging server
- If your staging servers are clustered, you must remove one from the cluster before you can sync
Follow these steps to set up this capability.
Install a Min Site on Every Server in the Cluster
- Upgrade each server to the same version of Ektron. If Ektron is already installed on one server, install a minimum site on the others. To do this, run the Ektron base installation file (CMS400Base8x.exe). For more information, see Installing the CMS Base.
- If the site with which you will sync is precompiled, precompile all min sites.
Update the Ektron Windows Service Config File
- Sign on to the first server in your load balanced cluster.
- Open
C:\ProgramFiles\Ektron\EktronWindowsService40\Ektron.ASM.EktronServices40.exe.Config. - Change the value of
LoadBalancedto 1 and save. - Do this on every server in the cluster.
- Stop and then Start the Ektron Windows Service on every server in the cluster.
Create eSync Security Certificates for a Load Balanced Cluster
You should be familiar with eSync security certificates before beginning this procedure. See Also: Managing eSync Security Certificates
Assume the load balance cluster has 3 servers: mach1, mach2, and mach3.
Part one: Generate Security Certificates
In this part, create the security certificates.
- Sign on to
mach1using an account with administrative privileges and generate security certificates. To do this, click the Windows Start button > All programs > Ektron > CMS400 v8x > Utilities > Security Configurator > right click and choose Run as Administrator. - The security configurator screen appears. See Managing eSync Security Certificates. Select the Generate Certificates radio button. Click the Generate button then click OKwhen the Ektron Windows Service’s warning dialog appears.
This action creates security certificates for your server and applies them to all the sites on the server. Optionally, you can select a single site from the Web Site Description drop-down to install certificates to a selected site. - Create a new folder (for example,
mach1_certitificates) on the desktop. -
Open the following folder:
C:\ProgramFiles\Ektron\CMS400vxx\Utilities\Software\SecurityConfigurator. - Copy the following files from the SecurityConfigurator folder into the folder you created in Step 3.
- mach1_SyncClient.pfx
- mach1_SyncClient.pvk
- mach1_SyncClient.cer
- mach1_SyncServer.pfx
- mach1_SyncServer.pvk
- mach1_SyncServer.cer
-
Repeat steps 1 to 5 for every server in your load balance cluster.
Part Two: Apply Security Certificates
In this part, copy then apply the certificates to all other servers in the cluster.
- Copy each server's certificates folder to the other servers in the cluster.
-
Run the Security Configurator (Start button > All programs > Ektron > CMS400 v8x > Utilities > Security Configurator) and apply the certificates from every other server in the cluster. For example, apply certificates from mach2 and mach3 on mach1; and apply certificates from mach1 and mach3 on mach2.
To apply certificates, follow these steps.
- Select the Apply Remote Server Certificates radio button.
- Click the browse button next to that field.
- Browse to the remote server’s certificates folder (which you copied in Step 1).
- Click the Apply button. Then, click OK when the Ektron Windows Service warning dialog appears.
- Repeat the above steps for all remote server certificate folders.
- Repeat steps on every server in the load balance cluster.
- Select the Apply Remote Server Certificates radio button.
Set Up and Run eSync
Set up and run eSync in a load balanced environment the same way you run it normally. See these sections for details.
Using eSync in a Multi-site Environment
If you want to use eSync in a multi-site environment, you must do so before the initial synchronization of a relationship. That is, you cannot set up a eSync relationship in a single-site environment and then later change to multi-site. You can set up a new relationship at any time. See Also: Supporting Multi-Site Configurations
- In a multi-site environment, you cannot create a staging site from a production site (as described in Initializing a New Site). You must first create all sites on the staging server, then set up production sites with which they sync.
- You should log into the main site then synchronizing it and all multi-sites from there.
Setting up eSync in a Multi-Site Environment
WARNING! Back up your database before beginning this procedure!
- Set up all sites on the staging server, following the instructions in Supporting Multi-Site Configurations.
- Install an Ektron min site on each production server that will host a site. To do this, run the Ektron base installation file.
- Install security certificates between the staging server and all production servers. This procedure is described in Managing eSync Security Certificates.
- Sign on to the staging server.
- In the Workarea, go to Settings > Configuration > Synchronization> Profiles.
- The View All Synchronization Configurations screen appears. Click Create Synchronization Server Configuration. The screen appears.
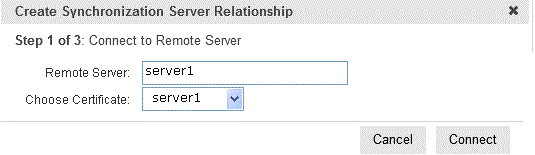
NOTE: If you see the following error, The system cannot find the file specified, you must set up security certificates. See Also: Managing eSync Security Certificates
- Use the following information to complete the screen.
WARNING! The first time you sync an Ektron website, all of its data is overwritten. Make sure that no important information resides on the production server before beginning the first sync.
- Remote Server—Select a production server by choosing the path to the site’s physical location on the remote server.
- Choose Certificate—If you selected a single server above, its name appears here. Proceed to the next step.
If you selected a domain or IP address above, click the drop-down arrow to view all servers whose client security certificates reside on this server. Then, select the server with which you want to set up an eSync relationship.
- Click Connect. After you connect to the production server, all eligible databases on it appear. The top one has a green check mark, indicating it is selected by default.
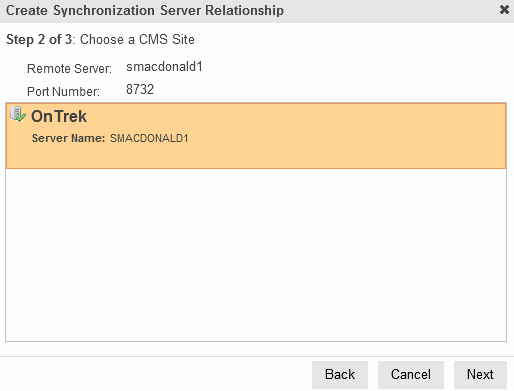
- Click the database with which you want to sync. When you do, a green check mark appears on it, and its background color changes.
- Click Next.
- A new screen appears, showing both servers and allowing you to change the direction of the initial database copy. Make sure you are copying from staging to production. Because the staging server is multi-site, the staging server area has a Site Path pulldown field, which lets you select a site.
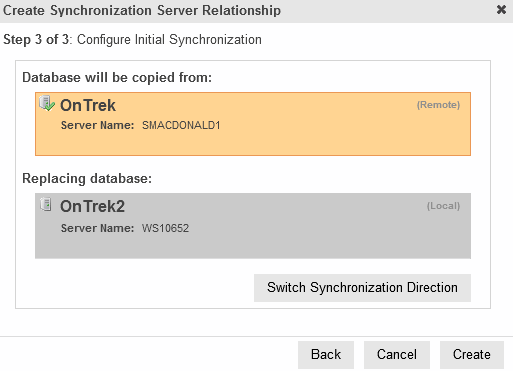
- When you are satisfied, click Create. This sets up the server relationship but does not launch the initial sync.
- The View All Synchronization Configurations screen appears with the new relationship. If you are ready to overwrite the production database with the staging one, click Start Initial Sync (). A confirmation message appears.
- A screen monitors the sync’s progress.
- The initial sync creates a default profile, which appears on the View All Synchronization Configurations screen.
- Set up and launch sync profiles to sync Workarea files and templates on the staging server with those on the production server. (This is described in Setting up eSync Profiles and Running eSync.) For synchronization direction, choose Running eSync.
Setting up Staging Multi-sites
By default, if you sign on to a staging server then insert library items (images, quicklinks, and so on) into content, the path to those items includes the production server. For example, your server setup includes 2 multi-sites: sales.ektron.com and support.ektron.com.
NOTE: Multi-site names are defined in the site’s folder properties screen’s Production Domain field, as described in Supporting Multi-Site Configurations.
So, library links in the sales.ektron.com site’s content look like this: http://sales.ektron.com/template?id=id number. However, you may wish to change library links so they refer to the staging server. This would help you verify that the linked items exist on it.
To change library links to refer to your staging server:
- Go to Settings > Configuration > Setup.
- Click Edit.
- Check the Staging Server checkbox.
- Click Update.
- Go to Content > the staging site folder.
- Choose View > Properties.
- Click Edit Properties.
- Scroll down to the section labeled Multi-Site Domain Configuration:
- In the Staging Domain field, enter the URL of your staging server.
- Click Update.
From now on, when a user signs on to the staging server and works with library links, the links include the staging server instead of the production server.
Using eSync with Web Alerts
The Web Alert feature enables Ektron to generate email for a list of registered users whenever new content appears on your site, or existing content is updated. For more information, see Administering Web Alerts.
In an eSync environment, you need to determine which servers send Web Alerts. For example, Web Alerts should probably not be generated when content is published on a staging server, but you would want them when content is published on a production server.
To determine if a server generates Web alerts, use the following property of each website’s web.config file.
<add key="ek_DisableWebAlerts" ..... />
Set the property’s value to true to suppress Web Alerts on a server.
Set the property’s value to false to generate Web Alerts to on a server.
Also, the server clock on the download side of the eSync relationship must be exactly the same time as or slightly ahead of the clock on the sending server.
Using eSync with eCommerce
When using eSync with an eCommerce site, you need to prevent orders from being processed on your staging server to prevent orders from being processed twice.
For example, a customer on your production site purchases a product. If the staging server and production server are synched before the credit card is processed, it might be charged twice: once from the production server and again from the staging server.
To prevent orders from being processed on your staging server, edit your staging site’s web.config file and set the following property to true:
<add key="ek_ecom_OrderProcessingDisabled" value="true" />
When the property is set to true, you cannot process or edit orders from the Workarea’s View Order screen on the staging server. Also, if you try to create an order from the staging server’s website, you receive the following message.
“We're sorry, an error occurred while processing your request. Please try again later...”
It is important to note that all other eSync functions still work properly. For example, when you create catalog entries on a staging server and perform a sync, the entries are moved to the production server. The ek_ecom_OrderProcessingDisabled key only affects the processing of orders.
Using eSync with Notifications
When using eSync with Notifications, any new agents are not synched. This means that you must manually add new agents to each server in your relationship.
When the agent exists on all servers in your relationship, eSync keeps them updated. For example, assume a membership user logs into the production server and updates the profile’s Activities tab by changing the activities a custom agent will perform. eSync will sync those changes with the staging server.
See Also: Adding a Custom Agent; Sending Notifications to a Community
Running 8.5 and 8.6 eSync Simultaneously
If you install an dbSync.config file was removed for dbsync.config file, run the following script.
IF(NOT EXISTS(SELECT NAME FROM SYS.OBJECTS WHERE (NAME='sync_settings') AND (type='u')))
begin
create table [dbo].[sync_settings
(
    profile_id bigint not null,
    memory_data_cache_size int not null default (32768),
    remote_sql_connection tinyint not null default(2),
    application_tran_size bigint not null default (0),
    script_encryption bit not null default (0),
    collision_action bigint not null default(0),
    backup_action tinyint not null default(0),
    backup_device nvarchar(max) null,
    log_retain_count int not null default(50),
    CONSTRAINT [PK_sync_settings] PRIMARY KEY CLUSTERED (profile_id)
)
end
go
if(not(exists(select 1 from sync_settings where profile_id=0)))
begin
insert into sync_settings(profile_id)values(0)
end
go
The following list describes some lines in the script.
memory_data_cache_size int not null default (32768—Define a maximum amount of memory that your server uses during a sync. The default is 32 MB. You can change it to any size up to the amount of RAM in your eSync server.remote_sql_connection tinyint not null default(2)—0-direct; 1-proxy; 2-autodetect- autodetect is generally the best solution
application_tran_size bigint not null default(0)—if changes are expected in multiple batches, set this value tomemory_data_cache_sizecollision_action bigint not null default(0)—The value of the Resolved Collisions during Synchronization field, which specifies types of data for which collisions will be resolved See Determining which Collisions are Resolved- 0=NONE
- 1=USER
- 2=FOLDERS
- 4=METADATA
- 8=EMAIL MESSAGE
- 16=URL ALIAS
- 32=TAG ENTRIES
- 64=STATISTICS ON TAG
- 128=TAG REGENERATION
- 256=TAXONOMY COUNTS
- 512=PRICE ENTRIES
- 1024=MULTISITE STAGING URL
- 2048=MENU
-
backup_action tinyint not null default(0)—1-backup always; 2-backup only before initial sync; determines when to back up destination database before a sync backup_device nvarchar(max) null—backup locationlog_retain_count int not null default(50)—set the number of logs retained in the database See Viewing eSync Activity
Troubleshooting eSync
There was no endpoint listening at http://alphatest:8732/Ektron.Sync.Communication/SyncCommunicationScheduleService.svc that could accept the message. This is often caused by an incorrect address or SOAP action. See InnerException, if present, for more details.
One server in the relationship cannot resolve the address of the other server. This may be due to security restrictions or because the Ektron Windows service is off.
Solutions:
- Modify the hostname of the other server so that it can be found.
- Restart the Windows service
- Reconfigure security
Local site cannot communicate with service.
Solution:
- Load the security Configuration utility:
C:\Program Files\Ektron\CMS400vxx\utilities\software\securityconfigurator\securityconfigurator.exe. - Select the website that is failing.
- Click OK. This recopies client certificates to the site and updates
web.configto use them.
No Ektron site exists on the remote server.
Possible Solution: Install an Ektron min site on the remote server.