 Importing recipients
Import a file that contains recipient data using a CSV Stands for "comma-separated values"; tabular data in a plain text file separated by the comma character. file. If the source file is not in this format, or to export recipient data from your local database or CRM Stands for "customer relationship management"; a system for managing interactions with current and future customers, including support for sales, marketing, customer service and technical services. first, ask your IT department for assistance. If the source file is a spreadsheet, convert it to CSV with the Save as command.
Trial import
Before importing, run a Test import to check recipient list data and the correct assignment to a Optimizely Campaign recipient list.
To import your recipient data, follow these steps:
Step 1: Start
- Open the Optimizely Campaign menu and select Recipients > Import.
- Click Browse and select the file with the recipient data.
The maximum allowed file size is 50 MB. To upload larger files, see Transferring files through SCP and Automatic recipient import.
- Click Next. The file is uploaded to the Optimizely server.
Step 2: Recipient list
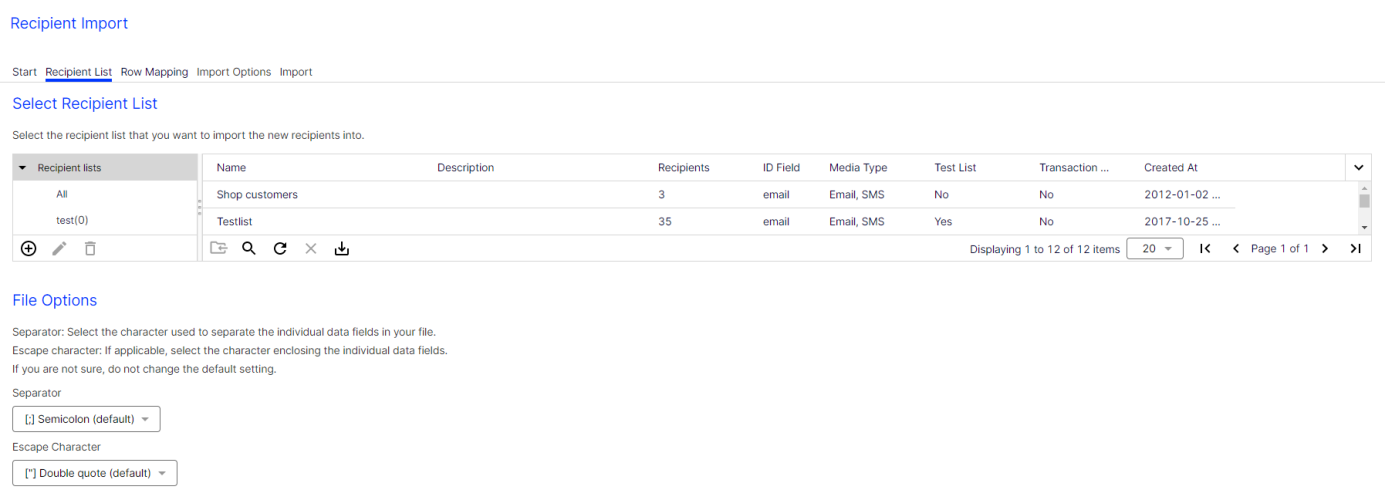
- In the Select Recipient List area, click the list to which you want to import new recipients.
If you want the recipients to be imported to go through an opt-in process, you must select an opt-in recipient list. You can make further settings for the opt-in process in step 4.
- In the File Options area, specify the characters your CSV file uses to separate the entries.
- Separator. Select a character (semicolon, comma, tabulator and so on) that separates data fields on the lines of the uploaded file.
- Escape character. Some database programs use a single quote (') or double quote (") around each data field when exporting. Select which one is used in the uploaded file.
- Click Next.
You cannot add new recipient lists. New recipients are added to an existing list.
Step 3: Row mapping
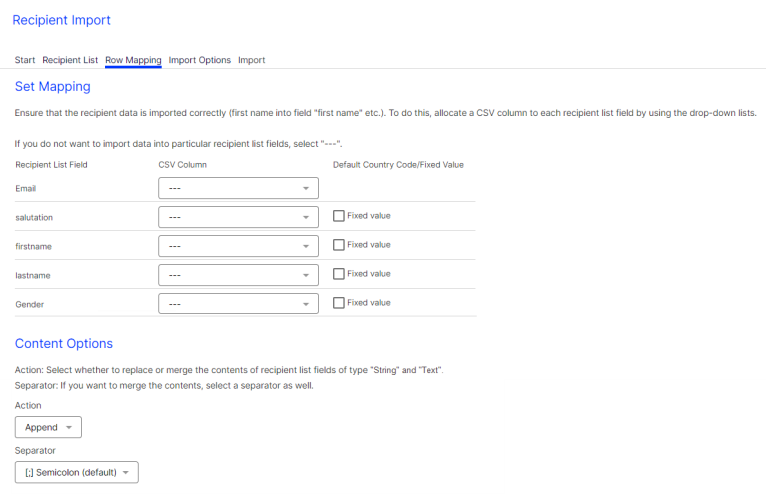
You must assign each column of the recipient list to a corresponding column in the imported recipient list. The left column of the Row Mapping tab lists fields of the Optimizely Campaign recipient list into which you are importing. The right column contains column headers from the imported list.
- Assign fields according to their content. Typically, Optimizely Campaign suggests the correct assignment (such as matching first name with first name). However, if first name in the recipient lists corresponds to name in the file, you must select the correct assignment.
- If you prefer to import data fields selectively (for example, only recipients' last names have changed), select the --- option for fields that should not be changed.
- Select the Fixed value check box to change the pop-up menu to an entry field in which you can enter any text or value (except for the Email field). This value or text is then imported into the corresponding field for each record.
For example, you generate email addresses of newsletter subscribers through your website as well as other sources (cooperation partners and so on). If you import records supplied by a cooperation partner, use the Origin field to indicate the partner's name or a corresponding code, so you can track the subscription's origin. You can also evaluate the activity of subscribers from various sources.
For another example, if your recipient list also contains mobile numbers, enter a country code for these fields during import if the imported numbers do not contain them. The country code is automatically prepended to the telephone number, and the telephone number may be standardized (eliminating the 0 before the area or network code).
- Under Content Options, the Action drop-down list lets you select whether to replace, prepend, or append contents of recipient list fields of type "String" and "Text".
See also: Data types.
When you select the Prepend or Append action, the Separator drop-down list appears. Select a character (semicolon, comma, tabulator and so on).
- Click Next.
Step 4: Import type and import options
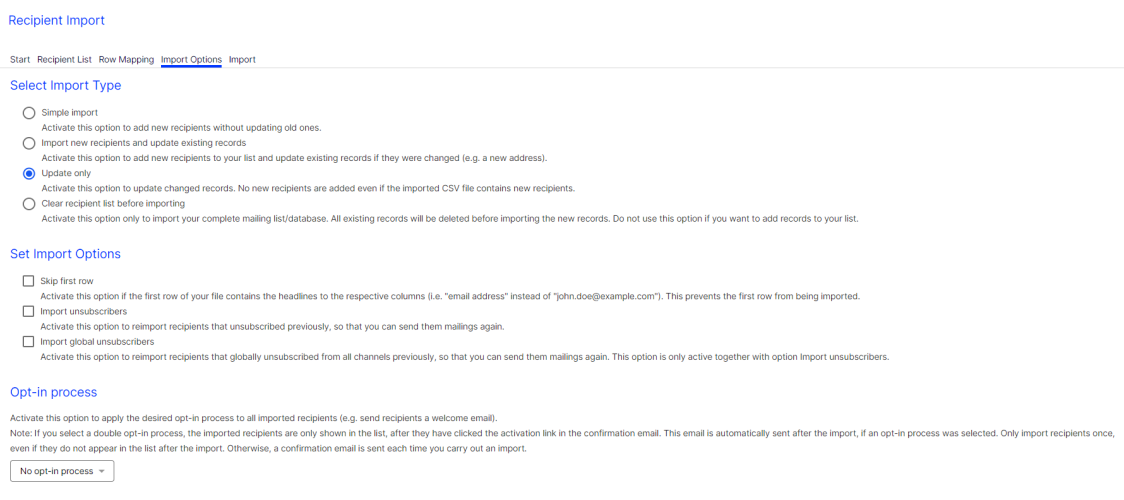
- In the Select Import Type area, select the import type.
Depending on the configuration of your client and your user authorization, you may see only some options.
- Simple import. Imports new recipients into your list. Existing records, unsubscribes or blocked Recipients whose email addresses are on the blocklist will never again receive email from you. This applies even if recipients subscribe to newsletters again later. To reverse this status, remove the recipient from the blocklist. recipients are skipped.
- Import new recipients and update existing records. Default import type. New recipients are added to the recipient list. Existing records are checked and updated as required. Optimizely Campaign identifies recipients by recipient ID, usually email address. If a recipient's email address has changed, he is imported again, because Optimizely Campaign does not recognize it as an existing recipient.
- Update only. Does not import new recipients. Only updates existing records as needed. If a recipient's email address changed, the recipient is skipped, because Optimizely Campaign does not recognize it.
- Clear recipient list before importing. Overwrite existing recipient list in Optimizely Campaign with data from the uploaded file. You should upload your complete address data.
Overwriting can be practical if recipients can unsubscribe both by clicking in the newsletter and through the call center. In this case, the unsubscribe information must find its way to Optimizely Campaign so that these recipients are unsubscribed and receive no further mailings. If your call center deletes a record from your database or CRM software, you can guarantee that this recipient is deleted by selecting Clear recipient list before importing.
- In the Set Import Options area, select one or more of the following import options:
- Skip first row. Often, the uploaded file has field names in the first row. Select to skip the table headers and start importing with the second row.
- Import unsubscribers. If this option is available, you can import recipients who are already marked as unsubscribed in your client The working environment of Optimizely Campaign. A client is a stand-alone and closed system that serves to organize your mailings. Campaign users can use one or more clients for your scenario.. Newly-imported recipients receive mailings right after importing them with this import option.
- Import global unsubscribers. If this option is available, the Import unsubscribers option only affects the marketing channels Channel through which advertising messages or information are transmitted to customers and prospects. For example, email, SMS, print or push. (media types) of the selected recipient list. If you activate both options, you import recipients that globally unsubscribed from all marketing channels.
This option is only active together with the Import unsubscribers option.
Permission is required for recipients. Do not send newsletters to unsubscribed recipients, if no permission (opt-in) exists.
- Add opt-in processes if you want to import recipients from a source that is not linked to an automatic opt-in process, such as from a telephone campaign. Select Standard for a Single Opt-In process or DOI for a Double-Opt-In process. Imported recipients receive a welcome or a confirmation email with an activation link. You can select this option only if the confirmation mailing is set up and edited beforehand.
Only import recipient lists once
If a double opt-in process is selected, imported recipients only appear in the list after they have clicked the activation link in the confirmation email. Optimizely Campaign automatically sends this email after the import, if an opt-in process is selected.
Only import recipients once, even if they do not appear in the list after the import. Otherwise, a confirmation email is sent each time you carry out an import.
- Click Import. The import starts and the Import tab opens.
Step 5: Import
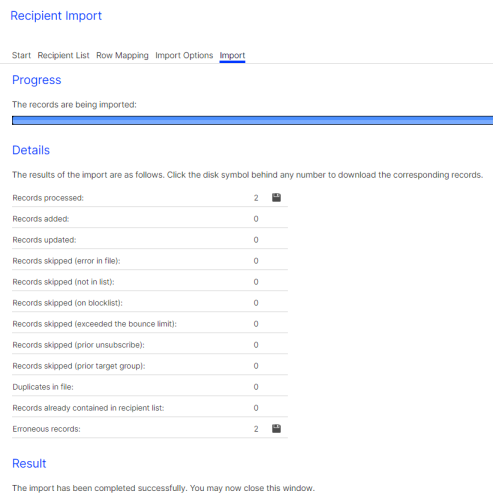
When the import is finished, Save ![]() appears next to each category for which records were found. Click Save
appears next to each category for which records were found. Click Save ![]() to download those records.
to download those records.
The number of processed records and the import result are listed for each category:
- Records processed. Number of processed records.
- Records added. Number of newly added records.
- Records updated. Number of updated records.
- Records skipped (error in file). The column assignment did not correspond with the selected values in the third step. For example, a record may contain only three columns instead of the indicated four columns.
- Records skipped (error in list). Number of skipped records; because they already existed, no changes were found, or you selected the option Update only and new records were found in the list.
- Records skipped (on blocklist). Recipients that are blocked. Depending on your client hierarchy, there might be several blocklists Recipients whose email addresses are on the blocklist will never again receive email from you. This applies even if recipients subscribe to newsletters again later. To reverse this status, remove the recipient from the blocklist.. A blocked recipient might not appear in the blocklist of your client, but be blocked on the list of the main client.
- Records skipped (exceeded the bounce limit). Recipients that exceeded the bounce Generated whenever an email fails to reach a recipient's server or mailbox. limit.
- Records skipped (prior unsubscribes). Recipients who previously unsubscribed.
- Records skipped (prior target group). The recipients were not imported because your client or the confirmation email (confirmed or double opt-in) uses target groups Subset of recipients defined by rules and conditions and a logic relationship between them. For example, all recipients in the United Kingdom. that do not match.
- Duplicates in file. Recipients only imported once to avoid duplicates in the recipient list.
- Records already in recipient list. Recipients already in the recipient list are skipped to avoid duplicates.
- Erroneous records. Optimizely Campaign validates data when importing them. Erroneous records may contain invalid characters or, in case of email addresses, a missing @ symbol or an invalid domain. Such records are not imported.
You can also import recipients automatically on a regular basis, for example to synchronize them with an external distribution list. For more information, see Scheduled jobs.
Importing recipients by category
To enable this feature, contact customer support.
If you maintain distribution lists in an external system, this additional feature lets you synchronize your external distribution list with Optimizely Campaign recipient lists. This feature lets you automatically import recipients into your client The working environment of Optimizely Campaign. A client is a stand-alone and closed system that serves to organize your mailings. Campaign users can use one or more clients for your scenario..
You can import the following categories in individual CSV Stands for "comma-separated values"; tabular data in a plain text file separated by the comma character. files or as multiple lists with markers for each category:
- Recipients
- Unsubscribers
- Blocked recipients
- Post clicks (requires a web analysis program with an export function)


