Synchronizing servers using eSync
Ektron’s eSync keeps websites up-to-date efficiently. From single sites, global multi-sites, and server farms, eSync provides scalable, geo-synchronization capabilities that let you easily update exactly what you want, when you want to update it.
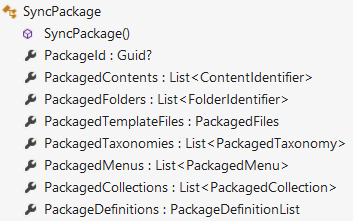
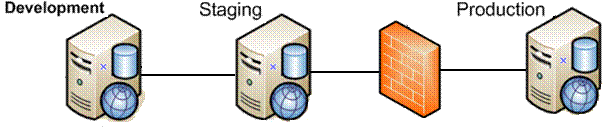
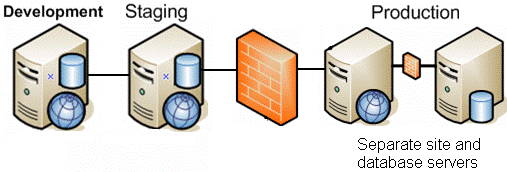
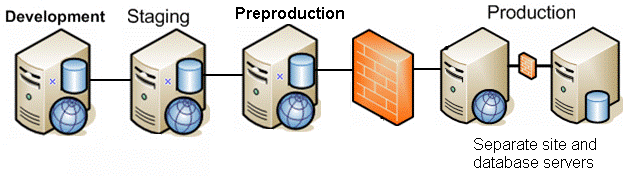
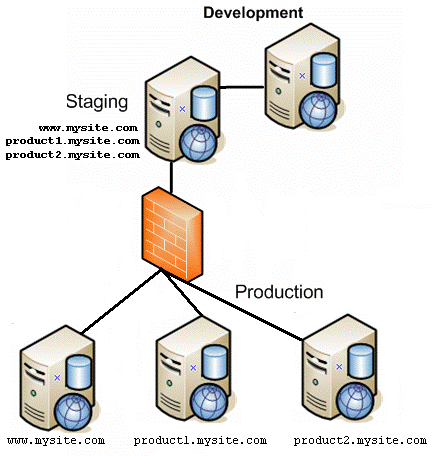
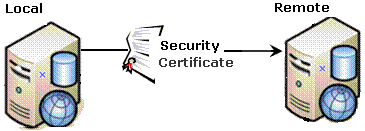
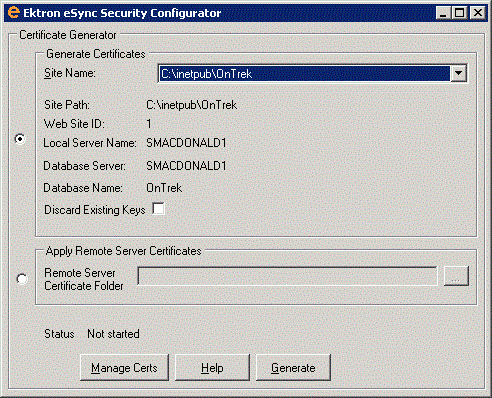
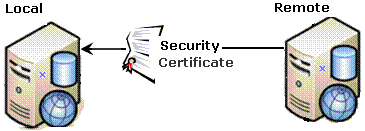
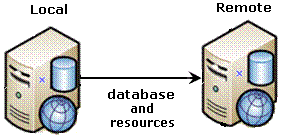
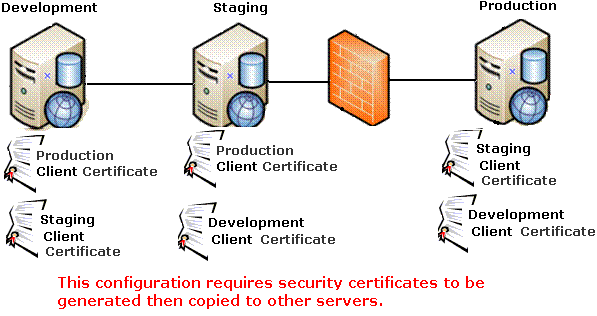
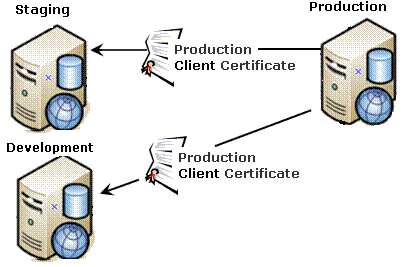
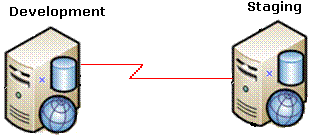
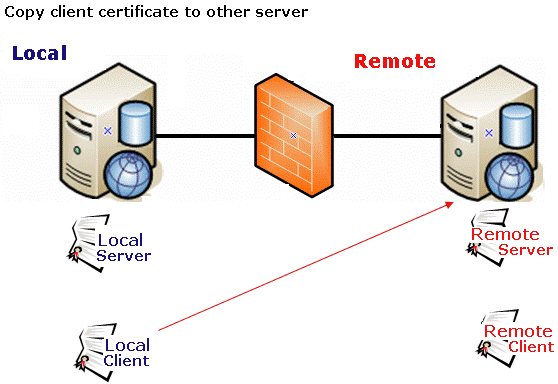
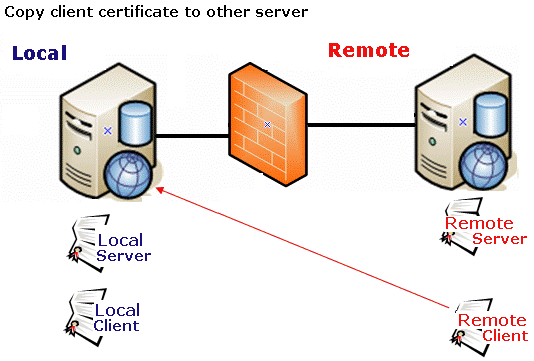
Ektron’s eSync lets users update content anywhere safely by employing certificate-based authentication to secure your website, whether it is on a production server or a development environment. Also, your updates can take place on the safe side of your firewall before being moved to the live site. Within complex IT infrastructures, eSync can synchronize content, assetAn external file, such as a Microsoft Word document or image, stored in one of these Ektron siteroot folders: assets, privateassets, uploadedfiles and uploadedimages. An asset can be managed like native Ektron content.s, HTML pages and other website components, whether they are managed by Ektron or not.
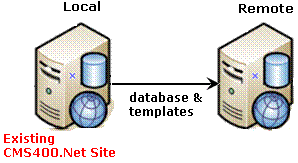
eSync efficiently makes updates and eliminates site downtime by moving only the changes you want to move, from single pieces of content to entire sites. With its intelligent synchronization technology, eSync securely moves selected content bidirectionally: Web 2.0 sites have a wealth of user-generated content and membership information which can be synchronized back to the development side of the firewall. To track changes to Ektron data between syncs, eSync creates a c:\sync
folder structure that mirrors your site’s Windows folder structure. This structure is created on each server when sync relationships are first established. No Ektron files reside in the \sync
folders. Instead, each folder has four .sync
files that monitor changes to Ektron files in the corresponding folder.
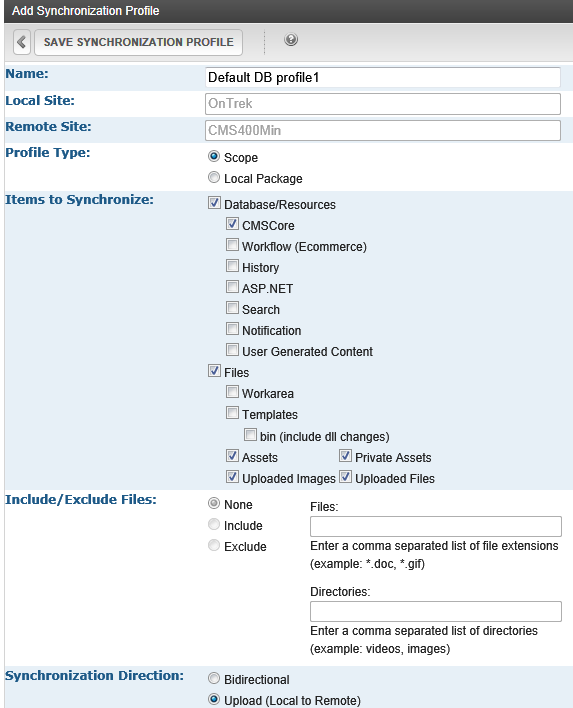
eSync manages content dependencies, that is references to other files such as images. eSync automatically handles the synchronizing of dependencies, so you do not need to worry about these extra files. Adjusting relationship settings explains how to sync content dependencies.
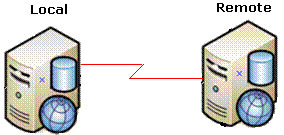
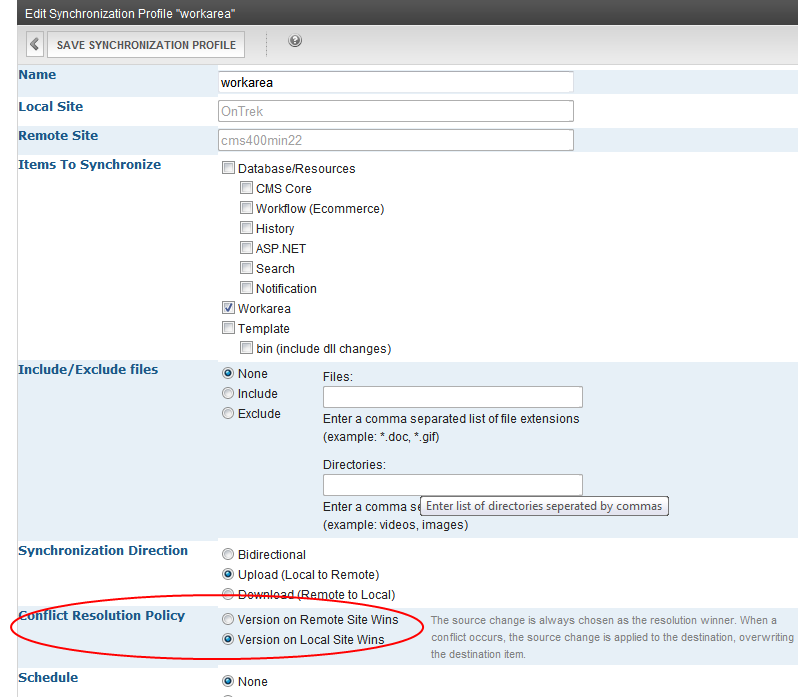
You can synchronize at any time with single or multiple servers; strategic times that assure optimal performance, while facilitating site updates; low-traffic times to coordinate global multi-site setups. You also can schedule time-sensitive events.
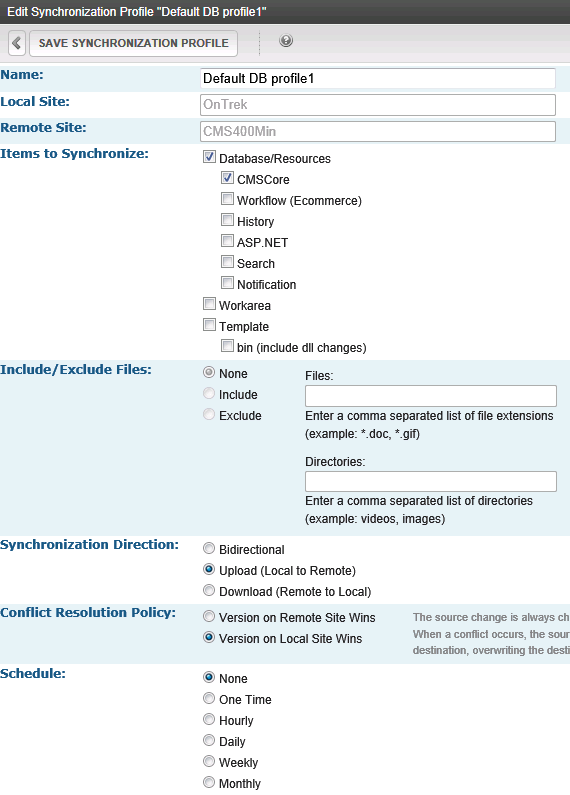
If conflicting versions of content exist, eSync’s configurable conflict resolution engine preserves your most recent content. The version that isn’t posted is saved in a history log (along with other previous versions), letting you track changes or restore if necessary.
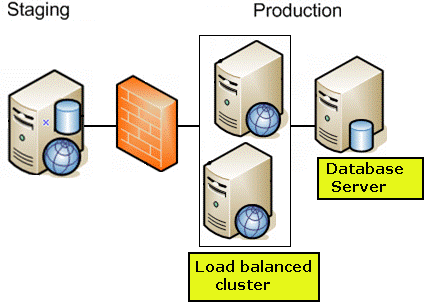
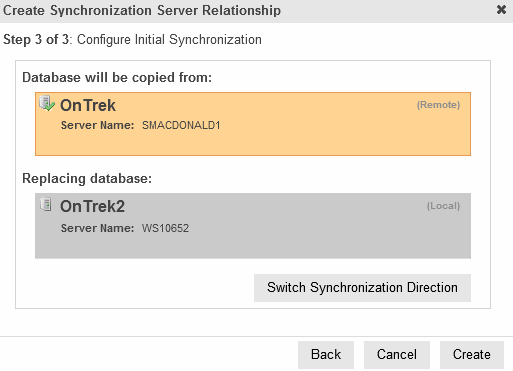
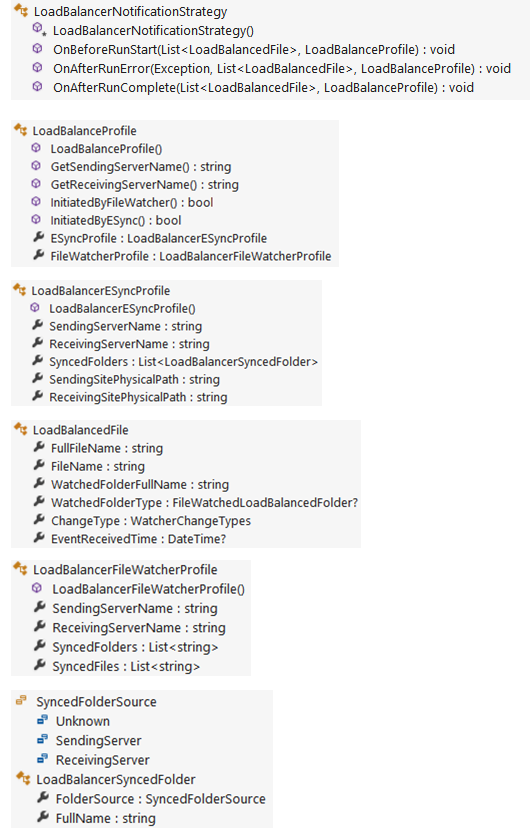
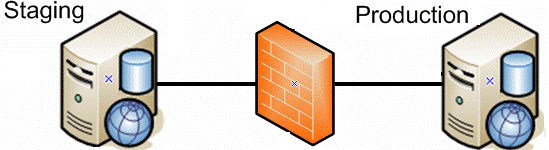
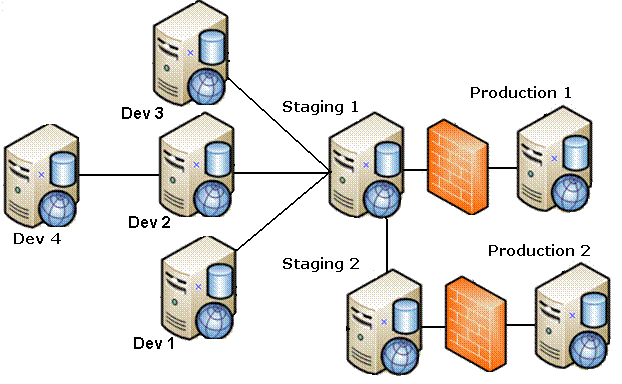
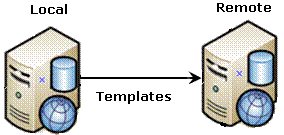
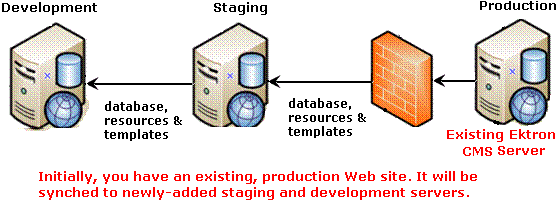
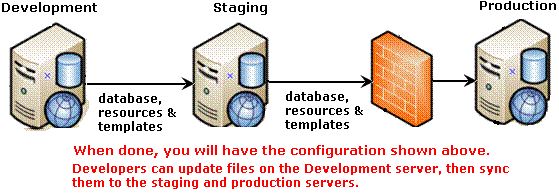
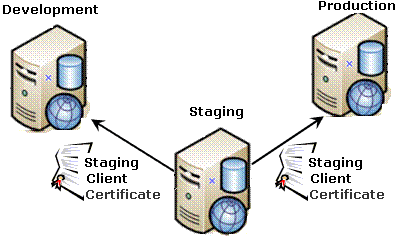
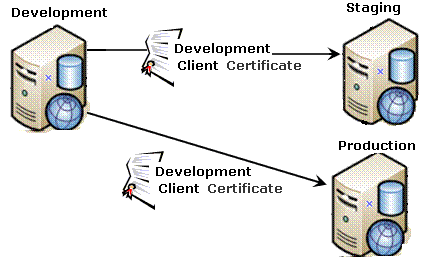
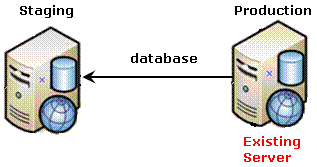
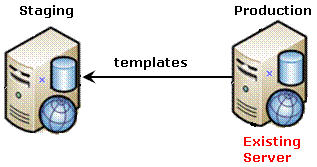
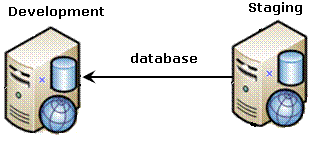
If you have multiple development servers, eSync can create a copy of the live site to work with. As your developers change the site, their updates can by synchronized to the staging and production servers. eSync also can support advanced infrastructures, including load balancing and failover server configurations.
Every server in a sync relationship is assigned a unique number. The originating server is 1, the first server with which it establishes a relationship is 2, and so on. The server number is stored in the c:\sync\serverinfoXX.xml
file.
<SyncServerInfoList>
<SyncServerInfo IsSyncRunning="false" Migrated="false" MaxId="2" ServerNumber="1" ...
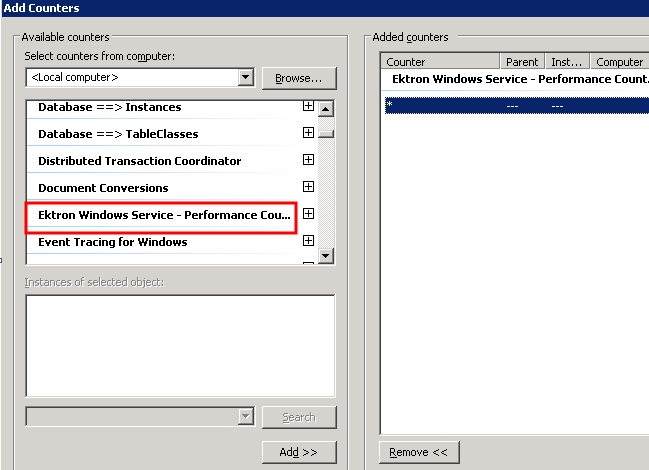
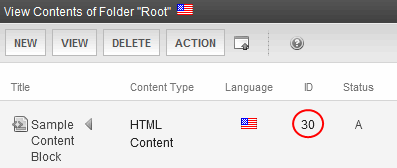
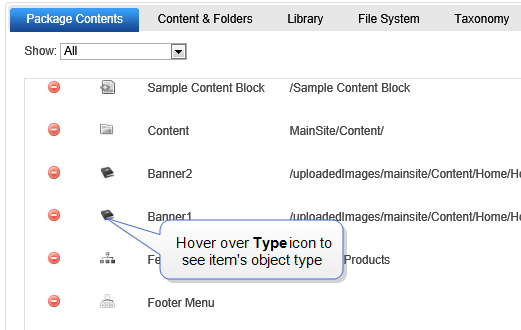
All Ektron data is assigned a unique ID number to distinguish it from similar objects. Examples are content (see illustration), folders, menus, users, and so on.
When you create a sync relationship, Ektron applies a new ID numbering range to each server to ensure that, from then on, objects created on either server have a unique ID. This prevents collisions when synchronizing between servers. For example, since membership users created on a production server have a different ID number range from those created on the staging server, eSync does not overwrite them.
To view a server’s ID number range, open its C:\sync\serverinfoXX.xml
file, and check the MaxId
value as shown in the following example.
<SyncServerInfoList>
<SyncServerInfo IsSyncRunning="true" MaxId="3" ServerNumber="1"....
Multiply that number by 1 trillion to get the largest ID number which that server can assign. For example, if MaxId
= 3, ID numbers range from 2,000,000,000,001 to 3,000,000,000,000.
This section explains several scenarios for installing and setting up eSync.
To use eSync, you must have the following:
IMPORTANT: The version of Ektron on every server in the sync relationship must match. You can neither upgrade nor downgrade Ektron using eSync.
cms400Base9x.exe
). Use to install a second site with which to sync your current site. NOTE:
NOTE: It is not a problem if your templates were created using the 2.0 Framework.
Database servers may use different SQL server versions. (For example, your development server uses SQL 2008 Express, and your production server uses SQL Server 2008 R2.)
db_datareader
You administer eSync through the Workarea > Settings > Configuration > Synchronization > Profiles screen. The screen lets you establish a sync relationship between 2 websites, then specify any number of sync profileA collection of eSync information to be reused, such as: files to be synched, direction, source and destination databases, and schedule.s for each relationship.
You can sync immediately by clicking Sync ().
You create profiles to sync these kinds of data.
File types or individual files can be included or excluded from a sync profile. Alternatively, you can sync content or folders. See also: Synchronizing content and folders.
You can synchronize any server to or from any other server with one important exception: you cannot initiate a sync from a server outside the firewall. You can only initiate a sync from a server inside the firewall because an outside server does not know the address of servers inside the firewall. However, your staging server can push to and pull from a production server.
IMPORTANT: eSync transmissions use port 8732. This is not configurable.
The most basic eSync relationship involves a staging and a production server. Each server has a database and one site.
eSync can automatically create a production server from your staging server. See also: Initializing a new site.
For installation instructions for this relationship, see Scenario 2: Synchronizing a local server with a remote server.
This relationship includes a development server. Developers can use it to create new features and modify existing ones. When they are done, they can sync changes to the staging server, where they can be verified before being moved to production.
For installation instructions for this relationship, see Scenario 3: Setting up a development > staging > production environment.
The following relationship illustrates synchronizing several sites on a staging server with those sites on production.
As shown in the illustration, any number of development servers can sync to each other and your staging and production servers.
In this relationship, the production site has 2 servers: one for site files, and another for the database.
To synchronize these servers, set up several eSync profileA collection of eSync information to be reused, such as: files to be synched, direction, source and destination databases, and schedule.s. One syncs the database, assetAn external file, such as a Microsoft Word document or image, stored in one of these Ektron siteroot folders: assets, privateassets, uploadedfiles and uploadedimages. An asset can be managed like native Ektron content.s, and templates to the production database server. Another profile syncs the staging server’s Workarea files with the production site server.
NOTE: When using separate site and database servers, assets are stored on the site server.
This relationship adds a server between staging and production. The preproduction server can be used for review and testing of changes before they are moved to production.
In this relationship, each production server has its own database plus the site files. As an alternative, you could have a separate server for each production database, with all sites on one production server.
NOTE: The above relationship also supports separate site and database servers.
To synchronize this type of relationship, set up several eSync profileA collection of eSync information to be reused, such as: files to be synched, direction, source and destination databases, and schedule.s, one for each site.
Typically, before you begin using eSync, one server hosts an Ektron website, and you want to bring other servers into the relationship. After the servers are synchronized, one is the staging server, the one on which content is created or updated, then published. Another server, production, hosts your live website.
IMPORTANT: The names of the site and all folders must match on both servers. This is because paths to images, XSLTExtensible Stylesheet Language Transformations files, and so on, refer to a site and its folders. If the names do not match, the links break.
First, use eSync to initialize new servers from the existing one. Afterward, use eSync to periodically sync updated content, folders, users, menus, and so on.
It is unlikely that you will use this relationship in “real-life” situations, but it provides the simplest way to begin testing and learning eSync.
IMPORTANT: Only use this scenario in a test environment. For a live environment, use either Scenario 2: Synchronizing a local server with a remote server or Scenario 3: Setting up a development > staging > production environment.
IMPORTANT: Install both sites to a physical folder relative to the root folder. Do not install one site to a physical folder relative to the root folder and the other site to a virtual directory.
If you're using Windows 8 or 2012, press the Windows key ()/Q then enter Security Configurator. Right click and choose Run as Administrator.
The security configurator screen appears.
C:\Program Files (x86)\Ektron\CMS400vxx\Utilities\SecurityConfig\SecurityConfigurator
.NOTE: Ektron Windows Services stop and restart at this point.
Now that both sites’ security certificates are configured, continue from Part 3: Connect local and remote servers.
To sync a local to a remote server, install a minimal Ektron site to a new, remote server. Next, use eSync to upload your Ektron site from the local to the remote server. After the you complete the initial and template syncs explained in this chapter, the 2 sites are mirror images of each other.
Follow these steps to configure 2 servers to sync with each other.
Prerequisite
CMS400Base9x.exe
). For more information, see System Requirements.IMPORTANT: Install both sites to a physical folder relative to the root folder. Do not install one site to a physical folder relative to the root folder and the other site to a virtual directory.
Security certificates authorize file synchronization between servers. In this part, you generate security certificates on the local server, then copy them to the remote.
IMPORTANT: Near the end of the installation procedure, you are prompted to generate security certificates. If you completed that screen, skip steps 2 through 6.
If you're using Windows 8 or 2012, press the Windows key ()/Q then enter Security Configurator. Right click and choose Run as Administrator.
NOTE: Ektron Windows Services stop and restart at this point.
WARNING! Do not create the new folder under the Web root, C:\inetpub\wwwroot.
C:\ProgramFiles\Ektron\CMS400vxx\Utilities\SecurityConfig\SecurityConfigurator
64-bit:
C:\ProgramFiles (x86)\Ektron\CMS400vxx\Utilities\SecurityConfig\SecurityConfigurator
NOTE: After copying security certificates to the remote folder, they need to be registered and moved to the correct folders. The Security Configurator screen does this.
If you're using Windows 8 or 2012, press the Windows key ()/Q then enter Security Configurator. Right click and choose Run as Administrator.
NOTE: Ektron Windows Services stop and restart at this point.
To accomplish this, repeat the steps in Part 2: Generate and copy security certificates, but this time, treat the remote server as the local server and vice versa.
WARNING! Back up your database before beginning this procedure.
NOTE: If your Ektron has a very large database or number of assetAn external file, such as a Microsoft Word document or image, stored in one of these Ektron siteroot folders: assets, privateassets, uploadedfiles and uploadedimages. An asset can be managed like native Ektron content.s, and you want to reduce the time required to complete the initial sync, see Minimizing the time of the initial sync.
The initial sync creates a default database profileA collection of eSync information to be reused, such as: files to be synched, direction, source and destination databases, and schedule.. You can reuse this profile to sync database/resource files in the future.
Use the following procedures if you have a large database or number of assetAn external file, such as a Microsoft Word document or image, stored in one of these Ektron siteroot folders: assets, privateassets, uploadedfiles and uploadedimages. An asset can be managed like native Ektron content.s and want to minimize the time to complete an initial sync. In both cases, you use a tool other than eSync for the initial copy. From then on, use eSync to sync your servers.
To quickly copy a database between servers:
C:\Program Files (x86)\Ektron\EktronWindowsService40
.<add key="skipDataSyncChanges">
element to true.Staging.abc.com
domain. But, on the production server, you need a production domain key, such as abc.com
. See also: License keys.<add key="skipDataSyncChanges">
element to false.Assets consist of files in these folders:
If your Ektron has a large number of assets, you may want to reduce the initial sync time. To copy asset files between servers quickly:
C:\Program Files (x86)\Ektron\EktronWindowsService40
\Ektron.ASM.Services40.exe.config
.<add key="skipFileSyncChanges">
element to true.<add key="skipFileSyncChanges">
element back to false.
Before
After
In this scenario, Ektron initially resides on one server. Consider that your production server and use it to initialize the staging and development servers.
NOTE: In this scenario, you cannot sync between the development and production servers. The sync can only be run between Development and Staging or Staging and Production.
Prerequisite
IMPORTANT: Install both sites to a physical folder relative to the root folder. Do not install one site to a physical folder relative to root and the other sites to virtual directories.
Security certificates authorize synchronization between servers. In an eSync relationship, every server needs a security certificate from every other server.
To generate and copy these certificates:
IMPORTANT: Near the end of the installation procedure, you are prompted to generate security certificates. If you completed that screen, skip steps 2 through 4.
Click the Windows Start button > All programs > Ektron > CMS400 v9x > Utilities > Security Configurator. Right click and choose Run As Administrator.
If you're using Windows 8 or 2012, press the Windows key ()/Q then enter Security Configurator. Right click and choose Run as Administrator.
The following screen appears.
WARNING! Do not create the new folder under the Web root, C:\inetpub\wwwroot.
C:\ProgramFiles\Ektron\CMS400vxx\Utilities\SecurityConfig\SecurityConfigurator
.After copying security certificate files to the staging folder, they need to be registered and moved to the correct folders. The Security Configurator screen does this.
If you're using Windows 8 or 2012, press the Windows key ()/Q then enter Security Configurator. Right click and choose Run as Administrator.
The security configurator screen appears.
IMPORTANT: Near the end of the installation procedure, you are prompted to generate security certificates. If you completed that screen, skip steps 2 through 4.
Click the Windows Start button > All programs > Ektron > CMS400 v9x > Utilities > Security Configurator. Right click and choose Run As Administrator.
If you're using Windows 8 or 2012, press the Windows key ()/Q then enter Security Configurator. Right click and choose Run as Administrator.
The following screen appears.
WARNING! Do not create the new folder under C:\inetpub\wwwroot
.
C:\ProgramFiles\Ektron\CMS400vxx\Utilities\SecurityConfig\SecurityConfigurator
.NOTE: After copying the security certificate files to the production folder, they need to be registered and moved to the correct folders. The Security Configurator screen does this.
If you're using Windows 8 or 2012, press the Windows key ()/Q then enter Security Configurator. Right click and choose Run as Administrator.
The security configurator screen appears.
IMPORTANT: Near the end of the installation procedure, you are prompted to generate security certificates. If you completed that screen, skip steps 2 through 4.
Click the Windows Start button > All programs > Ektron > CMS400 v9x > Utilities > Security Configurator. Right click and choose Run As Administrator.
If you're using Windows 8 or 2012, press the Windows key ()/Q then enter Security Configurator. Right click and choose Run as Administrator.
The following screen appears.
WARNING! Do not create the new folder under C:\inetpub\wwwroot
.
C:\ProgramFiles\Ektron\CMS400vxx\Utilities\SecurityConfig\SecurityConfigurator
.If you're using Windows 8 or 2012, press the Windows key ()/Q then enter Security Configurator. Right click and choose Run as Administrator.
WARNING! Back up your database before beginning this procedure!
NOTE: If your Ektron has a very large database or number of assetAn external file, such as a Microsoft Word document or image, stored in one of these Ektron siteroot folders: assets, privateassets, uploadedfiles and uploadedimages. An asset can be managed like native Ektron content.s, and you want to reduce the initial sync time, see Minimizing the time of the initial sync.
The initial sync creates a default database profileA collection of eSync information to be reused, such as: files to be synched, direction, source and destination databases, and schedule.. You can use the profile to run database/resource syncs in the future.
NOTE: If your Ektron has a very large database or number of assets, and you want to reduce the initial sync time, see Minimizing the time of the initial sync.
The initial sync downloads the staging server’s database and resources to the development server. A screen tracks the sync’s progress.
The initial sync also creates a default database profileA collection of eSync information to be reused, such as: files to be synched, direction, source and destination databases, and schedule.. You can reuse this profile to sync the database/resources between these 2 servers at any time in the future.
To minimize data entry, eSync saves job specifications in a profile. After you enter specifications once, select the profile to sync again using the same details. A profile contains the following information:
Use the Add/Edit Synchronization Profile screen to manage eSync profiles.
While Setting up eSync, you created a default database and a template profile. This section explains how to modify those profiles and create new ones.
To sync a website, you need at least 2 profiles: one for the siteroot/Workarea
folder, and another for all other site files. To create a profile for
Workarea
folder, check Items to Synchronize > WorkareaThe following list explains which files are synchronized by each grouping under Items to Synchronize.
Workarea
folder. See also: Setting up a profile to sync workarea files.IMPORTANT: If you run a template sync and Bin is checked, and one server is running is 32-bit mode while the other is running in 64-bit mode, users will not be able to drag and drop DMSDocument Management System; Ektron's way of managing assets (Microsoft Office files and other types of files) files on the staging server.
NOTE: If you perform an initial sync of a recently-installed min site with your staging site, the min site’s templates could overwrite templates on your staging site. This is because, when 2 templates have the same name, the most recently-modified one overwrites the other.
To avoid this, rename the only template installed with the min site (login.aspx) before performing the initial template sync. You should also rename login.aspx’s supporting files, such as login.aspx.vb.
The following file types are not synchronized by default.
You may add these file types to a Workarea or Template profileA collection of eSync information to be reused, such as: files to be synched, direction, source and destination databases, and schedule. via the Include/Exclude Files field.
Prerequisites
- You created a Sync relationship and ran an initial sync. See also: Setting up eSync.
- If your profile is based on an eSync package, it has been set up. See also: Synchronizing a package.
The following list describes the database scope filter checkboxes.
NOTE: The Include/ExcludeFiles field is available only for Workarea, Template, or bin syncs.
Use these checkboxes to choose groups of database tables. You must choose one scope if you check Database/Resources.
NOTE: Click any label under Database/Resources to see the list of database tables synchronized by that scope.
Whenever user-generated content is synchronized, the profile of the user who created the content is also synchronized.
User-generated content is a subset of CMS Core, so you would not choose both for the same sync. But you may select user-generated content with any other scope.
When you set up a sync profile for user-generated content, you typically choose Bidirectional as the direction. In this case, if a membership user updates his or her profile on the production server, eSync copies the changes to staging. On the other hand, if your administrator changes that information on staging, the next eSync copies it from staging to production.
NOTE: Since notifications are part of the User Communities feature, they are automatically checked if you check User Generated Content.
Effect of Choosing Conflict Resolution Policy
If the synchronization direction is Bidirectional
If the synchronization direction is Upload
If the synchronization direction is Download
NOTE: If you enter a date greater than 28, the sync will not run in a month that does not include that date. For example, if you enter 31, the sync will not run in February, April, June, September, and November.
Setting up a profileA collection of eSync information to be reused, such as: files to be synched, direction, source and destination databases, and schedule. to sync Workarea files is the same as Setting up a profile to Sync a database with the following exceptions:
Use the Include/Exclude Files field to include files not normally synchronized, or exclude files or directories that are synchronized by default. This screen section is active only if you choose a Template or Workarea sync and no Database/Resources scopes.
NOTE: By default, eSync ignores .config and .txt files.
For example, .txt files are not normally synchronized, but you want to sync several of them. In this case, check Include and enter *.txt into the Files field.
Examples of the Exclude Files option:
You can exclude file types and directories. eSync ignores files that satisfy either criterion.
Workarea synchronizes all files in the site’s Workarea
folder, except files in these subfolders:
Setting up a profileA collection of eSync information to be reused, such as: files to be synched, direction, source and destination databases, and schedule. to sync Workarea files is the same as Setting up a profile to Sync a database with the following exceptions:
Regardless of how you complete the Include/ExcludeFiles field, the following siteroot folders are not synchronized:
Within a template/bin sync's folders, you can select individual files. For example, you updated template files and related .css files on the staging server, and want to update the production server without moving everything else.
After saving the profile, click Synchronize files (
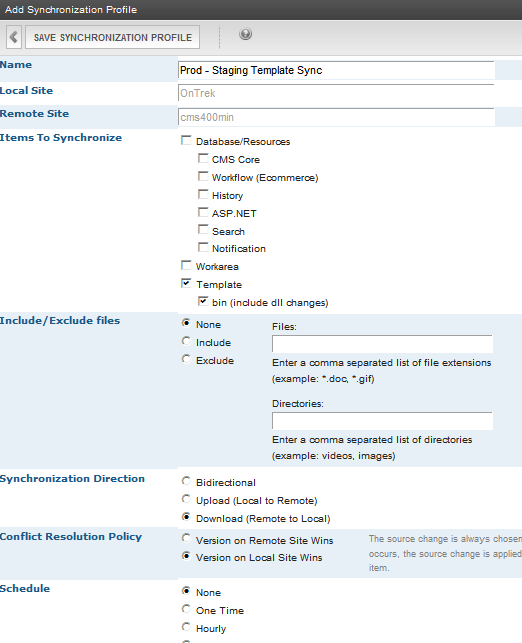
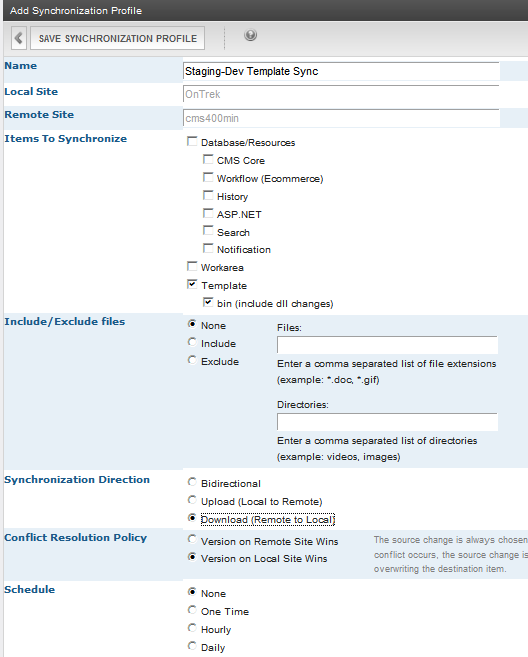
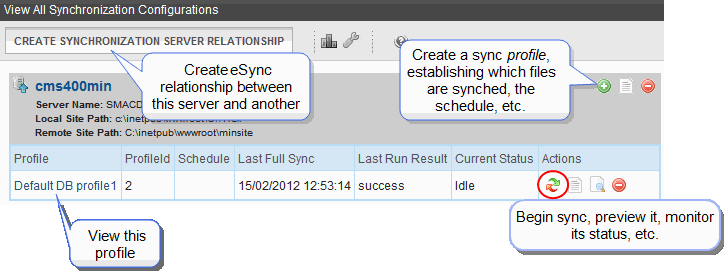
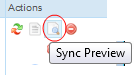
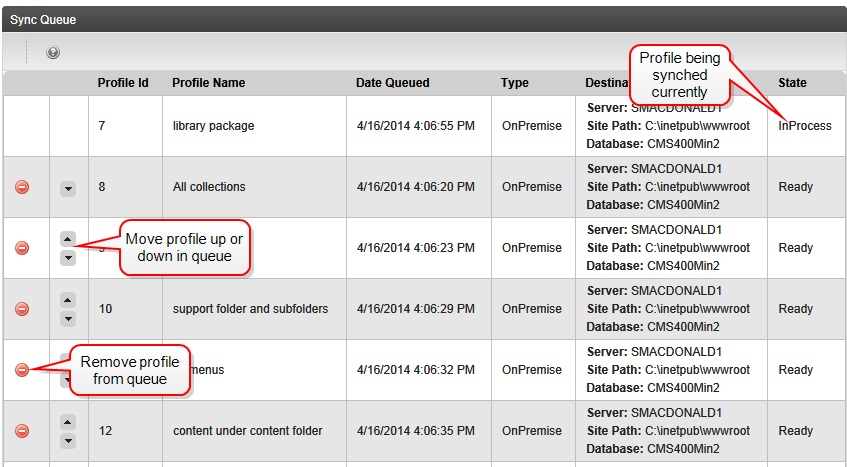
) from the View Profiles screen to access the Sync Files screen. Here, you can select individual files. If you included files types, only they are available for selection. If you excluded file types or directories, they are unavailable.
IMPORTANT: If you select one or more files on the Sync Files screen, the profile includes only those files. If you select no files, the profile includes all files indicated by your responses to the Include/Exclude Files field.
Before running a sync, you can view what will be synchronized by clicking Sync Preview.
Ektron recommends this feature to help confirm that tables, assetAn external file, such as a Microsoft Word document or image, stored in one of these Ektron siteroot folders: assets, privateassets, uploadedfiles and uploadedimages. An asset can be managed like native Ektron content.s, private assets, uploaded files, uploaded images and assetlibrary files that you delete, add, or change will be synchronized between servers as you expect. Also, you can predict how long a sync will take, because the preview takes the same amount of time.
The Sync Preview produces Sync Log files. See also: Viewing eSync activity.
NOTE: You cannot preview a sync profile that includes only Workarea files.
If a sync profileA collection of eSync information to be reused, such as: files to be synched, direction, source and destination databases, and schedule. has a schedule, you can pause it by clicking the profile's pause/play button.
While paused, the sync will not run. To resume the schedule, click the pause/play button again.
For example, a sync is scheduled to run every hour @ :50: 1:50, 2:50, 3:50, and so on. At 10:30 a.m., you pause the sync profile. So, at 10:50 a.m., the sync does not run. At 12:00 noon, you click the pause/play button again. The next sync starts at 12:50 p.m.
Although most Ektron data is created and updated on the staging server, some data is collected on the production server. This information can be viewed and edited on the staging server. Here are some examples:
When you set up a profileA collection of eSync information to be reused, such as: files to be synched, direction, source and destination databases, and schedule. to sync this kind of data (maintained in the database), you typically choose Bidirectional as the direction, and Notifications and User Generated Content under Database/Resources. So, if a membership user updates his or her profile on the production server, eSync copies the changes to staging. On the other hand, if your administrator changes that information on staging, the next eSync copies it from staging to production.
If the same file on both servers was updated since the last sync, your conflict resolution policy determines which data is saved.
NOTE: The first time you run a sync for templates or Workarea files, the sync is bidirectional, regardless of the direction you specify on the Synchronization Direction screen.
If you are using a bidirectional sync, and the same item changed on both servers since the last sync, eSync must decide which version to keep, and which version to overwrite.
NOTE: If you use bidirectional sync and only one version was updated since the last sync, the updated version overwrites the unchanged version.
Use the Synchronization Profile screen's Conflict Resolution Policy field to determine which version ends up on both servers after synchronization. The choices are:
eSync uses security certificates to secure communication between servers. All servers in an eSync relationship must have matching, encrypted security certificates to establish an eSync relationship.
NOTE: If your relationship includes separate database servers, you do not need to install security certificates on them. You only need to install certificates on servers that host Ektron.
See also: Create eSync security certificates for a load-balanced cluster.
Before you can establish an eSync relationship between servers, each server must have its own (local) security certificates and certificates from every other server in the relationship.
As another example, if an eSync relationship consists of 5 servers, each server requires 5 security certificates: one local and 4 remote.
Each server creates 2 certificates: a server and a client. Then, you copy the client certificate to the other servers in the relationship. The local machine’s server certificate must match a client certificate on the remote server, and vice versa.
You typically copy certificates only when establishing an eSync relationship between servers. After that, any eSync activity triggers a background check, and you can only proceed if certificates match.
Each certificate consists of these files.
The security certificates can apply to one site or all sites on a server. You determine this when installing them.
Use Certificate Manager to view security certificates installed on your server. Check marks indicate the certificates. You can also delete all certificates for a server.
NOTE: You can only remove certificates from remote servers. You cannot remove them from the server to which you are logged in.
To view (and delete) certificates:
If you're using Windows 8 or 2012, press the Windows key ()/Q then enter Security Configurator. Right click and choose Run as Administrator.
Prerequisite
Permission to copy and paste files between local and remote servers
To create and place eSync security certificates in the correct locations:
Log on using the credentials of the service account used by Ektron Windows Service 4.0 and your site's App Pool.
NOTE: You can access this screen at any time screen by clicking the Windows Start button > All programs > Ektron > CMS400 vxx > Utilities > Security Configurator > right click and choose Run as Administrator.
If you're using Windows 8 or 2012, press the Windows key ()/Q then enter Security Configurator. Right click and choose Run as Administrator.
NOTE: Only click Generate once. The status field at the bottom of the screen updates as it progresses. If you click OK more than once, you delay the certificates’ creation.
IMPORTANT: Do not create the folder under the Web root folder, for example C:\inetpub\wwwroot
.
C:\ProgramFiles\Ektron\CMS400vxx\Utilities\SecurityConfig\SecurityConfigurator
.NOTE: These files were created when you completed the eSync Security Configurator Screen in Step 1.
After you copy the local server’s security certificates to the remote server, they need to be registered and moved to the correct folders. The Security Configurator screen does this.
If you're using Windows 8 or 2012, press the Windows key ()/Q then enter Security Configurator. Right click and choose Run as Administrator.
Follow these steps to regenerate security certificates. You would do this if they stop working, or you are concerned about a security breach.
If you're using Windows 8 or 2012, press the Windows key ()/Q then enter Security Configurator. Right click and choose Run as Administrator.
When trying to connect to a remote server, after selecting a security certificate, you may see the following message.
To resolve the problem:
The following endpointPart of a DXH connection, it is the combination of an endpoint (a URL or API path) and authentication credentials that allows communication between 2 software instances. You define DXH endpoints in your site’s web.config file. error indicates that
The eSync Settings screen lets you define many eSync settings.
Workarea > Configuration > Synchronization > Settings.
The default value is false because Azure does not support encryption. You should only check this box if you are using eSync in an on-premises environment.
IMPORTANT: The names of the site and all folders must match on both servers. This is because paths to images, xslt files, and so on, refer to a site and its folders. If the servers’ site and folder names do not match, the links break.
NOTE: Syncs can be queued so they run 1 after the other. See also: Managing the eSync queue.
You may want to adjust the web.config
and db.config
settings before running a Sync. The following topics explain eSync features that you control via the .config files.
IMPORTANT: Ektron has discontinued new development on its eCommerce module. If you have a license to eCommerce, you will continue to receive support, but if you need to upgrade, contact your account manager for options.
Some Ektron customers prefer a tool other than eSync to sync assetAn external file, such as a Microsoft Word document or image, stored in one of these Ektron siteroot folders: assets, privateassets, uploadedfiles and uploadedimages. An asset can be managed like native Ektron content.s; for example RoboCopy. To disable eSync's asset sync:
C:\Program Files (x86)\Ektron\EktronWindowsService40\Ektron.ASM.Services40.exe.config
.<add key="disableFileSyncProvider">
element to true.Ektron.ASM.Services40.exe.config
.From now on, eSync does not copy assets. Set up your replacement tool to do that.
You can modify settings in the Ektron Windows service (EWS) config file (C:\ProgramFiles (x86)\Ektron\EktronWindowsService40\Ektron.ASM.EktronServices40.exe.config
) to accommodate your preferences. The settings are:
Prerequisites for Running a Sync
- s for Using eSync
- You created an eSync relationship and profileA collection of eSync information to be reused, such as: files to be synched, direction, source and destination databases, and schedule.s. See Setting up eSync.
- You are not signed on to a production server that is outside the firewall. You cannot sync from a production server outside the firewall to other servers—you can only sync to this production server.
You can run eSync on a schedule, or on demand. To sync a profileA collection of eSync information to be reused, such as: files to be synched, direction, source and destination databases, and schedule. immediately:
NOTE: If another sync is running,
NOTE: You can close the status window and reopen it at any time by clicking Sync (). If you do, the sync’s current status appears.
IMPORTANT: If you performed a database sync and the site being synchronized uses URL aliasing, you must go to its URL Aliasing Settings screen and click Refresh (
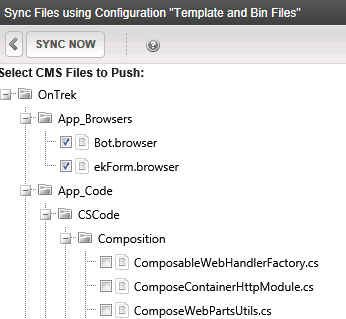
) to update its aliasing information.
Use the Force Initial Sync button to reinitialize a server that was previously initialized.
Here is an example of when to use Force Initial Sync.
To accomplish step 3, use the Force Initial Sync button. The button only appears when all of these conditions are present.
Prerequisite: Forcing Initial Sync Conditions
The Force Initial Sync feature requires these conditions.
- The server’s
web.config
file’sek_ForceReInit
property is set totrue
.- The site is not part of a multi-site relationship.
- The server has only one sync server relationship.
- The server is the destination (that is, on the download side) of the sync server relationship.
The following image illustrates the last 2 conditions.
NOTE: The Force Initial Sync procedure ignores these checks that are normally made prior to synchronization:
* the destination database is smaller than the source database
* the site was not previously staged
You can create a backup of the destination server’s database. If you do and problems occur during the sync, the database is restored to its pre-backup state. You can specify the backup to occur on the initial sync only, or every time you sync.
NOTE: No backup is made when you sync a package, folder, content. See also: Synchronizing content and folders, Synchronizing a package.
To set up database backup:
The backup file format is [dbname][yyyy][mm][dd][hh][mm][ss][mmm].[product].bak
. For example: cms400min20120216075946765.esync.bak
.
This section explains how to sync content and folders using context menu options.
See also: Prerequisites for Using eSync.
web.config
file.eSyncEnabled
to true
.<eSyncSettings> <!-- Set this key to true to enable content/folder sync if the eSync feature is available --> <add key="eSyncEnabled" value="false"/> </eSyncSettings>
Content sync copies selected content to another server. The sync also copies all entities on which the content is dependent, such as
NOTE: When you sync one content item, all physical files (DMSDocument Management System; Ektron's way of managing assets (Microsoft Office files and other types of files) assets and library files) in the content’s folder are also synchronized.
See also: Synchronizing content and folders.
To sync a content item:
NOTE: Alternatively, use the Synchronize button on the View Content screen.
NOTE: If another sync is running,
The folder sync updates folder properties and all content in the folder with the same folder in another server. It does not affect content in folders underneath the selected folder. See also: Synchronizing content and folders.
To sync a folder:
NOTE: If another sync is running,
You can use eSync to synchronize custom SQL database tables. To do this, you must create the custom table on all servers. eSync does not create the tables, but will follow rules for populating records in them.
IMPORTANT: Table names, which are case sensitive, must be identical on all servers.
Run the following SQL Query on the database. The table must have a primary key and cannot use identity
columns.
Here is an example of a valid table.
Create table foo3(Id int not null primary key clustered, Id2 int not null, company nvarchar(50) null)
Here are examples of invalid tables, which incorrectly use identity columns.
create table foo1(Id int not null identity(1,1) primary key clustered, company nvarchar(50) null) create table foo2(Id int not null primary key clustered, Id2 bigint not null identity(1,1), company nvarchar(50) null
NOTE: The Manage Custom Table Configuration button (
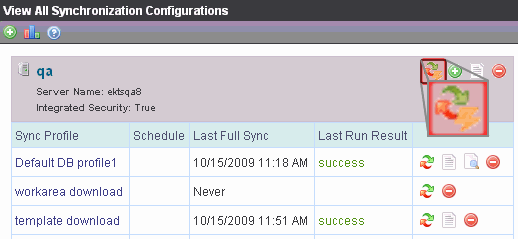
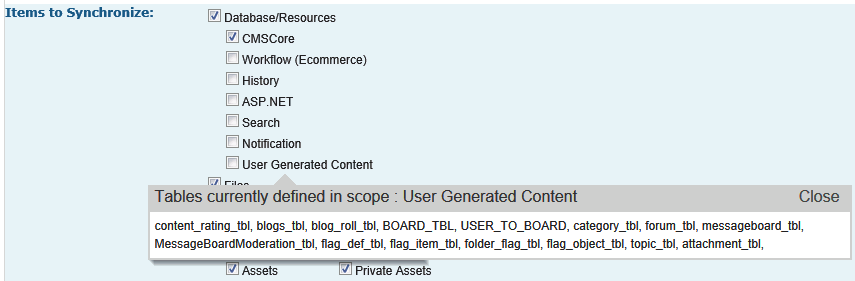
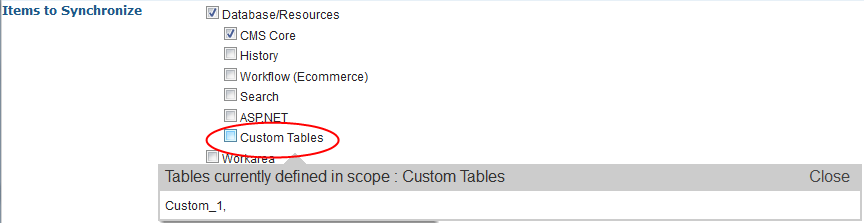
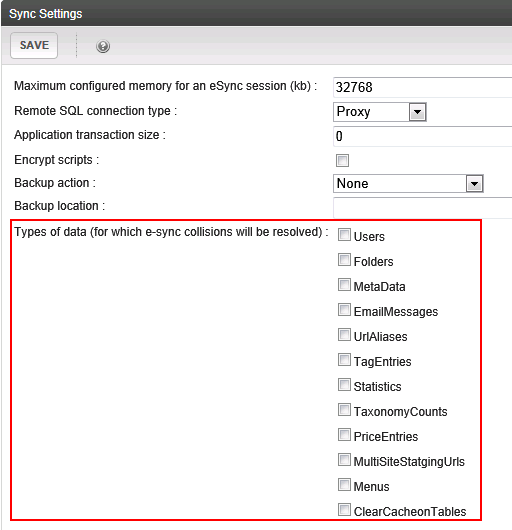
) appears only if your database has custom tables.
To add custom tables to an eSync Configuration, follow these steps on the source server.
Click Manage Custom Table Configuration (). The Manage Custom Table Configurations screen appears.
After you add a custom table, your eSync profileA collection of eSync information to be reused, such as: files to be synched, direction, source and destination databases, and schedule. displays a new Database/Resource scope, Custom Tables. Select it to sync custom tables.
You can group Ektron objects (content, folders, taxonomies, and so on) into a package, which can be synchronized at any time without having to run a complete sync. Advantages of a sync package include:
NOTE: As described in Prerequisites for content/folder sync, a content and folder sync has restrictions and dependencies. A sync package, on the other hand, includes modifications to parent objects. So, a package can sync content and folders whether or not a parent folder’s properties were edited recently.
For example, you are developing a new marketing campaign which consists of content in 2 folders, all library files in those folders, and 2 menus. After assembling the items into a sync package, you can sync it from development to production at any time without affecting other site files.
For a video tutorial on eSync packages, see eSync Packages (Ektron 8.6.1).
A package may include these objects.
301 redirects are not synchronized automatically with a package.
- You are a member of the Administrators group or assigned to the Synchronization Admin role.
IMPORTANT: You cannot select eCommerceAs of Ektron version 9.10, Ektron has discontinued new development on its eCommerce module. If you have a license to eCommerce, you will continue to receive support, but if you need to upgrade, contact your account manager for options. catalog folders.
As a taxonomy's content changes, the package automatically includes the current files.
NOTE: By adding a taxonomy to a package, you automatically select all language versions of that taxonomy.
As a menu's content changes, the package automatically includes the current files.
Folders assigned to menus are not synchronized with them. See also: Assigning a folder or template to a menu.
NOTE: By adding a menu to a package, you automatically select all language versions of that menu.
To sync a package, add it to a sync profileA collection of eSync information to be reused, such as: files to be synched, direction, source and destination databases, and schedule., then sync the profile.
IMPORTANT: The package sync requires but does not validate identical folder structure on both servers. You must verify matching folder structures on both servers before beginning a package sync.
Prerequisites
- One or more eSync packages. See also: Creating a package.
- You are a member of the Administrators group or assigned to the Synchronization Admin role.
NOTE: If another sync is running,
The eSync queue holds profileA collection of eSync information to be reused, such as: files to be synched, direction, source and destination databases, and schedule.s waiting to be synched. A profile is added to the queue in FIFO order (first in—first out) if a sync process is running when you try to sync a profile. To view the eSync queue, go to Workarea > Settings > Configuration > Synchronization > Queue. The queue screen lets you
NOTE: You cannot remove a profile whose state is "in process."
You can only view the eSync queue for the site to which you are logged in.
If you enable queuing for several sites on the same server, the eSync queue consumes a significant amount of server resources. So, you should carefully consider hardware resources when using the eSync queue in a hosted environment.
To enable the eSync queue, open the following 2 files and change value of EnableSyncQueue
to true
.
siteroot\web.config
C:\Program Files (x86)\Ektron\EktronWindowsService40\ Ektron.ASM.EktronServices40.exe.config
Within the eSync queue, you can remove a profile or move it up or down (unless its state is "In Process"). If you want to sync a removed profile at a later time, return to the View All Synchronization Configurations screen and click Sync () again.
eSync provides the following logs of sync activity.
The View All Synchronization Configurations screen lets you perform the following eSync-related activities.
To view a log of a profile’s most recent sync:
This button also appears on the View Profile screen.
Get Status () appears only for previously-synchronized profiles.
The sync log appears upon completing a sync (see following image).
The View All Synchronization Relationships screen provides a Synchronization Logs button (
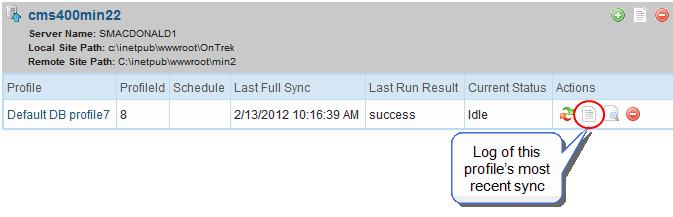
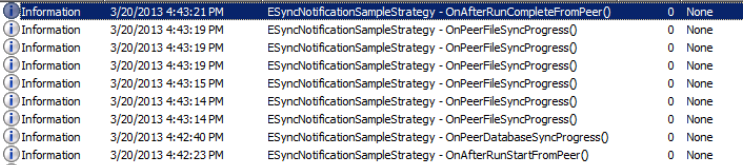
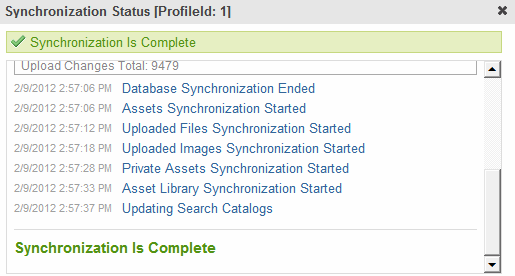
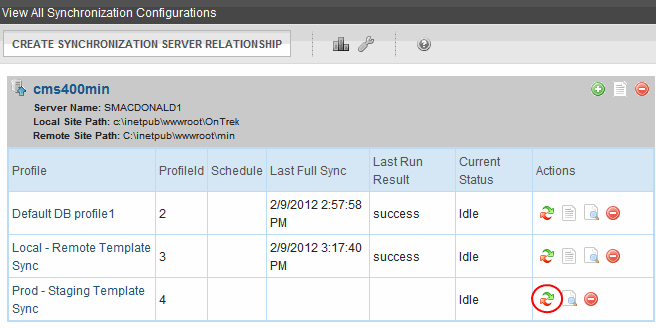
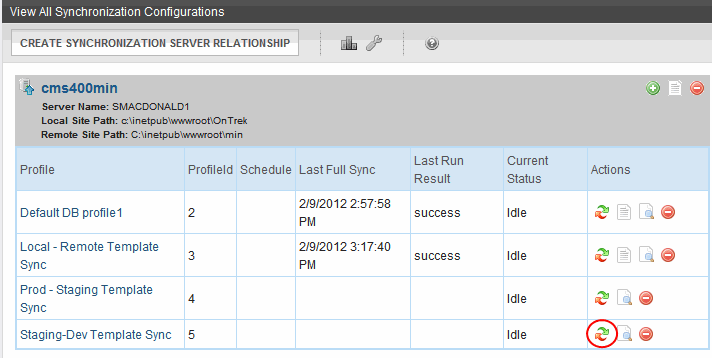
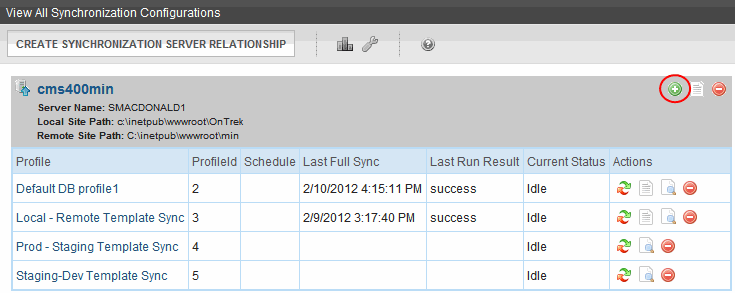
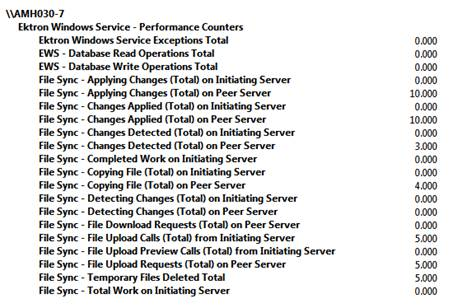
) that displays a chronological log of all syncs on your server, with the most recent at the top.
Click the icon in the Status column to view any sync's details. If the column contains a check mark, the sync was successful.
If the column contains a warning (
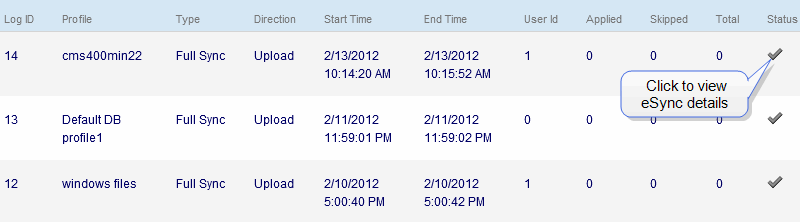
), the sync failed for some items. If you click the icon, a screen lists causes for the failure. Ektron support can use this log to troubleshoot the problem.
To verify the accuracy of data being synchronized, eSync may check for and resolve collisions between the following matching items.
For example, on the staging server, a user creates a folder under the root folder called Marketing
, and a user on the production server does the same.
NOTE: * Folders only match if they have the same name and folder path.
* Ektron and membership users are included.
A collision only occurs if both items were created since the last synchronization.
Although matching items have different ID numbers, their names are the same, so users may be unable to distinguish them. To avoid confusion, eSync appends a number to the more recently-created item. For example, the Marketing
folder becomes Marketing11329
. This is an example of a resolved collision.
To track resolved collisions, the View All Synchronization Configurations screen has a button (
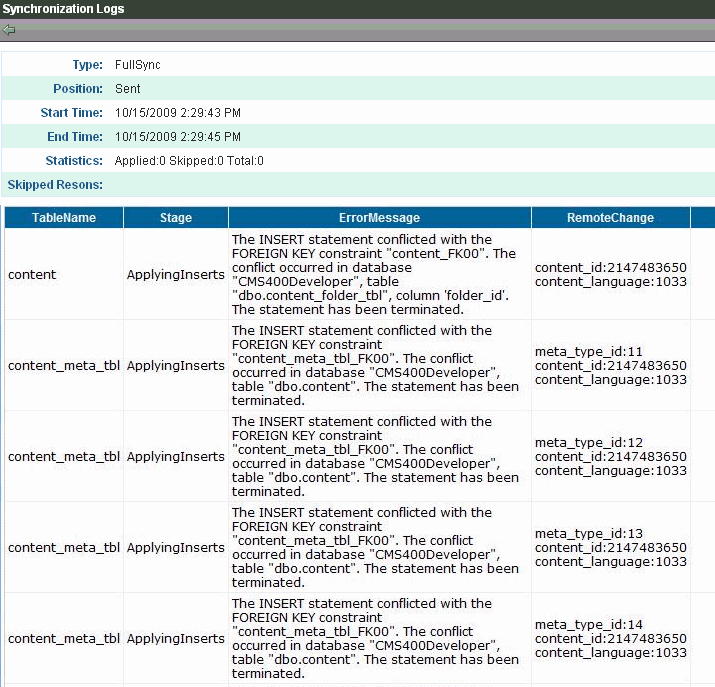
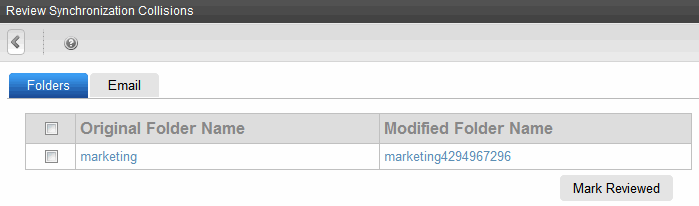
) that appears only after a collision is resolved. If the eSync direction is download, the collision resolution information appears on the local server; if upload, it appears on the remote server; if bi-directional, it appears on both servers.
When you click the button, you are prompted to review resolved collisions. If you click Resolve, the following button appears on the toolbar.
Click that button to see the Review Synchronization Collisions screen, showing the original and changed items.
The Review Synchronization Collisions screen shows resolved collisions. Upon viewing it, you should notify appropriate content authors, who may want rename the items.
After noting these changes, you can check the box in the left column, then click Mark Reviewed to remove it.
The Users tab has an additional button, Mark Reviewed and Email. Use it to remove the user from the screen and send an email to the user (using the address from the Add/Edit User screen’s E-Mail Address field).
lbl sync collision email subject = Your username has been changed lbl sync collision email body = For security purposes, your username has been changed. Your new username is {0}. You will need to use this new username the next time you login. Thank you.
NOTE: You can change the email text in the resource file. To learn about editing it, see Translating the Workarea.
On the eSync Settings screen, use the Types of data field to identify items for which you want to resolve collisions. Unchecked items are ignored.
Ektron recommends disabling the Resolve Collisions during Synchronization boxes for everyday use, because resources required to search for collisions may negatively impact your website's performance. When activity that might cause collisions occurs, you may temporarily enable checkboxes. Then, disable them again once the activity is complete.
You can use the Windows Performance Counter to view the progress of a file sync without affecting the EWSEktron Windows Service's performance. You can also use the Performance Counter to debug and monitor the EWS.
You can set up the Performance Counter to write to a file, so that you may monitor its activity over a few days or weeks.
The Performance Counter helps you monitor a sync's progress, especially if it has been running for a long time. If the counter's values stop changing, nothing is happening. This information can help you determine that it is safe to stop the service.
These performance counters are available.
NOTE: Definitions:
Initiating Server. The server from which file sync is initiated (via the website).
Peer Server. The other server(s) in a sync relationship.
Ektron Windows Service data
eSync data
File Sync data
To set up the display of the Ektron Windows Service performance counter:
If you're using Windows 8 or 2012, press the Windows key ()/Q then enter perfmon.msc. Right click and choose Run as Administrator.
Provides email notifications when the following important sync events occur.
In the screen settings, you determine which events trigger an email notification.
To use this feature:
NOTE: Separate email addresses with a comma (,).
Ektron.ASM.EktronServices40.exe.config
file.<add key="CEIPSmtpServer" value="ektexch01" /> <add key="CEIPKey" value="" /> <add key="CEIPSmtpUserName" value="your-ID" /> <add key="CEIPSmtpPassword" value="************" /> <add key="CEIPSmtpEnableSSL" value="false" /> <add key="CEIPSmtpPortNo" value="25" />
Ektron supports a load-balanced environment, in which several servers share your website’s processing load. See Balancing the load on your servers.
If your site uses load balancing, you can set up eSync so that, after one server in a load balance cluster is synchronized, the other servers are automatically synchronized. Note that if a separate database server is outside the load balance cluster, eSync only synchronizes documents and files used by the search among the clustered servers. It does not touch the database.
Beginning with Ektron version 8.5, the load-balance chain of servers is updated automatically, and servers that are not available are removed. The following illustration shows a typical load balanced cluster.
IMPORTANT: In a load balanced environment, only update templates on the staging server. Do not update them on the production server and assume they will be synchronized with the staging server.
IMPORTANT: Assume your load balanced cluster consists of 2 staging servers (S1 and S2) and 2 production servers (P1 and P2).
If you add/modify/delete a file on S1, to get the file to S2, you must run either a download sync on S2, or an upload sync on S1, or a bidirectional sync from either server. If you run a download sync on S2, you also need to run an upload sync to push the file to P2, which will then Load Balance with P1.
The best way to make sure that the added/modified/deleted file is changed on all servers is to initiate the sync from the server on which the file was changed. In this example, since you changed the file on S1, if you initiate a sync from S1, it will be automatically updated on S2, P1, and P2.
Prerequisites
- The connection string on all servers in the cluster matches
- You must initiate eSync relationships and the sync from a staging server
- If your staging servers are clustered, you must remove one from the cluster before you can sync
Follow these steps to set up this capability.
C:\ProgramFiles(x86)\Ektron\EktronWindowsService40\Ektron.ASM.EktronServices40.exe.Config
.LoadBalanced
to 1.AssetsLoadBalanced
to 1.LibraryLoadBalanced
to 1.You should be familiar with eSync security certificates before beginning this procedure. See also: Managing eSync security certificates.
Assume the load balance cluster has 3 servers: mach1
, mach2
, and mach3
.
In this part, create the security certificates.
mach1
using an account with administrative privileges and generate security certificates. To do this, click the Windows Start button > All programs > Ektron > CMS400 v9x > Utilities > Security Configurator > right click and choose Run as Administrator.If you're using Windows 8 or 2012, press the Windows key ()/Q then enter Security Configurator. Right click and choose Run as Administrator.
mach1_certitificates
) on the desktop.Open the following folder: C:\ProgramFiles\Ektron\CMS400vxx\Utilities\SecurityConfig\SecurityConfigurator.
Repeat steps 1 to 5 for every server in your load balance cluster.
In this part, copy then apply the certificates to all other servers in the cluster.
Run the Security Configurator (Start button > All programs > Ektron > CMS400 v9x > Utilities > Security Configurator) and apply the certificates from every other server in the cluster.
If you're using Windows 8 or 2012, press the Windows key ()/Q then enter Security Configurator. Right click and choose Run as Administrator.
For example, apply certificates from mach2 and mach3 on mach1; and apply certificates from mach1 and mach3 on mach2.
To apply certificates, follow these steps.
Once load balanced servers are configured to sync assets, configure eSync as normal between your staging server and one production server. When you sync with the production sever, the Load Balance feature pushes those files to the other servers in the LB configuration.
If you want to use eSync in a multi-site environment, you must do so before the initial synchronization of a relationship. That is, you cannot set up a eSync relationship in a single-site environment and then later change to multi-site. You can set up a new relationship at any time. See also: Supporting multi-site configurations.
WARNING! Back up your database before beginning this procedure!
NOTE: If you see the following error, The system cannot find the file specified, you must set up security certificates. See also: Managing eSync security certificates.
WARNING! The first time you sync an Ektron website, all of its data is overwritten. Make sure that no important information resides on the production server before beginning the first sync.
If you selected a domain or IP address above, click the drop-down arrow to view all servers whose client security certificates reside on this server. Then, select the server with which you want to set up an eSync relationship.
By default, if you sign on to a staging server then insert library items (images, quicklinks, and so on) into content, the path to those items includes the production server. For example, your server setup includes 2 multi-sites: sales.ektron.com and support.ektron.com.
NOTE: Multi-site names are defined in the site’s folder properties screen’s Production Domain field, as described in Supporting multi-site configurations.
So, library links in the sales.ektron.com site’s content look like this: http://sales.ektron.com/template?id=id number
. However, you may wish to change library links so they refer to the staging server. This would help you verify that the linked items exist on it.
To change library links to refer to your staging server:
From now on, when a user signs on to the staging server and works with library links, the links include the staging server instead of the production server.
The Web Alert feature enables Ektron to generate email for a list of registered users whenever content is created or updated. See also: Sending Web Alert emails to subscribers.
In an eSync environment, you need to determine which servers send Web Alerts. For example, Web Alerts should probably not be generated when content is published on a staging server, but you would want them when content is published on a production server.
To determine if a server generates Web alerts, use the following property of each website’s web.config
file.
<
add key="ek_DisableWebAlerts" ..... />
Set the property’s value to true to suppress Web Alerts on a server.
Set the property’s value to false to generate Web Alerts to on a server.
Also, the server clock on the download side of the eSync relationship must be exactly the same time as or slightly ahead of the clock on the sending server.
IMPORTANT: Ektron has discontinued new development on its eCommerce module. If you have a license to eCommerce, you will continue to receive support, but if you need to upgrade, contact your account manager for options.
When using eSync with an eCommerce site, you need to prevent orders from being processed on your staging server to prevent orders from being processed twice.
For example, a customer on your production site purchases a product. If the staging server and production server are synchronized before the credit card is processed, it might be charged twice: once from the production server and again from the staging server.
To prevent orders from being processed on your staging server, edit your staging site’s web.config
file and set the following property to true:
<add key="ek_ecom_OrderProcessingDisabled" value="true" />
When the property is set to true, you cannot process or edit orders from the Workarea’s View Order screen on the staging server. Also, if you try to create an order from the staging server’s website, you receive the following message.
“We're sorry, an error occurred while processing your request. Please try again later...”
It is important to note that all other eSync functions still work properly. For example, when you create catalog entries on a staging server and perform a sync, the entries are moved to the production server. The ek_ecom_OrderProcessingDisabled
key only affects order processing.
When using eSync with notifications, new agents are not synchronized. This means that you must manually add new agents to each server in your relationship.
When an agent exists on all servers in your relationship, eSync keeps them updated. For example, assume a membership user logs into the production server and updates the profileA collection of eSync information to be reused, such as: files to be synched, direction, source and destination databases, and schedule.’s Activities tab by changing the activities a custom agent will perform. eSync will sync those changes with the staging server.
See also: Adding a custom agent; Sending notifications to a community.
If you install an Ektron 9.10 SP3 site to a server that is also running an Ektron 8.5 version, the Ektron 9.10 SP3 Windows Service (EWSEktron Windows Service) replaces the 8.5 version. Also, the dbSync.config
file was removed for Ektron 9.10 SP3. To manage settings you previously configured in dbsync.config
file, run the following script.
IF(NOT EXISTS(SELECT NAME FROM SYS.OBJECTS WHERE (NAME='sync_settings') AND (type='u'))) begin create table [dbo].[sync_settings] ( profile_id bigint not null, memory_data_cache_size int not null default (32768), remote_sql_connection tinyint not null default(2), application_tran_size bigint not null default (0), script_encryption bit not null default (0), collision_action bigint not null default(0), backup_action tinyint not null default(0), backup_device nvarchar(max) null, log_retain_count int not null default(50), CONSTRAINT [PK_sync_settings] PRIMARY KEY CLUSTERED (profile_id) ) end go if(not(exists(select 1 from sync_settings where profile_id=0))) begin insert into sync_settings(profile_id)values(0) end go
The following list describes some lines in the script.
memory_data_cache_size int not null default (32768)
. Define a maximum amount of memory that your server uses during a sync. The default is 32 MB. You can change it to any size up to the amount of RAM in your eSync server.remote_sql_connection tinyint not null default(2).
0-direct; 1-proxy; 2-autodetectapplication_tran_size bigint not null default(0).
if changes are expected in multiple batches, set this value to memory_data_cache_size
collision_action bigint not null default(0).
The value of the Resolved Collisions during Synchronization field, which specifies types of data for which collisions will be resolved. See also: Determining which collisions are resolved .backup_action tinyint not null default(0).
1-backup always; 2-backup only before initial sync; determines when to back up destination database before a sync backup_device nvarchar(max) null
—backup locationlog_retain_count int not null default(50).
set the number of logs retained in the database.You created a custom table and try to sync it to the destination server, but eSync does not synchronize the source and destination servers.
Solution: As stated in Synchronizing custom SQL database tables, you must create the custom table on all servers. eSync does not create the tables, but will follow rules for populating records in them.
There was no endpointPart of a DXH connection, it is the combination of an endpoint (a URL or API path) and authentication credentials that allows communication between 2 software instances. You define DXH endpoints in your site’s web.config file. listening at http://alphatest:8732/
Ektron.Sync.Communication/
SyncCommunication
ScheduleService.svc
that could accept the message. This is often caused by an incorrect address or SOAP action. See InnerException, if present, for more details.
One server in the relationship cannot resolve the address of the other server. This may be due to security restrictions or because the Ektron Windows Service (EWSEktron Windows Service) is off.
Solutions:
Local site cannot communicate with service.
Solution:
C:\Program Files(x86)\Ektron\CMS400vxx\utilities\SecurityConfig\SecurityConfigurator\securityconfigurator.exe.
web.config
to use them.No Ektron site exists on the remote server.
Possible Solution: Install an Ektron min site on the remote server.
eSync Strategies are described in CMS Strategies. These strategies let you plug into the EWSEktron Windows Service , so developers can implement functionality like sync notifications, data modifications, and cache invalidation.
The strategies' design goals explain the intent and functionality available through the API.
ObjectFactory.config
file (C\Program Files (x86)\Ektron\CMS400vversionnumber\Utilities\EWSUpdates\EktronWindowsService40\ObjectFactory.config
). After you do, each event is logged to the event viewer. Review the event viewer to learn the order in which events fire.
IMPORTANT: The following .dlls require .NET 4.5.
Ektron Windows Services/Ektron.Cms.Contracts.dll
and Ektron.Cms.ObjectFactory.dll
.using Ektron.Cms.Extensibility
;
using Ektron.Cms.CoreService
;
C\Program Files (x86)\Ektron\CMS400vreleasenumber\Utilities\EWSUpdates\EktronWindowsService40
folder. Then, when adding project references, reference .dlls in that folder, not .dlls in the site folder.It may take 30-60 seconds to start the EWS with the new .dll. To know when EWS has started, open the Event Viewer\Applications and Services Logs folder and monitor the EktronL4 log. There are 2 messages:
The basic events are
APIStrategy: ESyncDataTransformStrategy See also: ESyncDataTransformStrategy
This is an abstract class, since it has no default functionality.
The eSync Notification strategy lets me detect events, such as when a database sync is completed.
There are two sets of methods: “FromLocal” and “FromPeer”.
Comments on this sample notification strategy follow the example.
using System; using System.Collections.Generic; using System.Linq; using System.Text; using System.Diagnostics; using Ektron.Cms.Extensibility; using Ektron.Cms.CoreService; namespace ProcessTaxonomy { public class WriteToXml : ESyncNotificationStrategy { public override void OnAfterDatabaseSyncRunCompleteFromPeer(PeerServerDetails peerDetails, SyncProfile syncProfileData) { if (syncProfileData.RemoteSiteConfig.SitePath.ToLower().StartsWith(@"c:\inetpub\syncreceiver") && (syncProfileData.SyncConfig.Direction == SyncDirection.Upload || syncProfileData.SyncConfig.Direction == SyncDirection.BiDirectional)) { WriteTaxonomyToXml(); } } public void WriteTaxonomyToXml() { string path = @"C:\inetpub\ConsoleApps\CreateTaxonomyXML\CreateTaxonomyXML\bin\Debug\CreateTaxonomyXML.exe"; Process proc = new Process(); proc.StartInfo = new ProcessStartInfo(path, ""); if (!IsProcessOpen("CreateTaxonomyXML")) { try { proc.Start(); EventLog.WriteEntry("CreateTaxonomyXml - Start", proc.StartTime.ToString(), EventLogEntryType.Information); proc.WaitForExit(); EventLog.WriteEntry("CreateTaxonomyXml - End", proc.ExitTime.ToString(), EventLogEntryType.Information); } catch (Exception ex) { EventLog.WriteEntry("CreateTaxonomyXml - Error", ex.Message, EventLogEntryType.Error); } } else { EventLog.WriteEntry("CreateTaxonomyXml - Info", "Process already running.", EventLogEntryType.Information); } } public bool IsProcessOpen(string name) { try { var procs = Process.GetProcessesByName("CreateTaxonomyXML"); if (procs.Any()) return true; } catch (Exception ex) { EventLog.WriteEntry("CreateTaxonomyXml - Warning", "Error finding process.", EventLogEntryType.Warning); return false; } return false; } } }
public override void
OnAfterDatabaseSyncRunCompleteFromPeer(PeerServerDetails
peerDetails, SyncProfile syncProfileData)
(syncProfileData.RemoteSiteConfig.SitePath.ToLower() .StartsWith(@"c:\inetpub\syncreceiver") && (syncProfileData.SyncConfig.Direction == SyncDirection.Upload || syncProfileData.SyncConfig.Direction == SyncDirection.BiDirectional))
{
WriteTaxonomyToXml();
}
string path = @"C:\inetpub\ConsoleApps\CreateTaxonomyXML\CreateTaxonomyXML\bin\Debug\CreateTaxonomyXML.exe";
proc = new Process();
proc.StartInfo = new ProcessStartInfo(path, "");
(!IsProcessOpen("CreateTaxonomyXML"))
{
try
{
proc.Start();
EventLog.WriteEntry("Process Name", proc.ProcessName,
EventLogEntryType.Information);
NOTE: EventLog.WriteEntry
methods write to the Event Viewer's Application log, not the EWS log.
EventLog.WriteEntry("CreateTaxonomyXml - Start",
proc.StartTime.ToString(),
EventLogEntryType.Information);
proc.WaitForExit();
EventLog.WriteEntry("CreateTaxonomyXml - End",
proc.ExitTime.ToString(),
EventLogEntryType.Information);
SyncProfile is the basic parameter class for eSync strategies. Its properties are neatly categorized and have self-documenting names.
The SyncSpecificDetails class contains all sync details for a sync type (such as template, folder, content, or package sync).
All properties of regular, profiled syncs are in the SyncProfile
class. The SyncSpecificDetails
class is for extra properties that are only present in a specific sync type.
This strategy lets you plug into database sync and modify columns within the records being synchronized. Addition or deletion of records is not supported.
Only one method is called per record for each table that will be synchronized.
The SyncDataRowContext
class provides context about the row being sent in the event. The class is used in the sample strategy to make it easier to perform data row actions.
The EWSEktron Windows Service includes a sample strategy that writes to the event log on the sending and receiving servers.
Internal classes used by the EWSEktron Windows Service are not exposed via the API. All API classes are present along with the rest of the CMS API classes in the Ektron.Cms.Contracts
assembly.
Internal EWS classes are, however, converted into API classes. By decoupling the API from the EWS classes, the API cannot be changed inadvertently as Ektron changes the EWS. The decoupling also ensures that the API is more developer-friendly, usable, and self-documenting.
Strategies are raised only when they are configured to be raised in the objectFactory.config file, within the EWSEktron Windows Service root folder. The following image files are modified for strategy implementation.
Define a strategy within the objectFactory.config file, as shown in the following image.
The ESyncStrategyLocalHandler
class executes local strategies one by one, logging any errors. The class also makes a WCF call to the remote EWSEktron Windows Service to execute strategy there.
The peer server strategy contains a PeerServerDetails
parameter that lets you determine which server sent the request. On the remote server, the strategy execution is straightforward, as shown in the following example.
The sample strategy shows records in the system event log, as shown in the following example. These records clarify the order in which events fire on the local server.
The remote server shows peer events.
Database events raised on the peer server also appear.
Progress events provided for database and file sync let you track a sync operation's progress. These events have both local and peer methods, because all types of Ektron Sync have two sync orchestrators: one runs on the initiating server, and the other runs on the peer server. Since progress is reported by both orchestrators, both are exposed by the API.
The quality of information provided by the local/peer event is determined by the sync direction and the initiating server. So, some properties may not be available in one method or the other.
Load-Balancer events are exposed via a separate LoadBalancerNotificationStrategy
, which provides information through the API about what is being synchronized to which server. This strategy provides extensive information about the load balancer, and is useful to end users.