![]()
Automatic URL Aliasing
Automatic aliasing lets you assign an alias to several content items at once. You identify content by either taxonomy or folder. Then, select additional elements of the alias pattern and save all information as a configuration.
You can create one automatic aliasing configuration for each folder or taxonomy. Since a single content block can be assigned to several taxonomies, it can have many automatic aliases.
When an automatic alias configuration is activated, an alias is assigned to all content in the taxonomy or folder (and its subfolders). From then on, that content can be identified by its automatic alias. In addition, any content added to the folder/taxonomy in the future will be assigned that alias as long as the configuration is active.
Enabling/Disabling Automatic URL Aliasing
To enable automatic aliasing, follow this path: Settings > Configuration > URL Aliasing > Settings. The screen indicates if automatic aliasing is currently on or off.
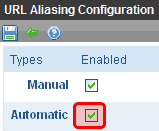
To change its state, click Edit ( ), check or uncheck the box, and click Save (
 ).
).
See Also: Creating User-Friendly URLs with Aliasing
Setting up Automatic Aliasing
After enabling automatic URL aliasing, you can create a configuration, which lets you
identify the content source (that is, a taxonomy or a folder)
choose elements of the aliasing pattern
preview sample original and aliased URLs
To create an automatic alias configuration, follow these steps.
1. Open the Settings > Configuration > URL Aliasing > Automatic screen.
2. If you are creating an alias based on Taxonomy, select its language from the language dropdown.
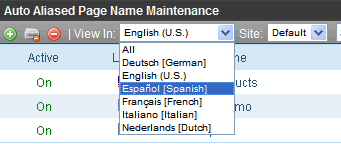
If you creating an alias based on folder, go to Step 3.
Note: On the Auto Aliased Page Name Maintenance screen, a folder-based alias’ Lang column shows a United Nations flag ( ). This indicates that folders are language-neutral.
3. Click plus ( ) to access the Add a New Alias screen (shown below).
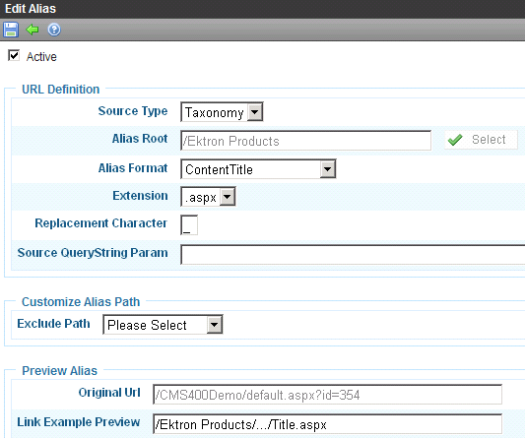
4. Use the following table to complete the screen.
|
Field |
Description |
|
Active |
Check this box to apply this configuration to content. If you do, the aliases are applied when you save the screen. If you uncheck this box, automatic aliases set up via this configuration are deleted from the associated content. |
|
Automatic aliases are based on either a taxonomy or a folder. Choose one. |
|
|
Navigate to and choose a taxonomy or folder to which you want to assign an automatic alias. If you choose a taxonomy, the automatic alias is applied to all content assigned to it and all of its child nodes. See Also: Furthermore, if your Ektron CMS400.NET supports multi-site configurations, the automatic alias will apply to content in all sites. This is because taxonomy is site independent. Note: If the language selector was set to All on the Auto Aliased Page Name Maintenance screen, and you chose Taxonomy as the Source Type, No Taxonomy appears here. This indicates that you must return to the Auto Aliased Page Name Maintenance screen and select a language before you can select a taxonomy as the Alias Root. If you choose folder, the automatic alias applies to all content in that folder and its subfolders. See Also: The taxonomy or folder is part of the automatic alias pattern. See Also: The Automatic Alias Pattern |
|
|
Use this field to help construct the automatic alias pattern. Choose one of the following items to identify the content within the alias. ContentTitle - Example: Sample Content Block ContentID - Example: 30 ContentIDandLanguage - Example: 30/1033 See Also: The Automatic Alias Pattern |
|
|
Extension |
Use this field to help construct the automatic alias pattern. Choose an extension from the list to identify the end of the aliased URL. Extensions are defined in the Extension field of the URL Aliasing Configuration screen. See Also: The Automatic Alias Pattern; Automatic URL Aliasing |
|
Replacement Character |
Enter the character that replaces prohibited characters in content titles when they appear within an automatic alias. Examples of prohibited characters are a space and question mark (?). So, for example, if the content title is About Us, and you enter an underscore (-) here, the aliased version of the title is About_Us. You cannot enter one of the following as the replacement character: [, \ / < > (Space): |? '] # * &% Note: If you're using IISdmin (Microsoft Vista or Server 2008), and specify a plus sign (+), you get this error: HTTP Error 404.11 Not Found The request filtering module is configured to deny a request that contains a double escape sequence. For a solution, see http://support.microsoft.com/kb/942076/en-us. |
| Source QueryString Param |
Enter the query string parameter for this alias. For example, if the alias uses a taxonomy, you could enter taxid. Here is an example of the parameter in a URL: http://localhost/eIntranetv2/Blogs.aspx?id=238&blogid=115&taxId=281 Warning! Do not enter id here because that will clash with the content id. Do not enter more than one parameter. |
|
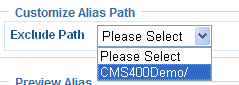
By default, the automatic alias pattern displays all folders or taxonomy levels from the top to the level you select. (The Automatic Alias Pattern) You can use this field to control which folders/taxonomy levels appear in the pattern. For example, your Alias Root is based on the following folder path: /CMS400Demo/About Us/Careers. Using this field, you can choose any of the following to indicate the folder or taxonomy path in the automatic alias pattern.
|
|
|
Preview Alias |
This area of the screen displays a sample Original URL an aliased example of that URL, based on the information entered on the screen To see any content item’s fully aliased URL, navigate to it and click its Alias tab. |
Uniqueness Requirement for Automatic Alias Configuration
A configuration must have a unique combination of Source Type, Alias Root, Alias Format, and Extension. For example
Source Type = taxonomy
Alias Root = the taxonomy named Products
Alias Format = Content title
Extension
You cannot create a configuration whose values match an existing one.
The Automatic Alias Pattern
The Automatic Alias pattern combines the following elements in this order. Each element is separated by a slash (/).
1. site root
2. folder or taxonomy path (Spaces are replaced by the Replacement Character specified on the Add/Edit Alias screen).
Note: Either a taxonomy or a folder is selected when creating an automatic aliasing configuration.
By default, a taxonomy path has all taxonomy nodes from the top to the level at which content is assigned. Here is an example: www.example.com/Medical_Conditions/Kidney_Disease/.
By default, a folder path has all folders from the top-level to the folder that contains the content. Here is an example: www.example.com/CMS400Developer/CMS400Demo/About_Us/Company_Profile/Board_of_Directors.aspx.
Note: You can use the Customize Alias Path field to determine which path components appear in the pattern. See Also: Customize Alias Path
3. content name source (Spaces are replaced by the Replacement Character specified on the Add/Edit Alias screen)
4. extension
Examples:
Folder-based automatic alias
www.example.com/CMS400Demo/About_Us/Company_Profile/Awards_and_Honors/
www.example.com/CMS400Demo/About_Us/Company_Profile/12548/
www.example.com/CMS400Demo/About_Us/Company_Profile/12584/1033
Taxonomy-based automatic alias
www.example.com/cms400/MapCategory/Restaurant/Chinese/You_You_Japanese_Bistro/
Note: Ektron CMS400.NET lets users create content with the same title in different folders. If an automatic alias based on a taxonomy is created, and the same taxonomy node is applied to two content items with the same title, both items will have the same automatic alias. To avoid this problem, do not allow users to assign the same name to more than one content item.
Viewing and Editing Automatic Alias Configuration
To view and edit an automatic alias configuration, go to the Settings > Configuration > URL Aliasing > Automatic screen.
Note: Use the screen’s language selector to find taxonomy-based configurations of a selected language.
From the Auto Aliased Page Name Maintenance screen, click the alias configuration that you want to view.
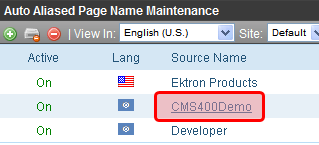
To edit an automatic alias, view it then click Edit (). To learn about the screen’s fields, see Use the following table to complete the screen..
Viewing an Automatic Alias
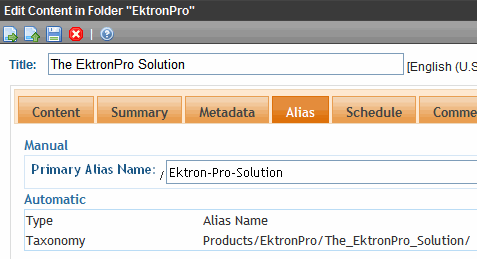
To view the automatic alias assigned to a specific content item, navigate to and view the content. Then, click the Alias tab (shown below). A primary manual alias appears near the top, followed by all automatic aliases.
Deactivating an Automatic Aliasing Configuration
Follow these steps if you want to temporarily deactivate an automatic alias configuration. When you do, automatic aliases created by that configuration are removed from all content to which they are applied. The configuration is saved, so if you later want to reactive it, simply undo these steps.
1. Open the Settings > Configuration > URL Aliasing > Automatic screen.
2. Click the alias that you want to deactivate.
3. Click Edit ().
4. Uncheck the Active checkbox.
5. Click Save ().
Deleting an Automatic Aliasing Configuration
Follow these steps if you want to delete an Automatic Aliasing Configuration. When you do, automatic aliases are removed from all content to which they are applied.
1. Open the Settings > Configuration > URL Aliasing > Automatic screen.
2. Click Delete ( ).
).
3. Check each configuration that you want to delete.
4. Click Delete ().
5. You are asked if you are sure.
6. Click OK.


![]()