![]()
Merging Indexing Service Catalogs
This section explains how to merge two Windows Indexing Service catalogs. You need to do this if your server has more than the maximum allowed number of 26 catalogs.
Note: The maximum number of catalogs is determined by Microsoft’s Windows Indexing Service.
Windows Indexing Service Catalogs
Warning! When you install more than three Web sites to a server, the catalogs for additional sites are automatically merged with one of the three existing Web site’s catalogs. An existing Web site’s catalogs are chosen for merging based on the site with the least amount of directories to index. When a Web site’s catalogs are merged with another, the information for each site is kept separate.
Each Ektron CMS400.NET site has three catalogs. In addition, your server may have catalogs for other applications that use the Windows Indexing service. Below is an example of what your Indexing Service catalogs might look like.

Note that the first six catalogs support two Ektron CMS400.NET web sites: Cms.example2.com and CMS400Developer. Each site has three catalogs:
Content
Private (assets)
Publish (assets)
Each catalog has a Directories folder, which lists the directories of the content being indexed.
Why Merge Catalogs?
The merge reduces the number of catalogs on your server, yet still indexes each site’s content for the search. After you merge the catalogs, each site’s search is still limited to content on that site -- the search does not find content from other sites even though several sites now reside in one catalog.
When merging catalogs, you copy the directory of the “merge from” catalog to the Directories folder of the “merge to” catalog. Then, you delete the “merge from” catalog.
Conditions for Merging Catalogs
You can only merge Ektron CMS400.NET catalogs if the Web sites use the same major point release. For example, you can merge catalogs from two sites with Release 7.0.4, or a 7.5.0 site with a 7.5.1 site. But you cannot merge a 7.0.4 site with a 7.5 site, because catalog properties change between releases.
Each Ektron CMS400.NET site has three catalogs.
- publish
- private
- content
You must merge the same catalog type between sites. So, for example, you cannot merge a publish with a private catalog.
Procedure for Merging Catalogs
As an administrator, you can merge different Web sites’ catalogs by using Ektron's MergeCatalog.exe command line utility or by performing the merger manually. For information on
Ektron’s MergeCatalog.exe command line utility - see Using the MergeCatalog.exe Utility
performing the catalog merger manually - see Manually Merging Catalogs
Using the MergeCatalog.exe Utility
There are two ways to use this utility. The first allows you to merge all of your Web sites’ catalogs until you have only three catalog sets. For example, if you have five Web sites, you can merge their catalogs down to the equivalent of three sites. To merge your catalog sets down to three, run the MergeCatalog.exe file located in the following folder.
C:\Program Files\Ektron\CMS400v8x\Utilities\MergeCatalog.exe
The second way allows you to merge catalogs from one specified Web site to another. For example, you want to merge the catalogs from your CMS400Developer site to your eIntranet site. See Also: Merging Catalogs from One Web Site to Another
Merging Catalogs from One Web Site to Another
To use Ektron’s MergeCatalog.exe utility, follow these steps:
1. Open a command prompt.
2. Change the directory to
C:\Program Files\Ektron\CMS400v8x\Utilities.
3. Run the MergeCatalog.exe utility.
Usage: MergeCatalog “<fromCMS400dir>” “<toCMS400dir>”
Below is an example of using the MergeCatalog.exe command line utility to merge the CMS400Developer Web site’s catalogs with the eIntranet site’s catalogs.
MergeCatalog "I:\inetpub\wwwroot\CMS400Developer" "I:\inetpub\wwwroot\eIntranet"
Once the merge is complete, the following message appears in the command box.
“Switching shared catalogs for site at <fromCMS400dir> into site at <toCMS400dir>

Restarting Ektron Windows Service

Catalogs Merged”
Manually Merging Catalogs
Follow these steps for all three catalogs on each site: Content, Private and Publish.
Part 1: Copy “From” Path to New Directory in “To” Catalog
In this part, you create a new directory in the “to” catalog. Point the new directory to the “from” catalog folder. Then, delete the “from” catalog.
1. Open Computer Management > Services and Applications > Indexing Service.
2. Select the first catalog that you want to merge from (that is, the catalog you will delete after merging).
3. Click its Directories folder.
4. The directory appears in the right pane.
5. Double click it. The Add Directory dialog appears.
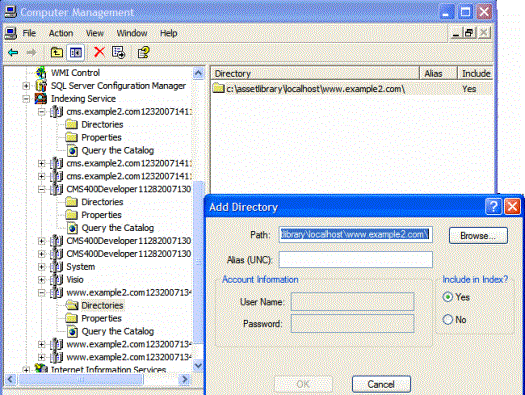
6. Press <Ctrl> + <C> to copy the Path field.
7. In the left panel, select the corresponding “to” catalog, the one into which you will merge the “from” catalog.
Warning! Make sure the catalog types match: content > content, publish > publish, private > private.
8. Right click the mouse and select New > Directory. The Add Directory dialog appears.
9. In the Path field, paste the path you copied in Step 7 and press OK.
10. Repeat these steps for the other two catalogs on the site that you are merging.
11. Click Indexing Service then stop the Indexing service.
12. Delete the three “from” catalogs.
13. Click Indexing Service then restart the Indexing Service. This action begins indexing the files in the new directory.
Part 2: Update .Config Files with the New Catalog Location
In this part, you open Windows Explorer and navigate to “from” Web site, that is, the site whose catalog you deleted above. There, you point its web.config and assetmanagement.config files to the new catalog.
1. Open Computer Management > Services and Applications > Indexing Service.
2. Find the catalogs that you have merged into.
3. Resize the window so that it occupies the left half of the screen.
4. Open Windows Explorer.
5. Navigate to the Web site whose catalog you deleted in Part 1: Copy “From” Path to New Directory in “To” Catalog.
6. In the site root folder, open the web.config file.
7. Resize the window so that it occupies the right half of the screen.
You should see the Computer Management screen on the left, and the web.config file on the right.
8. In web.config, find the element <webSearch defaultProvider="MSIndexDialectServer">.
Note: Don’t confuse the MSIndexDialectServer tag with MSIndexServer. You only need to change MSIndexDialectServer.
9. Shortly after that are catalogName and privateCatalogName.
10. Replace the value of catalogName with the name of the publish catalog, visible in the Computer Management screen. For example:
catalogName="CMS400Developer11282007130734Publish"
11. Replace the value of privatecatalogName with the name of the private catalog. For example:
catalogName="CMS400Developer11282007130734Private"
12. Save the web.config file.
13. In the site root folder, open the AssetManagement.config file.
14. Resize the window so that it occupies the right half of the screen.
You should see the Computer Management screen on the left, and the AssetManagement.config file on the right.
15. In AssetManagement.config, find the element CatalogName.
16. Replace the value of CatalogName with the name of the content catalog, visible in the Computer Management screen. For example:
catalogName="CMS400Developer11282007130734Content"
17. Replace the value of CatalogLoc with the path to the newly-merged catalog. To get the path:
- open Windows Explorer.
- navigate to the folder to which the catalog is being copied. For example, C:\Program Files\ Ektron\Catalogs\CMS400Developer11282007130734\Content
- right click the folder and select Properties.
- copy the Location field.

- Select the assetmanagement.config file’s CatalogLoc tag.
- replace the path with the copied one. For example.
catalogName=”C:\Program Files\ Ektron\Catalogs\CMS400Developer11282007130734\Content”
18. Copy the “to” catalog name and path entered in steps 16 and 17 to the other catalogs and locations: PublishCatalogName, PublishCatalogLoc, PrivateCatalogName, and PrivateCatalogLoc.
19. Save the AssetManagement.config file.
20. Stop and restart the Ektron Windows Service.
Note: If you still have the Computer Management screen open, you can quickly navigate to Services and Applications > Services > Ektron Windows Services 2.0.


![]()