![]()
Chapter 20 - Supporting Multi-Site Configurations
Ektron CMS400.NET’s multi-site support feature lets you set up and manage several Web sites under one CMS. For example:
www.example.com
support.example.com
forums.example.com
All sites share a single database. The multi-site support feature does not support multiple databases.
Advantages of Multi-Site Configurations
The URL can indicate the nature of the site to visitors.
All sites can share
- common content, but appear within their own site and templates
- the library of images and files. These files can be stored once, yet authors can insert them into content from any site.
Prerequisites
The server must run Windows Server 2003 or 2008
Note: Windows XP supports only one Web site.
All sites must reside on the same server
For each new site, you have a license key that supports Multi-site. To purchase additional licenses, contact Ektron sales. See Also: License Key Types
Using Multi-Site Configurations
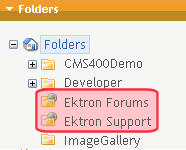
Within the Workarea, sites appear under Ektron CMS400.NET’s folder structure but the icon is a globe (see illustration below). So, an author can create and edit content in the additional site the same way he works with content in the root site.
Authors log into a root site then begin editing content in the additional site. Regardless of which site he is using, an author can use the library to insert hyperlinks, images, files, and quicklinks.
When a folder has a production domain assigned to it, it is a domain folder. Links to content in a domain folder are activated via linkit.aspx, which redirects to the appropriate domain name and uses the appropriate template for the folder or content.
Warning! You cannot create a hyperlink within content, a collection, menu, etc. to a form that resides in another site.
Installing the Multi-Site Support Feature
There are two ways to install multi-site support.
|
Ektron Best Practice For ease of use and to minimize errors, Ektron recommends the Automatic Multi-Site Setup method. |
Automatic Multi-Site Setup
There are four major steps in setting up a new site via the Site Setup wizard.
Step 1: Create New Site in IIS
Step 2: Run the Multi-Site Setup Wizard
Step 3: Assign Multi-Site Capabilities in Ektron CMS400.NET
Important: Before creating a multi-site configuration, you must have installed an Ektron CMS400.NET Web site. All installed folders mustImportant: remain in that site. The original site cannot have virtual folders.
Step 1: Create New Site in IIS
Follow these steps to create each new site in IIS.
1. Go to Start > Programs > Administrative Tools > Internet Services Manager.
2. Right click the Web Sites folder and choose New > Web Site.
3. A wizard screen appears. Click Next.
4. Enter a name for the new site.
5. On the IP Address and Port Settings screen, enter the IP address of your new Web site or the host header. Click Next.
6. On the Web Site Home Directory screen, browse to the new site’s folder.
7. On the Web Site Access Permission screen, make sure that Read and Write are checked.
8. You are notified that you have completed the new site.
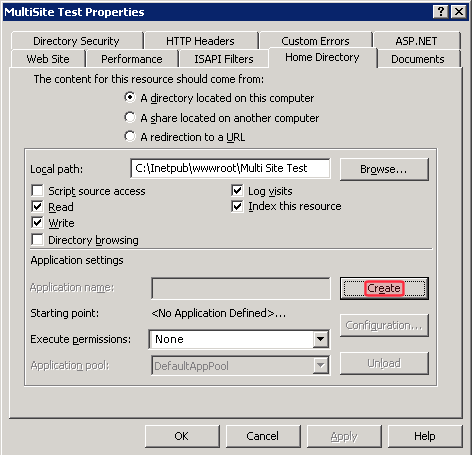
9. Make the new site an application. To do this, right click the site, and select Properties. Then, click the Home Directory tab. If you see nothing in the Application name field (under Application Settings), click Create then OK.
Step 2: Run the Multi-Site Setup Wizard
1. Double click C:\Program Files\Ektron\CMS400v8x\Utilities\MultiSiteInstall\Multisite.exe.
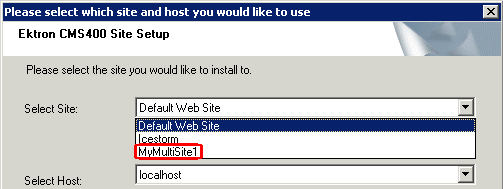
2. When prompted to select a site, use the pulldown to select the site you created in Step 1 .
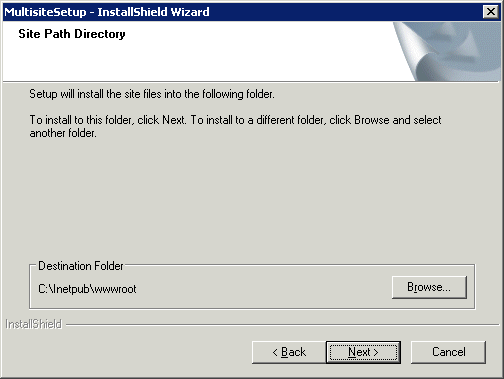
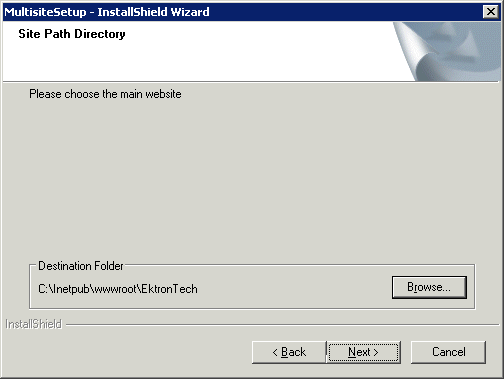
3. You are prompted to enter a path to the new site. A good choice is c:\Inetpub\wwwroot.
4. You are prompted to identify your main Web site. That is, the site to which this multi-site is being added. See example below.
5. When you are prompted to add a multi-site key, click Yes.
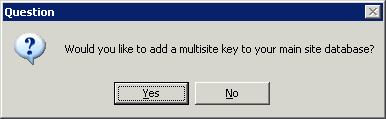
This step copies the new sites' license keys to the database.
6. You are prompted to enter a license key for the new site.
7. You are prompted to enter information about the new site's database.
8. Follow the remaining screens in the wizard.
Step 3: Assign Multi-Site Capabilities in Ektron CMS400.NET
1. Log in the Ektron CMS400.NET Workarea.
2. Click Content.
3. Click the site root folder.
Note: Site folders must reside within the site root folder.
4. Create a new top-level site folder for each site by choosing New > Site.
5. Assign site folder properties as you did for the root folder.
6. The Multi-site Configuration fields appear on the lower section of the screen (illustrated below).

7. In the Production Domain field, insert your production domain.
8. In the Stage Domain field, insert your staging domain.
9. Click Save ( ).
).
Within Ektron CMS400.NET, the new domains are indicated by a globe icon.
Manual Multi-Site Setup
There are three major, manual steps in setting up a new site.
Step 1: Create New Folders in the File System
Step 2: Create New Sites in IIS
Step 3: Assign Multi-Site Capabilities in Ektron CMS400.NET
Ektron CMS400.NET provides a utility (Multisite.exe) that automatically completes Steps 1 and 2 for you. If you run this utility, you only need to complete Step 3: Assign Multi-Site Capabilities in Ektron CMS400.NET on page 19-40.
The utility is located C:\Program Files\Ektron\CMS400v80\Utilities\MultiSiteInstall.
Step 1: Create New Folders in the File System
Important: Before creating a multi-site configuration, you must have installed an Ektron CMS400.NET Web site. All installed folders must remain in that site. The original site cannot have virtual folders.
1. Using Windows Explorer, navigate to the C:\Inetpub\wwwroot folder.
2. Create a new folder for each site.

3. Copy the following CMS files and folders from the original CMS site to your new multi-site folder.
all individual files (not subdirectories)
all .config files in all directories under the site root
these subdirectories:
- bin
- WorkArea
- widgets
- App_Code
- AssetManagement
- App_GlobalResources
4. Within each new site folder, open the web.config file and update the ek_sitePath and WSPath elements with your CMS site path.
For example, if your CMS site is in the Web site root, enter slash (/). If it is in a subdirectory of the Web site, enter the subdirectory name. For example, If your web site root is C:\inetpub\wwwroot and you have a subdirectory called CMS400Min, enter CMS400Min as the site path.
Step 2: Create New Sites in IIS
Follow these steps to create each new site in IIS.
1. Go to Start > Programs > Administrative Tools > Internet Services Manager.
2. Right click the Web Sites folder and choose New > Web Site.
3. A wizard screen appears. Click Next.
4. Enter a name for the new site.
5. On the IP Address and Port Settings screen, enter the IP address of your new Web site or the host header. Press Next.
6. On the Web Site Home Directory screen, browse to the new site’s folder. You created it in Step 1: Create New Folders in the File System.
7. On the Web Site Access Permission screen, make sure that Read and Write are checked.
8. You are notified that you have completed the new site.
9. Make the new site an application. To do this, right click the site, and select Properties. Then, click the Home Directory tab. Under Application Settings area, click the Create button then click OK.
10. Set Execute permissions to Scripts only.
Create Virtual Folders in IIS
In IIS, for each new Web site, create one new virtual folder for the following shared folders:
assets
privateassets
uploadedfiles
uploadedimages
These folders are created when you install Ektron CMS400.NET. If you did a normal installation, they reside under the site directory. For example, C:\Inetpub\wwwroot\your site root\uploadedimages.
To create virtual versions of these folders, follow these steps.
Creating Virtual Folders in IIS6
Creating Virtual Folders in IIS7
Creating Virtual Folders in IIS6
1. In IIS, select the new site folder you created in Step 2: Create New Sites in IIS.
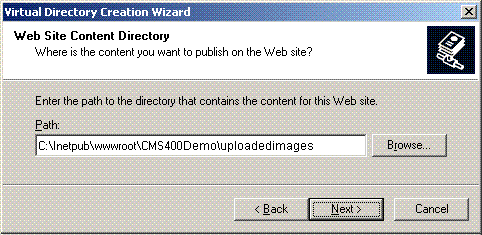
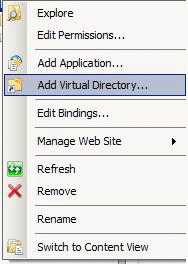
2. Right click the mouse and choose New > Virtual Directory.

3. Identify the corresponding subfolder in the root folder.
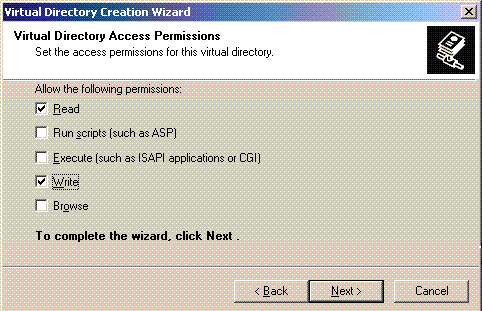
4. Assign Read and Write permissions to the virtual directory.
5. Follow this procedure for all four folders: assets, privateassets, uploadedfiles, uploadedimages.
Creating Virtual Folders in IIS7
1. In IIS, select the new site folder you created in Step 2: Create New Sites in IIS.
2. Right click the mouse and choose Add Virtual Directory.
3. Identify the corresponding subfolder in the root folder.
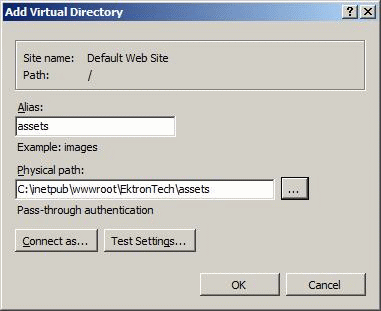
4. Follow this procedure for all four folders: assets, privateassets, uploadedfiles, uploadedimages.
Set File System Permissions on New Folders
To do this, follow these steps:
1. Using Windows Explorer, navigate to the new folder(s) you created in Step 1: Create New Folders in the File System.
2. Right click the folder and click Properties.
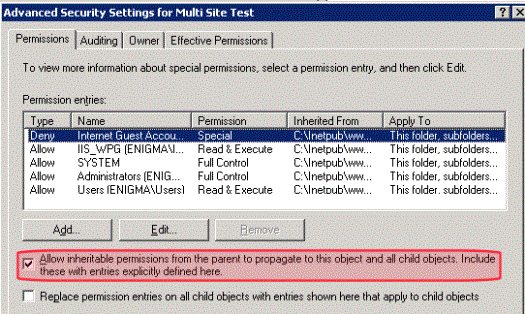
3. Click the Security tab.
4. Click Advanced.
5. Click the check box next to Allow Inheritable Permissions from the Parent to Propagate…
Install the aspnet_isapi.dll File
Follow this procedure to install the aspnet_isapi.dll file for every new site.
1. Open IIS.
2. Navigate to an Ektron CMS400.NET Web site.
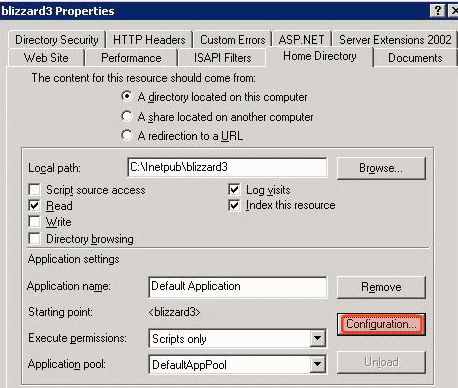
3. Right click the site and select Properties.
4. On the Properties screen’s Home Directory tab, click the Configuration button.
5. The Application Configuration screen appears.
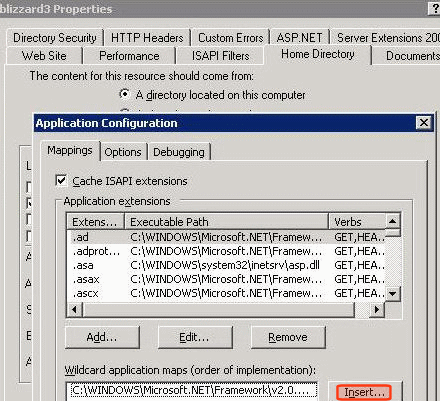
6. In the Wildcard application maps area, click Insert.
7. The Application Extension Mapping screen appears.
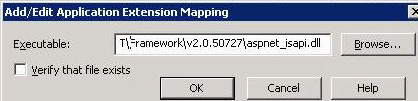
8. Browse to C:\WINDOWS\Microsoft.NET\Framework\v2.0.50727\aspnet_isapi.dll.
9. Uncheck the Verify that file exists check box.
10. Click OK.
Step 3: Assign Multi-Site Capabilities in Ektron CMS400.NET
1. In the Ektron CMS400.NET Workarea, click Content.
2. Click the site root folder.
Note: Site folders must reside within the site root folder.
3. Create a new top-level site folder for each site by choosing New > Site.
4. Assign site folder properties as you did for the root folder.
5. The Multi-site Configuration fields appear on the lower section of the screen (illustrated below).
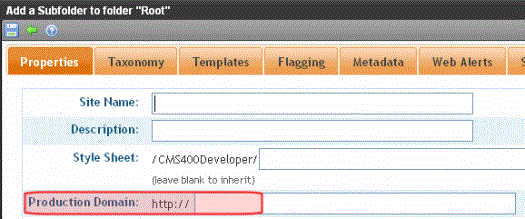
6. In the Production Domain field, insert your domain.
7. Save the screen.
Within Ektron CMS400.NET, the new domains are indicated by a globe icon.


![]()