Working with Tables
You can do the following tasks with tables.
Creating and Deleting a Table
Creating Up to 6 Rows by 6 Columns
- Click Table (
 ). A table dialog box appears.
 - Drag the cursor over rows and column to indicate the size of the table.


- Click the mouse.

- Enter text and images in the table cells. You can also select the table and drag its right border to the right and/or down to enlarge it for ease of use.
NOTE: You can create a table within a table by clicking Table (
) inside a table cell. To modify an inner table, click inside a cell and use right click menu options, such as Set Table Properties.
Creating More than 6 Rows by 6 Columns:
- Click Table (). A table dialog box appears.
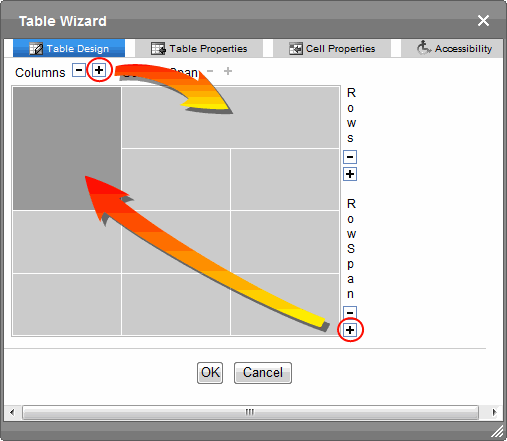
- Click Table Wizard. The Table Wizard dialog box appears.

- To change the number of columns or rows, click the plus or minus signs (+ -) next to Columns and Rows. The image adjusts to show the number of rows and columns.
- Press OK.
- Enter text and images into the table cells.
NOTE: You can create a table within a table by clicking Table (
) inside a table cell. To modify an inner table, click inside a cell and use right click menu options, such as Set Table Properties.
Deleting a Table
- Move the cursor over the table until the cursor becomes a 4-headed arrow (
 ).
). - Click the mouse button. The table becomes selected (small squares appear around it).

- Press <Delete>.
Creating a Section 508-Compliant Table
Narrative software uses the information from the Accessibility table fields (heading rows, columns, caption alignment and summary) to produce a Tooltip message for each table cell. Users with impaired vision can see those Tooltips as they hover over the cells.
To create a 508-compliant table:
- Create a new table or edit an existing one, as explained in Working with Tables.
- Right click in the table and choose Set Table Properties. The Table Properties dialog appears.
- Click the Accessibility tab.
 —Accessibility tab field descriptions—
- Heading Rows—If you want your table to have a horizontal header, enter the number of rows that it should occupy. The number cannot exceed five. Beginning with the top, all cells in the specified number of rows are designated as table headers.
- Heading Columns—If you want your table to have a header, enter the number of columns that it should occupy. The number cannot exceed 3. Beginning with the left column, all cells in the specified number of columns are designated as table headers.
- Caption Alignment—To choose the caption’s alignment, click the down arrow next to this field. Click the box that represents the alignment style you want.
- Caption—Enter a table caption. The caption appears above the table. The caption’s alignment is set in the Caption Alignment field.
- Summary—Enter the table summary. Non-visual browsers use the summary to explain the table’s contents. From http://www.w3.org/TR/WCAG10-HTML-TECHS/#data-tables:
“A summary of the relationships among cells is especially important for tables with nested headings, cells that span multiple columns or rows, or other relationships that may not be obvious from analyzing the structure of the table but that may be apparent in a visual rendering of the table. A summary may also describe how the table fits into the context of the current document. If no caption is provided, it is even more critical to provide a summary.”
- Associate Cells with Headers—Check this box if you want to associate the table’s data cells with the appropriate headers. See Also: http://www.w3.org/TR/WCAG20-TECHS/H43.html
- Click on the Cell Properties tab to set the Abbreviation and Categories fields.
 —Field descriptions for Cell Accessibility—
- Abbreviation—Sets or retrieves abbreviated text for the content in the tag. Can be used to render non-visual media, such as speech or Braille. For more information, see http://msdn2.microsoft.com/en-us/library/ms533058.aspx
- Categories—Sets or retrieves a comma-delimited list of conceptual categories associated with that tag. Can be used to render non-visual media, such as speech or Braille. For more information, see http://msdn2.microsoft.com/en-us/library/ms533489.aspx
- Click OK to make the table Section 508-compliant.
Formatting Tables
Merging and Splitting Table Cells
- Merge cells in the table wizard.
- Merge cells in a the editor by clicking in a cell, then right clicking and choosing Merge Cells Horizontally (row span) or Merge Cells Vertically (column span).
- Split a previously merged cell by clicking in a cell, then right clicking and choosing Split Cell.
Inserting and Deleting Rows and Columns
- Place the cursor in the cell from which you want to add or delete rows or columns.
- Right click the mouse. A menu appears.

NOTE: These options are also on the toolbar.
Setting Table Borders
- Right click in the table and choose Set Table Properties.
- Click the Table Properties tab.
- Use the icons within the Border area to indicate which border lines should appear. Each icon has tooltip text that explains its function.

NOTE: To view the selected borders on the dialog, a border color must be assigned.
Setting the Exterior Border of a Table
- Right click in the table and choose Set Table Properties.
- Click the Table Properties tab.
- Enter a number of pixels in the Border field.

Setting the Color of a Table Border
- Right click the table and choose Set Table Properties.
- Click the Table Properties tab.
- Click the Border Colordrop-down. A color selection box appears.
- Click a color to apply to the table’s border.—Show an example—


Setting the Word Wrap Feature
- Right click in the cell you want and choose Set Cell Properties. The Cell Properties dialog box appears.
- To turn off Word Wrap, click the No Wrapping checkbox.


- Click Update.
Word Wrap causes text to move down to the next line when the width of the characters on a line equals the column width. By default, all cells have the Word Wrap feature turned on.
If Word Wrap is turned off, text stays on one line until you press <Enter>.

Setting the Minimum Height and Width of a Cell
- Right click on the cell you want and choose Set Cell Properties.
- Click Cell Properties. The Cell Properties dialog appears.

- Enter the cell width and height in the fields. You can enter the width in pixels or percentage.
NOTE: When you set a cell width, there is no guarantee that the cell will occupy that width when displayed in a browser. This is because the cell is part of a column, and changes to other cells in the column can affect the cell whose width you set. Setting cell width only guarantees that the cell will not be less than the width you specify.
- Click Update.
Setting a Background Color for a Table or a Cell
- Right click in a table cell and choose Set Table Properties.
- Click the Table Properties tab (or the Cell Properties tab).
- Click the Background drop-down list. A selection of colors appears.

- Click a color for the table’s background. To choose no color, click the X color box.
NOTE: From the drop-down, you can add custom colors by selecting a color patch or entering a color’s hex value. Follow these steps to get help on how to use the color box. The custom colors box is only available with Internet Explorer. If you are using Firefox or Google Chrome, you can enter a custom color by its hexadecimal value.
Setting a Background Image for a Table or a Cell
- Place the cursor within the table.
- Right click the mouse.
- Select Set Table Properties.
- Click the Table Properties tab (or the Cell Properties tab).
- In the Background Image field, click the ellipsis button (
 ) to open the Library. From there, select an image for the table’s background.
- Click Update.
Setting a Background Color for a Table Row or Column
- Right click on a table cell and choose Set Table Properties.
- Click the Cell Properties tab.
- Within the Table Wizard dialog, hold down the <Ctrl> key while clicking all cells in the row. In the following image, the second row from the top is selected (dark gray) and red is chosen for the background color.

- Click a color for the table’s background.
- Click OK.
![]()