Shopping Workflow
There are many different types of e-commerce websites, however the two most common ones are:
- Business-to-Consumer (B2C) - typically designed for selling goods and services to consumers.
- Business-to-Business (B2B) - used to build strategic relationships with other businesses, and to ease the supply and procurement processes that characterize trade among those .
Sites can also have multiple , and a single EPiServer Commerce site can provide several functions. EPiServer Commerce is a flexible platform allowing for seamless integration with external systems such as financial, CRM, , warehouse and customer service systems.
Depending on how you choose to work with and your online store administration, you will define your roles and groups, and give them access rights to the different parts. Example of user roles in EPiServer Commerce are content editors, marketers, business owners, and store and system administrators.
Step-by-Step Process
A typical "shopping workflow" involves a number of interactions between a "shopper" on the website, EPiServer Commerce, and any integrated external system.. Depending on how the system is set up, the shopping workflow can be fully automated so that it requires little manual attention. However, a can always be monitored, accessed and handled manually from the Order Management part of Commerce Manager if needed.
In the following we will describe an example of a shopping workflow and the actions and tasks involved. This example is mainly based on a standard installation of EPiServer Commerce, which is a B2C type of e-commerce site.
Shopping Process
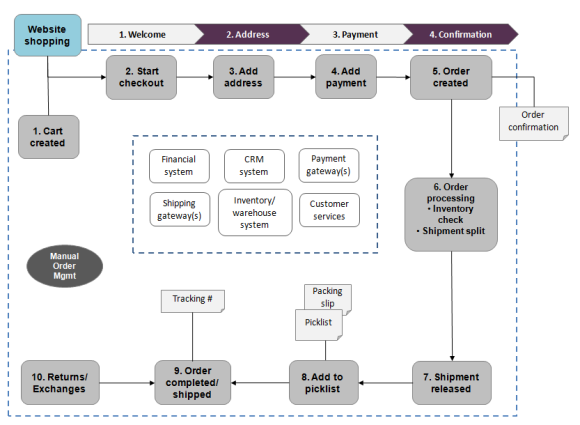
- Cart created
In this example, a shopper does not need to register on the site in order to buy. The order process actually starts as soon as the shopper selects a and adds it to a shopping . A cart will be created and saved in the system, and can be viewed in Order Management under "Carts". If the shopper doesn't complete the procedure, the cart will remain in the system for a specified time.
When the shopper returns to the website, the cart will be "remembered" and made available for continued shopping. Already in this early step the system will perform an inventory and pricing check, to look for availability in the warehouse, as well as discounts for selected products in the cart. This will be updated if and when the shopper returns to the cart at a later stage.
- Start checkout
When the shopper decides to complete the purchase and chose to "proceed to checkout", the first step of the checkout procedure is initiated.
- Add address
In the second step of the checkout procedure, the shipping and billing address information is added together with the preferred type of delivery (First class/Express etc). The address information can be entered manually by an "anonymous" shopper, or automatically if the shopper is logged in and has a registered user profile with address information. The system can also be set up so that it is possible to in different parts and to different addresses here.
- Add
In step three of the checkout procedure, the payment is added to the "purchase order to be". The system will calculate the total sum including the purchase amount and the shipping fee. In this step the shopper selects a payment method, for instance by credit card or PayPal. The payment will be registered and verified. This may happen instantly or after a certain specified time, depending on how the payment process is set up and the type of e-commerce solution (B2C or B2B). In this step it is also possible to , if the system is configured for this.
- Order created
Usually the actual purchase order is created in the system when the payment is settled. In the last checkout step, a purchase order number is created, the shopper confirms the purchase, and an order confirmation is sent to the shopper. The shopping cart is now converted to a purchase order which is visible with "In Progress" under "Purchase Orders" in Order Management.
- Order processing
When the order is created the order processing starts. This consists of steps to check the warehouse and inventory status for the products in the order, and for creating the actual . Depending on the inventory status for the products, the order may be split into more than one shipment.
- Shipment released - when the shipment is verified, it will be released. The purchase order will now appear in Order Management, under "Shipping/Receiving" and "Released for Shipping".
- Add to
This steps involves the addition of the shipping items to a picklist. The picklist is the list that the warehouse will use to create the physical shipping of the products in the order. This step will also produce a , which is the paper slip that will be attached to the physical to be shipped.
- Order completed/shipped
When the picklists with the different orders and their respective packing slips have been created, the order will be set to completed. In the system this involves the creation of a shipment validation number which is associated with . The tracking number can be entered manually or automatically, if such an integration exists. The tracking number connects the physical package with the shipping provider for the delivery, and is used for tracking the package on its way to the delivery address. The purchase order will now appear in Order Management under "Purchase Orders" again, with status "Completed".
- Return/Exchanges
Only completed orders can be subject to returns/exchanges. Depending on how the system is set up, returns can be created automatically or manually. Creating a usually involves replacing a delivered product with another one in , and/or a payment . When the return is created it will appear in Order Management under "Shipping/Receiving" and "Returns". Order status can be for instance "Awaiting Exchange".
If the return involves replacement of a new product, the shipping procedure will be initiated again. The return may also involve receiving a faulty product, in which case a receiving procedure is initiated involving the acknowledgement of a receiving receipt for the returned product.
Integration with External Systems
EPiServer Commerce is a flexible platform built for integration with other business systems needed in an e-commerce environment. These systems are typically integrated with various parts of the shopping workflow, for exchange of data with EPiServer Commerce.
Examples of such external systems:
- Financial system - for instance invoice management, payment refunds,and sales reporting.
- CRM system - for management of customer profiles and address information.
- Payment gateways - the setup of different payment solutions for instance credit cards and PayPal.
- Shipping gateways - the management of and exchange of tracking information.
- Inventory/Warehouse system - exchange of inventory information in connected warehouses.
- Customer Services - exchange of for instance order status information.
Version: EPiServer Commerce 1 R2 SP2| Last updated: 2012-09-20 | Copyright © EPiServer AB | Send feedback to us