 Order meta-classes and meta-fields
This topic is intended for administrators and developers with administration access rights in Episerver.
You can extend the metadata of catalogCommerce: a top-level container for catalog entries such as categories, products, and variants (SKUs). items and order forms. For example, if you create a meta-class called Wine, add meta-fields that are characteristic for wine, such as color, taste, vintage, and maturity.
Default order meta-fields that are used by the ordering process are built into the system and are not available from the administration interface. However, you can add your own meta-fields to extend the attributes of your orders.
Creating an order meta-class
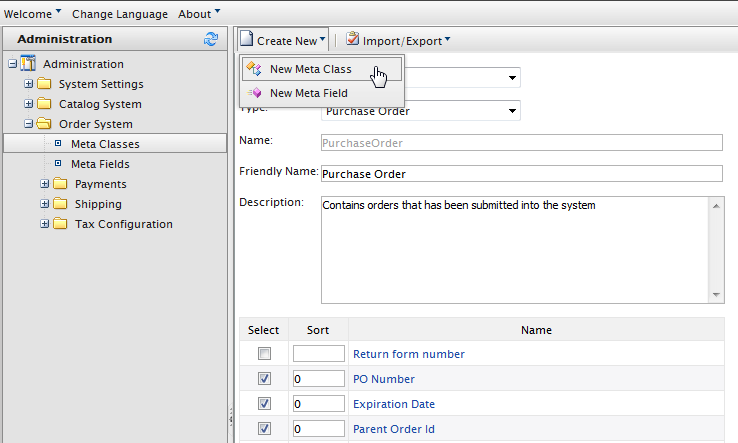
- Navigate to Administration > Order System > Meta Classes. The Meta Classes page appears.
- Select Create New > New Meta Class and fill in the fields.

- Name. Enter the name of the meta-class used in your code, this cannot have any spaces.
- Friendly Name. Enter the name of the meta-class displayed for practical use in Order Management.
- Description. Enter a description of the meta-class.
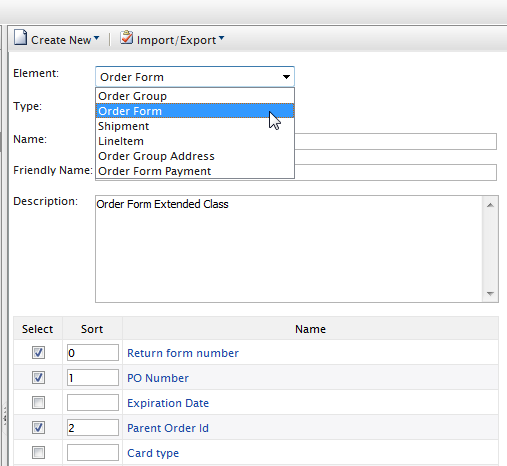
- Object Type. Select Order Group, Order Form, Shipment, LineItem, Order Group Address, or Order Form Payment.
- Select OK. The newly created meta-class appears in the Type drop-down list.
If you select the meta-class, you see available meta-fields listed but with none selected.
Creating an order meta-field
- Go to Administration > Order System > Meta Fields. The Meta Fields page appears.
- Select New Meta Field. The Meta Field edit page appears.

You can also select Create New > New Meta Field on the Meta Classes page.
- Enter Meta Fields details.

- Name. Enter a system name without spaces or special characters (such as NumberMegapixels).
- Friendly Name. Enter a user-friendly name seen by end-users on the back and front-end (such as Number of Megapixels).
- Description. Enter information about the meta-field.
- Type. The drop-down list shows the following field types.
- datetime
- decimal
- float
- money
- Integer
- Boolean
- Date
- URL
- Short String
- Long String
- Long Html String
- String Dictionary
- File
- Image File
- Dictionary (single and multiple line dictionary type option selector)
Supports Multiple Languages. Select if the meta-field can appear in two or more languages.
Use in comparing. Select to compare items (only works if you have compare functionality on the front-end site).
- Allow Null Values. Allows a null value for this field.
- Search Properties. Depending on the data field type selected, you may have the option to set the search properties of the data field. The options are:
- Allow search. Select the box to permit searching on this meta-field.
- Enable Sorting Search Results. Select the box to enable sorting of search results on this meta-field.
- Include Values in Search Results. Select the box to include the original value of this meta-field in the search results.
- Tokenize. Select the box to prepare individual words (word breaking) in a long productCommerce: various forms of merchandise that you can display and purchase from the public site, including products, variations/SKUs, bundles, and packages. Also known as a catalog entry. description property.
- Include in the Default Search. Select the box to tokenize and combine meta-field values for search from the front-end site.
- Select OK. The newly added meta-fields are listed in the meta-fields list.
If newly created meta-fields are not immediately visible, go to the next page or set the Page Size to display more entries.
Applying meta-fields to a meta-class
- Go to Administration > Order System > Meta Classes. The Meta Classes page appears.
- Select Element > Catalog Entry.
- Select the desired meta-class from the Type drop-down list. The Name, Friendly Name, and Description fields are populated with default values.
-
Apply a meta-field to a meta-class by selecting the check box next to the meta-field. If you want to sort the order of the meta-fields in the catalog entry, enter a number into the Sort field.

- Click OK.