 Visual link analysis
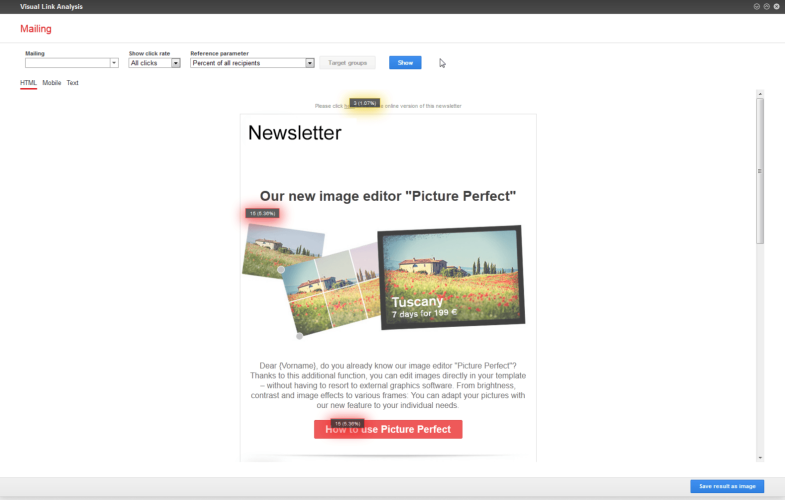
The Visual Link Analysis shows how often each link in a mailing is clicked. The analysis data is displayed directly over a screenshot of the original mailing to reveal correlations that might not be obvious, such as if recipients tend to click links in a certain area.
To create a visual link analysis, perform the following steps:
- Open the start menuMain screen in Episerver Campaign, where the available options are grouped together. and select Analytics > Visual link analysis. The Visual link analysis window opens.
- Click the Mailings box and the mailing you want to analyze.
- In the Show click rate drop-down list, click the type of clicks you want to analyze:
- All clicks. Each click is counted, including multiple clicks from the same recipient.
- Unique clicks. Multiple clicks from the same recipient on one URL are only counted once. If a recipient clicks on different links to the same URLStands for "Uniform Resource Locator". Also known as a web address such as http://world.episerver.com. (such as text and image), this is one unique click also, because not the link itself, but the URL to which it links, is decisive.
Calculation of the unique click rate
The unique click rate for each link is calculated in relation to the total number of unique clicks on each link in the mailing. This differs from the unique click rate of the whole mailing, as given in the mailing report.
In the Visual Link Analysis, one recipient can generate one unique click for each link in the mailing. The total number of unique clicks is usually higher than the total number of unique clicks as given in the mailing reports, because some recipients click various links in the mailing. The percentage of unique clicks for each link is calculated in relation to this number. Note that unique clicks in the overall mailing report and unique clicks in the visual link analysis are not identical, since they are calculated differently.
- In the Reference parameter list, click the reference value you want to use to display the attractiveness of the individual links:
- Percent of all recipients. Shows the clicks on a link in relation to recipients of the mailing.
- Percent of all (unique) clicks. Shows the clicks on a link in relation to unique clicks on links of the mailing.
- Percent of all recipients/(unique) clicks. Shows the clicks on a link in relation to unique clicks on links in the mailing and in relation to recipients of the mailing.
- If your client is set up for post-click trackingTracking method that measures and analyzes the click path that site users follow after clicking a link in an email., in the Additional data list, you can select the post-click option. It shows the post-click actions created from each link, such as the number of items bought. The data shown in this option depends on the kind of data tracked via post-click tracking.
- Click Show. The visual link analysis is started.
- To show only elements assigned to specific target groupsSubset of recipients defined by rules and conditions and a logic relationship between them. For example, all recipients in the United Kingdom., click Target groups, select one or more target groups, and click Submit selection. In the background, a screenshot of the mailing is shown. Over each link, the respective numbers (clicks and percentages) are shown.
You can switch between versions of your mailings by clicking the appropriate tab (HTML, Mobile and Text). Optionally, you can save the analysis result by clicking Save result as image.
The box also has a color indicator: White means a link has not been clicked; yellow indicates a low click rate, orange medium click rate, while red means frequent click rate.
Multiple links with the same link target
Multiple links to the same URL, such as an image and a text link, are not analyzed separately. That is, the total number of clicks/unique clicks is shown for each link item to the same URL. You cannot determine if recipients preferred clicking an image or a text link to the URL.
