 Watson Marketing (Silverpop) connector
The Episerver Customer-Centric Digital Experience Platform contains many features to support you in your daily work. Depending on how your solution is set up, some features described in this documentation may not be available to you. Contact your system administrator to find out more. See Episerver World for technical information.
The Watson Marketing (Silverpop®) connector add-on automatically exports form data from your website to your Watson Marketing (Silverpop) account database by mapping Episerver form fields to Watson Marketing (Silverpop) database fields. For information about other database connector add-ons, see Marketing Automation.
You can personalize and target messages based on profile information collected through the Watson Marketing (Silverpop) integration. You can apply personalization to forms, blocks, dynamic content and mailings.
Setting up Episerver forms with Silverpop
The Forms Marketing Automation Integration (MAI) connector lets you connect Episerver form fields to a Watson Marketing (Silverpop) database. See also: Marketing Automation.
A developer must install the Forms Marketing Automation connector and the Watson Marketing (Silverpop) connector. See Episerver World for more information.
- In the Episerver CMS admin view, select Config > Tool Settings > Silverpop. The Silverpop Engage settings screen appears.

You can have multiple instances of the same connector. For example, if you have marketing teams in separate regions, you can have more than one Watson Marketing (Silverpop) connector, such as Silverpop - Europe, Silverpop - US, and Silverpop - APAC.Click Add Connector to add another instance.
- Enter the information associated with your Watson Marketing (Silverpop) account and click Save.
- Create a form on a page.
- Click All Properties on the form.
- Open the Mappings tab.
- Select the database to which you map the form fields from the MA System Database drop-down field.
- Click Publish.
- On the form, select Edit from a form field's context menu.
- Open the Mappings tab. The database option that you selected earlier appears.
- Select the database to which you map the form fields from the MA System Database drop-down field.

- Repeat steps 8 through 10 for as many fields that you want to map.
- Click Publish.
To test the mapping, go to your form on a published page, fill in and submit the form, then go to your Watson Marketing (Silverpop) provider to verify that the user is added to the appropriate database (Silverpop Contacts).
Managing Watson Marketing (Silverpop) Engage database
Connect Episerver with the Watson Marketing (Silverpop) Engage to manage the database as follows:
- On the global menu, log in to Watson Marketing (Silverpop) Engage with your URL and login credentials. You need an account in Watson Marketing (Silverpop) Engage that can be granted access to the Episerver application for Episerver to communicate with Watson Marketing (Silverpop) Engage. On the dashboard you can manage data, content, automation, scoring and report in the main menu.

- To generate the refresh token, go to Settings > Org Admin > Organization Settings.
- Expand Application Account Access and select Add Account Access.
- In Application, select Episerver CMS and add a helpful text to the Description box.
- Click Add. An e-mail with the refresh token is sent to the notification address set up for the selected user.
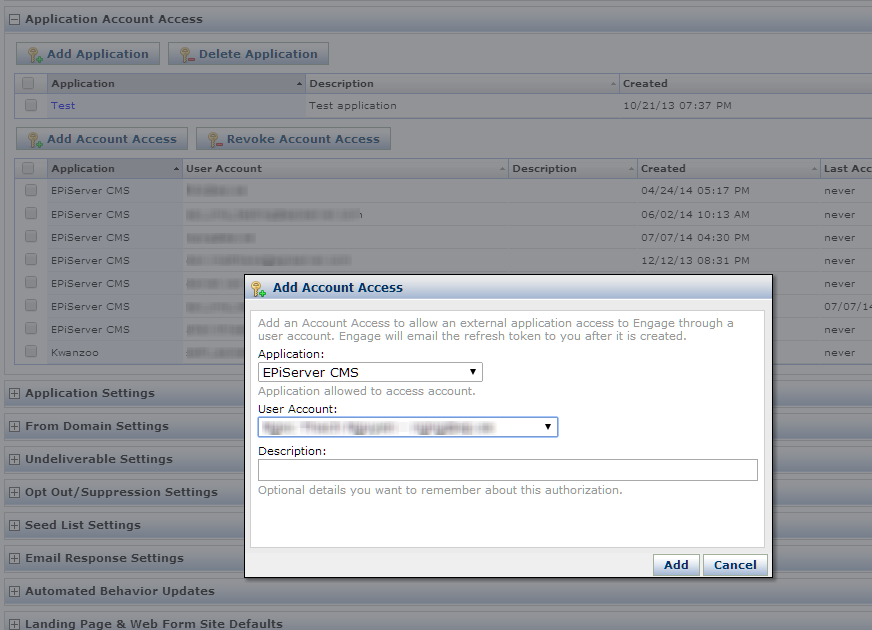
- Copy and paste the refresh token into the Episerver CMS admin view > Settings > Refresh token.
Creating a mailing
Creating a mailing is supported for version 3.x and lower. Versions 4 and higher do not support this feature.
The Watson Marketing (Silverpop) connector add-on lets you create or edit an email template within Episerver. Any changes to this template will automatically be replicated to the associated template in Watson Marketing (Silverpop).
Once you publish it, the email template will be saved into Watson Marketing (Silverpop). You can adapt your email communication based on the user’s behavioral data to certain score, such as website sections browsed, links selected, and so on.
To create a mail template in Episerver, make sure that it is enabled under a certain content type through a setting in admin view, for example, under the start page. See the Episerver CMS Administrator User Guide.
Make sure that the domain in the From Address is valid, in other words, that it matches the one set up by your Watson Marketing (Silverpop) on-boarding team.
Create a mailing in Episerver as follows:
- Create a page.
- Click [Silverpop] Mail Template.

- Enter the required properties, such as name of the newsletter, database used, subject and the address sent from, and click Create.

- Add content such as text and media. The template supports both content in HTML and text, and you should add content to both, in case the recipients have disabled emails in HTML format.
- Select the CRM enabled property to enable this template to be shared with the CRM integration.
- Publish the mail template.
- Log in to Silverpop > Home > Content > View Mailings to see the mail template created.
- Select the mail template, add content and submit the mailing. Watson Marketing (Silverpop) then starts tracking of the recipients demographic and behavioral data.
Personalization using a block
Personalize the block as described in Visitor groups. Connect the block to any of the existing visitor groups in edit view.
If it is a form block, add the form you have created and connected to Watson Marketing (Silverpop).
In this example, associated content appears on a page when the visitor match the Swedish profiles criteria.

To create a visitor group for a Watson Marketing (Silverpop) form, see Create a visitor group for an MAI connector form.