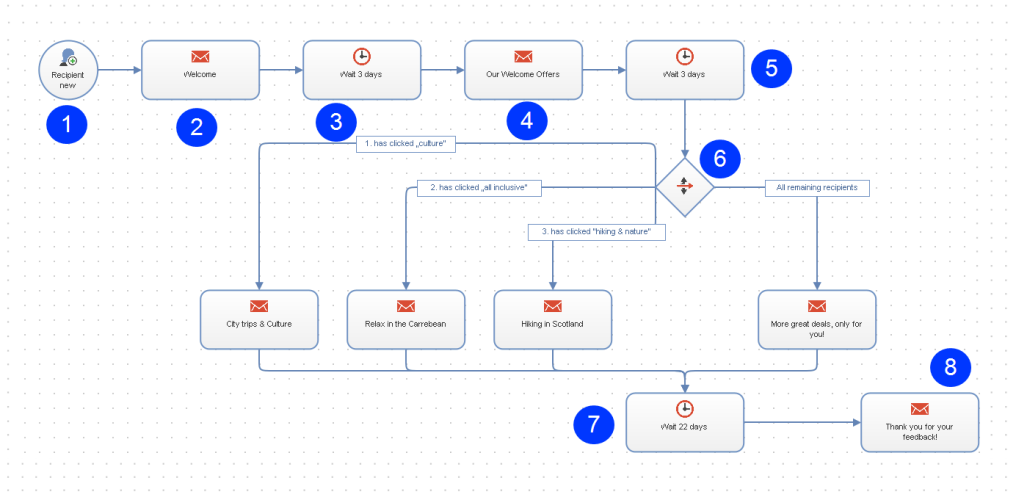
 Multi-stage series of welcome messages
A series of welcome emails can help develop customer value. Use multistage campaigns to acquaint new subscribers with your products and services. Recipients are particularly receptive to receiving a newsletter immediately after registration. This series of emails should comprise welcome messages followed by email with relevant content. Of most importance is a sustained, persuasive effort in the form of individual, premium offers.
The following example uses a travel service’s online portal for which you want to establish trust by recipients and learn more about their specific interests. To this end, begin by creating suitable mailings, click profiles Click profiling allows target groups to be generated quickly and easily. Click profiles work in a similar way to assigning keywords (tags). For example, email recipients who frequently click Blu-ray offers are segmented via a click profile then supplied with targeted and highly relevant information., target groups Subset of recipients defined by rules and conditions and a logic relationship between them. For example, all recipients in the United Kingdom., and coupons for the campaign.
The initial mailing should be a welcome mail without promotional content that summarizes the portal's products and services. The mailing includes test/user ratings and short statements from other rating portals that give the recipient a better understanding of what the portal offers. This mailing might be called Welcome to Travel Deluxe.
A second mailing, to be sent two days after the Welcome to mail, includes an incentive in the form of a coupon and additional information about travel preferences. So, you can offer several coupons, each tied to a different travel destination.
In addition, click profiles are created for secondary links that divide the offer into three categories: Hiking & Nature, All inclusive and Culture. This is placed under a mailing named Our Gift to You.
Mailings to be used with Marketing Automation must be set up as Transactional mail and be in Send status.
When these steps are taken, review how this campaign looks in association with Marketing Automation. The campaign should begin via the Recipient New start node Campaign: Item that determines when a recipient passes through the campaign, and the actions that are executed for the recipient. With the help of "connections", you can link nodes to specify the process of your campaign. The arrow at the end of each connection always points to the next node and the associated action. for recipients newly added to the main recipient list (either through self-registration or import).
- A multi-stage series of welcome mails begins via the start node Recipient New. This ensures that only recipients who are new newsletter subscribers and recently added to the recipient list are cycled through this campaign.
- Drag the Send Message action node into the workspace, select the type of mailing to be distributed in the node's Properties field, then link the start node to it.
- After the recipient receives the first welcome email, he gets a short breather using the Wait action node. The duration is set in the properties window of the Wait node once it is linked to the previous node. In this example, the count is 3, and the unit is days. So, the recipient waits 3 days before the next action is carried out.
- Select the subsequent mailing using the Send Message action node. This mailing contains the coupon offers including click profiles, as described above. This sends out individual, follow-on emails with reinforcing messaging. To do this, drag the action node into the workspace, select the mailing, and link the node.
- To give the recipient sufficient time to read and click, drag the Wait node to the workspace and set up 3 days.
- This step is essential for distributing the follow-up mailings. The action node Switch lets the recipient receive different mailings based on target groups. In this case, four mailings will be employed following the branch. These mailings are placed behind the Switch node with the aid of the Send Message node, as shown in the diagram. Next, individual branches are set and linked to the nodes. One target group is allocated to each branch.
In this case, three branches are assigned to target groups, while one branch is defined for recipients who correspond to none of the target groups. If a target group does not match the Send Message node with which it is associated, it skips over this node, and the mailing is not sent to the recipient.
- As required, the recipient should receive a feedback mailing 28 days after registering. If you subtract the 2x3 days employed by the wait-nodes from this 28 day period, you should place a Wait node with a value of 22 days.
- After being on the recipient list for 28 days, by using an additional Send Message node, the recipient receives this campaign's final mail.
